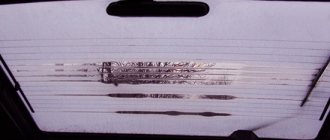
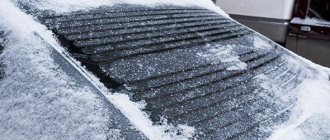
Almost all VAZ 2110 cars have a rear window heating system. But even if this system is not provided for in some models, it is usually “finished”, since here we are talking about basic comfort today. If the rear window heating does not work on a VAZ 2110, this creates many problems.
As a rule, heating is especially needed in cloudy, cold weather in autumn and early spring, when the glass becomes covered with condensation, blocking the driver’s visibility of what is behind the car.
Rear window with heating filaments
This lack of vision is especially dangerous when parking. The same can be said about winter use, when the frost literally draws patterns that you don’t want to admire at all.
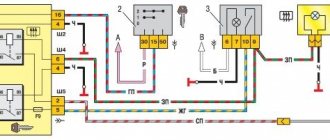
Rear window heating diagram for VAZ 2110, 2111 and 2112
1 – mounting block; 2 – ignition switch; 3 – rear window heating switch; 4 – control lamp for turning on the heating; 5 – rear window heating element; K6 – additional relay; K7 – relay for turning on the heated rear window; A – to power supplies
The rear window heating is activated using the auxiliary relay K7 (type 904.3747-10). When the heating is turned on, the orange lamp 4, which is located next to the button, lights up. The heated rear window only works when the ignition is on, since voltage is supplied to the button through an additional relay K6, which is activated when the ignition is turned on. Power is supplied to the heating threads through the contacts of relay K7 from fuse F7, which is directly connected to the power sources.
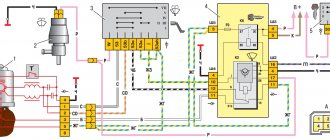
Diagram of the VAZ engine management system with BOSCH controller - ECM 21104 1.6 16V
1 – block of the ignition coil wiring harness to the ignition system harness; 2 – block of the ignition system harness to the ignition coil wiring harness; 3 – ignition coils; 4 – immobilizer warning sensor; 5 – immobilizer control unit; 6 – spark plugs; 7 – nozzles; 8 – diagnostic block; 9 – block of the ignition system harness to the ABS cabin group harness; 10 – controller; 11 – electric fuel pump; 12 – block of the ignition system harness to the fuel level sensor harness; 13 – fuel level sensor harness connector to the ignition system harness; 14 – block of the ignition system harness to the injector harness; 15 – injector harness block to the ignition system harness; 16 – block of the ignition system harness to the side door harness; 17 – speed sensor; 18 – idle speed regulator; 19 – throttle position sensor; 20 – coolant temperature sensor; 21 – mass air flow sensor; 22 – oil pressure warning lamp sensor; 23 – phase sensor; 24 – oxygen sensor; 25 – crankshaft position sensor; 26 — knock sensor; 27 – solenoid valve for purge of the adsorber; 28 – oil level sensor; 29 – coolant temperature indicator sensor; 30 – block of the ignition system harness to the instrument panel harness; 31 – instrument panel harness connector to the ignition system harness; 32 – ignition relay; 33 – ignition relay fuse; 34 – fuse for the electric fuel pump power supply circuit; 35 – electric fuel pump relay; 36 – electric fan relay; 37 – controller power supply fuse; 38 – ignition system harness block to the air conditioner connector; 39 – instrument cluster; 40 – ignition switch; 41 – electric fan of the cooling system; 42 – on-board control system unit; 43 – starter relay; 44 – contacts of the 8-terminal blocks of the instrument panel harness and the front harness; 45 – contacts of the 21-terminal blocks of the instrument panel harness and the rear harness; 46 – trip computer; 47 – diagnostic connector.
Troubleshooting procedure
- We check fuses F8 (20A) and F8 (20A) (mounting block).
- We check the serviceability of the rear window heating button. Is there a “plus” on pin No. 10 of the switch button and after turning on the button on pin No. 9 (a test lamp or multimeter will be useful).
- We check +12V at the Ш5-2 output and at the connector near the rear window.
- We check the wires and their connections.
- We check the rear window heating relay - K7.
- We check the integrity of the glass heating filaments.
The algorithm for determining the cause of a malfunction is similar for most cars, the only differences are in the names of fuses, relays and connectors.
By the way, did you know that to extend the service life of the heating elements, they use a Glass Heating Regulator (DOC), and you can also install a Fresnel lens on the rear window?
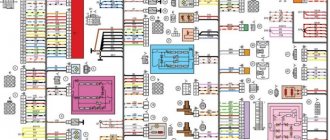
Shendys › Blog › Mounting block 2110
Diagram of the main mounting block of fuses and relays
Designations of fuses and relays of the mounting block
Open cover of the mounting block Location of the mounting block in the machine
| Relay no. | vendor code | Purpose |
| K1 | lamp health monitoring relay | |
| K2 | windshield wiper relay | |
| K3 | relay-interrupter for direction indicators and hazard warning lights | |
| K4 | low beam headlight relay | |
| K5 | headlight high beam relay | |
| K6 | additional relay | |
| K7 | rear window heating relay | |
| K8 | backup relay (not installed on VAZ-2110 family vehicles) |
Circuit breakers
| No. prev. | Ampere | Purpose |
| F1 | 5 A | Lighting lamps: license plates, instruments, dimensions on the dashboard, left dimensions, trunk lighting |
| F2 | 7.5 A | Low beam in the left headlight |
| F3 | 10 A | High beam in the left headlight |
| F4 | 10 A | Right front fog lamp |
| F5 | 30 A | Door windows |
| F6 | 15 A | Portable lamp, cigarette lighter |
| F7 | 20 A | Radiator fan, horn |
| F8 | 20 A | Heated rear window |
| F9 | 20 A | Windshield washer and cleaner |
| F10 | 20 A | Reserve |
| F11 | 5 A | Dimension on the right side |
| F12 | 7.5 A | Low beam in the right headlight |
| F13 | 10 A | High beam in the right headlight |
| F14 | 10 A | Fog lamp, left |
| F15 | 20 A | Seat heating |
| F16 | 10 A | Hazard signal, turn signals |
| F17 | 7.5 A | Brake light, ignition switch illumination, interior lighting |
| F18 | 25 A | Cigarette lighter, glove compartment light, interior heater |
| F19 | 10 A | Reversing lamp, brake light monitoring |
| F20 | 7.5 A | Rear fog lights |
Additional fuse diagram
Location of additional fuse in the mounting block
Stories from our readers
“Fucking basin. "
Hi all! My name is Mikhail, now I’ll tell you a story about how I managed to exchange my two-wheeler for a 2010 Camry. It all started with the fact that I began to be wildly irritated by the breakdowns of the two-wheeler, it seemed like nothing serious was broken, but damn it, there were so many little things that really started to irritate me. This is where the idea arose that it was time to change the car to a foreign car. The choice fell on the melting Camry of the tenth years.
Yes, I had matured morally, but financially I just couldn’t handle it. I’ll say right away that I am against loans and taking a car, especially not a new one, on credit is unreasonable. My salary is 24k a month, so collecting 600-700 thousand is almost impossible for me. I started looking for different ways to make money on the Internet. You can’t imagine how many scams there are, what I haven’t tried: sports betting, network marketing, and even the volcano casino, where I successfully lost about 10 thousand ((The only direction in which it seemed to me that I could make money was currency trading on the stock exchange, they call it Forex. But when I started delving into it, I realized that it was very difficult for me. I continued to dig further and came across binary options. The essence is the same as in Forex, but it’s much easier to understand. I started reading forums, studying trading strategies. I tried it on a demo account, then opened a real account. To be honest, I didn’t manage to start earning money right away, until I understood all the mechanics of options, I lost about 3,000 rubles, but as it turned out, it was a precious experience. Now I earn 5-7 thousand rubles a day. I managed to get the car buy after half a year, but in my opinion this is a good result, and it’s not about the car, my life has changed, I naturally quit my job, I have more free time for myself and my family. You’ll laugh, but I work directly on the phone)) If If you want to change your life like me, then here’s what I advise you to do right now: 1. Register on the site 2. Practice on a Demo account (it’s free). 3. As soon as you get something on the Demo account, top up your REAL ACCOUNT and go to REAL MONEY! I also advise you to download the application to your phone, it’s much more convenient to work from your phone. Download here.
I was faced with the heated rear window of my car not working, the problem was...
Source
Features of problems with imported cars
On domestic cars, only the rear window is predominantly heated. Foreign-made vehicles have heated glass and mirrors. When heating starts in the aft section, other positions are heated in parallel. If pressing the button does not activate the mechanism, the relay and fuse are checked. On foreign cars, the electrical circuit contains several fuses, so it is important to find which of the elements corresponds to the rear window and which to the mirrors. For example, if the heating is not activated on a Chevrolet Lacetti, you should look for elements with indexes F6, Ef7, including relay K10.
Restoring the glass and mirror heating function is carried out through the electronic control board. It fails due to stripes breaking or contacts being soldered.
Reasons why the heating does not work on the rear window of the VAZ 2110
Almost all VAZ 2110 cars have a rear window heating system. But even if this system is not provided for in some models, it is usually “finished”, since here we are talking about basic comfort today. If the rear window heating does not work on a VAZ 2110, this creates many problems.
As a rule, heating is especially needed in cloudy, cold weather in autumn and early spring, when the glass becomes covered with condensation, blocking the driver’s visibility of what is behind the car.
Rear window with heating filaments
This lack of vision is especially dangerous when parking. The same can be said about winter use, when the frost literally draws patterns that you don’t want to admire at all.
General concepts
In order for the glass to heat evenly and to a strictly defined temperature (sufficient to evaporate moisture, but not exceeding safe limits), a special electrically conductive thread (thin flat wire) is used, which has a certain strictly standardized resistance.
When current flows through it, it heats up. just like the coils in electric stoves and kettles heat up, only at a much lower temperature. Thanks to this heating, and also because it occurs evenly over the entire plane of the glass (since the thread is applied to it at equal distances), the latter quickly dries and is cleared of moisture.
How the system works
The operating principle of heating is very simple; it is used today in almost all cars, including foreign cars. Something simpler and better has not yet been invented. A conductive thread is applied to the rear window on the interior side, which heats up; accordingly, the glass is heated, which eliminates fogging from the inside, as well as snow and ice located on the outside.
Rear window heating operation diagram
This system is made up on a VAZ 2110:
- the thread itself, which provides heating;
- wiring going to it;
- heating relay;
- switch with signal light inside;
- fuse.
That is, nothing complicated for a craftsman. Considering that the size of the rear window of the VAZ 2110 is 121.3x67.6 cm, the heating size is usually only a couple of centimeters smaller, and essentially covers the entire surface, providing complete heating and good visibility of what is happening behind. There is no point in installing a much smaller heating system, because the driver should see the entire road behind, and not part of it.
The car does not start - there is no charge in the battery
This problem occurs because the battery charge is going somewhere. It does not disappear by chance, but always for some reason.
Here are some of them:
- you leave the car outside at an ambient temperature of -20 degrees or below;
- the battery life is ending;
- The radio was left on in your car for some time, which led to a loss of charging power.
In all these cases, two types of treatment are usually used: firstly, urgently recharge, and secondly, buy a new battery. If you keep pulling and driving on a dead battery, soon you won't even be able to disarm your car. You will have to manually remove the terminals, trying to make it “silence”. The situation will immediately improve as soon as the battery is charged again.
Causes of malfunctions and their identification
The heated rear window works as soon as the ignition is turned on, and the glass should clear within a couple of minutes. But sometimes it happens like this:
- The power-on signal does not light up, although the button is pressed, the glass does not defrost (remains foggy);
- The heating does not work, but the control light is on;
- The glass thaws in stripes;
- Heating is insufficient. This phenomenon occurs if the glass is heavily frozen. In this case, simply clear it of ice mechanically.
Rear window defogger time relay
The root cause of other phenomena should be sought:
- in relay control;
- check the condition of the fuse in the box;
- Check to see if the connectors on both sides of the rear window are secure. They may need to be cleaned;
- also check for breaks in the supply wires in the switch itself;
- if everything is in order here, you should check the conductive thread. With the engine running, you need to check the voltage approximately in the middle of each section (strip) of the thread. If the meter shows about 6 volts, everything is fine. If the readings are about ten, or, conversely, about zero, it means there is a break. A technique will help to determine exactly where the break is: the device has a pointed electrode, wrapped in a wide foil strip, and is led along a “suspicious” conductive strip. Where there is a voltage surge, there is a break;
- but often you can literally see the break - the thread has come apart in some area.
Heating system design, typical malfunctions
The glass heater in the car is quite simple. Typically, threads are applied to the glass surface, which can heat up when current passes. Other components that ensure startup, proper operation and power supply of the circuit are a button, wiring, relay, fuse, battery.
Frequent problems:
- The heating is ineffective and streaks of fog appear. The defect indicates damage to the threads. To identify the problem, you need to inspect the stripes; the place of damage is easy to detect - it will be foggy.
- Heating and sweating occur very slowly, which means poor contact and possible problems with voltage. It is necessary to check the indicators at the input and storage.
- If the heating does not work at all, but the light on the button lights up, the fuse may have failed or the problem lies in the power connectors.
- If the system does not work and the control light does not light up, you need to pay attention to the heating relay. The button, voltage and ground are checked.
- With a working system, defrosting does not occur. This happens when winter comes and the ambient temperature drops significantly, the glass freezes up. The heater power is not enough to thaw the ice. It is recommended to clean the glass by hand so that the threads can work normally.
Complete failure of the heating system is rare. The integrity of the threads is often compromised. If problems occur with the device, you can carry out repairs yourself.
Device
First, let's get acquainted with the structure of this system.
It includes the following elements:
- The thread that provides heating.
- Wiring (positive and negative).
- System switch. Equipped with a warning light inside.
- Heating relay.
- Fuse.
- Control buttons.
This system works very simply. There is a conductive thread on the rear window. It warms up when power is applied. This way the glass is heated and condensation is removed from the inside.
Why does the rear window heating not work on a VAZ-2110 car? The reasons may be trivial. After all, the device has no mechanical parts. Therefore, all you need for diagnostics is a multimeter and a test lamp. This is the only way to find out why the heated rear window of the VAZ-2110 does not work. There is a photo of the diagram in our article.
Below we will look at the main elements to check.
Relay
The most common reason why the rear window heating does not work on a VAZ-2110 car is the relay. Over time, it burns out and stops passing current normally. How to check this element for serviceability? You will need a multimeter. But first we check whether the relay is emitting signs of life. We turn on the heating button and listen to its operation. A working relay should make a characteristic click. If it is not there, we continue to search for the problem deeper. We pull the relay out of the mounting location and apply the probe of the device to one of the contacts. The second wire goes to ground (that is, to a bare area of the body). If the device shows “zero”, most likely the element needs to be replaced. It is because of the relay that the rear window heating does not work well. The VAZ-2110 is equipped with an element of the “K6” brand. It can be bought at any car store for a price of no more than two hundred rubles.
If you don't have a multimeter, you can use a test lamp. It is important that it is 12 volts. We connect one wire to the “plus” of the relay. The second one is connected to ground. If the lamp does not light, then the relay is faulty. But contacts can also burn out, due to which the voltage will not be fully supplied. The light bulb will not be able to determine this. For more accurate diagnostics, experts recommend using a multimeter.
The heated rear window of the VAZ 2110 does not work, what is the reason?
Almost all VAZ 2110 cars have a rear window heating system. But even if this system is not provided for in some models, it is usually “finished”, since here we are talking about basic comfort today. If the rear window heating does not work on a VAZ 2110, this creates many problems.
As a rule, heating is especially needed in cloudy, cold weather in autumn and early spring, when the glass becomes covered with condensation, blocking the driver’s visibility of what is behind the car.
Rear window with heating filaments
This lack of vision is especially dangerous when parking. The same can be said about winter use, when the frost literally draws patterns that you don’t want to admire at all.
How the system works
The operating principle of heating is very simple; it is used today in almost all cars, including foreign cars. Something simpler and better has not yet been invented. A conductive thread is applied to the rear window on the interior side, which heats up; accordingly, the glass is heated, which eliminates fogging from the inside, as well as snow and ice located on the outside.
Rear window heating operation diagram
This system is made up on a VAZ 2110:
- the thread itself, which provides heating;
- wiring going to it;
- heating relay;
- switch with signal light inside;
- fuse.
Improved windshield
As you know, in VAZ 2107 cars the manufacturer did not provide such a function as heating
windshield. There is only its air flow, which allows you to remove the “foggy glass” effect. If you want to improve your car, you can become the owner of a heated windshield. This athermal glass is easily delivered on its own as all the necessary components are attached to it.
This type of glass is ideal for the VAZ 2107, so a snowy, frosty morning can no longer ruin your mood. Of course, heated glass is quite expensive compared to its simple counterpart. But you probably won't regret this windshield upgrade.
Source
Diagram of elements of the glass heating system
A detailed diagram of the heated rear window system of the VAZ 2110 is shown in the figure below, according to it:
- The glass heating element is activated using an auxiliary relay designated K7 of type 904.3747-10, which is installed in the mounting block
- When the heated rear window is turned on, control light 4, located next to the switch, immediately lights up, it illuminates the switch key in red or orange.
- In VAZ 2110 cars, the heated rear window can only be turned on if the ignition is turned on, because the voltage to switch 3 goes through another relay designated K6, which is activated when the ignition is turned on.
- The power supply to the glass heater is supplied from relay contacts K7 through fuse F7, connected directly to the power source
- If you turn on the heating, but the rear window is not heated, then you need to check the condition of fuse F8, as well as the wires connecting them, and also relay K7 and switch
Complete heating connection diagram
Checking and replacing the heating relay
Typical VAZ glass heating relay
Problems that arise over time with heating the rear window are often associated with circuit problems, a blown fuse, as well as a heating relay:
- In VAZ model cars, the rear window heating relay is used to turn on the heating for a certain time within fifteen minutes
- This system operates thanks to a built-in timer.
- For vehicles in which a relay was installed, such a system can be located in the standard relay block or in the fuse box
- And in place of the standard relay, a new one is simply inserted and the heating is turned on with a standard button
- It is very important here that the winding of this relay is constantly connected to ground.
- The purpose of the relay is to turn off the heating when the motor is not running. The most important thing is that heating does not drain the battery
Fuse
If your rear window heating does not work, your VAZ-2110 should be checked for a blown fuse. In the mounting block, check the elements in connector F8 (usually they are rated at 20 amperes). If the fuse looks like the one in the photo below, it needs to be replaced.
For the future, experienced car owners advise carrying a spare set in the glove compartment. After all, if the fuse for the fuel pump burns out (especially while on the road), then the car will not be able to start at all.
What is the reason for this phenomenon? Most often this happens due to a short circuit. At one point, the voltage on the on-board network increased above normal. To prevent the contacts from melting, the system is simply turned off by breaking the connecting elements. In this case, this is +12 V power and conductive elements on the rear window.
The procedure for repairing a faulty OZS system
Having determined the reason why the rear window heating does not work, you can begin to repair this system.
- If the fuses or relays of the OSZ system are faulty, then the faulty parts must be removed. Replacing them with new, functional ones is not difficult. The main thing is that they are installed as indicated by the on-board electrical system diagram.
- In the case where the culprit of the damage in the OZS system is the terminal connection, restoring the heated rear window is also not difficult. It is enough to clean the contacts in the terminals. The terminal box may need to be replaced, but this will not take much time either.
- If the glue that was used to attach the contact on the rear window turned out to be of poor quality and peeling occurred, then in this case you need to buy a new high-quality conductive glue. Remove the layer of old glue from the peeled contact using a napkin with an alcohol solution. Then apply a layer of new connector and glue the contact in place.
- If a wire is torn off on one of the buses, it is necessary to solder this wire to the old place using the connection diagram. The procedure is as follows:
- remove the remnants of old solder from the wire, stripping the end; in addition, you need to clean the connection point on the bus;
- Using a brush, apply rosin paste as a flux to the cleaned surfaces of the bus and wire;
- Apply solder containing three percent silver to the cleaned and rosin-coated wire core;
- solder the wire to the bus, while avoiding overheating of the surfaces.
Troubleshooting and Troubleshooting
Common manifestations of heating malfunctions, which should start working simultaneously with the ignition being turned on, may include the following symptoms:
- If there is a light signal for the system operation, the glass is not heated.
- The same thing happens when the button is pressed, but without a light signal.
- Not all glass thaws (this usually shows up as strips of thawed and frozen water).
- The surface does not thaw completely - due to severe freezing or attempts to mechanically remove ice.
The search for the causes of the malfunction should begin by replacing the corresponding fuse, which is responsible for the operation of this device in the VAZ-2110. In our case, this is a fuse marked F8 in the corresponding block, which protects the heated rear window. This block is located to the left and slightly lower from the steering wheel. For correct diagnosis, the fuse, even if it looks intact, needs to be replaced with a new one and the heating operation checked.
If the previous manipulation did not bring results, you need to check the car wiring from the rear window heating button. Burnt wires or breaks along their route will clearly indicate the cause of the malfunction. It is worth noting that a completely non-functional system is quite rare - much more often only some part of it fails. In this case, all heater filaments are usually checked for breaks, since it is obvious that they do not heat up due to the fact that current has stopped passing through them.
The most common cause of this phenomenon is mechanical damage to the conductors. Despite a fully functional system that will help melt the ice on the rear window of a car in a short time, many impatient drivers are in a hurry to free this surface from the “ice captivity” outside or from fogging from the inside using various improvised means, while harming the performance of the profile device due to vibration or physical contact.
If the system does not work correctly, the car owner checks which heating threads have stopped working. To do this, you just need to turn on the device and visually observe in which areas the glass does not heat up. Next, those places where the system does not work are carefully cleaned and inspected with a magnifying glass - this is how the place where the conductor breaks is located. In this case, it makes sense to check all conductive threads. Firstly, a break even on one strip can occur more than once, and secondly, you can accidentally discover places of future breaks, which can be expressed in the form of burrs, sagging, tears and scratches.
After identifying all emergency and unreliable places, it is necessary to treat them with a special paste (lubricant, spray), which, when dried, forms a conductive substance and completely restores the functionality of the rear window heating system.
Operating principle
The main essence of the action of this element is to use the air inside the car interior and block its entry from the outside, thereby ensuring the recirculation process and, as a result, the fastest possible warm-up. Simply put, this simple technique allows you to close the entire air flow inside the vehicle, after which the stove comes into use.
Upon deeper study of the issue, it turns out that the button operates in accordance with the following algorithm:
- When it is turned on, the electro-pneumatic valve automatically opens.
- After this, the intake manifold flap closes, blocking the flow of air from outside.
- The recirculation mode will be supported as long as the fan is running, driving air through the heating system.
That is, the operation of this heating mode becomes possible only when the engine is running and nothing else. You can check this by looking at the interior chips, which will maintain voltage when the ignition and the recirculation button are turned on.
It is also important to remember that the absence of new oxygen supplies from outside is fraught with the formation of strong condensation on the glass, which can be eliminated by one of two methods: ventilation after 15 minutes of heating or turning on the external air supply to the cabin.
In addition, this problem can be solved in a simplified way by using on-board air conditioning, which, as is known, dries the air and maintains an optimal temperature regime inside the car.
Damage to the heating filament
For what other reasons does the rear window heating not work? VAZ-2110 is equipped with special threads. A break can happen here too. The threads are a small layer of conductive substance.
It is easily damaged by the slightest mechanical impact (even with such harmless actions as removing tint). You can determine the location of the damage using a magnifying glass. It is advisable to carry out diagnostics during daylight hours. Damage to the threads is one of the obvious reasons why the rear window heating partially does not work on the VAZ-2110.
What causes interior glass to sweat?
Why do the windows on a VAZ 2110 fog up? This is a question that baffles half of car owners. I’ll say right away that this most likely happens in cold weather due to increased humidity in the car interior, from which I’ll now explain:
- The most common reason is if the driver has a hangover, the windows sweat from fumes
- The second most common reason is that the interior heating radiator is leaking quietly, the liquid collects under the rugs, while the leak is small, it is almost unnoticeable, so it is worth checking the condition of this radiator
- Another reason for glass fogging may be the wrong direction of the stream of warm air from the stove; if the glass is blown, it dries, when it is not blown, it may begin to “sweat”, this, by the way, is the main reason why the windshield on a VAZ 2110 sweats
How to repair the conductive layer? Method No. 1
You can do this yourself. To do this, you do not need to dismantle the glass. All you need is to purchase a special conductive paste (available in auto stores or on the market) and apply it to the damaged area. It is important to prepare it carefully. To do this, carefully clean the varnish from the surface and degrease the area with alcohol (use a piece of soft rag). Next, we clean the ends of the damaged threads. We apply adhesive tape or electrical tape to its upper and lower parts so that there is a small gap (no wider than the thread itself). We apply a special adhesive into it. After a day, the composition will completely dry out. Next, you can remove the remaining tape and check the system for functionality. If the heating works only partially, it means that the break occurred in several places. Find the second place where the thread is damaged and treat it with a conductive compound using a similar principle. That's all. We will also consider the old-fashioned method of repairing threads.
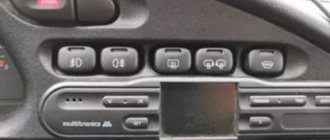
What does the button look like?
Surprisingly, this button is so inconspicuous that you may not notice it even after many years of using your iron horse. This is explained quite simply, because this element does not have a stationary location, “walking” throughout the entire dashboard depending on the car model.
In addition, the symbol of the key itself can change, although most often it is presented in two configurations, looking like arrows forming a circle or a car body with an internal recirculation icon located inside.
But it is this magic button that helps to heat the interior in a matter of minutes, coping with the task better than any other methods combined, unless, of course, we are talking about heating the windshield and side mirrors, for which there are special control keys.
Method number 2
This method involves the use of non-ferrous metal shavings as a conductive element. Also, to repair the thread, we will need a transparent varnish (it is advisable to use a thick one, like for nails).
Mix the shavings with a brush and apply to a strip previously sealed with tape, as in the previous case. After an hour, the varnish will completely dry. The method is quite old. It is not always possible to connect damaged contacts as needed. Therefore, if it is possible to buy conductive glue, it is better to use the first method. It will be much faster, easier and more reliable. The cost of a 10-gram tube with this composition is 78 rubles. This volume is more than enough to repair several damaged heating threads.
Source