Where are the Lada Granta fuses located? The fuse box is located near the driver’s left foot. To open the lid, pull the lower left corner of the lid (No. 1) and release the left locking point, then the middle one (No. 2) and the two right locking points (No. 3 and 6). Then release the top points (No. 4 and 5) and remove the cover. How to open the cover of the Lada Granta mounting block Installing the cover of the mounting block is done in the following order: first snap the right side of the cover, then the lower ones, then the upper ones. Make sure that the fastening elements of the cover are aligned exactly with the metal fasteners. Lada Granta mounting block cover On the plastic cover of the mounting block there are symbols that indicate what each fuse (F) and relay (K) is responsible for.
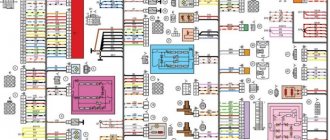
Lada Granta fuse diagram
Fuse Current strength, A Protected circuit F1 15 - Relay for turning on the engine cooling fan - Short circuit 2x2 - Controller (engine control unit) - Injectors - Ignition coil F2 30 Electric windows F3 15 Hazard alarm F4 20 - Windshield wiper - Airbag F5 7.5 Terminal 15 ignition switch F6 7.5 Reversing light F7 7.5 - Canister valve - Mass air flow sensor - Oxygen sensor 1/2 - Speed sensor F8 30 Rear window heating circuit F9 5 Side lights on the right side F10 5 Side lights on the left side F11 5 Rear fog lights F12 7.5 Low beam on the starboard side F13 7.5 Low beam on the left side F14 10 High beam on the starboard side F15 10 High beam on the left side F16 10 Front fog light on the starboard side F17 10 Front fog light on the left side on the left side F18 15 Heated front seats F19 10 ABS (Anti-lock brake system) F20 15 — Horn — Trunk lock — Gearbox — Cigarette lighter — Diagnostic connector F21 15 Electric fuel pump F22 15 Central locking F23 10 Daytime running lights F24 7.5 Air conditioning F25 10 - Interior light - Brake light F26 25 Anti-lock brakes F27 - Reserve F28 - Reserve F29 - Reserve F30 - Reserve F31 50 Heated windshield F32 30 - Heater - Electric power steering
Lada Granta relay diagram
Relay Description K1 Heater fan relay. K2 Power window relay K3 Starter relay K4 Ignition switch terminal 15 relay K5 Turn signal and hazard warning relay K6 Wiper relay K7 Headlight high beam relay K8 Horn relay K9 Headlight low beam relay K10 Heated rear window relay K11 Controller (engine control unit) relay K12 Electric fuel pump relay
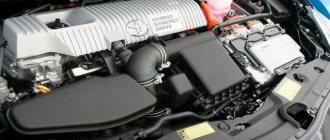
Lada Granta mounting block under the hood
Numbering from left to right. Lada Granta mounting block under the hood
F1, 50A Electric power steering; F2, 30A Heater fan F3, 60A Generator F4, 60A Generator F5, 30A Low beam headlights I was just looking for it myself recently. It might be useful to someone.
Determining the location of the break
Finding a cliff is not difficult. The fog or frost around the thread will not disappear. That is why, in order to quickly find a damaged element, the threads are counted and then the damaged area is found. But sometimes the breaks are so insignificant that it is very difficult to notice them. Then you should use a voltmeter.
Due to the fact that one of the buses is connected to the car body, the negative wire of the multimeter is connected to the body. Next, the positive wire with the probe touches the first and second tires. On the first, the voltage is +12 V, and on the second – 0 V. If for some reason there is no access to the tires, then measurements can be taken where the threads come out from under the seal.
If there is voltage not only on the first, but also on the second bus, then look for bad contacts in the circuit connecting the heating system wires to ground.
Doesn't work, what's the reason?
In fact, there are only two main reasons, and both of them are related to the energy system:
- Fuse. S can really burn. This happens for various reasons, perhaps a non-trivially large closure and that's it. Therefore, your heating will not work fully. You need to find the fuse and check it. This is the first and necessary step.
- If it is intact, you need to check the tension of the threads that fit the main “tires” (wide sides). They usually have regular metal contacts. We just take a multimeter and measure, if there is voltage and it is about 12 Volts, then the power supply is suitable here, everything is in order.
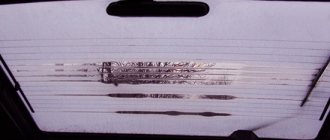
- The fine wrinkles themselves. To be honest, they won't all burn out at once. As a rule, from one to three, or at most four, “threads” will burn out. Therefore, if part of the window moves away (from fogging or ice), then part does not. You need to look for broken threads.
- Study this thin strip and you will see the point of impact. This will be a burnt part, there may be some kind of black color nearby (however, the thread was originally brown). In addition, the thread will open, so to speak, this place must be connected to restore functionality.
Separately, I would like to add that the fuse rarely lights up, mostly this is a break in the glass “threads” and they need to be restored.
Repair
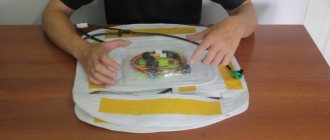
There are several ways to repair this system. The most effective and fastest way is to use a rear window heating filament repair kit.
So how to make repairs? Everything is very simple:
- Using alcohol or solvent, clean the area of the glass where the thread breaks.
- We take the tape in our hands and stick it on both sides of the heating element. In this case, the distance between the tape should not differ from the thickness of the heating filament.
- Using a brush or syringe, apply conductive glue or paste (depending on which kit will be used). How to apply it? The glue should cover an entire part of the thread, 10 millimeters on each side.
- Remove the tape and wait for the glue to dry. According to the instructions, the composition dries in 24 hours.
- After a day, remove excess glue. This can be done with a sharp knife - kitchen or stationery. Be careful - a knife can easily damage the surface of the heating element.
- Wipe the glass with a soft and slightly damp cloth.
- We check the functionality of the element.
You can also use another product to repair the rear window heating filaments. This is “Elekont” of domestic production. The mass is applied to the place where the thread is broken. Apply glue so that it covers the entire part of the thread on each side. Once cured, the electrical heating system will work again.
How the system works
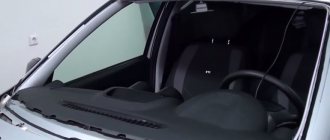
There is nothing supernatural in the very principle of operation of such a system. It is most often used to heat the rear window, but some car models implement heating of the front window, side glass and wiper locations when turned off.
The task of such a system is to create conditions on the surface of the glass that prevent frostbite or fogging. As you know, at temperatures below zero degrees Celsius, moisture freezes and ice forms. Therefore, to eliminate this phenomenon, it is enough to ensure the surface temperature is above zero degrees, and icing will not occur.
This is done quite simply - conductive strips are created on the glass, one end of which is connected to the vehicle’s on-board network, and the other through an appropriate control circuit to ground. When the heating is turned on, current begins to flow through such conductors; thanks to the generated heat, the glass is heated, which causes it to be freed from the formed ice.
Oxidation of contacts on heater connectors
The rear window defroster may stop working properly due to oxidation of the contact directly bonded to the glass. To detect this malfunction, you need to measure the voltage of the supply wire and make sure that it exceeds 11 Volts.
Repair. If the measurement results in a value less than 11 Volts, it is necessary to clean the contact from any oxidation that has formed. To clean the contact, you can use fine-grain sandpaper or a special rust remover.
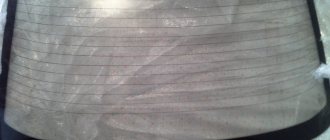
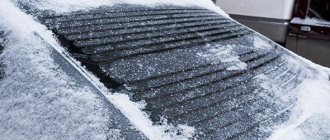
Is the rear window heating working and how to check?
An initial conclusion about how well the rear window heating works or does not work can be made based on observing whether the glass is cleared of ice, and how evenly over the entire surface. If some of the heating filaments do not work, the result will be isolated areas covered with ice. In this case, you can think about restoring the heated rear window.
Often, the cause of heating failure can be not only the burnout of the heating element filaments. Among the possible reasons it is enough to mention:
- failure of contact in the terminals supplying voltage to the heater;
- failure of the switch or relay for turning on the heating system;
- The fuse in the heating circuit has blown.
As a rule, the most common defect will be broken heater filaments ; in all other cases, to restore heating, a simple external inspection is sufficient to identify a blown fuse or broken contact. In those cases when the rear window heating does not work due to breaks or microcracks in the heating filaments, it is quite problematic to detect the specific place where the circuit failure occurred.
The fact is that heating filaments are typically connected in parallel, so using a tester to find the location of the damage is useless; the connections will “ring” through parallel circuits. You need to look for damage visually using a magnifying glass, having previously determined which of the tracks is not working.
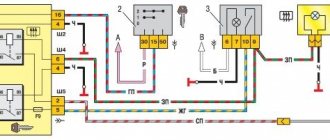
Fuses and relays in Lada Granta mounting blocks
The car has two mounting blocks, one of them is located to the left of the steering column in the cabin. (Figure 1) Figure 1 (left). Location of the mounting block with fuses and relays in the interior of the Lada Granta car
The second one with power fuses is located in the engine compartment. The article will talk about the purpose of fuses installed in the mounting blocks, the rated operating current, as well as the relays installed in the interior mounting block. Fuses installed on the car are fusible, disposable. For ease of installation and removal of fuses, it is best to use tweezers.
Rice. 2 Appearance of fuses and relays in the mounting block. The tweezers can be found in the mounting block (red in the picture on the left), and there are also places for spare fuses (top row in the picture). Below, according to the designations in the figure, is a table with a breakdown of the characteristics and purpose of the fuses in the car.
Table 1. Number of fuse and relay in the mounting block in the passenger compartment, indicating the rated current and the circuit powered through it in the car.
| fuse/relay number | Current, A | Fuse color | Purpose of installed relays and fuses |
| F1 | 15 | Blue | ECU (power supply, ignition system) |
| F2 | 30 | Green | Window lifters |
How to restore heated rear window
When a damaged area of the heater filaments is found, it is worth thinking about how to restore the heating in full. Of course, you can restore it simply by replacing the glass, but this is a rather expensive operation, while there are several ways that allow you to eliminate the defect on your own, without too much effort. Before work, it is necessary to prepare the place where a break is detected and the heating filaments will be restored. To do this, the conductive path in the right place must be carefully cleaned of varnish and degreased with alcohol. A characteristic metallic sheen should be visible on the prepared area.
Track restoration can be done in the following ways:
- Using special conductive paste. It is applied to cold glass. When performing work, do not turn on the heating. The path, prepared as described above, at the site of damage should be limited on both sides with adhesive tape. The paste is then applied to the area that is not working. It hardens, as a rule, within 24 hours; you can check and use the heating after this day has passed.
- Using metal filings. This method allows you to restore functionality when there is no paste. For this, pre-prepared small iron filings are used. During the work process you will need transparent glue and a magnet. It must be secured over the area where the damage is detected, and then iron filings must be applied to this place. The magnetic field will force them to line up along the section of the track that is not working. Having leveled the sawdust and ensured electrical contact with the damaged area, they are covered with a layer of glue. You can check whether the repairs have been successfully completed and whether the heating is working in one and a half to two hours.
- Using shavings and paint, in this case shavings of non-ferrous metals are used. It is mixed with paint in such a way that a mass similar to plasticine is obtained. Using tape, a kind of stencil is formed around the damaged area. The heating is turned on, and the prepared mixture is applied to the desired area, and a characteristic hissing may occur at the point of contact, but after a while it disappears. This mixture hardens in twenty to thirty minutes; you can check and use the restored system after an hour.
There are some other methods that allow you to restore a non-working heating system, but those described are the simplest and most accessible.
Unfortunately, such methods are unlikely to be applicable to windshield restoration. It uses thinner conductive tracks and the repair area will appear quite rough, impairing the driver's visibility. For a car, heated rear window is not a luxury, but can significantly improve driving safety. And if it does not work, then with the help of fairly simple techniques you can restore its functionality. » alt=»»>