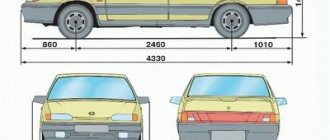
After the onset of winter, the presence of heating in the rear window of the car allows you to remove ice from it, thereby improving the driver’s visibility.
As you know, heating is provided by special paths. They can break down over time, which is usually the most common cause of the breakdown in question. However, this problem is not serious, and there is no need to contact a car service. It is not difficult to repair the heating yourself if you know what exactly needs to be done.
Most common reasons
It is worth noting that the heated rear window most often does not work in a VAZ-2115 car for the following reasons:
- fuse is blown;
- there is no contact at its terminal;
- The toggle switch that turns on the heating is broken;
- the relay has become unusable;
- contacts on the terminals of the heater circuit have oxidized;
- The threads have broken.
Fuses blow out quite often. This usually happens unnoticed by the car owner.
As a result, one or another device stops working. For this reason, you should pay attention to them first of all if you do not want to join:
- cigarette lighter;
- stove;
- burnout installed on the rear window, etc.
Replacing them with serviceable ones will solve the problem completely. In other cases, it will also be necessary to clean the terminals from dirt, and at least visually make sure that the power wires have not come off the buttons. If the relay is faulty, then it will need to be replaced - it is not very expensive and is quite easy to install.
Possible faults
reasons why the heated rear window of the VAZ 2114 failed.
- fuse is blown;
- the contacts in the fuse socket in the common block are covered with oxides;
- the switch is broken;
- the relay has failed;
- oxidation of the heater terminals has occurred;
- internal network wiring burned out;
- The heating filaments themselves have broken.
The first two (and most common) reasons are quite simple to solve - you need to check the fuse and, if necessary, replace it with a new one (in the general block it is designated as F5). You should also check the contacts in the fuse box and clean them with sandpaper or a cloth soaked in kerosene.
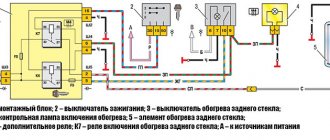
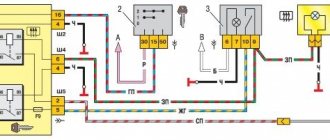
If the fuse turned out to be serviceable or was replaced, but the problem remained, then the heated rear window button of the VAZ 2114 may have failed. You can check it, as well as the control relay, using a conventional tester (multimeter). To do this, in the first case, the output contacts are “tested” in the on and off positions, and in the second, the supply voltage (its presence) on legs 1 and 9, as well as relays 2 and 4 (according to the diagram) is monitored.
If all the above elements have been checked and are working properly, then you should check all the wires included in the electrical circuit of the heater with a multimeter. If a break is detected, the wire should simply be replaced with a new one.
How to find a breakdown
To find out exactly what the reasons for the failure are, you only need a standard voltmeter, which every self-respecting car enthusiast should have. By simple manipulations with this measuring device, the problem will be identified very quickly.
You should start checking the heating element filaments with the following steps:
- the metal tips of the probes are wrapped in tin foil (this will avoid damage to the tracks);
- turn on the ignition;
- check whether the heating button is pressed;
- one probe is applied to the plus of the heating element mounted on the rear window;
- the second is installed approximately in the center of the thread.
If the device shows 6 volts, this means that there is no damage in this area. If the tester produces 12 volts, the gap is located somewhere in the segment between the probes.
If there are 10 volts, we can confidently say that the gap is located between the minus and the center of the track. In this situation, connecting one probe to the negative output will allow you to more accurately determine where the damage is located. At the same time, the second one must be carefully guided along the thread from the plus to the opposite end. Finding the exact location of the break is indicated by an increase in voltage from zero to 5 volts.
If you don’t have a voltmeter at hand, then the break will also be easy to find visually. To do this, you will need to wait until the windows in the car fog up, and only then turn on the heating. Where the track remains operational, the moisture will begin to evaporate noticeably. Condensation will remain in de-energized areas. It is these sections of the heating element that will need to be examined in detail. To do this you will need a magnifying glass.
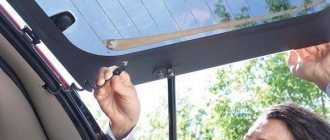
If the heating is completely out of order, it can be replaced with a removable model, which is attached to the glass using special suction cups. It is connected to the car's electrical network, like many other devices, through the cigarette lighter.
There are also modifications on sale in which an additional fan is installed. But this option is not very practical because it requires too much electricity.
General concepts
In order for the glass to be heated evenly and to a strictly defined temperature (sufficient to evaporate moisture, but not exceeding safe limits), a special electrically conductive thread (thin flat wire) is used, which has a certain, strictly standardized resistance.
READ Chevrolet Cruze Rear Shock Absorbers Replacement
When current passes through it, it heats up - just like the coils in electric stoves and kettles heat up, only at a much lower temperature. Thanks to this heating, as well as the fact that it occurs evenly over the entire plane of the glass (after all, the thread is applied on it at equal distances), the latter dries out quite quickly and is cleared of moisture.
Sometimes in winter, a car enthusiast may think that the heating has failed because the glass does not defrost for a long time. In such a situation, there is a high probability that the heating is working properly, but its temperature is not enough to melt a significant layer of ice. You should remove the ice manually using a special scraper, and then turn on the heating again.
Eliminating the break
Patching a cliff in general is not a difficult task, and there are several ways to solve it. The most commonly used is electrically conductive paste. Before repairing, it will be necessary to secure the broken area with adhesive tape (two pieces - one for each fragment of the track). The ends of the thread are cleaned and washed with alcohol. The paste is then applied to them and left to dry for at least 24 hours.
You can also restore the functionality of the rear window heating element using:
- glue (type BF);
- metal filings;
- magnet
Sawdust is quite easy to make using a file yourself. In turn, any magnet will do. It should be placed on the outside of the window, and metal dust should be placed on the inside, where the heating element is located. Then the joint remains to be treated with glue and varnish. Any oil paint can also be used.
Heating can be repaired quite effectively with a soldering iron. Here you will need solder containing a small amount of tin (for example, POS-18); in this case, instead of flux, use zinc chloride. But this method is suitable only if the cliff is small. You will have to fill a large area with either copper or silver wire.
In addition, it should be noted that now in stores there are also special adhesive compositions for repairing heating filaments. But for some reason they are currently not in demand.
The video below will help you understand in more detail how to repair a damaged rear window heater:
The rear window heating does not work, but the button is “on”
I noticed that the glass on the back does not defrost. The relay does not click, the button lights up.
I immediately ruled out the option of a non-working button, since firstly it lights up, and secondly, I updated all the buttons immediately when I bought the car about two years ago and was more than confident in the functionality of this one.
I started checking with the relay.
Taking it off
And further disassembled.
You can see how everything melted.
I was surprised by this design, how many relays there were on 2110 and they all worked on a spring, like this:
And here is a plate with the same operating principle.
So, we connect the plus and minus from the ROM to the red circles.
ROM
at, say, 10A, so that there is enough power to operate relay A to the yellow ones for the multimeter to ring:
I apologize right away, there was a picture of a sample here earlier, I threw it in by mistake, now I replaced it.
The polarity doesn't matter what's on the ROM at all.
And we see that nothing works, doesn’t beep, the plate only slightly gives a one-time push, trying to close the contact, “but it doesn’t work.” We help her with our finger and hear a squeak from the multimeter. I have several of these relays left from the 2110, some of them I removed from the car:
I took some new ones “as a spare”, took one of them and checked it the same way, the tester lit up.
Just installed a working one.
I checked the heating on a car with a new relay, everything works properly: the relay clicks, the glass thaws.
As for the relay, I read that sometimes it turns off after 20 minutes, nothing will melt if you forget to turn it off, you need to buy one.
Useful video
You can get more information from the video below:
- Fuel pump VAZ 2114: signs of malfunction, replacement, cleaning the grid
- How to remove a VAZ 2114 battery: questions and answers
- Let's look at the problem: the backlight of the VAZ 2114 instrument panel does not light up
The heated rear window does not work; a chip is torn off on one side of the glass and there is a chip on the other side of the glass, but there is no connection; what to do, how to connect which and where wire is needed, where to connect the plus and where the minus
I checked all the fuses, the power button, the heating thread itself, the whole thing, I checked everything with a test test, turned on the engine, I think that this is relay 9043747, if this is a relay, then how can I replace a LADA 2114 car? Help if possible!
Repair thread kit
Among the popular and reliable manufacturers of repair kits, which include threads, it is worth highlighting Quick and Permatex. Such options are suitable for repairing even large areas, even spruce we are talking about 10 cm. The equipment includes heating tapes, polymer resin in the form of a spray can and stencils.
Heater repair involves the following steps:
- determine the rupture zone and prepare a thread of the appropriate size;
- remove the protective film and use resin to fix the thread in the required area;
- After complete drying, repeat the manipulations and check the result after 2 days.
Why doesn't the rear window heating work?
The heated rear window provides good visibility (fights icing and sweat during the cold season or during temperature changes). It is difficult to overestimate this function, because the driver’s ability to adequately and fully assess the road situation is worth a lot.
Stern heaters are practically no different from each other. Threads that conduct electricity are applied to the glass from the inside. They heat the surface, which melts the ice and removes moisture.
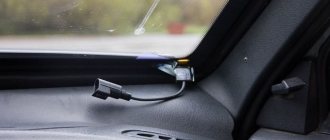
System components:
- threads (there are different quantities - depending on the model);
- wires (supply current);
- safety relay;
- fuse;
- “On” button with indicator.
Let's look at the most likely causes of heating failure.
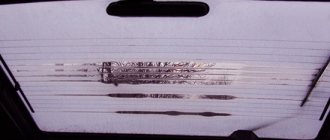
Damage to threads
Electric strips act as current conductors, heating up slightly due to resistance (the strips are connected in parallel - the voltage is distributed evenly). If even one heating strip is damaged, the current stops circulating in the system - the heating does not work.
To restore the heating strips, you will need to buy a special repair kit from a car store (do not buy the cheapest one, so as not to run into a low-quality product).
The set includes:
- special glue with high electrical conductivity (choose by color so that the “restored” area does not stand out);
- a brush for applying it;
- tape to mark boundaries.
Find the location of the chain break (often mechanical damage). Study the instructions for the restoration kit, pay attention to the drying time and the recommended method of application. Prepare the damaged area for repair - wipe it with alcohol using a lint-free, clean rag (remove dirt and grease). Apply strips of tape in the area of the tear on both sides of the tape (leave the appropriate width). Apply the special product in several layers (see the instructions for the quantity). Let the glue dry - often a day is enough. After this, remove the tape and check the operation of the unit.
This method is suitable for repairing rear window heating in domestic cars (for example, VAZ 2114, VAZ 2112, VAZ 2107, VAZ 2109, Lada Granta).
There are two more alternative methods for restoring a break:
- Using metal filings. You will need sawdust, a magnet and clear glue (preferably some tape). Description of the process: attach the magnet to the back side, pour sawdust onto the damaged area from the inside. Place tape under the bottom of the strip to prevent any metal shavings from sliding off. We fix the material on top with glue. Let it dry. Ready!
- The point here is that they use a mixture of non-ferrous metal shavings and paint. This substance should be identical in density to plasticine. Next, fix the tape, as in the previous version, and heat it up. Apply the material to the damaged area and wait half an hour (hissing is normal). Allow the glass to cool for another hour before using the heating fully.
Repair with conductive glue
Repair of the rear window heating threads can be carried out using conductive adhesive. It is designed for temperatures from 60 to 100 degrees. You should not choose kits with glue. They often do not last long or may not be effective at all. will be optimal for such a set.
- Please read the instructions included with the kit. You should have a clear understanding of the options for applying the composition and the speed of its complete drying.
- Prepare the problem surface. Soak a rag in the alcohol solution and wipe the area.
- Lightly sand the edges in the break area with grade-grade sandpaper. It is enough to simply remove plaque and carbon deposits in two movements.
- Use tape to cover the strips along the thickness of the sides. It should not overlap the thread, but also avoid going too far away from the tape. Focus specifically on the width of the thread.
- Proceed to apply conductive glue to the prepared area using a brush or syringe. The instructions will tell you how many layers to apply. The overlap on the working areas of the tape should be 1 cm to the left and right.
- Remove the tape and wait until the composition dries completely. This will not happen before 24 hours.
- Check the functionality of the system after drying.
Electrical wiring failure
The fuse is good - check the heater. If it still doesn't work, do some electrical diagnostics. Often the wires on the mount are broken or broken. What to do? The algorithm is like this:
- put the button in the “on” position;
- we check the voltage at the terminals (the place where the wires are connected);
- if there is no U, we look for a break in the wiring;
- We clean the terminals and connections from traces of corrosion.
Contact an auto electrician if you are unable to trace the path of the electrical wiring.
Control system
It happens that the rear window heating stops working, but all the parts are in good working order. The reason may be hidden in the control element. The button is on, the indicator is on - no warming up. The working contacts of the switch may be worn. Replace the toggle switch, as repair is not possible in this case.