Heating doesn't work at all
First of all, we check the power at the heating terminals. To do this, remove the terminals, take a multimeter and measure this value in voltage measurement mode. If there is no power (and this happens in 90% of cases), then the problem is not in the glass; if there is, then the problem is in the heating element. But practice shows that the glass fails not entirely, but in separate paths. The device should show 12 Volts or higher.
Let's go further - check the corrugation of the trunk door. We pull it out and look at the condition of the wires. We hold each one through. If there are no breaks, then the wiring has nothing to do with it. We open the fuse cover - in most cases, the 25A fuse F8 or relay K7 is to blame. There were a lot of calls to the dealer about this relay. They often failed. Replacement may solve the problem.
This is interesting: Removing and installing the Chevrolet Niva air conditioning condenser
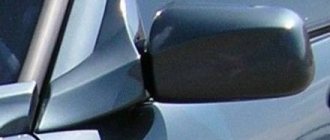
Heated mirrors Niva Chevrolet
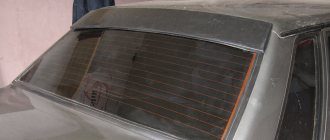
Rear window heating on a Chevrolet Niva consists of electrically conductive parallel threads applied to the surface of the rear window, connected to vertical (on the sides) wires.
How to determine if the rear window heating is broken
Typical glass heating problems are visually noticeable when the engine starts. It may thaw partially or completely fog up.
In the first case, the conductive thread may break with the following consequences:
- The glass sweats when the warning lamp and heating relay are not working. First of all, you need to check the voltage and fuse.
- The glass is not heated, although the control lamp works. The absence of tension cannot be ruled out.
- Condensation appears in places, which is explained by the presence of a broken thread. It is restored with special varnishes and repair reagents.
- Does not defrost, despite the operating state of the system.
This happens when there is severe icing and a possible lack of heating voltage. Ice should be cleared from the surface of the glass.
Troubleshooting
After checking the possible causes, the defect may lie in the switch or its button .
Search for an open circuit in the power supply circuit for heated rear mirrors.
The worst case scenario is that the problem lies in the wiring, which can be fixed by disassembling the dashboard.
The fuse for the heated rear window and mirrors is number 8 in the mounting block. Capacity 25 Ampere. The problem may be there. In the photo, due to poor contact, the seat presumably melted. There could be a fire.
Often the lack of signs of warming up is hidden in the fuse or heating control relay.
There are frequent cases of detection of defects related to the connection of the thread harness to the vehicle’s instrument system.
Checking the fuse box with a tester
The first fault is detected by the tester. The relay is checked by replacing it, albeit a used one, but with a working device.
An available option is to restore possible thread breaks. But often drivers resort to replacing the entire rear window, which is very expensive.
Restoring rear window heating threads on a Chevrolet Niva
Heating thread continuity
There are a number of ways to restore heating yourself. The choice of any of them is tied to the size (width) of the gap and the characteristics of the thread.
The experience of their restoration is based on proven methods.
- Use electrically conductive paste or adhesive, with a gap width of a millimeter . The repair package contains paste, syringe, and glass cleaning items. The use of electrically conductive glue “Elekont” or “Kontaktol”, which is applied to the area where the thread is broken.
Method of galvanic copper deposition.
Relay test
The stages of operations are performed after disconnecting the battery from ground. The serviceability of the relay is checked: by removing the switch and connectors from the panel, the integrity of the circuit.
At the same time, the switch timer built into the circuit is checked. This device is designed to turn heating on and off for a certain time when the engine is started and voltage is applied.
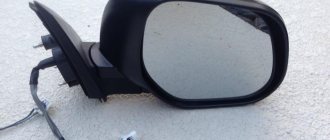
Why does the heated mirrors not work on a Chevrolet Niva?
It's hard to see, isn't it?
Focused on improving the safety of road users. Should be replaced immediately if beyond repair. They work in conjunction with the heated rear window and turn off automatically after a short period of time after the engine is turned off.
Melting of contacts in the mounting block. A design feature where both the heated rear window and the heated side mirrors hang on the same fuse.
If the console breaks down, it is disassembled by sequentially removing the heating plate (element) from its normal location. The plastic case is heated with a hairdryer and bent to remove the mirror from the holder. The body contains an element glued to the mirror. When assembling, follow the reverse sequence.
If standard heating is not included in the package, one must be purchased and installation, preferably entrusted to a service organization.
International NIVA Club
Forums
| Photo gallery | NIVA-SHOP | Files |
- List of forumsAuto - EquipmentTechnical section Lada 4x4 NivaElectrical equipment
- Search
- Unanswered topics
- Active topics
- Search
Re: Heated mirrors
Post by Myams » Jan 16, 2011, 8:42 pm
Electrically heated mirrors
Post by Myams » Jan 16, 2011, 8:42 pm
Post by ALK » Jan 25, 2011, 01:26
Who knows what's going on behind the fence of the zoo?
Post by KROKONIVETS » January 26, 2011, 20:00
Post by Bladerunner » Jan 27, 2011 00:15
Connecting front-wheel drive in a Niva is not so much a technical question as it is a philosophical one. (c) Vovchik
Post by Ghost_killer » Jan 27, 2011, 00:17
Post by Vovchik » Jan 27, 2011, 03:47 pm
Post by Bladerunner » Jan 27, 2011 3:51 pm
Connecting front-wheel drive in a Niva is not so much a technical question as it is a philosophical one. (c) Vovchik
Post by ALK » 10 Feb 2011, 16:40
I use heated mirrors much more often... right now all the crap that settles on the mirrors during the day of parking freezes to death. 5 minutes is enough for the ice to melt and dry. take a napkin and wipe it off. mirrors are clean
snow and precipitation — the rear window doesn’t matter, you can see everything in the mirrors
knopaska self-assembly - of two. Or rather, buy another one from the heater fan (2 positions) and rearrange the keys (pry it off with a screwdriver). for the most ardent breeders - push in the snail from the 8 and the button is freed
control - 2 relays (4-contact + 5-contact)
Who knows what's going on behind the fence of the zoo?
Post by Lyolik » March 02, 2011, 12:33
Post by ALK » 02 Mar 2011, 15:39
Purpose of the mounting block
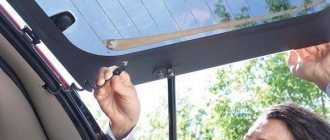
The Chevrolet Niva mounting block combines a fuse and relay panel. To get to it, you need to unscrew the screws securing the cover under the steering column, and then pull this cover towards you. The purpose of the mounting block elements depends on the year of manufacture of a particular model. In 2009, the Chevrolet Niva underwent restyling, therefore, along with other changes, the functions of the protective devices also changed.
Fuse box before 2009
In 2009, changes were made not so much to the appearance of the panel as to the purpose of the fuses. In models produced before restyling, the relative arrangement of all electrical elements was as follows:
Each protective device ensures the integrity of a separate circuit consisting of one or more consumers.
(current strength, A)
Protected circuits F1 (5 A) Backlight lamps. Trunk light. Engine compartment lamp. License plate lamps. Front side lamps F2 (7.5 A) Low beam lamp (left headlight). Electric headlight corrector. Corrector motor F3 (10 A) High beam lamp (left headlight) F4 (10 A) Left fog lamp F5 (30 A) Power window relay. Electric windows F6 (15 A) Electric door lock control unit F7 (20 A) Cigarette lighter. Horn relay. Sound signal F8 (20 A) Heated rear window relay (contacts). Rear window heating element F9 (20 A) Glove box lighting lamp. Windshield wiper relay. Windshield wiper switch. Windshield wiper motor. Headlight wiper relay (contacts). Electric motors for headlight cleaners. Headlight washer motor F10 Reserve F11 (5 A) Rear parking light lamp. Instrument lighting control F12 (7.5 A) Low beam lamp (right headlight). Corrector motor (right headlight) F13 (10 A) High beam lamp (right headlight) F14 (10 A) Right fog light F15 (20 A) Exterior mirror control unit. Motor gearboxes for controlling external mirrors F16 (10 A) Relay-interrupter for direction indicators and hazard warning lights (in emergency mode) F17 (7.5 A) Individual backlight. Immobilizer warning lamp. Brake light bulbs. Additional brake signal. Interior lighting F18 (25 A) Reversing lamps. Electric heater fan. Windshield washer motor. Rear window heating relay (winding). Rear window wiper relay. Rear window wiper motor. Rear window washer motor. Door lock control unit F19 (10 A) Relay-breaker for direction indicators and hazard warning lights (in turn signal mode). Devices. Indicator lamp for differential lock F20 Rear fog lights
Fuse box after 2009
Since 2009, the appearance of the mounting block and the relative position of all its components on it have changed. The appearance of the relays and their purpose have changed.
The purpose of the protective elements installed in the same position has also changed.
| Fuse (current, A) | Protected Circuits |
| F1 (5 A) | License plate lights, side light lamps in the left headlight and left rear light, engine compartment lamp, side light indicator lamp |
| F2 (7.5 A) | Low beam lamp (left headlight) |
| F3 (10 A) | High beam lamp (left headlight), high beam indicator lamp |
| F4 (10 A) | Left fog lamp |
| F5 (30 A) | Power window relay, front power windows |
| F6 (15 A) | Cigarette lighter |
| F7 (20 A) | Horn Relay, Horn, Trunk Lamp |
| F8 (25 A) | Heated tailgate glass element, heated tailgate glass relay, heated outside rear view mirror elements |
| F9 (20 A) | Heated tailgate switch, windshield wiper relay, windshield wiper motor, windshield washer pump, right steering column switch, glove compartment lamp, reverse lamps |
| F10 (20 A) | Remote control unit for electrical accessories (door locking) |
| F11 (5 A) | Side light lamps in the right headlight and right rear lamp, instrument lighting brightness control |
| F12 (7.5 A) | Low beam lamp (right headlight), gear motors for headlight beam control |
| F13 (10 A) | High beam lamp (right headlight) |
| F14 (10 A) | Right fog lamp |
| F15 (20 A) | Outside mirror control unit, electric outside rear view mirrors, heated seat control unit |
| F16 (10 A) | Relay-breaker for direction indicators and hazard warning lights (in hazard warning mode) |
| F17 (7.5 A) | Interior lamps, anti-theft system status warning lamp, brake lights, additional brake light |
| F18 (25 A) | Heater fan |
| F19 (10 A) | Relay-interrupter for direction indicators and hazard warning lights (in turn signal mode), instrument cluster (except for engine management system malfunction warning lamp), starter relay |
| F20 (7.5 A) | Fog lamps in the rear lights, anti-theft control unit, buzzer |
Preparing for work
To design heated mirrors with your own hands, you need to select suitable materials and tools.
What is needed for work:
Important:
When choosing a heater, you should choose the most reliable film models. Here, double-sided adhesive tape is used, where a conductive layer is provided. The advantage of this option is uniform heating and quick cleaning of the surface.
Is it possible to install heated mirrors yourself?
When thinking about how to make heated mirrors with your own hands, you should start by dismantling the existing mirror.
Each driver can remove it himself:
It is noteworthy that self-adhesive heating of rear-view mirrors on film is not the only option. It is allowed to use one or two weaker car bulbs that can quickly heat the structure.
Subtleties of connecting the device
Connection is an important stage that determines the effectiveness of the entire heating system. When thinking about how to connect heated mirrors, it is worth exploring two options. It can be connected to the glass heating or a button or a separate circuit is used. The latter option is better, as it reduces the load on the on-board network, since simultaneous heating of glass and mirrors is not always required.
If you have not installed a heated mirror system before, you will need to make a hole for the wires during assembly. The wiring is laid under the car door trim and then under the panel.
Let's get started:
A separate track does not work - how to solve the problem?
To identify this problem, you need to take a glass of water and pour it onto several paths while the heating is on. Where the path works, the water immediately disappears, and where it doesn’t, it remains. In addition, this can also be seen in cloudy weather by the fogging of the glass.
Of course, if the track is damaged, this is not a reason to replace the entire glass. The problem can be solved generally within 100 rubles. To do this, you just need to buy conductive paste.
- Using a sharp object, carefully scrape off the paint at both ends of the track to a length of 20 millimeters.
- Then we paste masking tape and make a slot for the future path.
- We degrease the repair area and apply the paste in a strip overlapping the adjacent paths. Let it dry and carefully paint it using the same pattern with orange or black paint to match the color of the heating.
That's the whole repair of heated glass.
Malfunctions
Despite the design simplicity of the rear window heating circuit, it breaks quite often. The most common system malfunction is a blown fuse.
But there are a number of other breakdowns that can occur with the device:
- Damage to conductive threads;
- Oxidation of contacts;
- Broken power supply;
- Relay burnout.
Some of these faults lead to a complete failure of the system, others lead to a decrease in its efficiency or uneven heating of the surface (unthawed areas remain on it).
Circuit elements
A blown fuse is a common failure because the system consumes a large amount of energy during operation. The operation of glass heating under heavy load leads to the fact that the protective element fails.
Also, the relay through which the threads are powered often fails.
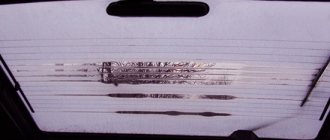
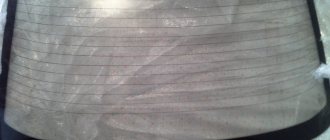
Conductive threads
The second common problem is damage to the threads. The thickness of the conductive path is insignificant and it is very easy to break it. Most often, the threads are damaged by the drivers themselves.
Ice forms on the interior side and many, trying to get rid of it quickly, without waiting for the heater to do it, remove it manually - using scrapers. But even the softest scraper can easily damage conductive tracks.
In this case, the system as a whole remains operational, but the broken thread will not heat up, and unheated areas will appear on the glass, reducing visibility.
One broken thread will not particularly affect the view, but several damaged paths can seriously complicate the driver's ability to assess what is happening behind the car.
The car owner has the opportunity to restore damaged threads, but this procedure is complicated by the fact that it is not always possible to visually detect the location of the break, and this is necessary to carry out repair work.
This is interesting: Replacing the protective caps of the Chevrolet Niva working cylinder
Phased renovation
The first thing you need to do is diagnose it and purchase a repair kit. There may be several options for a repair kit, and the repair technology in each case is discussed below.
Finding a Cliff
In addition to visual diagnostics of the condition of the threads, there are several more methods that are more reliable and effective:
- Visual diagnostics require activating the heater when the rear window is foggy. Where the threads are broken, the surface will warm up almost instantly, while in other areas visibility will be problematic.
- Using a voltmeter requires activating the ignition and then turning on the heating system. One probe should lie on the vehicle ground, and the second near the center of the heating tape. First wrap the second probe with foil. The break will be localized in the area where the voltage rises to 12 V or drops to zero. Ideally, this parameter should not exceed 5 V.
- The second method of using a voltmeter involves fixing one probe to the positive terminal of the heater, and the second one must be moved along the negative terminal strip. The problem area will be where the voltage is zero.
- Using the ohmmeter requires activation of the kilo mode. The device must be analog, with an arrow. The probes should be located near the system terminals, which are located in opposite directions from each other. Use distilled water to wet the cotton wool, which must be smoothly passed over the tape. As soon as the needle of the device moves, you will be able to detect the cliff area.
Repair with conductive glue
Repair of the rear window heating threads can be carried out using conductive adhesive. It is designed for temperatures from -60 to +100 degrees. You should not choose kits with glue, which cost 150-200 rubles. Often they do not last long or may not be effective at all. A cost of 300-400 rubles would be optimal for such a set.
Work order:
- Please read the instructions included with the kit. You should have a clear understanding of the options for applying the composition and the speed of its complete drying.
- Prepare the problem surface. Soak a rag in the alcohol solution and wipe the area.
- Lightly sand the edges in the break area with grade-grade sandpaper. It is enough to simply remove plaque and carbon deposits in two movements.
- Use tape to cover the strips along the thickness of the sides. It should not overlap the thread, but also avoid going too far away from the tape. Focus specifically on the width of the thread.
- Proceed to apply conductive glue to the prepared area using a brush or syringe. The instructions will tell you how many layers to apply. The overlap on the working areas of the tape should be 1 cm to the left and right.
- Remove the tape and wait until the composition dries completely. This will not happen before 24 hours.
- Check the functionality of the system after drying.
Methods for recovering conductive strips
Of all the malfunctions, the most unpleasant is the breakage of current-carrying threads. In this case, the system seems to remain working, but it does not function fully.
The difficulty is caused by the fact that the strips attached to the rear glass cannot be replaced, and it is not possible to install new ones, but it is quite possible to restore them. Repairing conductive threads is a simple operation and can be done by any car enthusiast.
A number of methods are used to restore stripes.
Conductive pastes, varnishes, paints
In auto accessory stores you can purchase repair kits for restoring conductive glass heating strips, the main components of which are the specified varnishes and pastes.
The essence of the repair with their help is very simple: tape is glued to the sides of the damaged strip (so that only the thread remains uncovered), the break area is cleaned and degreased.
After this, all that remains is to apply the paste or varnish, allow time to dry (usually 24 hours), remove the tape and check the functionality of the heater.
Metal powder, varnish, glue
The use of steel metal powder and a binder - varnish or glue. This method is good because all the components are at hand and you don’t need to buy anything.
The repair technology is as follows: we attach a magnet to the outside of the glass at the break site, and cover the break site with tape on the sides.
Using a file from any metal part, rub the powder, which we apply to the tear site (the magnet will hold it), then coat it with varnish or glue, and after drying, remove the tape.
The essence of the method is that metal powder, held by a magnet, will connect the strips of the heating system to each other, eliminating the gap, and simply fix the resulting bridge with varnish or glue.
Application of non-ferrous metal chips
Application of shavings from non-ferrous metals (copper, brass) and binders. This method is characterized by high repair speed and ease of implementation.
The technology is as follows: we cover the break area with tape. Mix the components - shavings and glue (varnish) in even proportions. Heat must be turned on before application.
And then we simply apply the mixture with a brush, while the current passing through the strip will ensure that the applied layer dries quickly.
All of these methods make it possible to restore the rear window heating equally well.
Repairing the heating mechanism yourself
Restoration work most often involves returning the heater filaments to working condition. Repairs can be carried out in several ways.
Troubleshooting a heater using a copper solution
Tools:
- sulfuric acid;
- copper sulfate;
- a copper rod with a diameter of 6–10 mm;
- woven strip (length - 50 cm; width - 30 mm);
- scissors;
- adhesive tape (scotch tape);
- glass cleaner.
After the preparatory stage, you can begin the actual repair.
First of all, the motorist must examine the threads of the heating system and find where the breaks appear. They are often visible to the naked eye. Next, you should turn on the heating. Let the system run for a while. After this, examine the window with your palm - all places where there are breaks will be cooler. You can also use a voltmeter to determine damaged areas. Using the positive output, faulty areas are identified. Breaks are accompanied by a drop in the voltmeter readings to zero. The negative terminal of the device must be connected to ground.
The video shows the process of repairing the rear window heating terminal:
Wrap one end of the rod with a piece of pre-prepared fabric. You can secure the improvised tassel using thick threads. Now you can start preparing the solution. Pour half a glass of clean water into a container and add copper sulfate (two teaspoons) to it. Stir until completely dissolved. After this, add a small amount of strong concentration sulfuric acid (0.2–0.3%) to the liquid. It can be replaced with battery electrolyte (0.5–1%).
The terminals from the heating system are connected to ground. A wire coming from the positive battery terminal is connected to a brush made of a metal rod. With the resulting electrode, soaked in the solution, the driver must diligently rub the sectors in which the appearance of breaks in the conductive element is noted. Areas with minor damage to the threads are completely covered with copper after this procedure. The ends of large breaks will have to be pre-treated with a soldering iron. With its help, an additional jumper made of a very thin wire is attached.
It is recommended that the motorist carry out restoration work in a work suit, otherwise the clothes may be damaged by the working solution.
Rear window defogger conductor rupture
Troubleshooting a Heater with Conductive Adhesive
Progress:
- Preliminary cleaning of damaged areas. You can use regular detergent for this. Finally, wipe the damaged areas dry and degrease them with alcohol.
- Use duct tape to seal off the area where the conductive adhesive is applied.
- Conductive glue, consisting of two components, is mixed in a separate container, strictly following the instructions indicated on the package.
- The layer of adhesive liquid should not exceed 2 mm. The hardening time of the conductive layer is 30 minutes.
- Perform the work with a cotton swab or brush.
- Removing the tape upon completion of the work done.
To facilitate repair work, you can purchase special repair kits from auto shops, which include a stencil and conductive glue. Their price ranges around 300 rubles. You can also use DD6590 glue instead. It looks like a syringe with an activator, a wooden applicator and a cloth soaked in alcohol.
Knowing how to repair the rear window heating system and what tools to use, a motorist will never drive with icy windows, and therefore will be able to avoid an accident on the road.
Location and electrical diagram
If during the operation of the vehicle you have identified any malfunctions in the operation of electrical equipment, then, first of all, you need to find out the cause of the breakdown. If the voltage in the electrical wiring of the car increases or a short circuit occurs, then it is the fuses that fail first.
That is why Niva Chevrolet owners should know which element of the fuse block (hereinafter referred to as the PSU) is responsible for the operation of which devices. Since a problem with burnt out parts can overtake the driver at any time. And therefore you should carry a set of spare elements with you. But before you start replacing, you need to know where exactly the mounting block is located.
In Niva Chevrolet cars, the power supply is located under the plastic lining of the dashboard. In particular, it is located under the instrument panel, on the driver's side of the seat to the left of the steering wheel. To replace components, you need to unscrew the decorative plastic trim that covers the power supply. It is attached to two self-tapping screws, so you need to do this with a screwdriver.
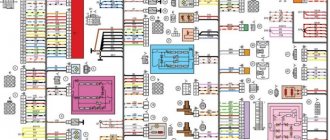
Next, you are presented with an electrical diagram and the designation of all components, as well as the relay of the mounting block.
Below is a table that shows which fuse is responsible for which electrical equipment.
Please note: Chevrolet Niva owners often encounter the problem of a non-working fuel pump, which consists of a failed fuse.
As you understand, if the fuel pump is not working, starting the engine and operating the car will be impossible. Therefore, if you encounter such a problem, you should check the power supply element responsible for the operation of the fuel pump.
However, in addition to the fusible elements of the mounting block, it also contains relays. They are intended for more powerful voltage consumers, so we will consider their purpose in a separate table.
| Number | Purpose |
| K1 | This relay is not used. |
| K2 | Without this component, the electric motor of the windshield wipers cannot operate. |
| K3 | Responsible for the operation of direction indicator lamps, as well as light signaling. |
| K4 | Ensures the functioning of low beam headlight lamps. |
| K5 | Responsible for the performance of high beam lamps. |
| K6 | If this fails, several components of the electrical network will become inoperative, namely: |
- device for heating the rear window of the trunk door;
- heating system ventilation device;
- windshield and rear window washer mechanism;
- as well as the wiper mechanism for both the windshield and rear windows.
If any component of the electrical equipment fails, then you need to check not only the circuit, but also the relay. If the relay is working, then you should clean its socket with a brush to remove dirt and corrosion. The contact may not be working due to dirt.
Causes of fuse failure
Each element is designed for a specific current. Its meaning is written on the case, but for convenience, the colors of the case correspond to certain values.
- Brown – 7.5 A
- Red – 10 A;
- Blue – 15 A
- Yellow – 20 A;
- White – 25 A.
If the permissible current value is exceeded, the fuse blows and the circuit opens. In this way, consumer failure is prevented. The reason for the increase in current strength may be an increase in the circuit load or a short circuit. In this case, the total resistance of the circuit decreases, and the current increases.
Repair kits and thread restoration products
When carrying out repair work, it is recommended to use repair kits designed for this purpose, especially since they are not particularly expensive, and they include everything necessary.
For example, a popular kit for repairing conductive threads of the glass heating system PERMATEX PER-09117 consists of:
- Degreasing wipe;
- Sandpaper for stripping threads;
- Adhesive compound;
- Activator;
- Conductive glue;
- Self-adhesive template.
But in addition to repair kits, you can also purchase simply conductive adhesives or pastes.
System diagram
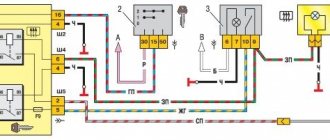
As can be seen from the diagram, using a K7 relay, type 904.3747-10, the glass heating element, which is located in the mounting block, is turned on. The system is designed in such a way that it does not work when the ignition is turned off; this is done specifically to prevent the battery from being discharged by the heating element. Therefore, power is supplied through an additional relay K6, which is activated and supplies voltage to element K7 only when the ignition is turned on. After the power has arrived, it is supplied to the heating element through a special fuse F8 which is connected directly to the power sources. Therefore, the first thing to do in case of this malfunction is to check fuse F8, relay K7-K8 and the wires that connect all the elements to each other. The malfunction can be identified using a tester, or by replacing the relay with a new part.
Sources of the problem
Since many drivers prefer to restore the heated rear window with their own hands, you need to know about repair options taking into account the source of the problem. There will be no obstacles to independently checking the functional components of the car if you have minimal skills in repairing automotive equipment.
System fuse
The safety element is the first thing that should attract your attention when a breakdown is detected, since the system will not work if it is burned out. The location of this element varies depending on the car model, so at this stage you will have to turn to the vehicle service book for help. Next, remove the fuse and make sure it is working. Repair of the rear window heating will be limited to replacing the burnt out element.
Relay and fuse diagram for Lada Niva (Chevrolet)
In the event of a car breakdown related to electrical equipment, first of all, check the integrity of the fuses and relays. If a fuse is blown, you must first determine the cause of its blown before replacing it. Details about the mounting block (popularly “black box”) of the Lada Niva (Chevrolet) are described in the operating manual, but the most complete information is contained in the repair manual for the Chevrolet Niva 1.7, which was developed by ITC AUTOSPHERE LLC at the request of JSC "GM AVTOVAZ".
Signs of breakdown
You can understand that there are problems with heating by the following signs:
- The glass begins to sweat when the warning light does not work. The first thing you need to do is check what voltage and serviceability of the fuses
- The glass does not heat up when the control lamp is on. The reason may be due to lack of voltage
- Condensation appears in some places; this may be due to a broken thread. Can be restored through repairs, special varnishes
- Defrosting does not occur even though the system is working properly. This can happen if the glass is heavily iced and there is not enough voltage; you need to clean the ice yourself.
There can be many reasons for the breakdown, ranging from the switch to the wiring itself, which can only be repaired by disassembling the entire dashboard.
If the reason is a broken thread, you can try to restore it. There are many different ways to solve this problem, which look like this:
- To eliminate a break, up to one millimeter, you need to prepare a special adhesive composition, for example (Kontaktol, Elekont), a syringe, or a glass cleaner. Special glue is applied to the area where there is a break, and insulating tape is tightly applied on both sides.
- You can use soft soldering or resort to the option of galvanic application of the material. But this procedure is labor-intensive and difficult to carry out in garage conditions.
- If the width of the gap exceeds two millimeters, you need to use a tinned copper core with a cross-section of 0.2 millimeters. It is better to perform soldering with POS-61 solder, but do not tinning the thread.
Question
Alexey O 0
Alexey O 0
- Newbie mazdovod
- Users 0
- 5 messages
- City: Yoshkar-Ola
- Car: Mazda 3 bk
hello everyone, I want to get advice from experienced Mazda drivers
I drive a Mazda 3 bk. The heated mirrors and rear view glass do not work, the button is illuminated, but nothing happens when pressed. I checked the fuse, it's ok, I don't know how to remove the relay to check. I rang the contacts on the glass, everything is in order. Is it really a relay, and how to remove it? I'm afraid to break it. Thank you
Other section materials
| Electrical package control unit - removal and installation |
| Motor test data |
| Data for checking the windshield wiper gearmotor |
| Data for checking the front door electric window gearmotor |
| Heater Fan Motor Test Data |
| Power windows for front doors |
| Immobilizer |
| Motor reducer for headlight range control |
| Rear window wiper |
| Features of the heater fan electric motor |
| Features of the instrument cluster device |
| Mounting block |
| Features of the windshield wiper device |
| Lighting and light signaling: device features |
| Data for checking the gear motor of the door lock system |
| Checking control device sensors |
| Wires and fuses |
| Adjusting the fog lights |
| Windshield wiper relay |
| Relay-breaker for direction indicators and hazard warning lights |
| Adjusting the headlights |
| Headlight relay |
| Understeering's shifter |
| Door lock system |
| Electrical package remote control system “Norma” |
| Heated exterior mirrors and rear window |
| Front seat heating system |
| Exterior mirror control system |
| Removing and installing the windshield wiper |
| Removing and installing the rear window wiper |
| Removal and installation, checking the instrument cluster |
| Possible malfunctions of the heater fan motor, their causes and methods of elimination |
| Possible malfunctions, their causes and methods of elimination |
| Possible malfunctions of the instrument cluster, their causes and methods of elimination |
| Replacing the remote control key battery |
| Ignition switch |
| Sound signal |
| Possible malfunctions of the windshield wiper, their causes and methods of elimination |
| Replacing lamps |
Stages of windshield replacement for Chevrolet Niva
Technologically, replacing a Chevrolet Niva windshield consists of several stages:
- dismantling,
- treatment of the installation site,
- inserting new glass.
After removing the old auto glass, the frame is cleaned of any remaining adhesive and then degreased. At the next stage, a primer is applied to increase the adhesion of the glue and body parts. Then the new glass is installed and fixed well. Within an hour after finishing work, the Chevrolet can be used, making sure to adhere to the speed limit.
Still have questions? Request a call back!
Back call