Repair manual for Lada Kalina
- Motorcycles
- Jawa Reviews/Tests
- IZH
- Minsk
- Ural/Dnepr
- Sunrise
- Scooters
- Jawa
- Jawa
- VAZ
- VAZ
- VAZ
- Motorcycles
friends of site
- Auto-Literature:
- VAZ
- UAZ
- GAS
- Audi
- Alfa Romeo
- Volkswagen
- Peugeot
- Renault
- Mercedes
- BMW
- CITROEN
- Fiat
- Ford
- Skoda
- SEAT
- Honda
- Mazda
- Nissan
- Opel
- Volvo
- Toyota
- Mitsubishi
- Daewoo
Maintenance of an injection engine (your topic is a control system)
Table, categories of operating conditions.
Category of operating conditions
A distinction is made between daily maintenance (DM), first maintenance (TO-1), second maintenance (TO-2) and seasonal maintenance (SO) for electronically controlled power systems. The frequency or mileage (in km) of TO-1 and TO-2 is established depending on the category of vehicle operating conditions. In our country, four categories (I-IV) of operating conditions have been adopted (Fig. 2.1.) (with a small letter)
The first maintenance (TO-1) includes checking the tightness of the fuel and air supply system, as well as the correct operation of the air damper drive. Fuel leaks and air leaks are not allowed. The throttle valve opening should be smooth and without jamming. During the TO-1 process, the gap between the electrodes of the spark plugs should be adjusted, and if necessary, they should be replaced. The gap between the spark plug electrodes is checked using a wrench and a feeler gauge. The gap should be 0.70-0.85 mm.
During TO-2, you should perform the same operations as during TO-1, checking the fastening of the exhaust and intake pipelines, as well as the exhaust pipes of the muffler. Loose nuts securing the fuel, air and exhaust systems should be tightened. Next, you need to check the fastening of the fuel rail, tension roller, ignition coils, engine pulleys, the condition of the exhaust gas recirculation system and clean the receiver. If necessary, replace the air filter element.
During seasonal maintenance (SO), parts of the fuel injection system must be washed without disassembling the oil deflector.
The fuel tank should be filled only with clean gasoline, and sediment and water should be drained from it periodically (in the fall). In the future, it is necessary to carefully check the tightness of the fuel line connections when the engine is idling.
Each subsequent maintenance begins with the completion of the previous operations. The operations for all brands of engines are basically the same. Some differences are caused by design features of the engines. Maintenance of the internal combustion engine consists of its external cleaning, control inspection, general diagnostics and diagnosing and regulating its systems. External cleaning of the internal combustion engine is carried out by first blowing it with compressed air, followed by wiping with cloth ends soaked in kerosene or diesel fuel.
Kalina fuel filter - why is it needed and when should it be changed?
Any car enthusiast knows that a vehicle fuel filter is installed in order to efficiently filter the fuel entering the engine. The gasoline we fill up at gas stations is often contaminated with various particles and water.
A similar situation can occur even when the driver “fuels” his iron horse at prestigious and expensive gas stations.
Fuel often becomes contaminated directly during its production, during long-term storage in the manufacturer’s warehouses, or during transportation to a gas station. It also often contains certain impurities (from the resulting oxides and dust) in the fuel tank of the car itself. It is clear that low-quality gasoline will sooner or later lead to car breakdown.
To avoid this, it is recommended to replace the fuel filter within the time frame specified by the manufacturer, or when the “symptoms” indicated at the beginning of the article occur. So, on the Lada Kalina we are interested in, it should be changed after 30 thousand kilometers (if you listen to the recommendations of AvtoVAZ). In practice, Kalina owners replace the filter every 10 thousand kilometers.
How to change the coarse mesh
The work package for replacing the first stage filter consists of several stages:
- Buying a new part.
- Preparation of tools and repair site.
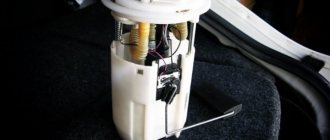
- Disassembly, removal of the gasoline pump and replacement of the mesh catcher.
To replace the old dirty mesh, you need to remove the fuel pump
How to choose a Kalina mesh filter is described in the previous section. The location for repair work does not matter, since you do not need a car overpass or inspection ditch - disassembly is carried out from the interior.
Preparatory stage
In warm weather, disassemble the car directly on the street, but in windy weather, find a quiet place, otherwise dust will blow into the interior. In winter, it is more convenient to work in an insulated garage or box.
The tools you need to prepare are:
- a Phillips and flathead screwdriver;
- pliers;
- a small chisel or metal point;
- hammer;
- clean rags.
To disassemble and dismantle the fuel pump you will need a modest set of tools
Before starting work, remove unnecessary objects from the rear row of seats, and then remove the seats themselves. They block access to the technological opening with a hatch leading to the fuel tank. The latter is attached to the bottom of the car from the outside.
Removing the fuel pump and replacing the mesh
The first step is to relieve excess pressure in the fuel line, otherwise when the pipes are removed, a stream of fuel will splash around the trim and the pungent smell of gasoline will “linger” in the cabin for a long time. There are 2 ways to relieve pressure:
- Pull out the 15 A fuse for the fuel pump electrical circuit, located under the cover in the center tunnel. Start the engine and wait until it stalls due to lack of fuel. Repeat the operation 2-3 times.
The fuel pump electrical circuit fuse is located under the cover on the center tunnel.
- Open the hood and locate the injector fuel rail valve. It is located on the right side (in the direction of travel) under the receiver and is a regular spool (the same ones are found in tires). Place a small container and press the valve, after twisting the protective cap.
The pipe with the spool is located behind the engine to the right of the ramp
After removing the rear seat, you will have access to a hatch covered by a fold-down trim flap. Place the cover aside and proceed to disassembly, performing the operations in the following order:
Take a Phillips head screwdriver and remove the 4 screws holding the hatch in place. Remove the cover.
The hatch is screwed to the bottom of the car with 4 screws
Disconnect the negative terminal from the battery, then disconnect the fuel pump power connector.
To disconnect the connector, you need to pry the plastic tab with your finger.
Squeezing the plastic retainer with your hand, pull the first pipe from the pump fitting. To remove the second tube, bend the metal bracket and plastic latch.
The pipes leading to the pump are held on by plastic latches
The pump housing is held in place by a lock washer. To unscrew it, use a small chisel and lightly use a hammer to turn the washer counterclockwise.
The lock washer is loosened by light blows of a hammer through the adapter
Remove the locking plate and carefully remove the fuel pump from the tank. At the same time, tilt the body to the side so as to pull out and not bend the float
Cover the opened hole with a clean rag to prevent debris from accidentally getting into the tank.
Pull out the pump carefully so as not to damage the float
Disconnect the internal pump connector (located under the cover) and remove it from the glass by bringing together the 4 long plastic latches.
To remove the pump from the glass, you need to press the plastic latches
The old mesh is simply pressed onto the fitting and removed by hand.
The mesh is removed and placed on the pump fitting by hand
It is advisable to remove dust with a vacuum cleaner so that it does not fall into the open tank
The new strainer is installed on the fitting until the latch clicks, after which the assembly can be assembled in the reverse order. Before doing this, look inside the glass where the gas pump is located: if you find dirt at the bottom, remove it with a rag or wash it with a brush soaked in gasoline. Before starting the engine, turn the ignition on and off several times, allowing the fuel pump to raise the pressure in the line to normal.
The above-described procedure for replacing the coarse filter element is performed in the same way on Kalinas with different body types. The same technology is used when repairing a Lada Kalina Sport car.
Let's sum it up
After completing the entire list of work, it is recommended to check the pressure in the system. If everything is fine, screw in the spool valve and start the engine, the fuel system should work as expected. To be completely sure, we check the Lada Kalina 8 valve while driving.
Struggling with excess pressure in the fuel line, I decided to replace the RTD. The execution procedure is not complicated, it can be done alone. So let's get down to business right away. I first pulled out the fuse and drove on gas for half a day, so the pressure in the system was released.
We fold back the rear seats and the carpet from the hatch.
We unscrew the 4 screws and here is the fuel pump. Next, disconnect the fuel wires (there are clamps there that you need to press on), and disconnect the connector with the wires. Take a flathead screwdriver or chisel and knock off the retaining ring counterclockwise.
Next, carefully pull out the fuel pump without damaging the float.
Next, the fuel pump needs to be disassembled.
I bought the mesh in advance and apparently not in vain. My old one was very dirty along with the pump.
So let's sort it out. Disconnect 3 wires in the pump. We disconnect the tube on the side of the case, it is there on 1 clamp. The top of the pump can now be pulled out. The RTD itself is located in the upper part of the pump and is held on a bracket; we pull out the bracket with a screwdriver. Then we just pick out the RTD from its seat, it just stuck with me.
The fuel pressure regulator is an element of the injection engine power system, which allows you to maintain the required fuel pressure in the fuel injectors at different operating modes of the internal combustion engine. In other words, the overall performance of the injectors and the stability of the engine depend on the serviceability of the fuel pressure regulator (FPR).
Lada Kalina fuel pressure regulator
If on the first modifications of VAZ engines with distributed injection the fuel pressure regulator was located in the engine compartment on the ramp, now the designers of the Lada Kalina 8 valve placed it inside the tank. Now this important element of the system is located in a single fuel module along with a pump and filters for fine and coarse cleaning; this is the entire fuel system.
This solution creates certain difficulties in terms of diagnosis and replacement, since partial disassembly of the tank will be required during the operation. Despite this, even the owner of a Lada Kalina, who does not have enviable experience, is able to identify and eliminate the malfunction.
How does the regulator (RDT) work?
The fuel system has a fuel pressure regulator. This injection system component is a conventional diaphragm valve. Its task is to maintain a constant level of pressure in the line and ramp, regardless of the operating mode of the motor. The pressure generated by the pump is maintained within 3.7-3.9 bar. If the upper threshold value is exceeded for some reason, the valve immediately directs excess fuel into the tank. When the fuel pressure is insufficient, the RTD is not able to increase it. If the valve fails, it can itself cause a decrease in pressure.
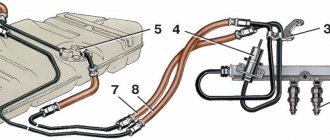
The operating features of the power supply system are discussed in detail in the diagram below.
To correctly diagnose the fuel pressure regulator, you will need to familiarize yourself in detail with the algorithm of operation of the injection system.
- When the ignition is turned on, the fuel supply pump (item 6) comes into operation. It creates the required pressure in the ramp (item 2) and the line. If after a few seconds the starter is not turned on, the on-board controller gives a command to turn off the pump power circuit.
- First, the fuel passes through filters designed for coarse and fine (item 7) cleaning. Next, it is sent to the fuel pressure regulator, after which it is supplied through the line (pos. 4) to the ramp and injectors (pos. 3).
- The start and further operation of the LADA Kalina 8 valve engine is characterized by fuel combustion. It is sprayed into the manifold by means of nozzles, after which, mixing with air in a certain proportion, it is directed into the engine chambers, where combustion occurs.
At idle speed, the RTD dumps the overwhelming share of fuel into the tank (position 5), because consumption is insignificant, and the pressure generated by the pump is constantly high.
At higher speeds the situation is different. Here the valve does not operate in reset mode, since the engine requires large portions of fuel.
Experts distinguish between two types of RTD faults. This is a decrease in the pressure level in the line or, conversely, its excessive increase. In the event of a breakdown, the LADA Kalina 8 valve element cannot be repaired. It is being replaced with a new analogue.
How to diagnose a malfunction?
Among the first signs indicating that the fuel system is faulty is a sluggish engine response to pressing the gas pedal, as well as difficulty starting. If there is a decrease in pressure, then the Lada Kalina engine does not have enough fuel for normal operation. This confirms the weak speed gain during acceleration. When the pressure is excessive, the car behaves confidently while driving, but the LADA Kalina engine is not able to start stably. This is explained by fuel overflows, which is pronounced in the summer.
The first step is to measure the fuel pressure. To do this, you will need to equip yourself with a pressure gauge, which is equipped with a spool nozzle. A similar device measures the pressure inside wheel tires.
We act in accordance with the algorithm below.
- With the LADA Kalina engine cooled down, open the hood and remove the plastic cap located at the end of the fuel rail (item 1 in the diagram).
- Place a suitable container under the fitting. We press the spool to relieve pressure, and then unscrew it (see photo).
- We put the pressure gauge hose on the designated fitting.
- To start the unit, you will need a wire that connects the positive terminal of the battery to the contact present on the diagnostic connector. It is marked "11". The ignition must remain on. The time to check is about 10 seconds.
The purpose of this small device
The car's system is designed in such a way that fuel flows through the injectors to the intake manifold. It is very important that the pressure does not change. In turn, the regulator makes an accurate calculation of the volume of gasoline supplied.
As a result, the device controls the pressure parameter inside two elements - the intake manifold and the fuel rail. In this case, the regulator’s task is to maintain the pressure difference at the same level. In addition, the regulator controls the pressure parameters at the injector and in the intake manifold.
A decrease in power, malfunctions of the power unit, an increase in consumption - all these are signs of a malfunction of the fuel pressure regulator (we’ll talk about this in more detail below). At the same time, the task of the car owner is to diagnose the problem in time and accurately determine whether the fuel pressure regulator is faulty or the problem lies elsewhere.
Replacing the electric window
If the window lift cable on a Lada Kalina car has become unusable or the motor has burned out, the ESP must be changed. We carry out the replacement operation in the following order:
- dismantle the power window control unit;
- remove the door trim;
- to disconnect the window regulator from the glass, the latter must be raised all the way up;
- unscrew the four bolts that secure the glass to the ESP (two in the front and two in the back). The glass is held on by seals, but it can also be secured so that it does not fall down;
- unscrew the black metal strip (three screws);
- unscrew the eleven window regulator fasteners (10 bolts), disconnect the power plug from the electric motor;
- We begin to remove the power window from the rear, first removing one half of it;
- then we take out the front part along with the motor from the door cavity;
A burnt-out electric motor on a lift can be easily replaced. For this:
- unscrew the three studs on the mechanism body, then four more screws;
- dismantle the motor, holding the cable spool with your hand, install a new part;
- We install the window regulator in the door, connect it to the glass guides, and put the trim in place.
How to replace a faulty valve?
To do this, you will need to remove the entire module from the tank.
- First, we release the pressure using the previously described technology.
- We remove the back seat.
- The hatch is covered with a soundproofing mat, which must be moved to the side.
- We unscrew the screws and remove the indicated hatch.
- Disconnect the electrical power connectors for the pump and sensor.
- Unscrew the clamping ring. We rotate to the left. You can tear it out of place with a punch and a hammer, making light taps.
- We take out the module and float.
- On the old regulator, remove the wire and pull out the spring clip. You will need a screwdriver.
- We install a new valve. Lubricate its rubber ring with oil (motor oil).
- During reassembly of the unit, we monitor the condition of the gaskets and, if necessary, replace them with new analogues.
- The installation of the module must be carried out taking into account its correct orientation in space. The arrow on the lid points towards the luggage compartment.
Checking Sensors and MI
The maintenance manual for fuel-injected vehicles equipped with electronic control systems describes the procedure for finding faults when it is impossible to start the injection engine.
The procedure for finding faults is simple and clear. If the engine does not start at temperatures above 10 degrees, this technique quickly helps to determine the malfunction of the injection engine in service conditions with diagnostic tools available.
It’s another matter when you are on the road and your engine stalls and refuses to work, or starts and immediately stalls. It’s even worse when your car is parked and the temperature outside is below -10 degrees. Under these conditions, it is not possible to carry out the described procedures completely and quickly eliminate the malfunction, especially since the engine has just been started and there were no visible problems with the control system.
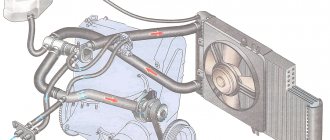
We expel air from the cooling system
The cooling system can become airy for various reasons, and first of all, the heater in the cabin stops blowing warm air, the temperature rises, and the antifreeze boils. If you squeeze the upper and lower radiator hoses, you feel that they are empty, there is no coolant in them. Often, “airing” occurs after replacing the heater radiator, and it is sometimes very difficult to remove air from the system. Alternatively, you can install an additional tee on the lower heater pipe under the hood, and lead the new hose into the expansion tank from above; a plug should be placed in the lower pipe from the tank to the lower radiator pipe.
Causes and Troubleshooting
If the above symptoms are detected, you should check the performance of the RTD using one of the suggested methods:
- measure the pressure in the fuel rail, its value should be at least 3 bar;
- find the return hose and carefully press it with pliers while the engine is running;
- disconnect the vacuum pipe leading from the manifold from the regulator.
The most reliable way is to measure with a pressure gauge. The device is connected to the fitting on the fuel rail, the test is performed with the engine running. If the pressure is below 3 Bar, additionally check the fuel pump - the unit may have lost performance. For diagnostics, you will need a tee with a pressure gauge embedded in the supply line. If the pump produces 3 Bar or more, change the RTD.
The reasons for valve failure look like this:
- the spring has lost its elasticity and allows the membrane to bypass fuel at low pressure;
- pollution with low-quality gasoline;
- rod jamming.
Due to the design features (the element body is rolled), repairing the fuel pressure regulator is impossible in most cases; the part will have to be replaced. The option of washing and blowing helps only with blockages inside the element.
Squeezing the return line is done at idle speed of the engine, preferably “cold”. If engine performance stabilizes, there is a problem with the RTD or pump. To determine the “culprit”, you will still need to measure the supply pressure. Try removing the vacuum tube from the manifold at higher speeds - if the valve has become unusable, the behavior of the power unit will not change.
https://youtube.com/watch?v=PEMmSVodwLU
In this article I will talk about what a fuel pressure regulator (FPR) is, where it is located, and also how to diagnose it yourself.
The pressure regulator is located on the fuel rail, its task is to maintain the correct pressure in the fuel system under different operating conditions.
How does the fuel pressure regulator work?
The pressure regulator is a diaphragm valve, on one side it is acted upon by fuel, on the other by the intake manifold spring. When the engine is released from the load, the valve opens, after which the unused fuel is returned back to the fuel tank. Once the fuel pump is turned on, fuel is drawn from the tank, cleaned in the fuel filter, and then passed to the regulator, which maintains the correct pressure in the fuel system during this cycle. The main task of the RTD is to maintain optimal pressure in the fuel system and ensure proper engine operation. Due to lack of pressure, engine operation changes; if you checked the pump, fuel line and found no abnormalities, most likely the problem is in the fuel pressure regulator. Signs of a faulty RTD:
1. Unstable engine operation;2. The car stalls at idle and reacts poorly to the gas pedal;3. Reduced engine power, poor dynamics;4. The engine choke while driving; 5. Increased fuel consumption.
Causes of fuel pressure regulator malfunction
1. The valve cannot hold the required pressure. The reason may be that the valve spring has sagged, causing it to return fuel back to the tank, causing the engine to start poorly;2. Fuel flow is obstructed or a complete blockage has occurred; 3. The valve is stuck. The pressure changes unevenly, as a result of which the car begins to jerk, especially during acceleration.
How to check the fuel pressure regulator, that is, do-it-yourself diagnostics of the RTD
There are several ways to check RTD at home. One of the most “ancient” testing options is to clamp or disconnect the “bypass valve”, while monitoring the force of the jet. This method of checking the fuel pressure regulator was practiced by our grandfathers on the first VAZ models. After carburetors were replaced by injectors, the method became irrelevant.
The most accurate and effective way to check the pressure in the fuel system is to use a pressure gauge.
In order to measure the RTD pressure in the engine at idle speed, it is necessary to connect a pressure gauge between the fitting and the fuel hose, and disconnect the vacuum hose. During measurements, the pressure in the system should increase from 0.3 to 0.7 Bar.
Result after replacing the fuel pump
So, after replacing the fuel pump, a pressure gauge was immediately connected and when starting the engine, excellent readings of 4 kg/cm² could be observed, and when the speed was set to almost maximum, the pressure did not decrease.
Here you can see information on replacing the fuel pump, which was done in this case. As for the result specifically in terms of the operation of the motor and its power characteristics, everything is excellent here too. Now the car drives very quickly, there are no dips or slowdowns when pressing the gas pedal. As surprising as it may sound, fuel consumption also returned to normal both at idle and when driving.
How to check the fuel pressure regulator?
There are several simple ways to determine the causes of problems and defective components:
- Visual method. A simple inspection without the use of any fancy tools is fine for carburetor engines. Pinch or disconnect the valve and observe the flow of fuel. The intensity of the fuel flow will help identify the malfunction. This method of verification is effective in its own way, but one cannot count on absolute accuracy.
- Method using a pressure gauge. Place a pressure gauge between the fuel hose and the fitting. To do this, temporarily disconnect the vacuum hose. The pressure level should change from 0.3 to 0.7 Bar. If the pressure indicator has not changed, repeat the operation with another hose.
- Hose clamping method. The pressure regulator is checked by pinching the return hose. A pressure gauge connected to the fuel system should give an immediate response. If the motor does not develop normal speed, you can determine the inoperability of the RTD without the device. Start the engine and clamp the return hose. Then track the RPM and listen to the engine. If the engine starts to run smoothly, then the problem lies in a faulty control valve that needs to be replaced.
Basic malfunctions of the injection engine power system
All modern cars with gasoline engines use a fuel injection system, since it is more advanced than a carburetor, despite the fact that it is structurally more complex.
The injection engine is not new, but it became widespread only after the development of electronic technologies. This is because it was very difficult to mechanically organize control of a system with high operating accuracy. But with the advent of microprocessors this became quite possible.
The injection system differs in that gasoline is supplied in strictly specified portions forcibly into the manifold (cylinder).
The main advantage of the injection power system is compliance with the optimal proportions of the constituent elements of the combustible mixture at different operating modes of the power plant. Thanks to this, better power output and economical gasoline consumption are achieved.
Video review of a dying fuel pump on Kalina
If you don’t want to read everything written above, then you can watch this video, in which everything was clearly demonstrated.
If you have any questions, ask them below in the comments or discuss them on the channel under the video.
Stable engine operation is ensured by a number of systems and mechanisms. One of such systems, including for the Lada Kalina, is the power supply system. Among the components of this system, the key role is played by the fuel pump, which ensures an uninterrupted supply of fuel to the gasoline injection parts - special nozzles.
LADA KALINA. Injector malfunction, which takes out the brain.
Hello. Today I want to continue the series of articles about the symptoms of faulty injection wiring. Using the Lada Kalina car as an example.
In my practice, there were cases of malfunctions in the engine control system, which sometimes baffled me. One of these reasons was on Kalina.
The owner of the car complained about floating speed, increased fuel consumption, loss of dynamics, and an illuminated engine malfunction lamp.
When connecting diagnostic equipment, we see an error on the oxygen sensor: “lean mixture”. At the same time, at idle, the oxygen sensor works: it draws a sine wave. But as soon as the engine cooling fan turns on, its signal shows 0.1-0.2 Volts, which corresponds to a lean mixture. The engine begins to idle unsteadily.
After the fan works, the oxygen sensor also hangs in a lean mixture until you change the gas several times.
After all the checks (measuring fuel pressure, checking for air leaks, timing marks), all that remained was to check the injection wiring. And indeed, when the wiring moves, next to the electronic engine control unit, the oxygen sensor readings return to normal.
We unravel the injection wiring in the car interior and find massive twists. Over time, the copper in them oxidizes and the ADCs of the sensors begin to float.
We also unscrew and clean the ground wire that goes from the engine to the body.
I wrote about this in previous articles, but the symptoms of the malfunction were simply different.
We solder the twists. After this, we are happy that the engine is working properly.
This wiring problem occurs on Lada Kalina cars produced before 2011, with a mechanical throttle cable.
I hope the article will be useful to car enthusiasts.
Procedure for servicing the fuel pump, possible malfunctions
You should not always resort to immediate replacement of the Kalina fuel pump, because first you can repair it. But for this you need to select the right tool in advance.
For this device, two parameters are usually monitored: operating pressure and operating performance. After removing the device, you can check the current consumption at rated and full load. But for such measurements you will need a specialized stand.
The initial point of control will be the voltage of the connector that supplies the fuel pump from the vehicle’s on-board power system. Not only should it be equal to 12 V or even slightly exceed this value, but also when the machine is operating, the noise of the operating device should be clearly audible.
The disadvantage of this control method is the inability to detect unreliable contact in the electrical circuit on the way to the connector. Any loose connection in the fuse box, fuel pump relay, will result in the 12 V received at the terminals upstream of the pump showing the same 12 V. But a working pump will receive only a few volts and will not be able to work normally.
Also, a malfunction in such a situation may be a breakdown of the fuel pump relay. This malfunction is easy to diagnose, since special symbols are displayed on the instrument panel, which allows the driver to see an error in the operation of this part.
All control relays are located inside the car and, when malfunctioning, distinguish themselves with characteristic clicks. Replacing the fuel pump relay yourself is not difficult; it is enough to recognize the location of its installation by the special printed symbols.
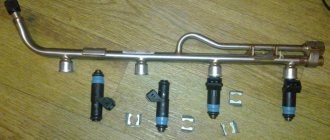
Fuel pump parts disassembled
Payment via PayPal
After selecting payment via PayPal, the PayPal payment system will launch, where you need to select the payment method: bank card or PayPal account.
If you already have a PayPal account, then you need to log into it and make a payment.
If you do not have a PayPal account and you want to pay using a bank card via PayPal, you need to click on the “Create an Account” button - shown with an arrow in the picture.
PayPal will then prompt you to select your country and provide your credit card information.
After specifying the information required to make the payment, you must click on the “Pay Now” button.
Signs of malfunction of the fuel pressure regulator viburnum
Hello everyone, I continue to run in the new engine, I started turning it up to 5000 rpm. And sometimes problems with traction appeared, namely, a cut-off effect was created at 4000 rpm. Those. The revolutions stupidly dropped to zero and the car did not want to go until the revolutions dropped below 3000. This happened on the old engine, but then I blamed it on a burnt gasket, but then I realized that this was connected with one of the engine systems. It also happened that with about 13 liters left in the tank, the car swallowed air and stalled like a diesel engine, at first it sputtered terribly and then fell silent, although the pump should clear the air lock. All symptoms pointed to problems in the fuel system.
the injectors were washed during assembly, the fuel pressure regulator (fuel pressure regulator) and the pump itself remained.
Checking the pressure in the system is very simple. You need a pressure gauge, a hose and 2 clamps. Do not forget that the pressure gauge accurately shows in the second third of the scale, i.e. if you need to measure pressure in the region of 2-4 kgf/cm2, you need to take a pressure gauge from 1 to 8-10 kgf/cm2. As a last resort, you can remove the pressure gauge from the pump, the main thing is that the limit is around 7 kgf/cm2. I took a certified pressure gauge for 10 kgf/cm2.
It is connected to the old and new model ramps in the same way. Remove the plastic cap from the end of the ramp
Under the cap there is a fitting in which a regular wheel spool is wrapped, unscrew it with the cap from the wheel (IMPORTANT! The system is under pressure, be careful when unscrewing the spool
), or better yet, remove the pump fuse or connector from it and start the car to relieve pressure in the system. And then we put on our hose with a pressure gauge.
Now we check the pressure regulator; to do this, at idle, remove the vacuum hose from the receiver; the pressure should jump sharply by 0.7-0.9 kgf. If this does not happen or happens slowly, the regulator is faulty.
Worked great for me, I changed it a year ago.
Next, we check the fuel pump itself; to do this, open the throttle at idle and look at the readings. The pressure should not fall below 2.2 kgf. If the pressure does not drop, read how to check the filter, if it drops like mine, then just read why it could be
, I dropped to 1kg. The drop may occur due to clogged filters or a half-dead pump. Now, in order to find the culprit of all the troubles, at idle we use pliers to pinch the fuel return, which comes from the pressure regulator. In this case, the pressure should reach 5-7 kgf/cm2. Those. the pump should pump more than 5 kgf at point-blank range. Now we watch how this happens, if the pressure reaches above 6 kgf but for a very long time, about a minute or more, clogged filters are to blame (coarse cleaning in the tank, or fine cleaning near the tank). If it does not reach at least 4 kgf, then the pump is dead, i.e. it works but not as it should. My pump cannot pump up even 3 kgf at point-blank range. The verdict is pump replacement.
Before this, about 3 years ago I already changed the pump, I had no experience then and a couple of times I got up with a dry tank. And now this happened due to a faulty device. All the readings on it are lying, so a replacement is being prepared for it with a 2110 tidy. In general, do not leave gasoline at the bottom of the tank, always keep at least 15 liters in it, the pump does not operate dry, there is no cooling by the flowing medium, i.e. gasoline, in the best cases, wear of the pump and a drop in pressure, and then complete failure. At worst, overheating and ignition inside the pump. There will be no explosion, but it will definitely scare you with smoke.
There was nothing to do, I had to take money and look for a new pump, by the way, 3 years ago I bought the original BOSCH for 750 rubles. He stood the same. Now, having asked for the original, I was shocked by the price of 1600 rubles. It's all about Kalinas and Priors, the prices of spare parts for them are higher than for the same Samara, but the pump, unfortunately, is the same everywhere, and thanks to the new markings because... Samaras are out of production, considered like a pump for a Priora, which is why the price is the same. But I went a different route and found in Magnitogorsk a functional analogue of the BOSCH from SOATE. But the price is 780 rubles. I also took a new coarse filter (crow's foot) and fine filter from SCT.
For those blog readers who follow my YouTube channel, the information will not be new, but for the rest I will describe everything here. So over the past few days my Kalina has started having problems. And they were as follows:
- After a long period of inactivity, the engine began to start poorly, often even on the second try.
- the car became very “dull”, and it felt like the loss of power was about 20%
- fuel consumption increased by 10% when the engine was idling, and when driving too
In general, based on all the signs described above, it looked like a dying gas pump. Of course, I checked the mass air flow sensor first, since its operating voltage is also already close to critical. But when it was turned off, nothing changed for the better.
As a result, I began to deal with the fuel system. I’ll say right away so that there are no unnecessary questions:
FakeHeader
Comments 17
Congratulations! You bought an excellent original UTES module (an old model, it says “UTES” in big letters, I had exactly the same one in my car from the factory, only 21101-1139009, manufactured in 2008), with an ORIGINAL Bosch pump 0 580 454 035 ( Now there are a lot of fakes)! Today I had a hard time finding and buying the original “UTES” module 21101-1139009 in Kharkov
There is the same one for Kalina:
I looked for it all over Ukraine, in Kyiv I went around the entire car market, called all the companies, then I started calling different offices in Kharkov, Dnepr and Zaporozhye - there is no original UTOS anywhere at the moment. Complete fakes under the guise of UTYOS or Chinese bullshit. The best thing that can be found now under the guise of UTOS is ATK (Avtotekhprom), but I was looking for the original UTOS in original packaging.
I accidentally came across the Losk104 website and there I bought exactly what I was persistently looking for!
Regarding DUT, Kalina is equipped with DUT-K, DUT-17 and DUT-10.
I can’t tell you which one for which tank. Like DUT-K of the “universal” type. I have a VAZ 21093 (2009) with a 1.6 Kalino engine, my module 21101-1139009 has a DUT-K2 sensor, it is completely interchangeable with DUT-11, there is no difference.
Dnepr auto dealers are still the same. They are purchased from Ukravtovaz (they recently opened their online store) shop.ladaukraine.com/ Now the fuel pump modules come from the DCK assembly line (the same was in my car)
Yes, in DneprAuto the prices are great, I just gave their links as an example, it’s easy to search on their website, it’s easy to look at the photo.
PS In UkrAvtoVAZ I see that the prices are also crap... A module like ours, only with a metal cover (for 1.5 engines) costs 2050 hryvnia shop.ladaukraine.com/prod...enzonasos/21101113900900/
You can buy it in Kharkov. where I bought mine for 1235 hryvnia
PS In DSK the inserts seem to be not Bosch ones, but Czech “Aisans” 3J, they seem to be worse than Bosch ones
You need to find out the price there, it differs. For example, Kalinovsky steering tips are indicated on the website for 430 UAH, but I paid 413 in fact
Yes, in DneprAuto the prices are great, I just gave their links as an example, it’s easy to search on their website, it’s easy to look at the photo.
PS In UkrAvtoVAZ I see that the prices are also crap... A module like ours, only with a metal cover (for 1.5 engines) costs 2050 hryvnia shop.ladaukraine.com/prod...enzonasos/21101113900900/
You can buy it in Kharkov. where I bought mine for 1235 hryvnia
PS In DSK the inserts seem to be not Bosch ones, but Czech “Aisans” 3J, they seem to be worse than Bosch ones
In my factory there was a 1 in 1 Bosch, the same as in Utes, but after so many years they could have changed the supplier.
Well, from the factory, our cars should be equipped with such Utes, with Bosch inserts and precisely with the number 0 580 454 035, or SEPO modules (they also come inside with the same Bosch ones and some other inserts from another manufacturer, like Aisan) or same DSK. Having deeply delved into this topic, studying forums and topics for a long time, I realized that there is nothing better than the UTOS module inside with the original Bosch.
( 2 ratings, average 4.5 out of 5 )
Selecting new filter elements
To purchase fuel purification system parts for VAZ 1117-19 models, you need to know what they look like:
- The coarse filter is a flat mesh bag made of chemically resistant plastic that captures large particles of 80-100 microns. In the center of the element there is a plastic fitting that fits onto the counterpart of the gasoline pump.
- The fine filter is made in the form of a cylinder with two fittings at the ends. The body is made of metal or special plastic - polyamide, and there is filter paper inside it. It traps particles measuring 15-50 microns. The pipes are equipped with clamps for fastening fuel hoses.
There are no tricks in choosing a coarse mesh - the parts are made according to a single sample and cost from 30 to 45 rubles. The only caution: in order not to purchase a low-quality product or a fake, contact well-established stores. Although the fuel pump mesh costs a penny, it plays an important role in the fuel system: it catches large debris that can quickly clog the filter paper of the next cleaning element.
In operation, the plastic case is not inferior to the metal one in terms of reliability.
The material from which secondary filters are made does not play a big role
What is important is the contents of the “barrel”, which cannot be seen or touched. Therefore, there are only 3 selection criteria:
- correspondence between the body dimensions and the diameter of the fittings;
- the presence of plastic clamps;
- brand (manufacturer).
The mounting clamp on the Kalina is designed for a case diameter of 56 mm
There are many different fuel filters sold in stores, and not all of them are equipped with clamps (in other cars, the hoses can be secured with clamps). The part for “Kalina” must have latches, otherwise the tubes cannot be secured.
A plastic latch secures the hose to the filter fitting
In the countries of the former USSR, the following manufacturers of gasoline filters have proven themselves best:
- BOSCH;
- FRAM;
- FILTRON;
- SCT Germany;
- UFI.
At the moment, second-generation Kalina machines are equipped with fine filters made of polyamide. But users are not very complimentary about the factory spare parts: after disassembly, it was discovered that the paper “accordion” was poorly glued to the body. As a result, half of the fuel passed through the gas pipeline without filtering. At the same time, based on the practice of isolated cases, it cannot be unequivocally stated that metal filters are better than plastic ones.
Inside the filter element there is porous paper that traps small particles
Error P0441
Owners of Lada Kalina often note that during the operation of the car, error P0441 appears, indicating that the gasoline vapor purge system is not operating correctly (the air flow differs from the norm). The cause of this malfunction may be:
- inoperative adsorber valve;
- clogging of the air line from the control unit to the air filter;
- air leakage through connecting pipes.
What should not be immediately considered is the line from the gas tank to the adsorber; here, a breakdown does not in any way affect the readings of the computer or diagnostic scanner. Still, most often Evap-Solenoid fails; this is a characteristic “disease” on Kalina.
If the EVAP valve stops functioning normally, it is not at all necessary that the engine will lose power, the fuel pump will fail, and so on. Mainly due to problems with the control gear, exhaust toxicity increases, and the Check Engine on the dashboard periodically lights up. There are car owners who do not pay attention to the diagnostic warning light, continuing to operate the car, but do not experience any great inconvenience. And most often in such a case, gasoline consumption does not exceed the norm, the engine starts normally, and no serious problems occur in the fuel system.
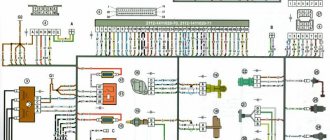
- Engine power system diagram
- 1 - separator
- 2 - filling pipe
- 3 - hose for supplying fuel vapors from the tank to the separator
- 4 — pipe for removing fuel vapors from the separator to the adsorber
- 5 - ventilation tube
- 6 - ventilation tube hose
- 7 - filling pipe hose
- 8 - fuel tank
- 9 - tee
- 10 - adsorber
- 11 — fuel supply tube to the fuel rail
- 12 — tube for supplying fuel vapors to the solenoid valve for purge the adsorber
- 13 - solenoid valve for purge adsorber
- 14 - fuel rail with injectors
- 15 - throttle assembly
- 16 — fuel supply hose to the tee
- 17 - fuel filter
- 18 — fuel supply hose to the fuel filter
- 19 - fuel module
Fuel is supplied from a tank installed under the bottom in the rear seat area. The fuel tank consists of two stamped steel parts welded together. The filling pipe is connected to the tank with a gas-resistant rubber hose. A ventilation tube is welded into the upper part of the filling pipe, connected to the tank with a plastic hose. The ventilation tube is used to remove air displaced from the tank when it is filled with fuel. The fuel tank ventilation inlet and outlet valves are built into the filler plug. The kalina fuel module, including a fuel pump, fuel pressure regulator and fuel level sensor, is installed in the fuel tank. For rough fuel cleaning, there is a strainer at the module inlet. To access the fuel module, there is a hatch in the bottom under the rear seat cushion.
The fuel level indicator sensor controls the operation of the dial gauge and signaling device located in the instrument cluster.
Fuel gauge sensor
Fuel pump - electric, submersible, rotary. The Lada Kalina fuel pump is turned on at the command of the electronic control unit (controller) when the ignition is turned on, through a relay. The pump creates a pressure in the system that exceeds the operating pressure in the fuel rail.