Every car enthusiast who values high-quality sound should know the basics of installing an audio system. Today, not all cars are equipped with radios, so drivers have to install the speakers themselves. How to connect speakers to a car radio, how to position the speakers correctly and what you need to know about wire insulation - read below.
What are the benefits of oval speakers?
Because this is an excellent ready-made solution that plays almost the entire range of frequencies audible to humans. The resulting sound has fairly good quality, power, and also contains good low frequencies. And these speakers are easy to install; they do not require any boxes or podiums. If you connect the ovals through an external amplifier, the sound can be improved even more.
Where did it start
In general, the idea was to install good expensive pancakes, such as Hertz, Pioneer and others. I went shopping, looked, and asked which ones cost how much. I decided to listen to it for testing in the car, I took several pieces: expensive and cheap. When listening, I didn’t notice a big difference in sound. I decided to make do with an inexpensive purchase, especially since cheap pancakes or ovals would work without an acoustic shelf.
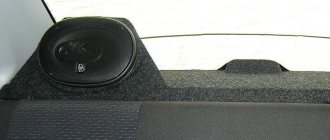
When I had done everything, I took a photo and decided to post it on this page for clarity. View from above, from below, separately one column from above and below.
Disadvantages of ovals or “pancakes”
What are the disadvantages of “pancakes”, which is why they are not used in good systems? The first drawback worth mentioning is the location, since these speakers are designed for shelf installation, they are always placed at the back. And the sound should come from the front. This is not an immutable rule, but music is always better perceived if it is heard from the front rather than from behind.
Because of this, by the way, it is impossible to listen to music normally if you have passengers sitting in the back. Because as soon as you turn up the volume control a little, they start complaining. This is not surprising, since the speakers are screaming right into their ears.
Also, “ovals” have all the disadvantages of coaxial acoustics. If a woofer, midrange, and tweeter are combined in one device, they will sound worse than component speakers due to design features, as well as the design and quality of the crossover.
Additional cooling
When I was figuring out how to connect the wires to the radio (I have a JVC), I noticed that the cooling radiator on the radio was small. It gets very hot even when working with low-power front speakers. Therefore, I added an additional homemade radiator, which I made from a piece of aluminum pipe from an old vacuum cleaner.
How to make your car smell nice.
There are no photographs here, as this can be made from any available material. There are many manufacturing options, the main thing is that the cooling surface is larger. Now I think that the radiator of the radio will not get very hot.
Correct installation of ovals
How to properly install such speakers? We must remember that they should be installed only in sedans, since in such a car the trunk is separated from the trunk. In hatchbacks, station wagons and other single-volume bodies, it is very difficult to achieve good sound from “ovals”, and it simply does not make sense to do this.
The installation site must be as rigid and durable as possible, without rattling or vibrating. If there were no holes in the shelf, you need to cut them to fit the mounting size of the speakers, if possible, between the metal stiffeners.
The metal of the shelf must be properly glued with vibration and noise insulation. To do this, you can use vibration-damping materials with a thickness of 3 or even 4 mm as the first layer and noise-insulating material as the second layer. Sound insulation must be selected according to thickness so that plastic cladding can be installed on top, if any.
The interior must be completely separated from the trunk, without cracks or gaps. You can also use plywood, which is cut to the size of the shelf and firmly installed on it. The plywood itself, for a more aesthetic appearance, can be covered with carpet, leatherette or painted.
The speakers should be installed by screwing them through plywood to metal. It is better to use bolts and nuts rather than self-tapping screws. If you don’t want to mess with plywood, you can use spacer rings made of the same plywood or MDF. The speakers must be fixed firmly, rigidly and without distortion.
After installation, you need to configure the sound correctly. When oval speakers are the only ones in the system, you can only slightly change the equalizer settings. If you also have front speakers, then it is advisable to shift the balance a little forward, thereby dragging the “scene” there.
It’s even better to make a “cut” on the radio, if it allows it, by forcing the oval speakers to play only low frequencies. In this case, this will allow you to achieve the effect of a subwoofer. If the head unit does not have an LPF, you can simply remove the midrange component and tweeter from the pancake, achieving the same result.
private photos
Bottom view of the speaker
I bought simple Chinese speakers Erisson, the brand is visible in the photo. There is nothing difficult about installation. The purchased speakers come with a special stencil. It allows you to cut the installation hole. There are holes on it for cutting - I placed them, outlined them with a pencil, and carefully cut them out with a sharp knife or cutter.
The sound is generally not bad, maybe the durability of the speakers will be less than that of expensive models, then I will replace them with new ones more often, that’s the whole problem. But I bought it inexpensively, you won’t believe it – 850 rubles per pair! This is because they are Chinese.
By the way, I didn’t say that I bought the speakers in an ordinary small store in our Siberian town. I didn’t order them anywhere, neither in China nor in other online stores.
Which ones are better to put
The choice of speakers for a car radio should take into account the needs of the car owner. There are several options. The appropriate location of the device will depend on the size and type (for example, it is better to place speakers in the door or on the back shelf).
- Home speakers. Such devices must be connected to the dashboard via a digital input.
- Portable speaker. It is most often connected via Bluetooth.
- Powerful acoustic speakers for cars. For demanding audiophiles, these are the best speakers that provide spacious, clear sound.
How to strengthen
During installation, it is necessary to carefully strengthen the speakers, since the sound quality and duration of operation of the device directly depends on this.
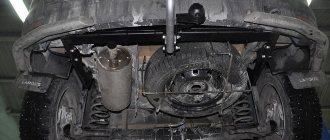
Installation of rear speakers VAZ 2114, VAZ 2115, VAZ 2113, Lada Samara 2
We install the rear speakers in the places provided by the car manufacturer in the right and left supports of the trunk shelf of the VAZ 2114. The diameter of the rear speakers is the same as the front ones - 130 mm. The rear seat back can be removed for convenience.
The length of the wires included in the speaker installation kit is usually not enough. Therefore, before installation it is necessary to purchase wires of the required length. Special two-core wires for speaker systems are available for sale. To connect each speaker you will need about five meters of such wire. If the wires do not have lugs to connect to the speaker terminals, you must install the lugs yourself (see Front speakers of the audio system).
In the cabin, remove the rear shelf from the right and left supports, after first removing the plastic pistons securing the shelf to the supports. To remove the piston, you must first remove the plastic lock from it by prying it off with a narrow-bladed screwdriver.
To install the speaker into the shelf support, you need to remove the support. The support is attached with a self-tapping screw to a bracket secured to the rear suspension strut cup. In addition, the support is attached with a plastic piston to the upholstery of the rear roof pillar of the VAZ 2113. Thus, to remove the support for the rear parcel shelf, it is necessary to unscrew one screw and remove one piston.
Each of the supports has four bosses with holes for self-tapping screws for mounting the rear speakers. You can use the speaker mounting option offered by the manufacturer. However, with this installation, a fairly large gap remains between the speaker diffuser frame and the inner surface of the rear shelf support. Thus, the space behind the diffuser has no interface with the space in front of it. Under such conditions, a so-called acoustic short circuit can occur. It does not pose a danger to humans, but the sound quality will be reduced. To solve the problem, it is necessary to isolate the area above the diffuser from the area below it, that is, eliminate the gap between the diffuser frame and the inner surface of the shelf support.
Website about joints
I was tired of the constant rattling of the rear shelf and so I decided to get confused and made a new shelf with my own hands
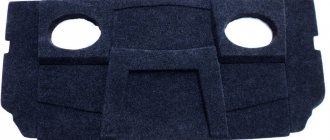
and so we take two pieces of plywood like this...
and cut out something like this. In order to cut it out, we take the old shelf and lay it on top of the plywood that is above in the photo, outline it with a marker and use a jigsaw. I made two such templates, the second one is about 1 cm narrower, along a curved arc that is located on the glass side. I did this because there will be fewer adjustments in the future
this is how it turns out, two cut pieces of plywood
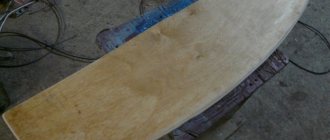
try it on. We make the smooth edge of the plywood flush with the reinforcing strut of the body. if it sticks out, we cut off the edge of the glass, but don’t get carried away so as not to overdo it
After making adjustments on site, we take the first measurement from below, insulation on it, and the second cut plywood on top. We mark, use a thin drill to make holes so that the self-tapping screw fits better, and tighten them tightly in a circle. This is done so that it is stiffer and does not rattle
marking the places for the speakers...
but here it’s up to everyone... I decided to paint on both sides. This is the outside side, that is, from the trunk. and one more thing, if you decide to paint, then before painting you still need to go through the screws; in the next photo you can see exactly where. We pass the edges with sandpaper and sand until there are no sharp edges
Read also: Electric chair massager
Here you can see where to go with the screws. inner side, from the salon
After the paint has dried, we attach the shelves so that they do not rattle like the factory ones and sit rigidly. unfortunately I forgot to take a photo. I made them this way: when we remove the seats, from the trunk side we see three lugs on the body amplifier, put the shelf in its place and make marks so that the bolt that will be the mount goes into this lug, this is the front mount. As for the rear, we open the trunk and climb into it)))) what do we do next, and then we see under the rear window there are two protrusions on the left and right, so, we make marks along the edge of these protrusions and go together with the shelf to make fastenings, I bent I put it on the screws from the tin, after which we put the shelf back and climb into the trunk, there are holes in the protrusions, we make marks on the tin, we make marks, the fastenings are ready. All that remains is to screw it on. I almost forgot, it is advisable to take the front bolts with a screwdriver head, insert them into place and tighten them, since then you will not secure the shelf firmly. According to the fastenings, everything seems to be all right. The writing seems scary, but in reality there is nothing complicated.
after the fastenings are ready, we take the insulation and lay it in three layers...
...the first and third layers are white. This is door trim insulation, you will have to buy it at a hardware store if you want to cover the shelf with leatherette, and the middle layer is made of ordinary insulation with glitter. We also buy it from the construction store.
we cover it with leatherette and put the speakers in place.
We put the shelf in its place and secure it. the resulting hole will be repaired later
We measure the holes, cut out one layer of plywood, then everything is the same as with a shelf, insulation in two layers and upholstery with leatherette. everything is secured with a construction stapler. fastened with three self-tapping screws. you can see in the next photo
here is the final result. good luck to those who bother to do the same as me
Acoustic shelf VAZ 2110
The acoustic shelf of the VAZ 2110 is made with your own hands if the standard one is not satisfactory for various reasons. Firstly, the factory shelf cannot in any way improve the quality of car audio that the owner so desires. Secondly, the factory shelf does not make it possible to install speakers with a wider diameter. On the VAZ 2110, the acoustic shelf can be made independently without any problems, although it can also be purchased at some store.
Do you need an amplifier?
We will not go into the features of amplifiers. Let's just consider what it gives and whether it is possible to do without it. An amplifier is primarily needed to increase the output power of the head unit. The inscriptions on the box of the 4x50 W radio tape recorder are true, but only partially; the manufacturer in bright advertising shows the peak power of the device, but in fact there are three powers - nominal, maximum and peak.
Peak power is what the tape recorder is capable of producing at the limit of its capabilities, for a short period of time, with sensitive overheating of the built-in amplifier. We are interested in the rated power - this is something between peak and idle during a song change, the power that the radio delivers most of the time.
The power ratio between the speakers and the amplifier will allow you to choose them correctly for each other. The rated power of the radio is significantly lower than the peak power and an amplifier is required for the full sound of good speakers. But speakers also have their own maximum power, and a powerful amplifier will most likely burn out weak acoustics very quickly. For car acoustics, a 30% power reserve in front of the amplifier is preferable. For example, if the amplifier provides 100 W per channel, then speakers are desirable at 140 W.
It turns out that a good head unit, for example a top-end Pioneer, will handle medium-power speakers without an amplifier, but if you need to make powerful speakers play, you will have to install an amplifier.
What to do?
The following article outlines the basic principles of frequency control. This is the starting point for your journey into the wonderful world of equalizers, but of course it is not dogma. These recommendations will save you time searching for the frequencies you need to highlight the positive properties of various musical instruments.
The operating algorithm is as follows. To begin, turn on the “solo” mode on the track you are working with. Most sound engineers start building their mix around the drums and gradually work their way up through the frequency range (kick, snare, toms, hi-hat, overheads). Every instrument has a specific frequency band in which it sounds and resonates, so if you're miking a kick drum, start at the bottom.
Set up the optimal low end and go on the attack. Very often, after adjusting the sound of a kick drum, some parasitic overtones creep out, such as ringing or hum, even though your low end is excellent and the attack is great. Your next step is to cut out the parasites with a narrow-pass filter. Once you feel comfortable with the sound of the kick drum, mute the track and move on to the next instrument.
Take your time with equalization. The painstaking work will bear fruit, the sound will become more intelligible and clearer. Each instrument will take its place and shine in the mix. Here are some more useful tips:
Read more: Adjusting headlights with your own hands: subtleties and nuances
Modification of the factory acoustic shelf
To tune the rear shelf you will need.
- Sheet of plywood (thickness - 20 mm, width - 33-34 cm).
- Jigsaw.
- Epoxy adhesive.
- Wood putty.
- Knife.
- Self-tapping screws.
- Sandpaper.
- Carpet.
- Construction stapler.
The acoustic shelf of the VAZ 2114 consists of two layers. First you need to cut off the part of the shelf where the speakers are installed using a sharp knife. Make a template for the part by attaching it to a sheet of plywood. Cut along the outlined contours with a jigsaw. Attach with epoxy glue to the back of the shelf part. The resulting protrusion of the plywood part above the part of the “original” shelf can be removed.
To do this, you need to cut a piece of plywood 2 mm thick in the shape of the cut part of the shelf and attach it to 20 mm plywood. The remaining roughness is removed with wood putty and treated with sandpaper. The finished part of the shelf is covered with carpet: first glue is applied, then the fabric is secured with a construction stapler.
Modified in this way, the rear shelf avoids sound distortion from speaker vibration, since the speakers are mounted on a harder surface and more tightly. Soundproofing the rear shelf will help achieve high-quality acoustics. To carry out this “operation” you will need.
- Vibration-absorbing material for the first layer (Vizomat, Vibroblast, Bimast) - 1 sheet.
- Sound-absorbing material (Bitomast, Accent) - 1 m².
- A smoothing roller (metal) or a round, hard object.
- Technical hair dryer (the power of a regular hair dryer may not be enough for long-term operation).
We cut a sheet of vibration-absorbing material into pieces of the required size, heat it with a hairdryer and apply it to the back shelf, smoothing it with a hard roller. Paste with Vizomat or Vibroplast from 50 to 80% of the area, Bimast - from 40 to 60%. Sound-absorbing material must cover 100% of the surface. When covering with materials, it is advisable to prevent the formation of air bubbles.
Review of the store shelf for Kalina hatchback
Shelf acoustic viburnum hatchback
Popular acoustic shelf with sides. It greatly improves the sound quality compared to the standard factory one. Let's look at the positive features of this shelf:
- It is made of plywood and covered with carpet. Thanks to this, vibration is significantly reduced;
- An acoustic shelf of this type with sidewalls is also an excellent functional detail that allows you to install speakers of any size, even heavy ones, into your car.
- An acoustic shelf with sides is an excellent solution for a music lover. It will give you the opportunity to enjoy all the nuances of musical sound;
- This shelf also makes it possible to build the right acoustic stage;
- Noises and squeaks, as well as other interference are eliminated;
- Thanks to the beautiful appearance of the shelf, the appearance of the interior is also improved. The acoustic shelf harmonizes perfectly with the interior;
- You can place large speakers on this shelf.
Acoustics for VAZ cars
In a word, this is a good shelf made of high quality materials (mainly MDF). It is covered with carpet, and instead of plastic sidewalls, strong and reliable wooden elements are installed.
Characteristics
| Type | Acoustic shelf |
| Purpose | Cars with hatchback body type (Lada Kalina) |
| Shelf material | MDF/plywood |
| Speaker size, cm | 13/16/20 |
| Possibility of hidden installation | Eat |
| Availability of sidewalls | Eat |
| Price | 1000 rub. |
Number of speakers in the car
Should you put 2 speakers or 4 speakers in your car, or maybe 6? The purity of sound is determined by the quality of the speakers, not their quantity. Many car owners are limited to two mid-frequency component speakers in the front doors and tweeters on the pillars, while a subwoofer is placed in the back, which plays low frequencies. Thus, the entire spectrum of sound in the car is revealed.
Also popular is the option of installing 4 coaxial speakers, 2-3 way in the front doors, 3-4 way in the rear parcel shelf. The number of speakers that can be installed is limited only by the size of the car and the desire of its owner. At various car audio competitions you can see cars with dozens of speakers installed throughout the car. 2 speakers in the front doors may well be enough for you, it all depends on your musical preferences.
Connection
When replacing speakers or installing new ones, pay attention to the quality and condition of the wiring. Thin wires with twisted connections are not capable of transmitting sound efficiently and without loss. There is special wiring for transmitting the audio signal - it is a multi-core copper or silver shielded cable.
For clear and high-quality sound, installation of such wiring is necessary. Pulling new wires to replace the old ones is quite simple; tie a new cable to the end of the old wiring and carefully pull it through the other end of the wire. During the connection process, it is very important not to confuse the polarity; the wide terminal on the speaker is the positive contact.
When connecting speakers through an amplifier, the wiring from the radio is stretched to the location of the amplifier, and from it diverges to the speakers. The amplifier's power wires should not be pulled together with the audio wiring; it is advisable to space them away from each other, this way you can avoid interference from pickup. The amplifier heats up during operation; free space is required for its normal cooling.
It is important not to forget to connect the audio system through a fuse, the power of which is calculated using the formula “Output power / 12 volts = number of amps of the fuse.” For example, 4 speakers are installed, 40 W each /12 = 13.3, we install a 15A fuse.
Connection diagram
After the cables have been laid and labeled (if necessary), you should proceed to connecting the acoustics to the head unit. To connect the speakers to the car radio, make sure that there is no short circuit to the body. To do this, check the wiring using a multimeter.
The next step is to check the impedance of the speakers themselves. The norm is 4 ohms. If there are no discrepancies with these parameters, you can begin connecting the cable. Each receiver should include a circuit diagram, so installation will not take much time.
The easiest way to connect the speakers to the radio in your car is using ISO connectors. If they are not provided in the standard radio, you can purchase a separate ISO adapter. With its help, you can quickly replace devices in the future.
Front
If the wires have multi-colored insulation, connecting them will be easy. The front speakers have light-colored cables:
If there are no markings, you can check the speakers as follows. A finger battery (AA or AAA) is connected to each wire for a short time. The speaker connected to this wire will begin to make a squeaking sound. This will allow you to connect the front speakers correctly.
When the diffuser moves upward, positive polarity can be determined.
Rear
When connecting the speakers to the radio, you need to remember: the rear speaker cables have dark insulation:
- purple (for the right device);
- green (for the left).
If markings are not provided, you can, as in the case of the front pair, check by connecting to a AA battery. Each wire must be correctly connected from the speakers to the head unit into the connector provided for this purpose. After this, the connection of the rear speakers to the radio can be considered complete.
Home speakers
Some car owners are wondering how to install pop or household speakers from a music center. Theoretically, such a connection of speakers is possible, but there are a number of nuances.
- The quality of the sound produced will be lower than with car speakers. This is explained by the fact that household speakers are designed for use in open spaces.
- The voltage on these devices is different from the voltage on car devices, so a conversion will be required.
With an active system on the power supply board, it is necessary to find the points at which voltage is supplied to the amplifier. In these places the device is powered by a battery. As for the connection diagram to the head unit, it can be different:
- directly from the radio;
- through a power amplifier.
Amplifier
Connecting an amplifier will increase the volume and sound quality. A cable from the head unit and a power wire (it comes from the battery) are connected to the amplifier. The next step is connecting the speakers. When using a bridge circuit, one channel is connected to “-”, the other to the load terminal “+”.
How to connect 6 speakers
Experts emphasize the fact that the sound quality in a car largely depends on the power and capabilities of the speakers in the car, and not on their quantity. Meanwhile, many car enthusiasts are wondering whether it is possible to connect 3 or 4 pairs of speakers to the radio.
To solve this problem you will need to purchase an amplifier with 4 outputs.
Portable speaker
Instead of a radio, you can use a portable speaker that connects to a smartphone or any other gadget via Bluetooth. This device is widely used among car owners. The list of its advantages includes a relatively low cost, no need to connect to the car system, and the ability to use it not only in the car, but also in any other place.
The only drawback of a portable speaker is that the sound quality often does not reach the level of specialized speaker systems consisting of an amplifier, speakers and subwoofers.
So, the time has come to replace the speakers in the car. How to do this, and what do you need to know for this? You definitely need to understand the number of speakers you are replacing, their size, the power that the tape recorder or amplifier will provide (when installed), and the desired power rating of the speakers. It would also be good to understand where to connect which ones.
How to connect?
Where and how to install
Before you begin, you should select a suitable installation location. Some car models have niches for placing speakers. This fact makes the task easier. If the location for the speakers is not prepared by the manufacturer, then you need to choose it yourself.
Are you a car driver?! Then you can take this simple test and find out. Go to test »
It is recommended to install the front pair of speakers in the car on the outermost sections of the dashboard. Another suitable option is the front door housing. In this case, not only high sound quality is achieved, but also the most reliable fixation of the device. To install speakers in doors, measure the diameter of the speaker and cut a hole for it in the door trim.
The rear pair of speakers is most often placed on the floor in the luggage compartment. However, it will require some work to achieve good sound. The standard trunk shelf is removed, and an acoustic podium with speakers is installed in its place.
Preparatory work
So, if the owner has firmly decided to upgrade on his own, then we prepare the following:
- set of automotive tools;
- new shelf, insert;
- speakers (optional);
- blocks with electrical wires for connecting to the central power circuit;
- other components at the discretion of the owner.
The shelf on the Granta sedan is located behind the rear row of seats. By default, the design does not have holes for speakers. This is precisely the stumbling block for many owners.
Related link:
Replacing the ignition module on the Lada Grant. Tips from repair experts