After purchasing a car, it is often necessary to modify some of its components, elements, and mechanisms. The reasons are the most banal: upgrading the audio system, installing additional speakers, a subwoofer, etc.
Standard designs do not allow placing a row outside the factory components. Depending on the complexity of the task, we carry out the Lada Granta upgrade both independently and with the help of workers from a specialized studio.
Shelf material
The standard design is made of impact-resistant polymer material.
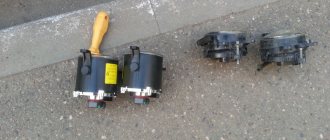
A tuned version of a shelf made of wooden inserts - supports, covered with felt fabric, which also serves as a noise absorber.
At the customer's request, the shelf for acoustic speakers can be made of special wood. This is practiced if you want to achieve an “ideal” sound. Obviously, the cost is several times more expensive than analogues.
How to install an audio system on a Lada: features
The standard equipment of the Lada Granta consists of elementary speakers with average sound quality. Accordingly, there is a desire to install something more serious in your car. In fact, this car brand has good preparation for a really high-quality audio system. The car has the necessary wiring for the car radio and beepers.
Before making the connection, disconnect the power from the vehicle.
In order to do the installation yourself, you should have:
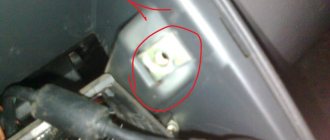
So, the work is carried out in several stages. Since the audio system is connected to wires, you should first turn off the power to the car. Otherwise, there is a risk of getting burned and receiving a strong electric shock. De-energizing occurs by removing the terminals with the “-” sign from the power supply. You should not forget about the antenna, which is most often installed in the right corner at the top of the windshield. Therefore, you should make room for it in advance.
Correctly the electrical wiring is laid under the car's dashboard and all the way to the glove compartment. You should also remove the plastic trim located on the glass on the right side. It is recommended to use modern antennas, as they have a self-adhesive base, which means the installation process will be much easier. But it should be remembered that any glue does not like dirty surfaces. Therefore, the future location of the antenna must be thoroughly cleaned and degreased.
Next comes the installation of the main device holder. First you need to check whether the car radio is working well, for which it turns on and tunes to any radio wave.
Then comes the installation of the speakers. They can be installed on car doors, since the main speakers will be located at the back. For this there are holes with a diameter of 30 cm.
source
Preparatory work
So, if the owner has firmly decided to upgrade on his own, then we prepare the following:
- set of automotive tools;
- new shelf, insert;
- speakers (optional);
- blocks with electrical wires for connecting to the central power circuit;
- other components at the discretion of the owner.
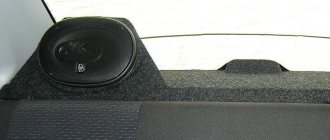
The shelf on the Granta sedan is located behind the rear row of seats. By default, the design does not have holes for speakers. This is precisely the stumbling block for many owners.
Related link:
Replacing the ignition module on the Lada Grant. Tips from repair experts
General information about music in Grant
In this section, we will consider general non-professional points about music in the Lada Granta.
Installing music
If you have a VAZ 2190 in the basic configuration (or Norma) with audio preparation, then installing music will entail the following steps:
- Removing the radio cover - on the back side there are ISO connectors for power and speaker wires. You will have to run the wires to the rear speakers yourself if you plan to install an acoustic shelf, since from the factory the wires are routed only to the doors;
- Installation of a 1-DIN radio (for 2-DIN you will have to farm, cutting out a jumper in the panel and looking for a suitable frame);
- Finding and connecting the plug of the pre-installed antenna - often the antenna wire on the roof is lost under the ceiling trim and it turns out to be easier to install the antenna separately than to find the factory cable;
- Pulling wires into the trunk to connect an amplifier, subwoofer and speakers installed in an acoustic shelf.
- To install the amplifier, you will also need a separate power cable from the engine compartment directly from the battery terminal through a fuse.
Removing the jumper in the panel cladding is mandatory when installing a 2-DIN GU.
If your car does not have audio preparation, you will have to separate the power wires for the radio and the speaker wires in the door.
What kind of acoustics to put in Granta
Common budget music option:
- radio tape recorder within 5000 rubles with the ability to adjust the equalizer;
- 16 cm component speakers with tweeters at the front;
- acoustic shelf with speakers 6*9;
- amplifier with subwoofer in trunk.
Let's look at an example of such a configuration with a price tag in the table (the calculation is for ordinary people, not audiophiles) based on Pioneer devices:
| Example of a Pioneer device | Average price tag in rubles | |
| Head unit (radio) | DEH-S101UB | 4000 |
| Front 16cm acoustics | TS-G1733i | 2000 |
| Acoustic shelf | 1500 | |
| 6*9 “pancakes” | TS-R6951S | 2200 |
| Amplifier 2-channel | GM-A3702 | 4300 |
| Passive subwoofer in a box | TS-WX305B | 5200 |
| Subwoofer installation kit | 1500 |
As a result, we get budget sound in the region of 20 thousand. If we consider professional head units, premium-segment speakers, installation of custom podiums and other delights, the price tag can easily jump over a hundred thousand, amounting to a third of the cost of the car itself.
The choice of podium depends on the type of windows, budget and number of speakers.
Podiums in the front doors
We will not describe the technology for making podiums with our own hands. Next is a selection from various resources for ready-made podiums and manuals for self-production.
- Here is a link to a store with ready-made options and prices. It's not advertising that's a source of inspiration.
- Here is a photo report on self-production with comments.
- This link is just a photo report without comments.
Professional acoustics
For car audio fans who are ready to invest large amounts of money in Granta, we have selected a couple of bright videos. Look what you can build on the Lada base and look decent in the area and at local car audio competitions. Enjoy.
The process of removing and installing a shelf
- We place the car on a flat platform, open the rear row of doors to provide full access to the shelf;
- lower the backrest of the rear row of seats;
- unfasten the seat belt fastenings, having first unscrewed the fastening bolts;
- unscrew the fasteners for the child seat;
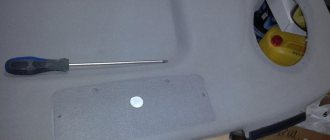
- use a screwdriver to pry up three plastic latches;
- pull it towards you and remove the plastic shelf.
Finally, we install the new one and assemble the components in the reverse order.
Installing speakers in Granta rear doors
The procedure for working with the rear doors is identical to the front ones.
An important difference: homemade spacers are not required here. The plant produces a set of special mounts for installing 13 cm speakers in the rear doors
Articles for ordering online:
| Speaker Mount - Rear Left | 21907901033 |
| Speaker Mount - Rear Right | 21907901032 |
| Rear left column trim | 21906202095 |
| Rear right column trim | 21906202094 |
| Trim for front left door | 21906102097 |
| Trim for front right door | 21906102096 |
Installation sequence:
- Disassemble the door;
- Cut a hole in the door card for the lining;
- Install the speaker mount on the door;
- Replace the standard audio terminals with normal ones;
- Connect the wires to the column, secure it;
- Install the trim and assemble the door.
Some points of sound insulation
You can increase the level of noise and vibration insulation in various ways. If we are talking about a standard design, then they practice pasting with felt fabric on the outside / underneath.
When it comes to a liftback shelf, it is already soundproofed from the start; there is no need for additional noise reduction.
We’ll look at how to remove the Grant liftback trunk shelf below.
When installing custom shelves, they are soundproofed by default during the manufacturing process.
General information about music in Grant
In this section, we will consider general non-professional points about music in the Lada Granta.
Installing music
If you have a VAZ 2190 in the basic configuration (or Norma) with audio preparation, then installing music will entail the following steps:
- Removing the radio cover - on the back side there are ISO connectors for power and speaker wires. You will have to run the wires to the rear speakers yourself if you plan to install an acoustic shelf, since from the factory the wires are routed only to the doors;
- Installation of a 1-DIN radio (for 2-DIN you will have to farm, cutting out a jumper in the panel and looking for a suitable frame);
- Finding and connecting the plug of the pre-installed antenna - often the antenna wire on the roof is lost under the ceiling trim and it turns out to be easier to install the antenna separately than to find the factory cable;
- Pulling wires into the trunk to connect an amplifier, subwoofer and speakers installed in an acoustic shelf.
- To install the amplifier, you will also need a separate power cable from the engine compartment directly from the battery terminal through a fuse.
Removing the jumper in the panel trim is mandatory when installing a 2-DIN GU. Installing an acoustic shelf entails dismantling it behind the back of the rear seat. The non-standard shelf will cover the ISOFIX mounts!
If your car does not have audio preparation, you will have to separate the power wires for the radio and the speaker wires in the door.
What kind of acoustics to put in Granta
Common budget music option:
- radio tape recorder within 5000 rubles with the ability to adjust the equalizer;
- 16 cm component speakers with tweeters at the front;
- acoustic shelf with speakers 6*9;
- amplifier with subwoofer in trunk.
Let's look at an example of such a configuration with a price tag in the table (the calculation is for ordinary people, not audiophiles) based on Pioneer devices:
| Example of a Pioneer device | Average price tag in rubles | |
| Head unit (radio) | DEH-S101UB | 4000 |
| Front 16cm acoustics | TS-G1733i | 2000 |
| Acoustic shelf | 1500 | |
| 6*9 “pancakes” | TS-R6951S | 2200 |
| Amplifier 2-channel | GM-A3702 | 4300 |
| Passive subwoofer in a box | TS-WX305B | 5200 |
| Subwoofer installation kit | 1500 |
As a result, we get budget sound in the region of 20 thousand. If we consider professional head units, premium-segment speakers, installation of custom podiums and other delights, the price tag can easily jump over a hundred thousand, amounting to a third of the cost of the car itself.
The choice of podium depends on the type of windows, budget and number of speakers.
Podiums in the front doors
We will not describe the technology for making podiums with our own hands. Next is a selection from various resources for ready-made podiums and manuals for self-production.
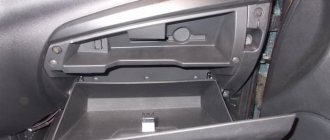
Please note that most of the podiums in the front right doors interfere with the opening of the glove compartment.
- Here is a link to a store with ready-made options and prices. It's not advertising that's a source of inspiration.
- Here is a photo report on self-production with comments.
- This link is just a photo report without comments.
Professional acoustics
For car audio fans who are ready to invest large amounts of money in Granta, we have selected a couple of bright videos. Look what you can build on the Lada base and look decent in the area and at local car audio competitions. Enjoy.
Reviews
| № | Positive |
| 1. | Victor, 45 years old: the car is in its second year, the shelf is not deformed, fits tightly, does not make noise, does not creak. |
| 2. | Konstantin, 51 years old: a few months ago there was an accident, the impact hit the rear, and the glass was damaged. I thought it moved the shelf, but it turned out to be in vain, it didn’t even deform. Good quality. |
| 3. | Vitaly, 37 years old: I work as a foreman in a service station, I have seen many VAZ models, but in Grant the quality of the rear shelf is good. It’s a pity that Priora cannot “boast” of such things. |
| 4. | Alexander, 39 years old: I’ve been working as a salesman in a store for the second year, I noticed that Granta shelves are bought extremely rarely, unlike previous models. |
| 5. | Maxim, 41 years old: I bought the car since it was released in 2011, during this time I changed a few things, but I didn’t touch the interior, it doesn’t creak or knock. |
| 6. | Valery, 44 years old: plastic inserts are of good quality, I’ve been using the car for three years now, I have no complaints about the interior or inserts. |
| Negative | |
| 1. | Mark, 38 years old: due to the fact that the car was often parked in the sun, the rear parcel shelf was deformed, constantly knocking, and occasionally creaking. I am dissatisfied with the quality, because the plastic should be adapted to temperature changes. |
| 2. | Vyacheslav, 47 years old: after five years of using the car, the plastic inserts in the interior began to knock on uneven surfaces, and a creaking sound formed. In general, the manufacturer saved on quality. |
| 3. | Mikhail, 37 years old: I was dissatisfied with the quality of the standard shelf, I had to replace it with a Mercedes-Benz one, it fits exactly. |
Related link:
Replacing the front door handle on a Lada Grant. Self-adjustment of the lock gap
Conclusion Removing the rear shelf on a Lada Granta is not at all difficult, it will take ten minutes of free time and you’re done.
Installing a tuned version of the insert is also not difficult for the average driver. If you don’t have free time, you can always contact a specialist service center. Now the owner knows exactly how to remove the Grant shelf with his own hands.
Choosing an acoustic shelf for the Lada Granta brand
When purchasing such elements for a car, you need to understand that not only the appearance of the structure is important, but also its quality. Therefore, it is worth finding out in advance more information about different manufacturers and their products.
LADA Granta
In terms of price range, shelves with plywood reinforcements are popular. Most auto stores have these acoustic shelves in stock. Along with the main elements, you need to purchase special wires to connect the system. They are sold separately.
Acoustic shelf
Many people focus on the practical appearance of the top covering, choosing the most attractive options. Faux leather or carpet looks beautiful in the cabin. Such materials are easy to clean.
Acoustic shelf models vary. Their designs, appearance, and materials differ. And speaker pedestals can be either protrusions or holes. When choosing, it is recommended to choose the modification that will match the interior color and fit well in all respects.
Speaker shelf
How to remove the rear parcel shelf on a Grant sedan
After purchasing a car, it is often necessary to modify some of its components, elements, and mechanisms. The reasons are the most banal: upgrading the audio system, installing additional speakers, a subwoofer, etc.
Standard designs do not allow placing a row outside the factory components. Depending on the complexity of the task, we carry out the Lada Granta upgrade both independently and with the help of workers from a specialized studio.
Making a shelf with your own hands
Ready-made panel for high-quality music
Auto mechanics recommend installing a wooden shelf for acoustics in the Lada Grant. This product significantly improves sound quality by using the trunk volume as an acoustic closed box. In this case, the speakers are installed on top, and a decorative grille is mounted on them. The brake light can be removed from the car's standard shelf.
Many Lada Granta car owners make their own acoustic shelf. For this you will need:
First of all, the ceiling of the product is made. First, the Lada shelf is outlined on cardboard, then the diagram is transferred to plywood. The side that will be located near the window is cut out obliquely, its ends are ground down.
Installation features
It is not recommended to install speakers in the standard shelves of the Lada Granta interior. Because, regardless of manufacturer and quality, factory standard shelves are not designed to hold a ton of speakers. Once the holes are cut and the acoustic elements are installed, the shelf will quickly sag and the entire sound system will deteriorate.
Shelf Lada Granta
The acoustic shelf of the Lada Granta liftback differs from the shelf for a sedan in shape. This is worth considering when purchasing a unit. Also, you need to carefully study the tips and instructions written in the documentation for the elements. Even better, before installation, watch a video from specialists in replacing shelves in Lada Granta.
You should have a good understanding of wires and their connection to the radio. And also, find out in detail how to hide them inside the cabin.
Beginning car owners, when installing sound, will learn for the first time about such a device as the Lada Granta acoustic shelf. What is this device, what functions does it perform, and most importantly, how to make it yourself?
Audio system installation
When buying a Lada Granta, a car enthusiast cannot always determine whether the vehicle is prepared for the subsequent installation of an audio system. Typically, such a system includes simple speakers with average sound quality. However, this option rarely satisfies drivers.
Lada Granta is quite well prepared for the installation of modern audio systems. This preparation includes having the necessary wiring to connect the car radio and speakers. To carry out this work, you will need a screwdriver, bits, edges, a knife and insulating tape.
Before installing the acoustics, you need to turn off the power to the vehicle. To do this, remove the minus terminal from the power supply. Please note that the antenna is often installed in the upper right corner of the windshield. A place for it is cleared in advance.
The electrical wiring must be routed under the dashboard to the glove compartment. There is a small plastic trim on the right side of the glass that will need to be turned off. The modern antenna is equipped with an excellent self-adhesive panel that can be easily and quickly mounted to the windshield. In order for the antenna surface to bond well with the glass, you will need to degrease it. A special tool is used for this. A similar technique is used when installing speaker systems on various brands of cars.
The next step involves installing the main instrument holder. Before installation, the serviceability of the radio is checked. To do this, you need to turn it on and listen to the radio station.
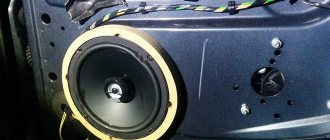
To ensure the speakers are installed correctly, first remove the door trim. To do this, glue a special ESP connector located on the back side. The manufacturer took care of the presence of an opening with a diameter of 30 cm for the speaker. Speakers are installed in these places. The final stage is to turn on the minus terminal and tighten the screws.
The final stage
Note. The life expectancy of the speakers directly depends on the density and thickness of the protection. The less chance of large debris getting in and causing mechanical damage to the speakers, the better. Be sure to check that they are not catching on the seats and headrests.
- We fasten the speakers to the shelf with self-tapping screws, connect the wires with a screwdriver;
- We install the finished shelf in place and fasten it with bolts.
Advice. You should definitely make sure that the standard ventilation holes are open, otherwise the window will quickly fog up.
Acoustic shelf installed
Operation completed! We take photos, shoot videos, share instructions with friends, and enjoy the results of the work done with our own hands.