In head optics, low beam lamps most often have to be replaced. For a Lada Kalina car, the low beam lamp is a halogen lamp with an “H7” socket, the power of which is 55 watts (no more). Osram bulbs may come from the factory, but others will do. After replacement, the filament will occupy a new position, and the headlight adjustment may be lost. So, checking the settings, and, if necessary, adjusting the headlights is carried out immediately after replacing the lamps, which on the Lada Kalina is done without dismantling the headlight unit.
Step-by-step replacement instructions
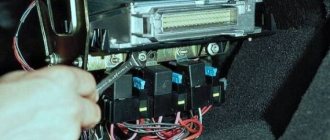
Each H7 standard bulb has an iron base, which is pressed to the headlamp with a wire clamp. To bend this bracket, just get close to the plane of the headlight from behind. Let's open the hood and see what exactly will bother us.
Engine compartment of Kalina-2 (VAZ-2192, 2194)
Behind the headlight on the right is a washer reservoir. It is dismantled like this: disconnect the electric motor terminals, tighten the plug harder, find one nut and one fastening bolt. The fastening elements are unscrewed with a 10mm wrench, then the tank is placed on the engine. Next we could look at how to remove the headlight on Kalina-2, but in this case this is not required.
Before performing any manipulations with electrical equipment, always disconnect the negative terminal of the battery. It is better to connect this terminal last (before closing the hood). Be careful.
Replacement sequence:
- Remove the rubber cover covering the low beam lamp compartment;
- Disconnect both terminals from the lamp contacts;
- The fastening bracket is removed from the grooves by first pressing on it, then the bracket is moved to the side;
- They take out the lamp, install a new one in its place, and return the bracket to its place.
Next, perform steps “2” and “1” in reverse order. The connection diagram is not important - there are only two contacts, and both go to the filament. Now, if we connected LEDs, then everything would look more complicated.
The bracket presses the cartridge to the plane of the headlight
When installing a halogen light source, you must remember: the surface of the lamp glass must be perfectly clean. Do not allow grease marks to remain on the flask. Installation is carried out using only cotton gloves. The glass of the flask is cleaned with industrial alcohol or Secunda.
DIY car repair and maintenance
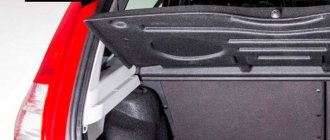
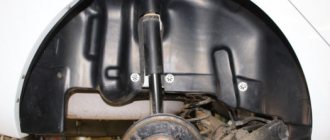
This is us showing the top where the bumper is attached, also four self-tapping screws for a shaped screwdriver - everything is convenient and fast.
2 self-tapping screws - all for a shaped screwdriver - are located at the bottom of the amplifier.
There are two 10mm bolts at the bottom on both sides of the radiator frame, as we can see, they are marked with red circles - we unscrew everything very conveniently here with a curly screwdriver.
And here there are two ten-point bolts, and one self-tapping screw, the same thing for a figured screwdriver, attached to the wing, since everything is sufficiently provided for, no great intelligence is required.
Question and answer: what should not be allowed under any circumstances
Q: What happens if you buy lamps with a base other than “H7”?
A: It will not be possible to install lamps in a standard headlight.
Q: If I use more than 55 watts of power, will this cause overheating?
A: Excessive power leads to the fact that the fuse in the low beam lamp circuit burns out. A separate fuse is used for each of the lamps, so it will not be possible to “deceive” the automation.
Q: Are halogens afraid of power surges?
A: For incandescent lamps, excess voltage is a harmful factor. In the case of using halogen lamps, there will be two harmful factors: overheating, underheating. Actually, this is why MTBF can be considered a relative rather than an absolute value. This value depends, and depends strongly, on the stability of the voltage.
Comments
Guests cannot leave comments on the site, please log in.
Products for LADA at the best price
A selection of accessories for LADA from AliExpress
What the Kalina headlight is, what its functions are, how replacement and repair are carried out - such questions arouse the interest of motorists. A machine is a well-coordinated mechanism with thousands of parts. And it is difficult to name the main or secondary one.
In particular, the headlight unit provides directional light and illuminates the route and the surrounding area at night, which is very important for traffic safety.
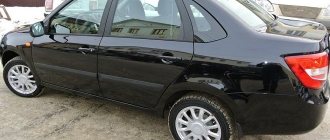
Headlight design for Lada Kalina
Headlight unit installed on a car
Like most new generation cars, VAZ 1117-1119 models are equipped with headlights of a simple design . Let's look at what elements are included in this node:
- Outer glass that protects the light bulbs and prevents water and dirt from getting inside.
- A plastic case to which all the main elements are attached.
- The rubber seal between the glass and the body provides good water and dirt resistance.
- Lamps for signaling turns, as well as low and high beam.
- There is a plastic reflector installed inside the case, which has a mirror surface and reflects the light of the bulbs.
Each headlight unit is equipped with light bulbs, which are well, one might say tightly, fixed in the housing, which ensures their resistance to vibration.
Headlight diagram with explanation
Dismantling and repair
In the event of a minor traffic accident, when the headlight housing is not damaged, only the glass can be replaced. To do this you will have to dismantle the element. How to do it?
- Remove the front bumper.
- Disconnect the connectors of the wires supplying power to the headlight.
- Unscrew the lower fasteners.
Unscrew the lower headlight mount
Unscrew the top fastenings of the headlight unit
After installing the headlight in place, be sure to re-adjust it so as not to blind oncoming traffic and not “shine into the milk.”
Glass repair will take a maximum of half an hour.
We take out the headlight towards ourselves
So, let's move on to the sequence of actions.
- Carefully remove the rubber seal.
- As practice shows, it is glued and to dismantle it you will have to cut through it with a thin knife.
- When the glass and the body are separated, it is necessary to clean off the old seal and glue residues.
Disconnecting the headlight housing and glass
The repair has been completed and the headlight can be installed in the reverse order.
Disassembling lanterns
To disassemble headlights of any brand on a Lada, you will need:
- hair dryer (household or industrial);
- flat screwdriver;
- stationery knife.
To separate glass or polycarbonate, you will need to remove the material's fastening brackets. After this, heat the sealant that holds the glass or polycarbonate in place with a hairdryer. Next, the softened sealant can be cut off. This makes it possible to remove the glass with a flat screwdriver.
Author: Baranov Vitaly Petrovich
Education: secondary specialized. Specialty: car mechanic. Professional diagnostics, repair, maintenance of passenger cars of foreign production 2000-2015. Extensive experience working with Japanese and German cars.
4 comments
- Makar says:
I'm interested in the design of the headlights - I had to disassemble them, but I couldn't find any latches. I recently got a car - I’m a newbie, I went to the forum, and they laughed at me. Tell me how to disassemble them - are there screws or clamps? And where are they located?Emin says:
There are no screws or fasteners - they are glued together with sealant. So it's no surprise that you didn't find the latch.
Makar says:
How to take them apart then? Pry with a knife or screwdriver? Won't I break it?
- Ekaterina says:
Good afternoon. Heat the connecting seam with a hairdryer, pry it with a screwdriver and separate the body - the sealant will warm up and it will be easy for you to separate the halves.
conclusions
The installation and repair of the Lada Kalina headlight is quite simple and dismantling and installing the element will not take much time. Of course, if the housing is destroyed, the entire element will need to be replaced. As experience shows, if the fastening elements, the so-called “ears”, break, the headlight does not change, and the damaged part is simply “soldered”. It's much cheaper than replacing an entire element.
It is important to remove the headlight correctly if you decide to replace it with a new version, adjust the light, or to improve its decorative properties. From the factory, Lada Kalina is equipped with two types of headlights from different manufacturers: Avtosvet CJSC and Bosch. Regardless of the type of device, they are attached according to the same principle. There is only one difference in lighting technology: Bosch is marked with the letters AL and is made of polycarbonate, while “Avtosvet” has a cap on the low beam lamp.
Notes:
Adjusting the position of the headlights must be done every 20 thousand km or as needed. On the Lada Kalina, this adjustment operation is not carried out often, since deviations from the norm rarely occur (in most cases, due to road accidents).
Checking and adjusting the headlights of the Lada Kalina VAZ 1118 is carried out with a fully filled fuel tank, a set of tools and a spare wheel.
1. First check the air pressure on all tires of the car with a pressure gauge. If necessary, bring it to normal.
2. Place the Lada Kalina car perpendicular to a smooth wall (for example, a garage) at a distance of 5 m. Place an additional weight weighing 75 kg on the driver’s seat.
3. Mark the screen on the wall as shown in the headlight adjustment diagram.
4. Draw a vertical center line O on the screen, lying in the plane of symmetry of the car (the distance from it to the center of the left and right headlights should be equal). To the left and right of it, draw two more symmetrical lines A and B , which should coincide with the centers of the left and right headlights.
5. At a height h corresponding to the distance of the centers of the headlights from the ground, draw a horizontal line 1, and 75 mm below it - line 2 .
6. Turn on the low beam headlights on the Lada Kalina car by turning the headlight range control of the Lada Kalina 1118 to position “0” (this position corresponds to the load of the Lada Kalina car with one driver).
7. Closing each headlight in turn, check that the light limit corresponds to the adjustment diagram previously marked on the screen. The boundary must follow line 2. The inclined segments must begin at the intersection points.