I have been using the cruise for the third month now - the perfect smoothness of the ride and precise adherence to the speed limit (108 km/h highway, 128 Ring Road) delight me, my passengers and my wallet.
I wanted to install cruise even before buying the car) At that time, the Comfort-Multimedia package was not on sale, and the toad animal did not allow me to overpay for 16-wheel drive, heated windows and other features I didn’t need. It whispered in my ear - “it’s a shame that no one has set up a cruise yet, this is probably a one-two task, set a couple of buttons and go!” It turned out, not really... So, how it was: I started with these reports. www.drive2.ru/l/10378423/ Everything seems to be fine, only a case is described when the equipment is luxury. And there really is a freebie) Here is a description for comfort and classics: xn--80aal0a.xn--80asehdb/…a-klassik-i-komfort.html# Everything would be fine, but there are not enough details. I will try to supplement it myself and outline the missed subtleties that I had to solve during the process. Well, here people are also actively discussing the process, some useful thoughts came from there, but there are also a lot of useless ones - www.lada-vesta.net/showthread.php?t=813
Preparation step by step: 1. Buy a multifunction steering wheel 8450006832, 5000 RUR. 2. Buy a steering column switch - 8450006924, 8000 rub. Moreover, from there you will only need to take a penny snail, which fundamentally differs from ours in several wires! Scheise! 3. Buy wires - I used a 6x0.22 mm2 network cable. To the radio you need 5 wires less than a meter long, to the ECU you need 3 - I ran all 6, two of them. This is not the best choice - it is better to take 3 slightly thicker wires (up to 1mm). 4. Buy any compact connector with 10-12 contacts (You’re unlikely to find the original 1379662 TE, so here’s lifehack where to get it) 5. BLS contacts for the ECU, like these: sklep.avt.pl/media/produc…big_BLT. jpg?lm=1450095426 6. Mini-ISO C3 connector blue 7. Electrical tape, heat shrink tube, soldering iron (optional) 8. Warm season or garage. I did it at 0 degrees outside – BRRRRRR!
Working step by step:
1. Remove the steering wheel with the wheels in a strictly straight position. 2. Remove the old steering column switch 3. Replace the snail on it - the rotation sensor and levers will all remain the same. You need to be very careful with the rotation sensor and snail. The first one is afraid of blows, and the snail cannot be twisted. If you do twist it, then: from lock to lock it makes about 6 turns - check that you have the same number, turn it three times and fix it that way. 4. Next, you need to insert a connector into the cochlea from the back side, from which the wires will go to the ECU and radio (see diagram). So far no one seems to have been able to find it (1379662 TE), so people suggest using separate BLS pins or 2 BLS-6 connectors. The first option is bad because it may not hold tightly, the second is even worse - you can actually bend and break the pins, because their distance is not the same. In the end, I simply cut off the required connector from the wires that come out of the cochlea - the same one is used to connect the buttons to the cochlea! But because Here you can change both parts, so let's do it! In the photo, only the response part has been preserved, which is being replaced and is not used anywhere else, but we need a “dad”.
Having replaced the connectors, in the steering wheel we now have the usual 10-pin male-female pair (choose any one, as long as it fits into the hole in the steering wheel).
And the released connector can now be used to connect the entire device to the steering column switch on the engine side; the process of connecting (and disconnecting, if necessary) to the snail will be much more reliable. 5. Let's continue. So, we have 10 wires that, according to the diagram, need to be connected to this plug. Of the 10 wires, 5 are the radio control connection. I will not duplicate the description - it is well covered by previous authors, everything is simple and without pitfalls. 6. Three more wires go to the ECU, contacts C2, C3, E3. Enjoyment is below average. This is where warm weather or a garage is very desirable. Otherwise, you will freeze and break the plastic on the connector. We begin to work from the ECU side only when we remove the wires from there and connect them to our connector. a. We remove the battery, disassemble everything that will prevent us from working with the connector.
Connecting a steering wheel with buttons
So, a block with wires is already connected to the steering wheel, so maintaining a given speed and the limiter will work immediately after installing the multi-steering wheel ( left button panel ).
To activate control of the radio or multimedia system ( right button panel ), you will have to modify the design. We add 5 wires to the block (which already has wires for cruise control), and put a miniISO block on the other end and insert it into the radio (how to remove it).
Wiring diagrams for the Vesta multifunction steering wheel (radio control):
As a result, using the buttons on Vesta’s steering wheel, it will be possible to control the radio, cruise control and speed limiter, and the button backlight will also work.
The only difference from the standard implementation is that there will be no indication of cruise control operation on the instrument cluster. To do this you need to flash it. By the way, during the panel test, pay attention to the cruise control indicators (icons in the speedometer well at about 140 and 160 km/h); if they are on, then the firmware is correct.
Here is the cruise control indication on Vesta, which has a multifunction steering wheel from the factory:
Let us remind you that the “Multimedia” option package includes not only a multifunction steering wheel, but also a rear view camera. We looked at how to connect a camera to a multimedia system earlier. By the way, another way to modify Vesta is to install fog lights.
The multi-steering wheel on the Lada Vesta car ensures comfortable movement in the car. In addition, the steering wheel is an element of the interior, a lever for controlling the behavior of the car and additional options. The Lada Vesta multifunctional steering wheel, also known as the multifunction steering wheel, is present in the top-end and luxury configurations of the Lada Vesta. In other variations, its capabilities do not go beyond the standard. Finishing materials are not of high quality. But it can be connected using a special adapter for the multifunction steering wheel.
Installing a multifunction steering wheel on a Lada Vesta car is possible, even if it is not included in the factory equipment. This function allows you to put buttons on the steering wheel, increasing the level of safety while driving, since climate control and the operating mode of the multimedia system are adjusted using the keys on the steering wheel. You can change the covering materials (braid, leather trim, trim - also known as a cover) yourself if you know the size and diameter of the Lada Vesta steering wheel. You can also do heating. The heated steering wheel function on the Lada Vesta is especially pleasant on frosty days in winter. After reconstruction, you will get a multifunctional unit. Read the article to the end and master all these repair skills!
Lada Vesta head unit with navigation: review, technical specifications
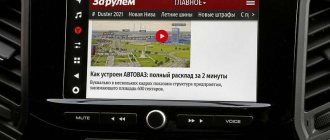
The standard car radio with navigator is equipped with a multimedia screen. There are no external buttons on the sides; at the bottom there is a rotating knob and Mute and Mode buttons.
There are 3 pairs of keys on the steering wheel:
- with arrows and a picture of a handset for scrolling through files and songs, and in the “Phone” mode – for managing calls;
- duplicate Mode and Mute;
- adjusting sound volume.
Lada Vesta standard radio with navigation.
You can control the multimedia system without being distracted from the road. Loading and shutting down the MMC occurs automatically when you turn the key in the ignition.
System filling
Installed software – Windows CE. The software requires a small amount of memory (32 KB) to operate. The RAM capacity of the standard MMC is 256 MB.
The processor is not the fastest, but it is powerful enough to process GPS and Glonass signals. 2 GB of internal memory are allocated for the firmware, another 8 GB are intended for storing cards.
Screen and menu
The 7-inch screen is equipped with TouchScreen technology. Vesta's manufacturers chose a resistive display that can operate without failures at subzero temperatures and in hot weather. One of the disadvantages of this type of screen is that finger touches are poorly recognized. You have to use a stylus or a substitute object.
Vesta owners complain about the poor placement of the screen: the display is placed at an angle, the image cannot be seen if the panel is illuminated by the sun.
The icon sizes are large: the buttons are grouped on separate tabs. On one you can control radio, audio, telephone and navigation. Photos, videos and a button for activating the AUX connector are transferred to the second.
Connectors and supported cards, formats
The Vesta multimedia device with navigation includes:
- SD card slot (carrier volume is at least 1 GB, upper limit is 4 (SD) and 32 (SDHC) GB);
- USB port (memory capacity of the connected device up to 64 GB);
- AUX port;
- Bluetooth communication unit.
The maximum current for recharging the phone is 1.5 A. The more files on the device, the longer it will take to read the information (the download time increases). There are restrictions on the number of root folders (no more than 4). Maximum capacity: 1024 files and 256 folders.
Bin files cannot be downloaded to external connected devices. This is the format of the firmware. The car radio will start updating and stop working.
Modes
There are 8 modes on the radio of the Lada Vesta car:
- Radio. FM and AM modulations are supported. There is an auto search function. Vesta's standard MMS stores up to 8 radio stations. When the “Radio” mode is turned on, the name of the received wave is displayed on the screen.
- Audio. Allows you to play music from an SD card, flash drive or received via Bluetooth. The sound is adjusted using the equalizer. 6 standard settings are included (jazz, rock and others). Music formats Mp3, WMA, WAV, FLAC are played.
- Telephone. You can load your smartphone's address book onto the radio, then when there is an incoming call, the phone number and the installed photo of the subscriber will be displayed on the screen. There is a speakerphone in the cabin.
- Navigation. Allows you to determine the location of the car, display a map and build the optimal route. The standard MMS has the offline navigator "CityGID 7".
- Photos. MMS reads files in jpeg, jpg, jpe, bmp, gif, png formats.
- Video. The car radio plays WMV3 files with a resolution of 320x240 pixels. A paused movie will continue from the interrupted point even when you exit to the main menu and then return to viewing mode.
- The MMC will begin to play files from the external media connected through the corresponding port.
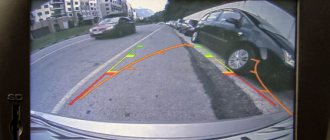
- Rear View Camera. The mode is activated automatically when reverse gear is engaged. Markings are visible on the screen, allowing you to determine the distance to the car bumper with an accuracy of +/- 0.5 meters.
In any mode, files are played in the order they were recorded. So you won’t be able to set up a playlist by simply numbering the songs in the required order.
Connecting cruise control keys
To connect the cruise control keys, follow the procedure.
Subsequence
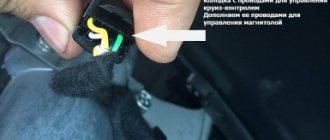
Route three wires to the computer through the window above the pedals (the source is located in the engine compartment) and connect to the block. Study the diagram according to which the wires for the buttons are led from the electronic unit. The snail with wires for the buttons has blocks from which the wires should lead to the corresponding blocks on the electronic unit.
| Block on the snail |
Block on the electronic unit
Using the installed keys, you can turn cruise control on and off, or turn it off for a certain time interval.
Required
Need to buy:
- multifunction steering wheel (catalog number: 8450006832);
- steering column switch (volatile) with wires for the steering wheel buttons (catalog numbers: 8450006923, 8450006924), or buy a cable with a large number of tracks and replace it inside the volute;
- BLS pins for cochlea connector.
To control the radio:
- cable of 5 wires with a diameter of 0.5 mm;
- blue mini-ISO connector C3 (for Classic or Comfort configuration);
To operate cruise control and speed limiter:
- cable of 3 wires;
- connector for connecting wires (radio and cruise control controls) to the snail block.
Where can I buy?
In our online store (steering wheels for Vesta)
Connecting buttons to the radio
Connecting the buttons on the steering wheel begins with completing the wired cruise control system with the radio wiring. Connect the wiring to the multimedia device into the blue connector. To avoid mistakes, study the wiring diagrams.
If a new radio was installed during operation, you will need an adapter for the specific type of audio system.
After connecting, test the functionality of the new functions. As a result of a correctly completed connection, the keys will highlight and select the operating modes of the radio:
- switching music files;
— selection of menu items;
— selection of file storage media;
- Instant volume mute.
Cost of steering wheel with buttons
The price for the model with buttons depends on the store. Most Lada Vesta car owners purchase products with keys in virtual stores. The order is placed for article number 8450006832. The cost ranges from 5000 to 7000. If the vehicle owner needs an airbag, the price increases by another 1000-15000. For leather covering you will have to pay another 2000-2500 rubles.
To save money, you can use an overlay with keys on a standard steering wheel. This option is more difficult to connect and difficult to find, since it is not popular.
Radio Receiver Capabilities
Modes:
- “Radio” mode (manual and automatic search for radio stations)
- “Audio” mode (listening to audio files from an SD card, USB flash drive or phone via bluetooth)
- AUX mode (To play audio from an external source)
- Hands-free Bluetooth mode
Setting up audio parameters (short press on encoder No. 7 in the main menu):
- Switching and changing the radio settings is carried out by rotating the encoder (position 7) in the following order: Equalizer, Bass tone, Treble tone, Balance, Front/rear balance, Loudness, Output.
- There is an equalizer, the settings of which are carried out in the following order: EQ JAZZ, EQ POP, EQ CLASSICAL, EQ VOCAL, EQ USER.
New Lada: Home> Popular> Cars and motorcycles>»Lada Vesta android car radios»393 results System settings (long press on encoder No. 7 in the main menu) allow you to:
- set the time display format (Clock mode);
- manually set the current time (Setting hours/minutes);
- on off. function of adjusting the current time using RDS signals (RDS CT);
- on off. function of automatic switching to an alternative broadcasting frequency (RDS AF);
- on off. search function for radio stations by a given program type (RDS PTY);
- on off. function for receiving regional radio stations (RDS REG);
- on off. CB band (AM band);
- on off. Bluetooth function (phone connection);
- on off. button press confirmation signal (signal);
- on off. noise reduction function (noise reduction). Affects only operation in “Radio” mode;
- reset the radio settings to factory settings (factory settings). After resetting, the radio settings are set in accordance with Table 2 (clause 1.2 “Description of controls”).
Instructions for luxury equipment, which has gray wires
- There are holes on both sides of the Lada Vesta steering wheel. Insert the rods into them and press.
- The base of the airbag rises. You need to carefully remove it.
- Carefully separate the wires.
- Unscrew the central locking screw and pull the control wheel towards you without any effort. The wires should exit through the hub opening.
- If it is necessary to install the steering wheel, carry out all the steps in reverse order.
The steering wheel in the car is locked tightly. Therefore, when removing it, do not make any effort, gently swing it.
If you connect the gray wires to the steering connector, you can access the cruise control controls. To control the multimedia system, you need to connect five wires to the block using bls terminals. On the reverse side of the bundle of wires, a mini ISO connector is installed, which connects to the audio system.
Test the correct connection. All keys must function as intended. If the backlighting of the cruise control keys does not function, then a flashing is required. After checking, the airbag is installed.
Instructions for other configurations of Lada Vesta where there are no gray wires
This connection option is more complicated, since the connection to control the multimedia device is carried out independently. You will need a bundle of three wires and an additional block for the cochlea. Dismantle the old model and replace it with a new one. Wires are pulled from the audio system and connected to the steering connector. A pre-prepared bundle of three wires is supplied from the electronic control unit to the audio system. Together with the multimedia wires, it is connected to the steering block.
Lighting
Light bulbs, Headlight lamp, Halogen lamps, Xenon lamps, LED lamps, PTF lamp, Rear PTF lamp, Tail lamp lamp, Brake lamp, License plate lamp, Brake lamp, Reversing lamp, Parking lamp, Turn signal lamp, Instrument panel lamp, Trunk lamp, Engine compartment lamp, Interior lamp, Heater backlight lamp, Headlight, Left headlight, Right headlight, Xenon headlight, Headlight washer, Headlight washer pump, Headlight washer nozzle, Headlight range control, Additional headlight, Finder headlight, Headlight ignition unit, Sensor ground clearance, Headlight mount, Headlight cover, Headlight reflector, LED headlight, Headlight glass, Fog light (PTF), Fog light, PTF mount, Fog light, PTF frame, Tail light, Reversing light, Brake light, Running lights, Side lights , Reflector (reflector), Side marker, Parking lights, Turn signal, Side turn signal, Rear turn signal, Front turn signal, Repeater, Lamps, License plate light, Trunk light, Door light, Engine light, Dashboard light, Interior light, Rotating light
How to remove the steering wheel
It's not difficult to remove. It is enough to study the sequence of events and strictly follow them. The main condition is that the ignition is turned off.
Sequence of actions for removing the old steering wheel
- We insert metal rods into the holes on the sides of the steering wheel and press on them;
- The base of the pillow rises, which makes it possible to carefully remove it;
- After removing the cushion, it is possible to unscrew the central fixing screw using an extension and a bit. The wheelbase is in a straight position;
- After removing the bolt, pull it towards you without any effort;
- Lead the steering wiring through the central hole;
- Remove the fuse (red on the right side) and install it in the center of the circulation device.
Replacing the ball joint
Tool for work:
- wrenches 17, 19;
- hammer;
- mount;
- puller;
- head for 12.
The ball joint is being replaced
The car is put on the handbrake, the bolts of the wheel from which the ball joint will be removed are loosened. Using a jack, the front part of the Lada Kalina car is raised, the bolts and wheel are removed. Use a 19 wrench to unscrew the ball pin nut. Insert the puller and twist to release the support pin.
The support fastening bolts are removed using a 12mm socket. The lever is pressed down, the support is released and removed. There is another way to dismantle the ball joint: the brake disc is placed on a rigged brick, the jack is lowered slightly to relieve the lever. At this moment the rack rises up, the ball is released.
Braid
The steering wheel is covered with high quality leather. A leather version of the Lada Vesta steering wheel is installed on luxury and top-end trim levels of the car. This finish looks very elegant, sophisticated, and increases the operating comfort of the steering wheel. In the economical configuration, the steering wheel pad is made of more modest materials. Vesta owners are improving the finishing quality of the control wheel. You can purchase and change the braid yourself. In addition to the finishing itself, the kit contains everything you need for replacement: threads, glue, knife, leather trim, plastic clamps for fixing, instructions. The cover for the Lada Vesta multi steering wheel is selected by color and depends on the interior trim.
Lada Vesta steering wheel reupholstery
Many owners of basic cars do the reupholstery of the Lada Vesta steering wheel with their own hands. The leather version looks solid.
To install a braid made of high-quality, expensive material, you will first need to remove the steering wheel.
See the sequence of actions above.
- If control keys are present, remove them.
- The braid is applied so that the seams match each other exactly.
- Along with the braid, the set contains clamps. They fix the position of the braid. Mark the position of the recesses.
- Using the knife included in the kit, easily make indentations on the surface. The recess size is 3-4 mm. Same depth. Several such slits are required to remove all the edges of the braid.
- Check the alignment of the joints again.
- Apply the adhesive composition to the back surface of the steering spokes, and in the same area on the inner surface of the leather braid.
- After 5-10 minutes we glue the surfaces. Using the same method, we connect all parts of the leather braid.
- Take a piece of thread from the kit no longer than 80 cm. Wind the thread into the groove of the seam. Thread will be needed to fasten the lower steering parts.
- Then a piece of thread 1-1.3 m long is required. It is needed to sew together the most voluminous section - the upper part from one iron rod to another.
- Use a needle to thread the thread through the holes, removing it to the front surface.
- Burn the ends of the thread with fire.
- Hold the ends of the braid with your hands and adjust the tension with a thread.
- Use a small screwdriver or knitting needle to secure the thread in each stitch of the selected stitch.
- Having stitched to the edge of the second metal rod, secure the thread in the same way.
- When the entire braid is stitched, tuck the edges of the material into the prepared holes.
Do-it-yourself reupholstery is not a complicated, but labor-intensive process that cannot be rushed and requires care.
Nuances of troubleshooting on Kalina
Sometimes applying lubricant to the shock absorber bushings does not bring positive results; a squeak accompanies the driver when driving on uneven roads. The reason is improper installation of the part, wear of rubber bushings, cushions, and oil leakage.
With such problems, the shock absorber will move freely. Worn bushings must be replaced, installation errors can be corrected by tightening the fastening bolts and nuts. When oil leaks, stains mixed with dirt appear on the shock absorber. It is necessary to simultaneously replace parts on the left and right.
Sometimes it is necessary to remove the crankcase guard to replace the gasket and tighten the bolts. To do this, you need to dismantle the engine splash guard, drain the residual oil, unscrew three bolts, remove the lower clutch housing cover and the engine sump. Then you should replace the gasket and bolts, while tightening them from the middle to the edges.
To eliminate the damage, the steering wheel is completely disassembled
To prevent noise from disturbing the driver, you need to know the correct tightening pattern for the wheel bolts. To ensure even tightening and to avoid figure eight, the bolts are tightened clockwise in the following order:
- 4 bolts - “hourglass”, pattern: 1-3-4-2;
- 5 bolts - “pioneer star”, scheme: 1-4-2-5-3;
- 6 bolts - “radiation”, scheme: 1-4-5-2-3-6.
You need to tighten the bolts by hand, first using a can with a short lever, then with a long one.
A dull knock when turning the steering wheel may come from the front wheels. Springs and shock absorbers are best replaced in pairs. If the driver wants to change the springs because of their age, this is not always reasonable. Ground-in old springs make the suspension soft, and they should be changed if the car owner is not satisfied with the ground clearance, which is measured in the front of the car.
When replacing a spring, trouble may arise.
- The new part will burst.
- A creaking and crunching sound will appear in the CV joint.
- You will have to do the alignment several times.
If the cause of the knocking is due to metal fatigue of the spring, it needs to be replaced. Otherwise, the racks will quickly break, the supports and balls will fail, the Kalina springs will bend sideways and will not allow the installation of other racks.
How to make a heated steering wheel on a Lada Vesta
The need for a heated steering wheel function is especially felt in cold winter weather. The warm surface will warm your hands, which is very pleasant in the cold. To make the steering wheel heated, follow the procedure:
- Remove the steering wheel;
- Use wire as a heating element. You can use copper, chrome. Diameter 0.3-0.4 mm;
- Make a bundle of 4 pieces of wire;
- Make two entrance holes;
- Wrap the wire around the surface of the control wheel (you can only wrap it on its upper part - this will heat up faster and more efficiently);
- Make small slits on the back surface so that the wire threads cut into them and subsequently do not move or unwind;
- Connect the wire harness to the power supply (you can use a sound signal - it is suitable for power);
- Select the heating on/off button;
- Install it on the side from which it is more convenient to press;
- Fold the wiring, install the airbag, install the steering wheel;
- Test the installed function. Normally, after 1.5-3 minutes the surface will not be cold; after another 1.5-2 minutes it will be noticeably warm.
Audio mode
The audio player window is intuitive. All audio files are played on 6 speakers, the sound of the acoustics is at a decent level. You can adjust the sound using the equalizer (there are 6 pre-programmed settings for Jazz, Rock, Voice, etc.).
It is possible to listen to music via Bluetooth from your phone. One drawback worth noting here is that information about the file being played is not displayed on the MMC screen.
Requirements for MP3 files with constant or variable bitrate:
- 32-320 kbit/s at sampling rates of 32000 Hz, 44100 Hz and 48000 Hz for MPEG-1 Layer 3;
- 16-160 kbit/s at sampling rates of 16000 Hz, 22050 Hz and 24000 Hz for MPEG-2 Layer 3;
- 8-160 kbit/s at sampling rates 8000 Hz and 11025 Hz for MPEG-2.5 Layer 3.
Requirements for WMA files with constant bitrate and bit rate:
10-320 kbps, with variable bitrate and bit rate 32-192 kbps, and sampling rates 8/11.025/16/22.050/32/44.1/48 kHz.
Requirements for WAV files:
8/16/24 bit resolution with 44.1 kHz sampling rate.
Requirements for FLAC files:
with a sampling rate of 44.1 kHz.