Main elements of the stove
Structurally, the Lada Priora stove is similar to the device installed in the VAZ 2110; let us highlight its features in the mechanical and electrical parts.
Mechanical part:
- Air exhaust distributor assembly. It consists of flaps for heating the lower part and windshield, a half-body on the left and right, and a drive lever for the flaps.
- Instrument panel trim with guide units provided in it.
- Ventilation ducts (located on the left and right). Connect oval windows and side deflectors.
- Heating nozzles for side windows.
- Ventilation deflectors (in the center and on the sides).
- Air duct for heating the “foot” area of the driver and front passenger.
- An air duct for heating the rear section of the car where the passengers are located.
- Spoiler.
- Air filter.
Electrical part:
- Air distribution gearmotor. Provides distribution of air flow to different areas depending on the selected mode.
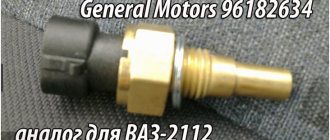
- Temperature sensor. Fixed in the ceiling area for the most precise temperature control.
- Resistor (additional, additional). The rotation speed of the furnace fan depends on it. Fixed in the engine compartment.
- Heating device controller/control unit. Here the car owner sets the operating parameters of the device.
- Electric fan. Located in the engine compartment.
- Stove radiator (located inside the heating device).
- Heating damper motor reducer. Redirects air flow in the cabin.
Installation
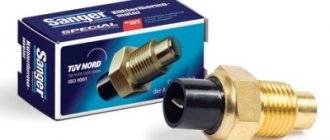
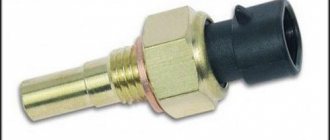
You will need : buy a temperature sensor (catalog number: 21150-3828210-00, 21150-3828210-02 or 21150-3828210-03, approximate price - 200 rubles), protective corrugation 3 meters and 3 meters of wires. Find out the model and firmware version of the instrument cluster, it should be 2190-3801010-20 (firmware 90 or 91) or 2192-3801010-20 (firmware 06 or 07). On other versions, the operation of the sensor is not guaranteed (it needs to be flashed).
Procedure:
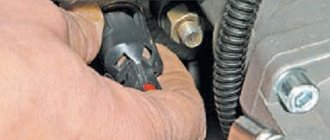
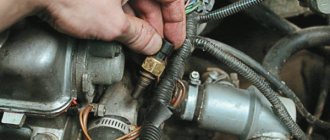
- We attach the outside air temperature sensor to its standard place behind the bumper, slightly above the towing eye (it is not necessary to remove the bumper).
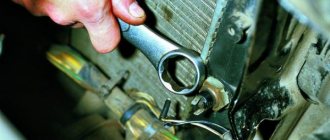
- We stretch the wires from it along the hydraulic corrector hoses, fastening the corrugation with the wires with plastic clamps.
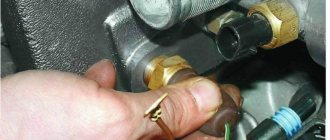
- From the engine compartment to the passenger compartment we pull the wiring through the hole in the engine panel. Inside, the wires will appear above the clutch pedal.
Principle of operation
To understand the reasons why the stove in Priora does not work, you need to know the principle of its operation. The same system applies here as in the “tens”.
The air flow from the heater is directed to the distributor, where, taking into account the position of the dampers, it directs the air.
Car owners can choose one of three positions:
- Heated / defrostered windshield.
- Ventilation.
- Direction of flow to the feet of people in the rear sofa or front seats.
It is possible to select an intermediate position of the dampers, for example, to direct air to the windows and ventilation.
The position of the flaps changes independently by moving the handle on the main deflector panel. When the blowing/heating is turned on, the air flow is directed through the channels to the desired areas.
Each of these channels is placed separately, which eliminates the mixing of different air flows.
Design flaws
The Lada Priora stove has a number of design flaws that manifest themselves already during operation.
Let's highlight the main points:
- Air is supplied to the side deflectors in any of the damper positions. For this reason, there may not be enough air in the legs.
- The presence of additional holes and insufficient quality of seals when connecting pipelines leads to poor flow.
- Poor channel smoothing leads to excessive noise in the air ducts.
Otherwise, the design of the Priora stove is well thought out and rarely causes complaints from users. The exception is those cases when the device ceases to perform its intended functions.
For example, a common problem is when the stove constantly blows cold air. In this case, the cause of the malfunction is the damper or radiator.
Initial diagnosis
Before taking more serious steps, it is necessary to conduct a preliminary diagnosis.
Take the following steps:
- Check the coolant level in the expansion tank. The coolant level should be between the minimum and maximum marks. If antifreeze constantly leaks, check the system for leaks. Inspect the pipes and tighten the clamps. Make sure that the oil level in the engine crankcase has not increased due to antifreeze entering through the cylinder block gasket.
- Start the engine and wait until it reaches the optimal temperature.
- Feel the thermostat. Look at the thick tubes that go from it to the car's radiator.
- Make sure that after the engine warms up, the upper pipe heats up. If it is cold, then the cause is a broken thermostat. In this case, you cannot do without replacing the device. The second explanation for why the stove is not working correctly is a broken cap on the expansion tank. Install a new one and check again how the heating system works.
- Check the cooling (heating) system for air. Let us immediately note that in a Priora, the appearance of an air lock is possible only when the antifreeze is depressurized or incorrectly filled. To fix the problem, warm up the car, turn the heater on to maximum, drive the front wheels up a small hill and periodically step on the gas. First remove the expansion tank cap. In this mode, let the engine run for 5-10 minutes.
- Pay attention to the fan operation. If it does not move air well, remove the cabin filter and make sure it is not dirty. If you have such suspicions, replace the device.
Priora temperature sensor 16 valves where is it located
Many motorists confuse the DTOZH with a cabin or ambient temperature sensor, but this is completely wrong. The purpose of the DTOZH is to monitor the temperature of the refrigerant in the cooling system.
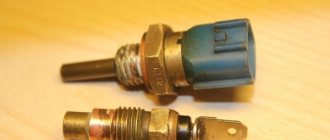
There are two regulators in Lada Priora cars:
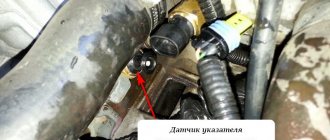
- One of them is installed on the cylinder head and its purpose is to display information about the engine temperature on the dashboard. Essentially, this is a pointer.
- The thermostat housing contains the DTOZH, which plays a more important role. This device transmits pulses to the control unit to activate the ventilation device. In addition, it plays an important role in the formation of the combustible mixture during startup of the power unit.
As for the principle of operation, it is as follows. The main regulator is located in the thermostat housing, which allows for the highest pulse accuracy. Since the DTOZH in any case comes into contact with consumables, that is, antifreeze, it instantly detects changes in temperature and sends corresponding signals to the ECU. The latter, based on the information received, adjusts the operation of the engine and changes the composition of the air-fuel mixture. If there is no or too low level of consumable fluid in the system, the controller will provide incorrect data.
Checking the coolant temperature sensor and its circuits
With the ignition off, disconnect the engine management system wiring harness block from the coolant temperature sensor (see “Removing the coolant temperature sensor”). By connecting the tester probes to terminal “2” of the block and the engine “ground”... ...with the ignition on, we measure the voltage in the sensor input signal circuit. The device should detect a voltage of 4.8–5.2 V. If the voltage does not match, check the serviceability of the circuit (open and short to ground) between terminal “2” of the wiring harness block and terminal “39” of the controller. If the circuit is OK, the controller is faulty.
By connecting the tester probes to terminal “1” of the block and the engine ground, we measure the resistance of the ground circuit. If the sensor ground circuit is working properly, the device should register a resistance of less than 1 ohm. The cause of increased resistance may be an unreliable connection in the pads connected to the sensor or controller.
We connect the tester probes to the sensor terminals. We measure the sensor resistance for two values of coolant temperature - cold and warmed up engine. To more accurately check the sensor, it must be removed (see “Removing the coolant temperature sensor”). We lower the sensor into a vessel with water and heat the vessel. We measure the resistance of the sensor at different temperatures. We control the temperature using a thermometer. We compare the obtained values with the control ones (see table). If the measured resistance values do not coincide with the control values, the sensor must be replaced.
Possible sensor malfunctions
If the regulator fails, this is fraught with the following problems for the car owner:
If we talk specifically about the reasons, then the DTOZh may be working properly. If this is the case, then the car owner needs to diagnose the wiring and contacts - it is possible that all the symptoms are associated with an open circuit or oxidation of the sensor contacts (the author of the video is the Car Design and Repair channel).
Operating principle of the sensor
The coolant temperature sensor itself is nothing more than an ordinary thermistor, i.e. a resistor whose resistance value is directly related to the change in the temperature value of the coolant. This effect in electrical engineering is called “negative temperature coefficient” and means that as the temperature of the coolant (antifreeze) increases, the resistance value of the coolant temperature sensor drops.
An increased temperature value of antifreeze entails a reduced resistance value (70 Ohm + 2% at a temperature value of 130°C), and, accordingly, a decrease in temperature value implies an increased resistance value of the sensor with values of 100-700 Ohm ± 2% at a temperature parameter of - 40°C.
The operating principle of the coolant temperature sensor is as follows: the controller, as an actuator, sends a voltage supply signal with a value of 5 V to the device through a constant resistance integrated into the controller. This executive component calculates the temperature values of the coolant based on changes in voltage readings on a sensor with a variable resistance.
On an unheated motor, the voltage value is high; on an engine that has reached the temperature value of the operating operating mode, the potential difference parameters are low. Thus, if the power plant is not turned on, then the voltage on the temperature sensor has increased values; if it has reached the optimal operating temperature, the values are low.
When the coolant temperature sensor operates in the engine start mode, when the ignition system is initiated, the on-board computer transmits a signal to the electric fuel pump relay. This device, having received a command signal, generates the corresponding pressure value in the fuel line for supply to the injection system.
The on-board computer tests the pulse of the Priora coolant temperature sensor and sends a signal to supply the optimal volume of fuel and air masses. When the vehicle's crankshaft rotates, the on-board computer initiates the creation of a fixed-type signal to fire the injectors, the pulse interval being related to the frequency of the signal supplied by the temperature sensor. This interval will be longer when the engine is not warmed up and shorter when the power plant has entered operating mode.
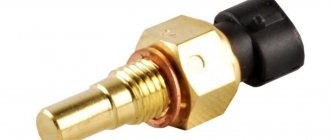
Let's look at the location of the coolant temperature sensors in the Priora. It should be remembered that the two-contact temperature sensor is located between the cylinder head and the thermostat, while the single-contact temperature sensor is located on the dashboard.
DIY replacement instructions
If the diagnostics showed that the DTOZH is operational, but signs of a malfunction still appear, then, as we have already said, check the quality of the regulator connection and wiring. If, as a result of the check, it turns out that the device is inoperative, then the coolant temperature sensor will need to be replaced. The replacement procedure itself is not particularly complicated; even a novice car enthusiast can handle it.
As you know, Lada Priora cars go on sale in several modifications - with an 8 or 16 valve engine. Therefore, some car owners may think that the replacement procedure will look different in both cases. But we immediately want to dispel doubts - everything will look almost identical - the thermostat housing is located in the same place on both versions of the engine. The only difference is that you will need to dismantle the line that connects the air filter element to the throttle in advance.
Cold heater radiator (heater does not heat)
In driving practice, a common situation is when the Priora’s stove blows cold air instead of hot air.
Let us highlight the main reasons for this situation:
- Failure in the engine cooling system. The stove radiator is cold and does not give off heat. To check, touch the heater pipes, which should be hot. The explanation for the malfunction may be the radiator itself, for example, due to the fact that it is clogged and does not allow antifreeze to pass through.
- Dirty cabin filter. To check the version, dismantle the unit and check whether the stove is functioning or not.
- The gear motor has failed.
- Wedge or damage to the damper.
- Failure of the heating device controller.
- Damage to the temperature sensor installed in the car interior. To check this version, disable it for a while, and then check the operation again.
During long-term operation of the vehicle, dirt collects in the engine block on the pipes, which is subsequently spread throughout the system, thereby clogging the radiator honeycombs. The stove radiator is no exception, which also becomes dirty and begins to work worse.
In such a situation, do the following:
- Drain the antifreeze from the system.
- Remove the wiper arms.
- Remove the frill cover and move the noise shield to the side.
- Disassemble the stove body, discard the wires and remove the electric motor.
- Remove the heat exchanger by discarding the supply pipes.
- Clean or replace it.
How is the replacement made?
Finding this element of electronics is not so difficult. It is located directly above your head, in the area of the ceiling. To remove it, you must do the following:
- Remove the rear view mirror cover.
- Remove the mirror itself, which is secured with 2 mounting screws.
- Remove the upholstery container, which is also secured with two Phillips screws.
- Disconnect the cable block from the lighting fixture and temperature sensor.
- Remove the sensor by twisting the fasteners.
Fault diagnosis is carried out using a multimeter. It is necessary to measure the resistance, which should not deviate from the standard values. If you notice too much value for this indicator, get ready to buy a new device. Reassembly after replacement is carried out in the reverse order.
Source
Fan doesn't work
If during the check it turns out that air is not entering the cabin at all, take the following steps:
- Check whether fuse F9 is good or not. It may have burned out, causing no voltage to be supplied to the device.
- Make sure the fan is working properly. In this case, try to repair it or replace it immediately.
- Change the resistance if it is causing the fan to not operate properly.
- Make sure the controller is working.
- Clean the fan. There are situations when the device becomes clogged, causing it to not work or making increased noise during rotation.
- The fan relay is burnt out. If none of the tips discussed above helped, check the relay, the appearance of which can be used to judge its serviceability. If something is burnt inside, this indicates the need for replacement. After this, the Priora stove fan should start working.
- We wrote about the cabin filter above.
If the remaining components of the Priora stove are functioning normally, the cause may be a failure of the temperature sensor.
What kind of device?
- Thanks Don't like it
3A%2F%2Fi.lada-forum.ru%2Fpublic%2Fstyle_images%2Fmobile%2Fprofile%2Fdefault_large.png" /% lokotcy Dec 17, 2009
- Thanks Don't like it
profy Dec 17, 2009
Although I don’t have a priory, I think it’s the cabin air temperature sensor. Through it, the heating system regulates the temperature in the cabin. There is a small fan in this sensor, and it makes noise.
- Thanks Don't like it
Sergey_62 17 Dec 2009
Well, I changed my fifteen-swallow to a Priora. First impressions - Super, power + dynamics, and besides, it’s quieter than the tag, although I myself made a total noise with it. Unfortunately, there were some mistakes left, in the form of a rattling rear parcel shelf and the left driver's window. But I’m talking about something else, priorovods explain what this socket with holes near the eyeglasses is, which begins to quietly grumble when the ignition is turned on. The sound is somewhat similar to an old radio at low volume. Tell me that this sound in general is normal or that I already have something short.
Control unit failure
The weak point of the Priora stove is the control unit (controller). The functions of this device include air distribution, creating airflow activity in different zones, as well as maintaining optimal temperature inside.
If the unit fails, the stove will also not function, because it will lose its control body.
Before replacing the controller, check the serviceability of the regulator installed on the front panel, because the control unit rarely breaks down.
To avoid wasting extra money, find a known-good controller, install it in place of the current one, and check that the furnace is working properly. If the heater still does not work, look for a breakdown elsewhere.
To check whether the gearmotor is controlled by the control unit, remove the latter. Find the brown and pink and green wires (they control the gear motor). Measure the voltage on them.
To do this, connect a multimeter to the wires in 20V mode. Turn on the ignition and turn the control to hot and cold modes.
In the hot position, the multimeter should show around 10V, in the cold position - minus 10V. Those. the gearbox is controlled.
If the wires are connected in a different polarity, the readings will be opposite.
Only speeds 1 and 4 work
Often such a malfunction occurs when the stove switch gives a command only in the extreme positions. The cause of breakdown is often additional resistance, which reduces the rotation speed of the furnace device.
The resistor is a block where the fourth speed is direct and without retardation. The device is located in the heater housing on the left and is secured with a pair of screws.
In a situation where the first three positions do not work, and only the 4th one functions, the cause may be a broken resistor (mentioned above) or a failure of the heating and ventilation system control unit. The last malfunction is more common.
The elements responsible for the operation of the Lada Priora stove are shown below.
What does the air conditioning system in Priora consist of?
Regardless of the company, the air conditioner kit for Lada should contain the following elements:
- Air conditioning compressor assembly;
- Condenser with receiver assembly;
- Evaporation block assembly;
- Air conditioner radiator for Lada Priora;
- Highways;
- Cushion bracket;
- Generator bracket;
- Tensioner bracket;
- Tensioner roller;
- Compressor drive belt;
- Rubber seal;
- Installation kit;
- Wire harnesses.
When dismantling the heating system (this is necessary to install an air conditioner). You will have to drain the coolant. There is no need to refill it; you should buy new fluid for the kit. But it may end up in the warehouse of a technical center that will install an air conditioner in Lada.
The stove does not turn on
In a situation where the Priora stove does not turn on, there may be two explanations - a blown fuse, a blown fan motor, a breakdown of the controller, or oxidation of the contacts in the connectors.
After checking the fuse, take the following steps:
- Open the hood and on the left side (looking at the windshield) remove the rubber seal at the top left.
- Remove the four screws to remove the trim.
- Find the heater connector somewhere near the third mount.
- Turn on the ignition.
- Try to press the connector and pay attention to whether the stove starts working or not.
Damage to the connector is a real problem on the Priora, so do not rush to immediately change the control unit or other elements before checking the fuse and the quality of the contact connection.
Reasons for premature failure of DTOZH, DNTV
- Third-party mechanical damage;
- Manufacturing defect;
- Crack on the base, body;
- Circuit short circuit;
- Loose terminals;
- Moisture getting inside measuring instruments;
- Burnout of the fuse melting element of the fuse box;
- Incorrect operation of the system firmware of the ECU electronic control unit (error P1298, P5493).
Removing the stove control unit
Car owners have many difficulties when removing the heater control unit.
Take the following steps:
- Open the cover on the center console.
- Remove the screws on the left and right.
- If a radio is installed, remove it and unscrew two more screws at the top on both sides.
- Discard and take out the ashtray.
- Unscrew the fastening screws from the bottom.
- Pull the console towards you and remember that it is latched. Please note that it will not be possible to completely remove the device, because the wires are connected to it.
- Disconnect the connectors that are connected to the device.
- Press the other side of the button until it comes out.
- Press the latch and remove the device.
- Press the clamp and throw the wires away from the heater control unit.
- Remove the device itself.
After this, you can perform replacement or repair depending on the current situation.
Rustle, hum from the interior lamp of Kalina
In Kalinas with air conditioning (although there are also ones without air conditioning), a cabin temperature sensor is installed in the lighting ceiling so that fresh air constantly flows in; a small fan is installed there. Everything does not last forever and over time this fan begins to produce unpleasant sounds: rustling, noise, rattling, whistling, etc. This is especially often reflected in those who constantly keep the cabin fan on at a given temperature. There is no point in repairing this fan; the easiest way is to replace it together with a temperature sensor.
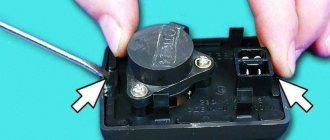
To access the fan, you need to remove the entire interior lamp. We remove the first trim, slightly pressing the edge towards the interior and pointing it down.
And carefully pull it out of the two latches, you can press down the ceiling a little.
After this, all that remains is to unscrew the 2 screws with a Phillips screwdriver and pull out the lampshade.
We take out the lampshade and turn it back. To replace the interior temperature fan with sensor, you need to disconnect its plug and unscrew the 2 screws with a small screwdriver.
We replace it with a new one and assemble it in the reverse order. Before installing the last cover, I advise you to tape it against squeaks, as indicated below.
Blows constantly hot
Another situation that may arise when using the Priora stove is that it is not possible to regulate the temperature, and only hot air comes out of the system. Turning the regulator does not give any result.
In this case, do the following:
- Measure the voltage at the control unit (see above).
- Measure the voltage at the MMR (gear motor).
- When switching to maximum and minimum voltage, 30 V of a certain polarity appears, and then drops to 0.
- If the quiescent voltage is not 0, but is about 5 V, then the fault concerns the control unit.
- In the case when the voltage is not normal and the damper does not change position, it is necessary to change the MMR.
Connection
Procedure:
- We insert one wire into the black block of the dashboard between the pink and black and white wires.
- We connect the other wire to ground using a screw under the panel.
We check the presence of outside temperature readings on the display when switching modes. We perform assembly in reverse order. In the comments, leave the versions of your panels on which you managed to install a temperature sensor.
The installation of DTNV is also shown in the video:
Do you know how easy it is to change the interior of your car using vinyl film?
Priora stove with air conditioning does not work
The situation is different when the car has air conditioning. In this case, incorrect operation is due to a breakdown of the speed control unit. Its functions include adjusting the operation of the electric fan motor.
If the radio frequency control malfunctions, the stove stops working altogether and performs its functions only at the last (fourth) speed.
Most often, the breakdown is explained by prolonged operation of the heater in recirculation mode and, as a result, overheating. That is why the serviceability of this device also needs to be checked.
Well, the other breakdowns described above have not been canceled.
Throttle Position Sensor
The throttle position sensor (TPS) is installed on the throttle valve on cars without the E-GAZ system. Designed to regulate engine speed. The sensor is not reliable and often fails. If there is a malfunction, the “CheckEngine” light does not always light up.
Signs of malfunction:
- Not smooth idle;
- The revolutions are floating;
- Troubles the engine;
- When starting the engine, the speed is increased;
- Spontaneous increase or decrease in speed;
The heater doesn't heat up at idle
Another problem that car owners face is problems with the kidney idling.
In this case, there are several reasons for the malfunction:
- Low level of antifreeze in the cooling system.
- Leaks that lead to the situation described in paragraph 1.
- Airiness of the system.
The first two problems are rarely difficult to solve. The situation is different when the malfunction is caused by an air lock.
Take the following steps:
- Remove the screen from the motor.
- Loosen the clamp, then remove the throttle assembly heating tube and select any of the options.
- Unscrew the cap of the expansion tank.
- Place a clean rag on the neck and start blowing until coolant comes out of the removed pipe.
- Place the tube onto the fitting and tighten the clamp.
- Put the screen back in place.
If the considered method does not solve the problem, go through the following steps:
- Warm up the engine to increase the pressure in the system.
- Turn off the car and remove the tube from the throttle heating. In this case, there is no need to remove the plug from the cooling system tank.
Due to the high pressure, excess antifreeze will come out through the tube. Next, all that remains is to insert the tube into the fitting and tighten the clamp.