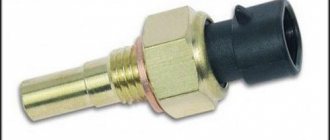
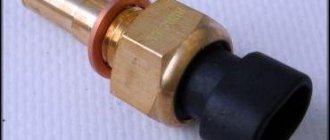
Checking the temperature sensor is a simple procedure that even a novice car enthusiast can handle. The coolant temperature sensor (abbreviated as DTOZH) is a thermistor, that is, a resistor that changes the value of its internal resistance in accordance with the temperature where its actuator is placed. Most often, a multimeter is used for this (another name is a tester, “tseshka”), which is able to measure the value of electrical resistance in a circuit.
How does the coolant temperature sensor work?
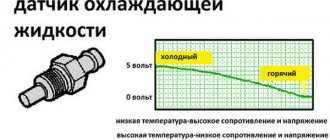
Before we move on to discussing how to check the coolant temperature sensor, it is necessary to briefly look at the signs of its malfunction and understand how it works. This will help determine the diagnosis. As mentioned above, the coolant temperature sensor (sometimes simply called the engine temperature sensor) is a thermistor - a resistor that changes its resistance depending on changes in temperature, in particular the coolant of the engine cooling system. The corresponding resistance value and its change are recorded by the electronic engine control unit (abbreviated as ECU), on the basis of which it issues the appropriate commands.
Based on information from the coolant temperature sensor, the ECU, when starting, sets the required number of steps of the idle air control (IAC), thereby regulating the fuel supply. The thermistor mentioned has a so-called “negative temperature coefficient”. This means that at cold temperatures its electrical resistance is of great importance, and when the sensing element heats up, this resistance drops.
The sensor is controlled by supplying it with an electrical signal with a constant voltage of 5 Volts from the electronic control unit through a resistor with a constant resistance, which is located inside the control controller. Accordingly, the control unit calculates the coolant temperature by the voltage drop across the sensor, which, as mentioned above, has a variable resistance. On a cold engine the voltage drop will be greater, and accordingly on a warm engine it will be less. And on a cold engine, the voltage on the sensor will be higher, and on a hot engine, lower.
Device Description
If you need to know where the coolant temperature sensor is located and how it works on 16- or 8-valve VAZ 2110 engines, first read the basic information on the device. The operating principle of the regulator and typical problems with this element are described below.
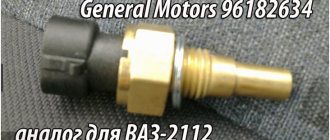
DTOZH for VAZ 2110
Principle of operation
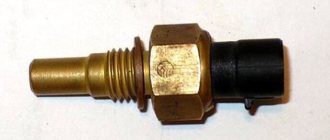
The coolant temperature regulator on a 16- or 8-valve VAZ 2110 car is a simple thermistor device. A thermistor is a resistor that has the ability to change resistance values depending on the temperature conditions in which it operates. On an injector with 8 or 16 valves, the device is installed directly in the cylinder head. Antifreeze circulates through the hose in which the regulator is installed.
The purpose of the coolant temperature sensor on the carburetor or injector of 16 valves of the VAZ 2110 is to monitor this temperature. If the indicator exceeds the normalized one, the device reports this to the control unit, as a result of which the fan is turned on. It should be noted that the fan is turned on forcibly. Without turning on the fan, the motor may overheat.
There is an opinion that in the entire design of the VAZ 2110 16-valve injector, this element is the most reliable. However, breakdowns still occur. On the dashboard there is a regulator with a pointer, which receives a signal from the device. If the element is working correctly, the signal indicator will always show the exact temperature.
Two knobs for "ten"
Typical problems
There are quite a lot of problems associated with the failure of the sensor on the engine injector 16 valves of the VAZ 2110. As a rule, the essence of the malfunction lies in the lack of contact on the internal components of the device. The malfunction may also be due to problems with the insulation of the cables around the regulator itself, in particular if the gas pedal cable is hanging loose. If the regulator does not work correctly, it will not be able to provide the correct information to the control unit, and accordingly, over time, problems with starting the internal combustion engine may appear. In addition, if the device on the 16-valve injector of the VAZ 2110 does not work correctly, fuel consumption may increase.
If the device sends incorrect signals, turning on the fan will be impossible, and without turning on the fan, as mentioned above, it will not be possible to cool the motor. Sometimes it happens that the fan is turned on constantly - if the regulator registers an increased temperature, but in fact it is normal. Then the fan is turned on constantly, in principle, this does not threaten the car enthusiast in any way, but this can cause high energy consumption of the battery (the author of the video is Vasily Kalugin).
The thermistor, which is installed inside the coolant temperature control device on the 16-valve injector of the VAZ 2110, is an electronic system. This system is characterized by negative temperature indicators. If the element heats up, the resistance level begins to decrease, and vice versa, if the device cools, the resistance increases. By the way, the resistance indicator is considered quite important. The optimal operating temperature of the VAZ 2110 injector is up to 130 degrees, in this case the resistance level drops to 70 Ohms.
The lowest temperature limit, which is 40 degrees below zero, will increase the resistance to the highest value - 107 Ohms. When the controller is operating, it passes a voltage of about five volts to the regulator according to the circuit. The coolant temperature in this case is determined by the ECU. The control unit calculates this parameter based on the voltage difference across the device. Always take into account the fact that temperature levels affect the functioning of many vehicle mechanisms.
Signs of failure of the coolant sensor
A number of signs will indicate the need to check the coolant temperature sensor. However, it is worth noting that the situations listed below may be signs of other breakdowns in the car’s engine, therefore, to obtain an accurate result, it is necessary to perform additional diagnostics. So, signs of a faulty coolant temperature sensor include:
- Activation of the warning lamp on the Check Engine panel. However, it can also be activated during other failures, so it is necessary to perform an additional scan of the error code.
- Increased fuel consumption . This is due to the fact that incorrect information is supplied to the electronic control unit, and accordingly, it is also unable to determine exactly how much fuel is needed not only to create an optimal air-fuel mixture, but also to maintain the engine temperature in the normal (non-emergency) range.
- Unstable motor operation . In particular, its unstable operation at idle, difficulty starting (especially in the cold season), spontaneous stopping at low speeds.
- The engine stalls when hot . That is, it may suddenly stall when the critical coolant temperature is reached. Moreover, this does not depend on what kind of coolant was poured into the system (in particular, factory-made antifreeze or ordinary water).
- Problems with the cooling fan on the radiator . This can manifest itself in different ways. In some cases, the fan does not turn on at all, in others it does not turn on in emergency modes, in others it does not turn off even when the engine cools down. When the coolant temperature sensor is disconnected, the electronic control unit perceives this as an open circuit in the sensor and forcibly turns on the fan. In any case, to obtain an accurate picture, it is necessary to perform additional diagnostics of the sensor and/or thermostat.
Due to the fact that this sensor has a fairly simple device and most often a non-separable housing, if it fails it must be replaced. This applies to almost all machines on which this device is installed.
Checking work
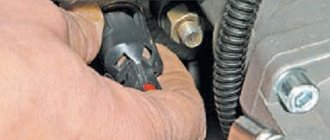
How to check the device at home? To check an element, it is necessary to measure its voltage level only if it does not work. The voltage check is carried out with the engine turned off; the indicators for checking can be measured using a multimeter. It is necessary to pierce the circuit as carefully as possible next to the regulator connectors and measure the voltage level between the third and fifth contacts.
If the component is working and does not require replacement, the voltage reading will be about 0.996 volts. Of course, if the element is not working, it will show incorrect readings, which will be more than 1.7 volts. If this is indeed the case and during diagnostics you identified such a parameter, the part needs to be replaced. To replace a component you do not need any knowledge or experience, everything is quite simple.
Sensor location on the engine
In order to check the coolant temperature sensor, you need to know where it is located. Naturally, this information will vary for cars of different brands and models. However, there are several typical signs by which you can find the place where the sensor is directly attached. So, in most cases it is located on the exhaust pipe of the cylinder head. Structurally, it has a metal thread, with which it is screwed into the corresponding hole. The main requirement in this case is to ensure direct contact between its sensitive element and the coolant. It is this contact that ensures the accuracy of the sensor readings.
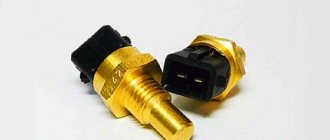
Please note that some vehicles may be designed to have two temperature sensors installed. In this case, the first of them records the temperature of the coolant at the outlet of the engine (cylinders), and the second - at the outlet of the radiator. This approach makes it possible to more accurately monitor the condition of both the engine as a whole and its cooling system in particular. However, two sensors are usually installed on powerful and/or expensive cars, where this parameter is critically important, and the ECU contains special programs for engine operation. You can find additional information about the design of a particular car in the corresponding manual or technical documentation.
CO functions
The cooling system is responsible for removing excess heat that is generated during operation of the power unit. If the engine overheats, the consequences can be catastrophic.
Cooling system diagram
In addition to heat removal, CO additionally performs several other functions:
- Helps accelerate engine warming up to optimal operating temperature;
- Cools the lubrication system;
- Cools exhaust gases.
Warms the air inside the cabin;
In total, three types of cooling systems can be used on cars:
- Air. The cooling process is carried out by blowing air over the units;
- Liquid. The coolant is a special liquid - water, antifreeze or antifreeze;
- Combined. Both types of cooling are mixed in one system.
antifreeze or antifreeze acts as a cooler .
Causes of failure of the coolant temperature sensor
Structurally, the coolant sensor is quite simple, and accordingly, it rarely fails. Usually this happens simply due to its old age or mechanical damage. For example, corrosion of contacts and metal parts of the case may occur due to the fact that instead of antifreeze or antifreeze, ordinary water was poured into the cooling system (and even more so if this water is “hard”, that is, with a high content of metal salts). Also, the reasons for the failure of this device may be:
- Hull damage . This can be expressed in various aspects. Often, leaks of coolant are visible, which flows from the threads of the sensor or its housing. Also, the electrical contacts and/or the thermistor itself may be damaged, which will produce an incorrect signal.
- Oxidation of contacts . Sometimes situations arise when, under the influence of fumes or simply from old age, the contacts on the sensor oxidize, so the electrical signal does not pass through them.
- Damage to the chip . In some cases, due to mechanical damage, the so-called “chip” may fail, that is, a group of contacts that is connected to the coolant temperature sensor. Simply put, the wires at the base of the connector fray. According to statistics from reviews found on the Internet, this is one of the most common malfunctions that occurs with the sensor and the corresponding system.
- Lost electrical contact inside the sensor . In this case, unfortunately, repair is hardly possible, since usually its body is sealed and does not allow access to the insides of the DTOZH. Accordingly, in this case the sensor only needs to be replaced with a new one.
- Violation of wire insulation . In particular, we are talking about the power and signal wires that go to the sensor from the electronic control unit and back. The insulation can be damaged due to mechanical stress, abrasion, or even simply from old age, when it “peeles” in pieces. This is especially true for those machines that are operated in conditions of high humidity and sudden changes in ambient temperature.
If it is possible to simply clean the body/threads/contacts of the sensor, then to restore its normal operation it is enough to carry out the appropriate measures. However, if the housing is damaged and/or the internal thermistor is damaged, then repair is hardly possible. In this case, you just need to replace the sensor with a new one. Its price is low, and the replacement process is simple and will not take much time and effort even for novice car owners.
Operation and possible device malfunctions
The VAZ 2110 temperature sensor is nothing more than an ordinary thermistor. This is a resistor that has the property of changing its resistance parameters depending on the temperature in which it is located. It is integrated into the cylinder head. Coolant circulates through the pipe in which the sensor is located.
The sensor must ensure that the operating temperature of the VAZ engine does not exceed the norm. If the temperature readings are outside the normal range, the device supplies the corresponding information to the ECU, and then a command is generated to force the fan to start.
If the sensor is faulty, it will provide incorrect information, which may result in certain difficulties when starting the engine, and will also increase fuel consumption. The thermistor located inside the sensor is an electronic system with negative temperature indicators. As the device heats up, the resistance decreases. If it cools, the resistance indicators increase.
The operating temperature of the VAZ engine is up to 130 °C, the resistance of the device can drop to 70 Ohms. The lowest temperature limit of -40 °C will increase the resistance of the thermistor to 107 ohms.
The controller, also known as a detector, allows a voltage of 5 V to be passed to the temperature sensor with a constant resistance inside. The electronic control unit determines the coolant temperature values by the voltage difference across the temperature sensor. When using the device, you need to remember that the temperature of the coolant affects the operation of many vehicle components.
How to check the functionality of the coolant sensor
There are two main methods for checking the health of the coolant temperature sensor. The first - with its dismantling, the second - directly on the seat in the car engine. In turn, the first method can also be divided into two more. The first is with the use of a thermometer, the second is without it. Removing the sensor can usually be done using an ordinary wrench of a suitable size, after first disconnecting the contact terminals from it. But before dismantling the sensor, you need to make sure that power is supplied to the DTOZH. Typically it is equal to 5 Volts DC voltage. This can be easily found out by disconnecting its chip from the sensor, and using a multimeter set to DC voltage measurement mode (with the appropriate range) using probes to check the voltage value. If voltage is present and at the specified value, then further testing of the coolant sensor can be performed.
Checking the temperature sensor on the car
Many car enthusiasts are interested in the question of how to check the coolant temperature sensor without removing it from its seat in order to simplify the work and complete it as quickly as possible. And they do this using a multifunctional tester, measuring the resistance between its output contacts, that is, the resistance of its electrical winding.
They do a DTOZh check right on the car by disconnecting the chip from the sensor so that there is normal access to its electrical contacts (terminals). Please note that if the engine is hot, you need to work carefully so as not to burn yourself or melt the electronic multimeter and/or its probes! Next, using a multimeter switched to resistance measurement mode, you need to measure this value between its terminals. As mentioned above, on a cold engine the value will be quite high, and on a hot engine it will be lower. As an example, we provide technical information for the VAZ-2110 car , which gives a general understanding of resistance values. It is necessary to understand that for other passenger cars (using sensors of similar models) these values will be very similar, that is, they will not differ critically.
| Water temperature, °C | Resistance value, Ohm | Water temperature, °C | Resistance value, Ohm |
| +5 | 7280 | +45 | 1188 |
| +10 | 5670 | +50 | 973 |
| +15 | 4450 | +60 | 667 |
| +20 | 3520 | +70 | 467 |
| +25 | 2796 | +80 | 332 |
| +30 | 2238 | +90 | 241 |
| +40 | 1459 | +100 | 177 |
To be fair, it must be said that sensors do not break down so often, but instead there are situations when the DTOZH “lies”, that is, it produces incorrect information. Therefore, you can compare the temperature readings on the dashboard and compare them with the obtained resistance value. If the sensor still produces incorrect information, then it makes sense to dismantle it and carry out additional diagnostics using a thermometer and a water heater.
Checking with a diagnostic tool
The activation of the Check Engine light on the panel is always a reason to perform an additional error code scan. The fastest and most effective option in this case would be diagnostics with a personal ODB2 scanner. In our case, we will use a budget scanner made in Korea, Scan Tool Pro Black Edition
.
If, during a visual inspection, no signs of damage to the coolant temperature sensor or the corresponding electrical wires and corrosion of the connector are found, and the diagnostics showed the presence of one of its errors, for example, P0115, P0116, P0117 or P0118, then most likely the problem is in the sensor. To check this, it is not necessary to check it with a multimeter; the scanner makes it possible to show the operation of all available sensors (including DTOZH) in real time. If the sensor is working normally, then you will see what temperature it produces.
Since the Scan Tool works on a 32-bit chip (analogues at this price have only an 8-bit controller), it can diagnose not only the engine, but also other components and assemblies of the car (gearbox, transmission, auxiliary systems ABS, ESP and etc.). It will also allow you to measure the operation of vehicle systems over certain periods of time and save the data obtained. Compatible with all popular diagnostic applications, without loss of communication. Works via wi-fi / Bluetooth.
Checking with a thermometer
So, you must first remove the sensor from its seat on the car engine. This is usually not too difficult and can be done using a wrench of the appropriate size. At the same time, you can carry out preventative maintenance on its threads in the pipe, clean and lubricate it, and the sensor itself, too, if it is in good working order and the car owner will not replace it with a new one.
Next, you need to pour water into an electric kettle or other vessel, but in this case you need to use a boiler to heat the water later. Also, to work you will need an electronic multimeter operating in the mode of measuring electrical resistance. The sensitive element of the sensor must be placed in heated water, and normal access to the electrical contacts must be ensured using the probes of a multimeter. Also place a thermometer in the water (preferably an electronic one, as it provides higher measurement accuracy and ease of obtaining relevant information about the water temperature).
Next, you need to step by step measure the sensor resistance in accordance with the temperature increase. It is advisable to do this at intervals of 5°C (for example, +15°C, +20°C, +25°C, and so on). As a result, you will have an array of data that can be formatted into a table. This data must be compared with the data available in the technical documentation of a particular car or, in extreme cases, with the table given above.
Naturally, during the measurement process some non-critical errors are allowed, which will depend, firstly, on the conditions of the experiment, and secondly, on the characteristics of a particular sensor, since often even for sensors of the same model, the resistance will differ slightly under the same measurement conditions.
Checking without a thermometer
This method of checking the coolant temperature sensor with a multimeter is similar to the previous one, but you do not need to use a thermometer to carry it out. So, it is necessary to bring water to a boil and place the sensitive element of the sensor in it. Next, similarly, it is necessary to measure the resistance value at its output contacts. As indicated in the table above, the corresponding value should be approximately 177 ohms. However, it is necessary to take into account the error and assume that the water temperature at the time of measurement may be a couple of degrees lower, and therefore the resistance is slightly higher.
How to check the temperature sensor on a VAZ 2110
In general, checking the coolant temperature sensor on the VAZ 2110, 2112, Priora, Kalina and other similar Ladas is identical to the processes described in the previous sections. As a rule, the mentioned VAZs use sensors with article numbers 23.3828 and 405213, or their equivalent - 423.3828. To check this sensor, it will be useful for car owners to know its resistance at different temperatures:
- resistance at 15°C - 4033...4838 Ohm;
- resistance at 128°C - 76.7...85.1 Ohm;
- voltage output at 15°C - 92.1...93.3%;
- voltage output at 128°C - 18.1...19.7%.
As for dismantling the sensor for its further inspection/replacement, this activity must begin by draining the coolant a little. Moreover, this must be done when the engine is cold so as not to get burned or damage tools/engine parts. To dismantle you will need a 19mm wrench. With its help, you need to unscrew the sensor and remove it along with the sealing ring. Also, do not forget to change the antifreeze in the engine cooling system on time!
We measure the resistance of the sensor in steps of 10 degrees Celsius, starting from the boiling of water in a vessel with DTOZH and until it cools to room temperature. We compare the results with tabular data.
Conclusion
The coolant temperature sensor (or engine temperature sensor) is a simple device, and checking it is not very difficult. To do this, you only need to have the tools to dismantle it, as well as an electronic multimeter, water and a heating element. As for repairing the sensor, in most cases it is not practical to do it, since the process is not worth the time and effort, and the price of the coolant sensor is not that high. An exception may be cleaning its contacts from dirt and/or corrosion. In some cases, this makes it possible to restore the functionality of the DTOZH.
Prevent car computer damage
If your car computer acts as the interface between the sending device and the temperature sensor or warning light, turn the ignition switch off when disconnecting the wires from the sending device, warning light or temperature indicator. This is necessary to prevent damage to the computer from induced voltage. Refer to your vehicle's repair manual.
If you suspect it is faulty, the temperature sender is most likely the culprit.
Recommendations for care and maintenance of sensors
- Strictly adhere to vehicle maintenance schedules;
- Buy parts with original catalog numbers. The exact data is indicated in the instruction manual for your technical device;
- Carry out preventative maintenance, install consumables and spare parts at certified service stations. Relevant while the car is under factory warranty. There are frequent cases of warranty cancellation due to third-party intervention.
- When the first signs of engine malfunction appear, contact a service station.
What's the result?
As you can see, there are a number of reasons why the temperature gauge does not rise and/or the engine does not reach operating temperature. At the same time, many drivers are concerned about the question of whether it is possible to drive if the engine does not heat up.
Also, the car may lose performance, fuel consumption increases, loaded components wear out more, engine oil ages faster, exhaust becomes more toxic, the service life of the catalyst decreases, etc.
It is quite obvious that in such a case it is necessary to stop active operation of the vehicle, not to subject the engine to loads, and also to carry out diagnostics and eliminate the malfunction at the first such opportunity.
The engine does not reach operating temperature, the engine temperature arrow does not rise during warm-up or falls while driving: causes of the malfunction.