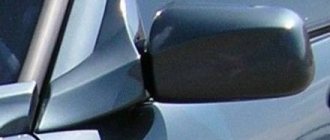
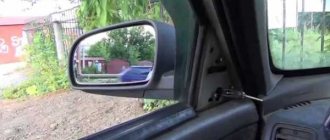
Externally, the interior and technical characteristics of the updated Lada Vesta are comparable to foreign foreign cars. A rear view camera is needed for safety and improved visibility. installation will be easy - if it is standard. Car users note a disadvantage in the form of insufficient visibility of the side mirrors. Well, if you don’t have a luxury car, installing a rear view camera will help. It expands the viewing radius and has a range of other functions. Some configurations of Lada Vesta have a standard device - from Samsung. In the article you will find a checklist for installing a rear view camera. You will get acquainted with the main functions of the device (dynamic rear view camera) and of course we have selected for you a list of breakdowns and their descriptions. We hope that our tips will be useful and you will park safely!
Installing a rear view camera on Lada Vesta
You need to know that the installation procedure for this equipment on a Lada Vesta will differ from installation on other VAZ models. It will be much cheaper to connect yourself. Installing a rear camera is quite easy to do and there is no need to rely on a body shop.
- First you need to disassemble the trunk lid trim and use a file to cut out a suitable mounting hole for the camera. Or you can go another way to connect the rear view camera: having measured the place (usually the area behind the license plate), carefully drill two holes in the plastic trim.
- If parking sensors, installed in standard places, begin to fall into the holes, it is necessary to remake them in the plug itself. It is better to connect the wires in the direction of the lamp wiring.
- To install the equipment, you need to study the diagrams and wiring connections of the cords according to the document. If you don’t have a diagram, you need to use a multimeter and find out which wiring is responsible for reverse.
- Pulling the cable along the left or right side of the passenger compartment when connecting the rear view camera does not really matter. By hiding everything unnecessary under the ceiling, you can finish the job.
Installing a rear view camera
Interior tuning
Despite the fact that the interior of the Vesta SW Cross is made with high quality and accuracy, there is potential for tuning.
What can be improved:
- The standard armrest can be trimmed with leather instead of fabric. This will make it look more expensive and be less susceptible to abrasion. The approximate price of such an improvement is four thousand rubles;
- Depending on the quality, interior carpets can completely follow all curves and do not require additional fastening. The floor is reliably protected from moisture, dust, and dirt from the street. The cost is about two thousand and above;
- The trunk mat protects against scratches, spilled liquids and other unpleasant situations;
- Seat covers can be chosen according to your taste and from any material;
- Modernization of the cabin filter;
- All kinds of overlays for the front panel.
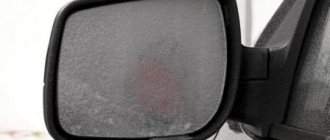
Doesn’t work after washing - what to do
If the device stops functioning after washing, it means it was damaged by water pressure. There are two options: either it is completely disabled, or the contacts are damaged as a result of getting wet. In the first case, you will need to contact a workshop, or install a new model. To understand the reason, remove the connector and dry it with a hairdryer. Install it in place and test the operation. If the system still does not function, use a multimeter. Set it to resistance mode and connect it to the vision system connector. If the resulting value is equal to one, the device requires repair.
Should I close it in winter?
There is no definite answer, it depends on the climate in your area and how you drive your car. You can drive on an intercity highway or around the city, the difference will be noticeable. If you have a warm climate, the weather rarely gets colder than -15 degrees, and you drive around the city, then you do not need to insulate the engine on Vesta. Otherwise, the motor may overheat.
If the frost is below -25 degrees, and you have to travel long distances, then it is better to insulate the Vesta engine. On such trips, the technological plug, oil seals or oil dipstick are often squeezed out of the motor housing. As a result, oil leaks. This happens due to long driving in the cold.
Oil vapor in the crankcase ventilation system freezes. A plug forms, which causes excess pressure. Therefore, whether to close the radiator in winter is up to you. Analyze your operating mode and make the right decision.
INSTALLATION OF ELECTRONIC CONTROL UNIT AND CONNECTION DIAGRAM TO THE VEHICLE ELECTRICAL CIRCUIT.
ATTENTION! The device operates at a voltage of 12V and a current of 0.5A
2.1 Remove the trunk lid trim (rear door).
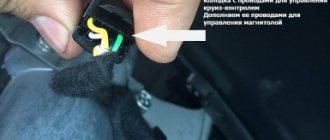
2.2 Install the electronic control unit (Fig. 2 - No. 1) at a distance of no more than 40 cm from the protective device (Fig. 2 - No. 2). Secure the electronic control unit (Fig. 2 - No. 1) with zip ties (10).
2.3 Connect the electrical wiring according to the diagram.
(Fig.2)
2.3.1 Connect the red wire from the electronic control unit (Fig. 2 - No. 1) to the positive wire, which goes from the ignition switch through the fuse (Fig. 2 - No. 11).
2.3.2 Connect to “-” (ground) with a black wire from the electronic control unit (Fig. 2 - No. 1)
2.3.3 Connect the blue wire from the electronic control unit (Fig. 2 - No. 1) to the “+” (plus) of the reverse lamp
2.3.5 Connect the green and white wires of the electronic control unit (Fig. 2 - No. 1) with similar ones from the protective device (Fig. 2 - No. 2).
If everything is connected correctly, when the ignition is turned on, the cover of the protective device (Fig. 2 - No. 2) should close.
The instructions are universal and contain the general principle of installing automatic protection for the rear view camera. Photographic materials may differ, but the installation diagram remains the same.
Installation
On a station wagon you will need to remove the fifth door trim.
Procedure:
- Remove the trunk lid trim (“saber”), on a sedan - unscrew 4 bolts and unclip 2 clips; on a station wagon, you will additionally need to remove the fifth door trim for this.
- Make a hole in the “saber” for the camera using a utility knife.
- Secure the camera to the saber using hot glue.
- Route the wires into the trunk next to the standard harness.
- It is more convenient to extend the wiring to the front of the car along the left threshold, next to the standard wiring.
- To connect the camera to the radio, you will need to remove it.
INSTALLATION OF ELECTRONIC CONTROL UNIT AND CONNECTION DIAGRAM TO THE VEHICLE ELECTRICAL CIRCUIT.
ATTENTION! The device operates at a voltage of 12V and a current of 0.5A
2.1 Remove the trunk lid trim (rear door).
2.2 Install the electronic control unit (Fig. 2 - No. 1) at a distance of no more than 40 cm from the protective device (Fig. 2 - No. 2). Secure the electronic control unit (Fig. 2 - No. 1) with zip ties (10).
2.3 Connect the electrical wiring according to the diagram.
(Fig.2)
2.3.1 Connect the red wire from the electronic control unit (Fig. 2 - No. 1) to the positive wire, which goes from the ignition switch through the fuse (Fig. 2 - No. 11).
2.3.2 Connect to “-” (ground) with a black wire from the electronic control unit (Fig. 2 - No. 1)
2.3.3 Connect the blue wire from the electronic control unit (Fig. 2 - No. 1) to the “+” (plus) of the reverse lamp
2.3.5 Connect the green and white wires of the electronic control unit (Fig. 2 - No. 1) with similar ones from the protective device (Fig. 2 - No. 2).
If everything is connected correctly, when the ignition is turned on, the cover of the protective device (Fig. 2 - No. 2) should close.
The instructions are universal and contain the general principle of installing automatic protection for the rear view camera. Photographic materials may differ, but the installation diagram remains the same.
Connection
To connect the rear view camera to the multimedia system, you must use the green mini-ISO connector:
- C7 – camera power
- C8 – CAM─
- C9 – CAM (6.2 V)
Are you ready to buy such automatic rear view camera protection for your Vesta for that kind of money?
An alternative to this expensive accessory is to install a rear view camera washer.
Keywords: Lada Vesta accessories | trunk of Lada Vesta | Lada Vesta safety
Found an error? Select it and press Ctrl Enter..
- AvtoVAZ sells LADA to its employees on special terms
- Alteration of the bolt of the second row of Lada Largus seats (increasing the angle of inclination)
- How to install the hood seal Lada Kalina 2
- Eliminate noise and vibration of the heater fan on Lada Vesta and XRAY
How to install
Installing a camera on a Lada yourself does not require the use of special tools. Self-installation allows you to save significantly on costs. The instructions for carrying out the work are as follows:
- To gain access to the element in question, you must disassemble the rear trunk door. The casing is attached with bolts and clips, so there are no problems with disassembly. If a non-original camera is used, then you have to change the mounting location for the new device.
- The wires are connected in the direction of the lamp wiring. Laying the power cable together will eliminate the possibility of damage.
- In the absence of the required circuit, you can identify the cable responsible for reverse with a multimeter.
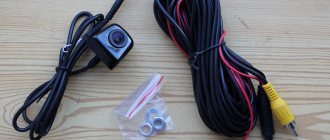
- The camera is connected using special chips. Therefore, there are no problems with carrying out the work. If missing or defective, you can purchase them at a specialized store.
Those who installed a new audio system or carried out other similar work have no problems. Over time, corrosion and oxide may develop on the surface and cause display problems.
How to reflash MMS yourself
Newer firmware versions can be downloaded on the Internet. Unzip the downloaded firmware to an SD card with the FAT32 file system. Insert the card into the MMS and turn it on. On the main MMS screen, press “i”. In the menu that appears, click sequentially in four dots.
In the next menu, click “SOFTWARE”.
In the next menu, click “SW UPGRADE”.
After which the following menu will appear, where you need to select “Update Navi” (although, if you wish, you can update everything else, taking into account that the corresponding settings will be reset to factory settings). Next, you need to wait a few minutes for the update, after which the MMS will reboot and you can start using it.
Rear view camera (standard, original), with connector, Vesta cable
Dear customers, in order to avoid errors when sending a standard rear view camera with a wire and connector LADA VESTA / LADA Vesta SW CROSS, indicate the model and year of manufacture of your car in the “Comment” line.
Externally, the interior and technical characteristics of the updated LADA VESTA / LADA Vesta SW CROSS are comparable to foreign foreign cars. A rear view camera is needed for safety and improved visibility; it is an excellent replacement for traditional parking sensors and a good addition to it. It allows you to avoid damage to your or someone else's car, collision with children or animals, as well as collision with other obstacles.
The standard rear view camera 8450008028 Samsung expands the viewing radius and has a range of functions:
— signals approaching an obstacle;
— the built-in ccd matrix produces high-quality images at any time of the day in any weather;
— the viewing radius increases to 170 degrees at any time — dark and light;
— the image is transmitted to any display;
— the camera is light, compact, and easy to operate.
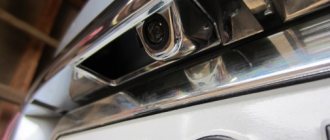
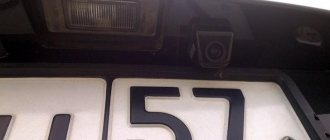
The standard rear view camera 8450008028 Samsung is mounted in the place of the license plate illumination and is equipped with a special backlight to illuminate it.
Note: The advantage of the factory standard rear view camera 8450008028 Samsung is that there is no need to make holes to fix the device.
The standard rear view camera 8450008028 Samsung is provided in the following trim levels of LADA VESTA / LADA Vesta:
Version Option package Option code
Comfort Multimedia GFL11-51-04P
Comfort Multimedia GFL12-51-04P
Luxury Multimedia GFL11-52-04P
Luxury Multimedia GFL12-52-04P
Luxury Multimedia GFL32-52-04P
Scheme for connecting a standard rear view camera 8450008028 Samsung to the MMC via a mini-iso connector and channel bus
The installation procedure for the standard rear view camera 8450008028 Samsung on LADA VESTA / LADA Vesta SW CROSS will differ from installation on other VAZ models. It will be much cheaper to connect yourself. Installing a rear camera is quite easy to do and there is no need to rely on a car repair shop.
First you need to disassemble the trunk lid trim and use a file to cut out a suitable mounting hole for the camera. Or you can go another way to connect the rear view camera: having measured the place (usually the area behind the license plate), carefully drill two holes in the plastic trim.
If parking sensors, installed in standard places, begin to fall into the holes, it is necessary to remake them in the plug itself. It is better to connect the wires in the direction of the lamp wiring.
To install the equipment, you need to study the diagrams and wiring connections of the cords according to the document. If you don’t have a diagram, you need to use a multimeter and find out which wiring is responsible for reverse.
Pulling the cable along the left or right side of the passenger compartment when connecting the rear view camera does not really matter. By hiding everything unnecessary under the ceiling, you can finish the job.
If the standard rear view camera 8450008028 Samsung on LADA VESTA / LADA Vesta SW CROSS starts to connect to work every once in a while, or the multimedia system displays a white or black screen instead of an image, or even shows nothing at all, you need to carry out the following manipulations:
— The reset key in the lower corner restarts the multimedia system (MMS);
— The car radio must be switched to RDS mode;
— Contact dealers if the MMC has old firmware and requires updating;
— Reset via menu to factory settings LADA VESTA / LADA Vesta, often solves problems;
If the camera does not work sometimes, for example, in severe cold, the reason may be due to moisture or dust getting on the contact of the rear motion sensor. A clean sensor and a warmed car are not susceptible to such problems.
Other article numbers of the product and its analogues in catalogues: 8450008028.
Lada Vesta SW/ SW Cross Lada Vesta, Lada X Ray / Lada Xray, Priora, Granta, Kalina, Kalina 2, Datsun.
Any breakdown is not the end of the world, but a completely solvable problem!
How to independently install and replace a rear view camera on a Lada Vesta family car.
With the AvtoAzbuka Internet Store, repair costs will be minimal.
Just COMPARE and BE SURE!!!
Don't forget to share the information you find with your friends and acquaintances, because they may also need it - just click one of the social networking buttons located above.
What you need to know about camera parameters
When choosing a device for the Lada Vesta, pay attention to the type of light sensitivity of the monitor.
| Variety | Characteristic |
| Cmos | The advantages are low energy consumption and affordable price. Disadvantages: poor image quality in the dark, poor contrast. |
| CCD | Higher image quality at night, good contrast. The disadvantage is the high cost. |
In addition to the type of screen sensitivity, pay attention to the following characteristics:
- Viewing radius (rational indicator - 170 degrees);
- Minimum light level to obtain a high-quality image (interval from 0.01 to one, the lower the better);
- Video camera resolution;
- The presence of backlight (improves the quality of shooting at night, fog, twilight);
- Mirror reflection function (displaying an image on the display);
- Temperature amplitude (an indicator of the highest and lowest temperature conditions of the device);
- Moisture and dust resistance. This indicator must be taken into account, since the device is fixed in a place where it is constantly exposed to road dust and moisture.
Substitute devices
The rear view camera for the new Lada can be produced by other manufacturers, the main thing is to choose the most suitable device. When choosing, the following points are taken into account:
- The recommended viewing radius should be at least 170 degrees. Otherwise, there is a possibility that the display will not show objects that could cause a collision. A similar parameter is indicated by the manufacturer in the operating instructions.
- Minimum light level to obtain a high-quality image. Reversing at night occurs when the environment is insufficiently illuminated, and a flashlight does not help much to solve the problem. Only high-quality models provide good picture quality in the dark.
- The most important parameter is the resolution of the video camera. It determines how high quality the resulting image will be. Due to the small size of the device, it is almost impossible to provide high resolution.
- Availability of backlight. It can significantly improve the quality of the resulting image when shooting at night or in fog. However, such a device cannot be installed correctly in all cases.
- The temperature amplitude determines whether it is possible to use the camera in certain conditions. The recommended range is -40 to 70 degrees Celsius.
- Degree of resistance to moisture or dust. When making the case, plastic is often used, which does not react to environmental influences. A high degree of protection eliminates the possibility of oxide and corrosion, which can cause the device to fail.
There are a large number of different Chinese models on sale, most of them have attractive properties. It is worth considering that a low-quality rear view camera for a car will not last for a long period.
Features of the standard camera
The standard video camera can expand the viewing angle to 170 degrees.
In its production, a ccd matrix is used, which displays high quality images at any time of the day.
It is simple and can last for a long period, the image is transmitted to any display. Features are as follows:
- The matrix is photosensitive, color.
- The housing protection is organized according to the IP 67 standard. It determines the high resistance of the device to high moisture and dust.
- The viewing angle is 170 degrees. This indicator is typical for most rear view cameras.
- The operating temperature range varies from -30 to 70 degrees Celsius.
- 12V voltage is supplied for power supply. It is used to power various elements of the vehicle, so there are no difficulties with connection.
- The device is capable of generating parking lines on the image, which significantly simplify vehicle parking.
The original camera is produced under the ParkCam brand. If installed correctly, it can last for a long period.
INSTALLATION OF ELECTRONIC CONTROL UNIT AND CONNECTION DIAGRAM TO THE VEHICLE ELECTRICAL CIRCUIT.
ATTENTION! The device operates at a voltage of 12V and a current of 0.5A
2.1 Remove the trunk lid trim (rear door).
2.2 Install the electronic control unit (Fig. 2 - No. 1) at a distance of no more than 40 cm from the protective device (Fig. 2 - No. 2). Secure the electronic control unit (Fig. 2 - No. 1) with zip ties (10).
2.3 Connect the electrical wiring according to the diagram.
(Fig.2)
2.3.1 Connect the red wire from the electronic control unit (Fig. 2 - No. 1) to the positive wire, which goes from the ignition switch through the fuse (Fig. 2 - No. 11).
2.3.2 Connect to “-” (ground) with a black wire from the electronic control unit (Fig. 2 - No. 1)
2.3.3 Connect the blue wire from the electronic control unit (Fig. 2 - No. 1) to the “+” (plus) of the reverse lamp
2.3.5 Connect the green and white wires of the electronic control unit (Fig. 2 - No. 1) with similar ones from the protective device (Fig. 2 - No. 2).
If everything is connected correctly, when the ignition is turned on, the cover of the protective device (Fig. 2 - No. 2) should close.
The instructions are universal and contain the general principle of installing automatic protection for the rear view camera. Photographic materials may differ, but the installation diagram remains the same.
Rear view camera does not work
If the rear view camera of the Lada Vesta starts to connect to work every once in a while, or the multimedia system displays a white or black screen instead of an image, or even does not show anything at all, you need to carry out the following manipulations.
- The reset key in the lower corner reboots the multimedia system (MMS);
- The car radio must be set to RDS mode;
- Contact dealers if the MMC has old firmware and requires updating;
- Resetting the Lada Vesta to factory settings via the menu often solves problems;
If the camera does not work sometimes, for example, in severe cold, the reason may be due to moisture or dust getting on the contact of the rear motion sensor. A clean sensor and a warmed car are not susceptible to such problems. The device must be connected to the MMC via a mini-iso connector. Therefore, replacement of this contact, in case of visual transmission defects, is advisable.
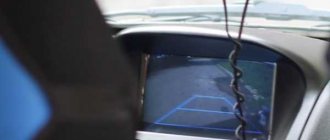
A rear view camera (RVC) is an extremely useful device, especially for novice car owners and those drivers who live in large cities with heavy traffic. With its help, images of what is difficult to see in the mirrors are displayed on the display in the cabin. Therefore, it can also be called a parking camera.
Top-spec Lada Vesta cars are equipped with a standard rear view device, along with a multimedia system (MMS). You can install such a device yourself - in place of the license plate light. Rear view camera malfunctions are often hidden in computer settings or connectors and can be fixed without much difficulty.
Malfunctions and repairs
The Lada Vesta rear view device is not characterized by high protection from environmental influences. SV Cross also has a similar drawback. In some cases, the original camera may fail after washing. Among the features of this case, we note the following points:
- As a result of poor waterproofing, water can get inside the structure, and this will lead to the appearance of oxide.
- To solve the problem with the formation of oxide, you will have to disassemble the entire system and dry the contacts, and then clean the surface of the resulting oxide.
If drying and cleaning the contacts does not solve the problem, then you have to replace the camera. To increase the degree of protection, you can place it in a plastic lampshade.
Some problems cause the image to appear black or white. It is displayed if the multimedia device program crashes. If all contacts and devices do not have obvious defects, then the algorithm of actions is as follows:
- To reboot the multimedia system, press the reset button.
- RDS mode is selected in the device settings. It allows you to use hidden settings.
- Among the information that appears, you need to highlight the one that is related to the version of the installed firmware.
- Resetting to factory settings is carried out. This is done taking into account the fact that all settings will have to be set manually.
If the device stops working in cold weather, then there is a possibility of frost and snow appearing on the surface. Long-term use in such conditions can cause the appearance of oxide. When disassembling and cleaning the surface, you need to provide high-quality insulation, which will eliminate the likelihood of the problem reoccurring.
- Connection diagram for rear view camera to car radio
- Rear view camera repair
- After washing the parking sensors beeps
- How to connect a rear view camera to a car