With the rapid development of high technology, video cameras have long ceased to be a privilege of premium cars. Nowadays, rear view cameras are universally installed on many modern budget cars. The presence of such a device greatly facilitates reverse maneuvers, this is especially true for novice drivers. The Lada Largus also has the option of equipping it with a rear view camera.
Lada Largus › Logbook › Rear view camera
The next modification was the installation of a rear view camera.
I ordered a camera with a monitor on Aliexpress, taking into account discounts it turned out to be 1350 rubles. The parcel arrived in three weeks. There is a lot of material on installation on the Internet, nothing will surprise you here. I will briefly describe the main points. We disassemble the rear door trim; in addition to the pistons, the trim is also mounted on sealant, so we carefully cut it off and remove it without fanaticism.
I decided that it would be more convenient to remove the outer trim, so I drilled out the mount for the rear wiper motor...
And then the cover itself is removed.
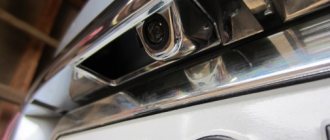
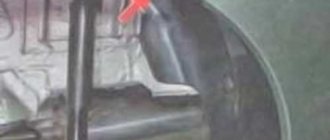
Many people place the camera below the place where the lock cylinder is attached, but I decided to place it a little to the left, near the license plate light.
Then we fix the camera
I made another hole in the inside of the cover for the wire, brought it inside and covered it with madeleine.
Then he put it back and bolted the motor and began to pull the oncoming wire from the passenger compartment.
My camera’s wire connection is made in the form of a convenient plug, so I pulled it through the corrugation in literally 3-4 minutes...
Next, I covered this wire with madeline and connected it and started working in the cabin.
I ran the wire from the reverse gear on the right side (I forgot to take a photo) and powered the camera in the area of the trunk light, there is a convenient bracket for the ground there.
After that, I stretched the wires along the left side to the driver's seat. There, at the driver’s feet, the monitor was powered to the reverse wire
Then he carefully rolled up the excess, wrapped it in madeleine and placed it in the fuse box.
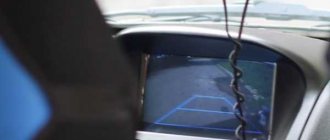
I installed the monitor in the left corner of the glass (the monitor cable is visible in the photo, but then I put it behind the casing behind the monitor, so now it is not visible).
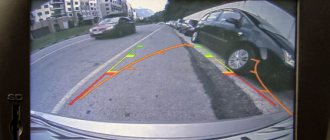
The quality for such a price was pleasantly surprising, to be honest, I expected worse. I would like to note that the camera is not a panacea! Anyway, when reversing, I look at the mirrors first! But now another means of control has appeared. It helps a lot: especially if something is in the middle of the car and you can’t see it in the mirrors. So, I definitely recommend it!
Source
Instructions for changing engine oil Lada Largus (K7M and K4M)
For Lada Largus, it is recommended to change the engine oil every 15,000 km. or after 1 year (whichever comes first). Under severe operating conditions (large city, very dusty area), replace the oil and filter every 7-8 thousand km.
| Engine model | Engine oil volume | Factory filled oil | Recommended oils |
| K7M (8 valve) | 3.3 liters | ELF SOLARIS RNX 5W-30 | Motor oils with quality class API SL / API SM / API SN / ACEA A1/ ACEA A2/ ACEA A3/ ACEA A5 and SAE viscosity level: 15W40; 15W50 10W40; 5W30; 5W40; 5W50; 0W30; 0W40 (depending on climatic conditions). |
| K4M (16 valve) | 4.8 liters |
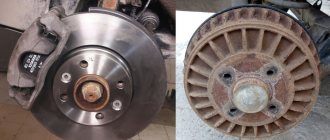
How to drain engine oil
You will need : buy engine oil and an oil filter, prepare a “10” wrench, an “8” square wrench, a clean cloth, an empty 5 liter container. and a wire brush.
The engine oil should be drained after a trip while the engine is still warm (if necessary, warm it up to operating temperature). It is recommended to drive the car onto an overpass.
Procedure:
- Unscrew the oil filler plug.
- (At the bottom of the car on the engine crankcase), clean the drain plug with a wire brush, then unscrew it. Be careful not to burn yourself!
- After all the oil has run out (about 10 minutes) into a previously placed container, clean the plug from dirt and screw it back.
Lada Largus CROSSodil › Logbook › Rear view camera and VR power supply
Over the weekend I decided to install the ZV camera, which was previously installed on Kangu. The monitor is built into the mirror, I decided to leave it for now, and then we’ll see. True, it is too heavy for Largus’s mirror, and when it moves, the reflection in the mirror trembles. At the same time, the mirror itself in Largus does not have an edging on the plastic, as a result of which the overhead mirror does not hold tightly, hence the vibration. The Kangu had an edging, it looks like both mirrors were from Renault, but there was such a difference. In general, we need to come up with something so that the mirror does not vibrate.
It was also necessary to organize power for the VR and this mirror. Well, covertly carry out the eyeliner.
I prepared in advance, printed out diagrams for disassembling the rear door and wiring. In general, everything is the same as on Kangu, because Renault is there too. Even the color of the wires and markings on the diagrams and connectors are the same.
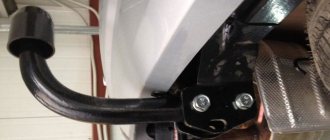
I started with the back door, I was already aware that I needed to drill out the rivets, so I selected replacement M6x20 bolts and tools.
But the biggest problem came with removing the wiper, it couldn’t be removed by hand, I don’t have a puller, but it was pressed out with a 50mm clamp. We should probably buy pullers for the future.
Next, I removed the cover above the number. She has already touched the paint in places. Protected the contact area with narrow tape. 3 years ago I did not know about such useful material for use in a car. Someone suggested on Kalina to protect the door frame from rubbing with tape (when using a roof rack), as practice has shown, it lasts for a long time, and in places where the touches are not critical, it generally lasts all the time. One of the advantages is that if you glue it carefully, it is not noticeable to the naked eye. Sometimes even scratches can be sealed and forgotten, I did this on Kangu, because... there was no color tint. Moreover, if you don’t know where to look, you can’t see it at all.
The only place to put the camera was found:
Next came the assembly, spent some time figuring out how to insert the left bolt for the motor, I even wanted to put them on hot-melt glue, but then I realized that I had to insert it first, and then start installing the motor, then I could carefully insert the motor without dropping this bolt and attach it. And the remaining bolts can be inserted after installing the motor. Although it all depends on the thickness of the fingers, mine were enough to crawl up.
For comparison, Kangu did not require so much disassembly.
I pulled the wiring through the corrugation using 16 sq. mm aluminum wire, this was after the experience like on Kangu, it didn’t take much time.
Installing a rear view camera
Start of the story at the link below:
3. The rear view camera is spherical. I didn’t really understand what resolution the camera has from the description, but with two rear view lights there will definitely be no problems with parking, everything is clearly visible!
The whole package: cutter in a box, camera, video cable and power and video signal distributor...
I installed the camera on the empty space of the lock cylinder in the door trim (locks are only installed on vans). To do this, it was necessary to first remove the inner trim of the left loading door. To remove the outer door trim, you need to unscrew two bolts on the left and two nuts on the right (when viewed from the inside of the door).
However, it is impossible to unscrew one of the bolts without removing the wiper. The windshield wiper, according to a strange idea of the designers, is attached to rivets that need to be drilled out with a large drill.
For reinstallation I used M6 bolts with nuts and washers.
Bolts instead of rivets...
The camera comes with a cutter; we use it to drill through two layers of plastic and push the wires inside. The camera snaps tightly and sits firmly...
In fact, all this hemorrhoids could have been avoided, but I didn’t know if there was anything inside this pad, I was afraid of damaging it. You can drill a hole and install the camera without removing the trim and the windshield wiper!
Next, it was necessary to run the wiring through the corrugation, but it turned out to be impossible to push the “tulip” through it! The corrugations and wires became stiff in the cold! I had to temporarily wrap everything up with electrical tape and tie the wires to the corrugation, there was no other way.
Later I bought a collapsible RCA connector at the radio market in Mitino, cut the cable, ran it through the corrugation and soldered the connectors...
Next, I had to remove all the plastic pillar covers on the left side, the armrest and lower cup holder of the third row, as well as the seat belts of the second and third rows in order to route the video cable behind the wheel arch and further under the floor lining along the left sill and along the A-pillar trim under the headliner .
We remove the belt reel of the third row, here we stretch the wire from the lamp and further behind the wheel arch to the hole of the second row reel...
We remove the clips, the second row belt, the seat clamp and the third row cup holder...
We remove the upholstery and remove the coil of the second row; through this hole it is more convenient to pull the cable (in the photo - the thinnest one below) further, to the lower hole through which the car’s wiring harness comes out...
How to display the camera on the radio screen
To display the camera on the radio screen, firstly, the radio itself must be equipped with a display and support video formats. If your radio does not have these functions, then you can purchase a rear view mirror that is already equipped with a built-in screen.
So, we connect the device to the monitor. To do this correctly, you must first of all carefully read the equipment instructions. Sometimes radio tape recorders have several inputs for camera plugs, in which case you need to navigate by color. Typically, the input to the radio is located on the rear wall. In order to connect the device, you will have to remove the music player.
After you have connected the monitor and video camera, you need to connect the radio back to the network and insert it into place. Remember that the wire with a negative charge must be connected to the ground of the car in the most accessible place, i.e. it must be grounded, and the wire with a positive charge must be connected to the rear view light. Typically, the power wire for this light is located near the gearbox.
You can also display the camera on the mirror screen. To do this, you will need to connect the mirror itself to the wiring in the car and carefully route the wires. This can be done along the ceiling and down to the driver’s seat, hiding behind the dashboard
When purchasing such a mirror, be sure to pay attention to device compatibility. It is advisable that they be from the same manufacturer
What is the camera for?
However, this car, like any other, is not without some disadvantages and useful options. This refers to the rear view camera. This accessory is simply necessary in modern life for novice station wagon owners. The bulky rear of the car creates certain difficulties when parking in a very limited place, such as an area in the yard or near a supermarket. Even an experienced owner, who has driven tens of thousands of kilometers behind the wheel of a Lada Largus, is not immune from an unpleasant collision. It is for the reasons stated here that it is recommended to purchase and install such a useful and modern accessory from the world of electronics as a rear view camera.
Let's sum it up
rear view camera The installation algorithm itself is not complicated, however, the procedure for pulling cables is quite troublesome, for which the owner needs to carefully prepare. If the installation is carried out correctly, the driver will have full confidence that during parking he will not make an emergency mooring, moving astern.
Sources:
https://avtotop.info/ustanovka-kamery-zadnego-vida-v-lada-largus/ https://autotuning.expert/parktronik/kamera-zadnego-vida-na-lada-largus-kross.html https:/ /zamenarenault.ru/largus/elektrika-i-tormoza/kamera-zadnego-vida.html
Features and completeness
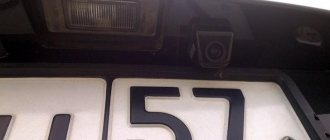
In most situations in the Lada Largus, the camera must be installed at the location of the backlight element for the rear license plate. This installation option has received a maximum of positive opinions and reviews. You can also fix the accessory we are considering in another place at the discretion of the owner.
Typically the delivery kit includes:
The rear view camera can be connected to the monitor both using wires and using advanced wireless communication. Here, each owner of a practical station wagon should decide for himself.
To watch online, click on the video ⤵
DIY installation of a rear view camera in Lada Largus Read more
Repair of Largus - Part 3 Installation of a rear view camera Wi-Fi (in detail and in detail) Read more
#Installation of #rear view camera Lada #Largus link where you got the #camera in the description More details
How to install a rear view camera in Lada Largus Read more
Rear view camera for Largus Read more
Largus. I installed a reverse camera. More details
Mirror and rear view camera from China for Lada Largus Read more
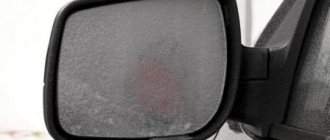
Clean camera Lada Largus Read more
Rear view camera Lada Largus (Largus) in the brake light Read more
How to install wiring in the interior of Renault Logan, Sandero, Largus Read more
Recorder for the lamp of Lada LARGUS or Renault Logan Read more
Installing a rear view camera on the Lada Granta Read more
Installation of additional rear lights on Largus 1 part Read more
Repair of Largus - Installation of rear bumper protection on LADA Largus. More details
Refinement of Lada Granta! Mirror-recorder with rear view camera. More details
How to get an overnight stay in Lada Largus. 2 adults and a child. More details
How to install a camera in Lada Granta FL and maintain the warranty! More details
REVERSE VIEW CAMERA from ¨Main Road¨ NTV for 140614 More details
20 COOL PRODUCTS FOR LADA GRANT FROM CHINA WITH ALIEXPRESS Read more
Purpose of the rear view shooting element on a car
The main purpose of the accessory we are considering is to simplify the parking process while reversing. Here the element appears as an indispensable assistant, since it provides the driver with an image that greatly improves visibility. Exterior mirrors lose significantly in this regard. The picture is generated on the monitor, both standard and additional, depending on the level of equipment of the car or the scope of delivery of the accessory. Therefore, recently the installation of a rear view camera has become very popular.
Where to look?
The camera has been selected - we go to the receiving devices, which display the image from the video camera. This could even be a DVR that has a second (rear) camera and displays the image from it on its display. It’s just very difficult to see anything on such a small screen.
It’s another matter when the picture is displayed on a 2 DIN multimedia device (standard or installed additionally). It is usually equipped with a display with a diagonal of six to seven inches and allows you to connect a rear view camera. All that remains is to provide a signal to this device, and also inform it that reverse gear is engaged.
They also offer separate monitors with a screen diagonal of no more than five inches, which are mounted on the instrument panel. But a modern car’s front panel is already crammed with equipment. Therefore, another solution seems interesting, quite inexpensive (and compact): you can use a rear-view mirror with a monitor that comes to life only when power and a video signal are supplied.
You need to connect two devices with a video cable. This task is quite troublesome, since the cable will have to be routed through a moving connection - an opening door or trunk lid. We recommend laying the cable under the roof trim: it is much easier than making your way along the thresholds of the car, where the non-standard cable may be subject to chafing.
A more convenient solution is to transmit the image over a radio channel. We purchase a so-called radio module. It receives power, as well as a video signal, from the camera and transmits it via radio frequency to the receiving device, which outputs the signal to the display. The radio module will cost one and a half thousand, but will save time during installation.
DIY installation of a rear view camera on a Lada Largus Cross
Due to the fact that rear view cameras are not installed by the manufacturer on Largus, many drivers solve this problem on their own. The dimensions of the car are such that parking in places with limited maneuverability is difficult, and reversing at night is difficult, because the windows in the loading doors are located high. The only way out of this situation is to install a safe parking system.
How to install
Parking radar sensors are installed in the rear bumper. Work can be carried out without dismantling the body part. To properly install the parking kit on Largus, you must adhere to the following requirements:
- The distance between the sensors should be equal to 1/4 of the width of the vehicle, measured at the location of the most protruding body parts.
- Install the sensors on both sides of the middle of the bumper.
- The height of the location from the road surface should be 0.6-0.7 m.
Failure to comply with the dimensions has a negative impact on the adequacy of the readings - many false positives will appear.
To correctly mark the mounting holes, apply masking tape to the bumper. If the installation location coincides with the reinforcement of the body part, then you can move the sensor or drill the entire structure. The holes are made using a complete cutter. The sensors are installed according to the markings from left to right - A, B, C, D.
The sensor wires are assembled into a bundle and secured with ties inside the bumper. The cable is inserted into the trunk through the existing hole. The connectors are connected to the control unit. The kit receives power when reverse gear is engaged, which is indicated by a short signal. Parking sensors, correctly installed on Largus with your own hands, will make parking safer.
Functionality of the original device
The rear view camera is designed to assist the driver when parking and reversing in all weather conditions. Most often it is installed in the place of the lock cylinder of the loading doors or the license plate light. Universal devices are mounted in the bumper or on the door glass on the interior side. In all cases, the delivery package includes:
If the car does not have an information display screen, then purchase an additional monitor.
In addition to transmitting an image of the road situation behind the car, the camera shows static parking markings - graphic fixed lines that are superimposed on the image. Using them, the approximate distance to the obstacle is calculated. More functional models have dynamic markings (intelligent parking system), which monitors the position of the front wheels. That is, when you turn the steering wheel, the lines will display the expected trajectory of the car.
The camera viewing angle (120-170°) allows you to cover a large area, but reduces the clarity of the image.
Experts believe that the image obtained from the device with an angle of 120° will be sufficient to safely perform parking maneuvers.
The quality of the image depends on the resolution of not only the camera, but also the monitor. Its value should be 480-540 TV lines. The image is displayed either on the MMS screen or on the monitor. A salon mirror with a built-in screen is very popular. Such equipment does not take up space on the dashboard and does not limit the driver’s visibility.
The problem of choosing the right device
Before you begin the actual installation of a new alarm system, you must first select it. Today this is somewhat problematic, since the available range of goods simply “breaks all records.” If we take into account the fact that all products were created to protect the car, then in order to increase competitiveness in the relevant market, they will differ in their security level, manufacturer and price per set.
When the price range is visible to the naked eye, the owner of a Lada Largus should think about how expensive it is and what degree of protection would be most acceptable. After all, there is not only the alarm system itself, but also entire anti-theft complexes that it is part of. In addition, certain types of devices are not always suitable for the Lada Largus, especially those that you can install yourself.
As a rule, all anti-theft systems are equipped with a standard set of devices, which include the alarm itself, an immobilizer and an electronic hood lock.
Types of alarms
As you know, all vehicles, including Lada Largus, are equipped with standard means that prevent their theft - door and ignition locks. However, today you can arm yourself with more advanced means, among which the following options are especially popular:
- one-way or two-way communication with or without autostart;
- dialogue;
- telematic;
- with GSM modules.
Their effectiveness and operating principles often differ from each other. There are devices that are sensitive to even the slightest breath of wind, and there are those that will not feel the kick of a passing person. Here it is very important to pay attention to the strength of the communication channel between the receiver and the key fob.
Models to replace the standard camera
On the Lada Largus, in addition to cameras installed in standard places, you can mount universal devices: mortise, overhead and framed numbers.
The AutoExpert VC-206 embedded camera has the ability to rotate the optical axis relative to the body. IP68 waterproof rating ensures reliable operation of the device in all weather conditions.
The Avis 985 CMOS is an overhead device with infrared illumination. At night, the picture turns out without shadows, which greatly simplifies parking the car. The device has a reliable fastening consisting of a hollow bolt and nut. Installed in a plastic cover above the license plate.
The Rolsen RRV-180 rear view camera is mounted on a bracket with an adjustable tilt angle. There are 4 IR LEDs for illumination at night. Easily installed in any convenient place. The movable hinge allows you to adjust the optimal angle of inclination.
The disadvantage of the cameras is the matrix with a resolution of 0.3 megapixels.
Installation and connection
Due to the fact that loading door locks are only available on vans, a mortise chamber is most often installed in place of the locking cylinder. Using the included cutter, a hole is made in the plastic cover. To do this, it does not need to be dismantled. In its normal location, the video camera is fixed using clamps located on the device body. To lay the cable for power and video signal wires, remove the inner trim of the left half of the door. It is secured with clips and Torx screws.
The wires are routed inside the cabin through a corrugated pipe. The “tulip” of the video cable must be cut, because the dimensions of the corrugated hose do not allow it to be routed together with the cable. For DIY reverse installation, you need a dismountable RSA connector. The harness to the monitor is laid either along the floor of the cabin or under the roof trim. The video device is powered from the reversing light. The Largus Cross model is equipped with parking sensors and a multimedia center. Therefore, there is no need to buy a monitor.
Installing a camera to view the traffic situation while reversing does not cause any difficulties. Therefore, most drivers install a safe parking system with their own hands.
Setup and operation instructions
The video device must be installed so that the top edge of the bumper is visible from the bottom of the monitor. The accuracy of parking using static graphic lines depends on this. If for any reason the battery is disconnected, the settings are lost. The manual indicates how to restore them:
If the parking kit includes a unit for tracking the position of the front wheels, then the dynamic lines are configured in the same way.
You need to know that a video camera does not provide a complete guarantee of safety, therefore, when performing maneuvers, the road situation must be monitored by all available means.
Source
Parktronic, installation. — Lada Priora Sedan, 1.6 l., 2011 on DRIVE2
The Chinese parking sensor arrived.
I ordered the cheapest one with an indicator in meters. Aliexpress 11.37 usd (707 rubles). I ordered silver sensors based on the picture, but they received gray sensors.
As a result, I bargained with the seller for 5.5 usd (357 rubles) to purchase new sensors. But I’m smart, I won’t buy silver sensors, I’ll install gray ones, I won’t even paint them, and that’s fine.
The length of the sensor wire is 230cm. The length of the indicator wire is 500 cm. The length of the power cable is about 90cm.
The indicator makes too much noise with its squeaking noise. I sealed his hole with a piece of tape.
I tested the system on the table, it works fine. Be sure to install the sensors upside down!
Installation diagram: 12-15cm from the car size to the side sensor, height - 50-60cm,
The kit included a bit for drilling holes with a diameter of 22mm, but I used a stepped one. + Screwdriver.
Today (November 22) is not cold, +1. I'll go install the parking sensors.
I measured approximately 56cm from the floor, and 14cm from the visual dimension. I put a mark on the masking tape.
side mark for sensor
The distance between the side sensors was 130cm. Divide by 3 and get an interval of 43.3 cm.
Sensors through 43cm
I took off the wheels, removed the bumper. I removed the energy-absorbing beam from the bumper. I drilled 4 22mm holes from the outside. I installed the sensors and used a screwdriver to help with the silicone sensor holders on the inside of the bumper. I secured the wires with clamps. Installed the beam.
We pass the sensor wires through the rubber plug, first making a hole in it. We install the wires to power the processor unit. Here you need a terminal from the reverse sound sensor
Power wires to the sound sensor terminal
Next, we check all 4 wires from which sensor they come from and mark A, B, C or D. Having marked the wires, insert them as needed and test.
The block was stuck behind the lamp, between the body and the trunk trim.
I installed the indicator on the left side of the glass. The wire runs to the left of the torpedo, underneath under the floor trim, goes behind the rear seat, then under the trunk trim and to the block.
UPD In the end, I set the place a little high. He can only see the front bumpers of cars up close, starting from about 70 cm. It must be placed somewhere at the level of the reflectors or under them.
Issue price: 350 ₽