- hiding it under plastic sills and trim of the door pillars;
laying under the roof lining of the car.
The image will be displayed on the monitor
As a result, the wire should appear behind the radio. If the kit you purchased does not include a monitor, then you can connect the device to a regular standard radio with a multimedia function.
please, when copying information from the website kalina-2.ru, set a back link
Installation
Required:
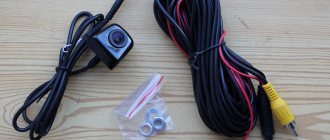
- rear view camera (see section Cameras for Grants).
- mini ISO connector (blue block and tulip).
- several meters of wire.
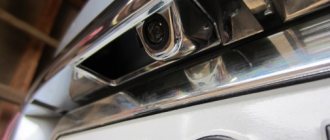
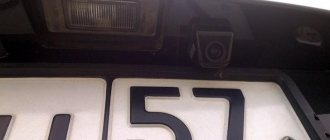
Most often, the rear view camera is placed above the license plate (on an overlay called “saber”). This location is the most favorable from a viewing point of view; the camera is not noticeable and there is no need to remove the bumper. First, remove the trunk lid trim, and then the saber, which is held on by 6 M8 screws.
We determine the most suitable place for the camera and drill a hole there. We secure the accessory on the reverse side with a nut.
We route the wires from the camera into the trunk through standard corrugations.
It is more convenient to route the wiring to the front of the car under the rubber seal of the headliner. Then we drag it under the dashboard to the back of the radio. To remove the MMC, you will first need to dismantle the panel cladding.
Connection
General diagram for connecting a rear view camera:
In the trunk we connect the camera to the rear light wiring:
- +12V to green wire (reverse)
- "mass" to black
We connect the miniISO connector to the radio, the location of the wires in the blue block is as follows:
- Ground (outer part of the tulip) of the connector to pin 16.
- Plus (central part) of the connector to pin 19.
It is worth noting that if the MMC was installed on a car in the “norm” or “standard” configuration, then you will need to additionally supply +12V from reverse to pin No. 1 of connector A1 of the radio.
The process is also shown in the video:
Connection to radio
Once you have connected the camera to the car's electrical outlet, run the video cable (yellow tulip plug) through the interior and secure it with electrical tape. It is important that the yellow wire is not pinched and does not get caught in the fastening element. Typically, the length of the video cable is from 3 to 5 meters, this is enough to lay it in the most inconspicuous way even in a large SUV.
Healthy! If you do not have enough cable length, you can extend it with another cable of the same type.
Next, connect the cable to the tape recorder. To do this, first read the instructions for the radio, although the principle is the same for most systems, some may still differ in their configuration. Also in the document you will find the specification of the ports, their markings and the location of the input connectors. Usually it is enough to connect the second end of the “tulip” to the corresponding “Video in” connector.
A typical camera connection diagram is presented above. On most car radios that have the function of connecting a video camera, in addition to the video input, there is an additional wire for activating the inclusion of the radio in the mode of displaying the video image coming from the video camera. This wire is designated “Reverse” or “BACK”. Activation is carried out by applying a “positive” (+12 V) voltage to this wire. For this purpose, video camera manufacturers complete their products with a special wire that, in addition to the cores transmitting the video signal, has another core (red, designated “P3” in the diagram). One end of this wire is connected, together with the + 12 V end of the “P2” connector, to the power wire of the reversing lights, and the other end to the additional wire of the radio.
If we are talking about a wireless camera, then the connection principle is the same as described above, with one difference - instead of a yellow video cable, you will need to connect the included transmitter to the “Video in” port. This completes the installation of the rear view camera, the video of which you can watch at the end of the article. But don’t rush to assemble the interior trim; first you need to check that you did everything correctly.
Setting up standard MMS
No firmware is required for the radio; you just need to activate the rear view camera. To do this, download the program (To download files you need to log in to the site) and copy it to removable media (USB Flash).
- Go to the desktop (WinCE). On the radio screen, hold down the “Settings” button, then “Exit” and “Desktop”.
- Let's launch the program. My device - USB disk - Folder with the program - Run the CamOnOff file.
- We allow you to use the camera. Click on the corresponding button. We close the program, it and the flash drive will no longer be needed.
By the way, the whole process is also shown in the video:
We check the operation of the rear view camera, including reverse gear.
Let us remind you that some motorists prefer to use parking sensors instead of a camera.
Share on social networks:
Found an error? Select it and press Ctrl+Enter..
Source
Installing a rear view camera on a Lada Kalina 2 Lux station wagon or hatchback
Many motorists install video devices for viewing the road situation to simplify parking in places with a large concentration of cars. The presence of a standard parking sensor complements the system and reserves elements when one of them fails. Installing a rear view camera on Kalina 2 is desirable, since it does not have any other standard parking system.
Checking and setting up the camera
In order to check how successfully the installation and integration of the camera into the radio was completed, connect the battery, start the car and put the car in reverse gear. If an image appears on the car radio, it means you did everything correctly. If the picture is missing or is poorly displayed, try the following:
- go to the radio menu in settings;
- find the “cameras” section;
- find the camera in the list;
- adjust the focus and other parameters of the “eye”.
Thus, the car radio with navigation and rear view camera are installed and you can enjoy all the conveniences of this gadget.
Camera selection
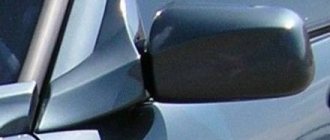
You can install any universal camera on the Lada Kalina. Due to the fact that there is no space for a standard video device on the car, most drivers select them based on their capabilities. Most often, video cameras are located in the place provided for installing the license plate light. The most suitable size is the stock camera for the Volkswagen Touareg. The device is equipped with a small lamp to illuminate the room. The difference in illumination will be visible, but there will be no reason for a traffic police officer to stop due to the lack of 1 lamp.
They install rear view cameras on cars, located in the license plate frame. With this arrangement, the device is not protected by body elements from dirt and dust. The option of placing a video camera under the trunk lining (“saber”) is more acceptable, but for installation you will have to drill a hole. The device is almost invisible; it can only be seen close up.
Benefits of new technologies
MMC Lada Kalina 2 is characterized by a simplified control system. Now all the necessary options can be obtained with 1-2 taps on the screen. The system is equipped with a more functional resistive screen. Unlike the standard Kalina radio with a capacitive version, the resistant screen has improved performance characteristics. The device is able to operate without failures in any temperature conditions.
Lada owners often complained that in sunny weather it became impossible to use the car radio. This is due to the numerous glares that make the characters on capacitive screens almost unreadable. The designers, when developing the second version of the radio, took this drawback into account.
If desired, the car owner can choose a model with a mini-visor that protects from glare.
The maximum display area of MMS Kalina 2 is 7 inches. Its operation is based on the Windows CE 6 operating system. The version developed specifically for radio tape recorders has characteristics close to optimal. It takes a few seconds to turn on the device. The amount of RAM ranges from 128 to 256 MB. Firmware for the Kalina 2 radio has significantly improved the technical capabilities of the equipment. Now they are as follows:
- support for wav, wma, mp3 formats;
- 6 programmed shades of music playback;
- the display of the Lada Kalina 2 radio shows information about the song and album during playback;
- there is the ability to play video in wmv format;
- the multimedia system supports maximum video resolution at 320*240 pixels;
- it is possible to play video files of other formats, but for this you will have to use a convector;
- availability of FM radio;
- micro SD card support;
- Lada radio firmware makes it possible to view images saved in bmp, gif, jpe, jpg, jpeg formats;
- The maximum photo size is not limited, but if it exceeds 2 MB, then the Kalina multimedia firmware will open it from 2 to 10 seconds.
Installation
Due to the fact that there is no standard view of Kalina 2, the camera is positioned depending on its type so that it shows the situation behind the car without distortion. On Kalina hatchback it is most often installed instead of one of the room lamps. To do this, remove the trim from the trunk door and dismantle the saber. It is secured with 6 nuts. Then remove one of the lights, having previously disconnected the live wires.
Before installing the video device unit, it is necessary to drill out the standard mounting points for the lampshade, since the element being installed has a collar on the holes for self-tapping screws. For fastening, strips of durable plastic are placed on the inside of the saber, which will serve as the basis for screwing in the screws.
In most cases, a video camera with a pin is mounted on a lining under the trunk lock. The hole should be drilled away from the center, otherwise the pin of the device will interfere with the locking. The overhead camera can be mounted in the middle, since there is no need to drill anything. The pin of the device together with the wires is installed in the hole and secured with a nut. The video cable is passed into the trunk through the hole for the wires of the room lamps.
After this, you can install the overlay in place and begin connecting the traffic camera to the monitor or to the standard multimedia system (MMS). The video device is installed in the same way on the Kalina station wagon.
What is MMC Kalina 2?
Depending on the selected vehicle configuration, the consumer receives MMC Kalina 2 with various options. At the time of choosing the necessary equipment, the future owner must carefully study this issue. It is possible to install a 2 din radio with or without a CD drive, touch screen. In the last few years, car owners have given preference to models with touch control mode.
Connection
The wires from the camera are routed along the inside of the trunk door to the corrugation of the standard power supply harness for the lamps. You can stretch the cable using thin steel wire. Some drivers power the camera from the license plate lighting. This is not entirely convenient, since power will only be supplied when the lighting fixtures are turned on.
It is better to connect the camera to the reversing lights. When reverse gear is turned on, the video device will receive power automatically and transmit the image to the monitor. The length of the camera's power cable does not allow it to be connected to the flashlight, so it is necessary to extend the cable by 0.5 m.
Throughout the interior, wires can be laid on the floor or under the roof trim.
Many drivers prefer the first option, because a poorly secured cable under the roof can rattle when driving. The Kalina Lux package includes a standard MMC, which provides for the connection of video devices, including a rear-view camera. The radio is equipped with a mini ISO connector for connecting them. The plug is blue. The corresponding wires are connected to pins 16 (ground) and 19 (+12 V).
In order for the radio to automatically display an image when reverse gear is engaged, you need to download and install the special Cam On Off program. After activation, the MMC can be put in place. The camera is powered from any consumer that receives power after turning the key to the ACC position. This could be either the cigarette lighter or the interior light.
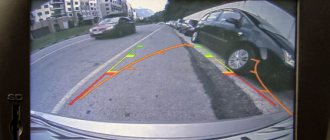
After testing, the dismantled elements are installed in place. It must be remembered that due to the tilt of the camera, the parking lines convey the distance to the obstacle with distortion. In reality, they show the distance to the asphalt. The true distance is determined empirically.
A properly installed and connected video system will provide the user with safety when parking a car.
Source
WebCam On-Off 1.3
| |||||||||||||||
| WinLock 8.21 WinLock is a program for limiting the time you work with Windows. Automatically loads when you turn on the computer and checks operating time. After expiration Block 4.5 Blok is a program for locking the keyboard and mouse from children. Locks the keyboard, mouse, with the function of turning off the monitor (if you leave for a long time Active Password Changer 10.0.0 An easy-to-use utility that allows you to quickly and easily recover your local administrator or user password in Windows. Present Internet Censor 2.2 Internet Censor is a free and simple parental control application that allows you to filter Internet resources whose content is potentially KeyFreeze 1.4 KeyFreeze is a simple portable utility for locking the operation of your computer's mouse and keyboard without locking the Windows screen itself. USB Manager 2.05 USB Manager is a small utility for managing USB ports on your PC Reviews of the WebCam On-Off programMARK about WebCam On-Off 1.3 [04-11-2019] We advise you to pay attention Built-in search helps you find any file. The built-in player will show you the video without waiting for it to load. The catalog will help you choose from a million programs, games, films exactly what you need. | |||||||||||||||
Categories
| |||||||||||||||
Connecting a rear view camera on a Kalina car
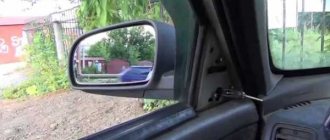
This is what your future assistant looks like
This device greatly facilitates parking both during daylight hours and in the dark, especially in small courtyards of city high-rise buildings. The cost of such a device is not so high compared to the benefits you get in the end. A rear view camera installed in the car will help you avoid unwanted collisions with fences, posts, as well as with other cars when making turns or when entering a parking space.
Required accessories and installation sequence
On Lada Kalina 2, the camera is most often installed above the license plate. Usually, the standard design of Russian cars does not require a camera to view the space behind the car. However, you can install the device not only at a branded service station, but also yourself. This can be done especially easily on cars such as the Lada Kalina and its second-generation model of the same name.
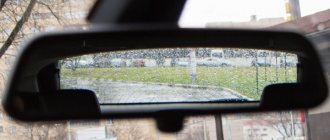
You can notice it when you zoom in
To install a rear view camera, you need to strictly follow the instructions and prepare the necessary accessories, as well as remove the tailgate trim in advance.
Tools you will need to install a video device yourself:
- crosshead screwdriver;
- a set of open-end wrenches or sockets;
- suitable diameter drill bit, drill or screwdriver;
- The device itself - the rear view camera - is universal and, depending on the configuration, can be installed in any vehicle.
The rear fifth door trim is the most preferred place for mounting and fixing a rear view camera (duplicate name “saber”). To remove the saber, you will need to unscrew six nuts using the key set to “8”. The process of performing sequential operations is as follows: we mark on the saber the area where the camera will be mounted, then we drill a hole of the required diameter and pull the wiring for the video device through it.
To route the wiring harness without drilling extra holes in the tailgate, you can use any of the six holes for the saber clip. To do this, lift the elastic band and move it to the side. We cut the plug in place. Then we install the door trim on the remaining 5 nuts. Now the wiring for the camera is ready.
The device itself is attached to the outside of the fifth door trim using 2 strong self-tapping screws. To connect the camera to the video playback device, we stretch the wiring around the cabin. There are two options here:
- hiding it under plastic sills and trim of the door pillars;
- laying under the roof lining of the car.
As a result, the wire should appear behind the radio. If the kit you purchased does not include a monitor, then you can connect the device to a regular standard radio with a multimedia function.
Many motorists install video devices for viewing the road situation to simplify parking in places with a large concentration of cars. The presence of a standard parking sensor complements the system and reserves elements when one of them fails. Installing a rear view camera on Kalina 2 is desirable, since it does not have any other standard parking system.
Device characteristics
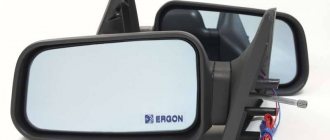
If you decide to purchase a salon mirror, then you will probably be interested in the features of such devices:
- Of course, the first feature is the ability to know exactly what is happening behind the car, including the space of “blind spots”. Even if there is a small obstacle behind, the driver will still be warned about it.
- Large viewing angle, on average this parameter is about 170 degrees, which again allows you to fully control the space behind.
- Most cameras connected to a mirror display a color image.
- The ability to operate the cameras in any weather conditions, since the device itself has a sealed housing.
- Such cameras demonstrate a mirror image of the image, so the driver will know about the real location of objects.
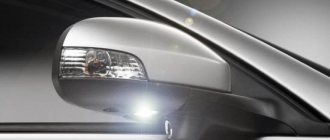
- If you choose a more modern device with a highly sensitive matrix, the video quality will be high even if the lighting is low.
- Most car mirrors with cameras turn on automatically when reverse gear is activated.
- If necessary, the driver can always adjust and configure the camera to select the most optimal viewing angle.
- Special parking lines are superimposed on the image displayed on the mirror, which will allow an inexperienced motorist to park more quickly.
- Versatility of mounting a mirror device and a camera. The gadget itself can be built into the license plate of the car.
Now let’s briefly look at the types of gadgets that can be found on sale:
- Universal options. Installation of such devices is carried out in specially designated places.
- Gadgets sold with a numbered frame in which they are installed.
- Standard rear view devices manufactured for use in specific car models (the author of the video is the All Miscellaneous channel from China).
Advantages and disadvantages
Of course, any electronic devices have both their advantages and disadvantages, this is quite normal. It should be noted that all the pros and cons depend solely on the specific model of the gadget.
The advantages of such devices are as follows:
- Simplicity of design, as a result of which installation of the mirror and the camera itself is possible in any place convenient for the car owner.
- Affordable price.
- Possibility of full control of the situation behind the vehicle.
As for the disadvantages, they are:
- Depending on the device, it may be equipped with too little protection against damage. And when driving a car on our roads, the device can fail quite quickly.
- Bad image. If you purchased a cheap device, then you should not be surprised at the low picture quality.
- Typically, devices of this type do not support the ability to change the angle.
Installing a rear view camera Lada Kalina 2
I have long dreamed of installing a rear view camera on my car and finally my dream has come true. I purchased a suitable camera from the auto market and began installation.
The installation mechanism is not complicated; I have already described how to remove the rear light. So, from there I ran the power to the camera, and I ran the power through the right corrugation that goes to the fifth door, and I pulled the video signal cable through the left corrugation, since their diameter is small and it’s difficult to push both cables.
I ran the video signal cable behind the rubber seals under the ceiling. Many have already described dismantling a beard, I will just mention one nuance. The radio is not removable, or rather it can be removed, but you need to disconnect the antenna cable, and it’s somewhere in the depths, it’s a pain in the ass. You can disconnect all the plugs from the back of the radio and carefully turn it backwards towards you so that the plug socket is visible. The cable to the monitor does not interfere with this; it is of sufficient length.
So, I couldn’t find a miniISO connector, so I soldered small plugs to the ends of the video signal wires, which fit well on the legs of the radio connector. Of course I rolled my eyes, but it was okay. Basically everything. True, then I had to reinstall the program for the camera in the radio and that’s it. Everything worked. The video camera had to be lowered down as much as possible, since it looks far away, as a result, on the monitor half of the screen there is a rear side and a brush, but when you back up, there is a dead zone of 30cm, that’s all. I think this is normal.
Note that our website already has a similar article in the electrical equipment section - this is installing navigation on the Lada Kalina 2 + links to the necessary programs.
Video. Installing a rear view camera Kalina 2 with your own hands
In addition, a big plus in installing the camera this way is that it is always clean, since the brush cleans the glass and there are no hemorrhoids. That's all. Let me remind you that in the previous article we looked at installing the hood seal on Kalina 2 with our own hands.
Camera selection
You can install any universal camera on the Lada Kalina. Due to the fact that there is no space for a standard video device on the car, most drivers select them based on their capabilities. Most often, video cameras are located in the place provided for installing the license plate light. The most suitable size is the stock camera for the Volkswagen Touareg. The device is equipped with a small lamp to illuminate the room. The difference in illumination will be visible, but there will be no reason for a traffic police officer to stop due to the lack of 1 lamp.
Installation
Due to the fact that there is no standard view of Kalina 2, the camera is positioned depending on its type so that it shows the situation behind the car without distortion. On Kalina hatchback it is most often installed instead of one of the room lamps. To do this, remove the trim from the trunk door and dismantle the saber. It is secured with 6 nuts. Then remove one of the lights, having previously disconnected the live wires.
Before installing the video device unit, it is necessary to drill out the standard mounting points for the lampshade, since the element being installed has a collar on the holes for self-tapping screws. For fastening, strips of durable plastic are placed on the inside of the saber, which will serve as the basis for screwing in the screws.
In most cases, a video camera with a pin is mounted on a lining under the trunk lock. The hole should be drilled away from the center, otherwise the pin of the device will interfere with the locking. The overhead camera can be mounted in the middle, since there is no need to drill anything. The pin of the device together with the wires is installed in the hole and secured with a nut. The video cable is passed into the trunk through the hole for the wires of the room lamps.
After this, you can install the overlay in place and begin connecting the traffic camera to the monitor or to the standard multimedia system (MMS). The video device is installed in the same way on the Kalina station wagon.
Connecting external devices
Domestic developers made sure that their creation was maximally adapted to work with third-party devices. The 2 din radio allows the use of wireless hands free, mobile phones and external information sources.
In order not to overload the Lada with unnecessary wires and inputs, the connection between the radio and an external device occurs via the Bluetooth protocol. It is enough to set the necessary settings once for the system to remember them.
If you wish, you can download music from external media to the internal memory of the radio or listen directly from a flash drive or phone. If the second is selected, then the sound comes from the speakers installed in the car or wireless headphones. When it comes to connecting memory cards, they must be formatted in a certain way - FAT16/FAT32. The connection connector is located on the back side.
Repair and warranty service are as follows. If the installation of the radio in Kalina was carried out correctly, then once a year it is necessary to do a preventive examination at a service center.
If the service period has passed, then everything can be done at home. All wires must be carefully disconnected. Using a screwdriver, loosen the fastenings and remove the radio. Then it is delivered to the workshop, where the failed element is replaced.
Article rating:
Cam on off for MMS Kalina 2 Link to main publication
Related publications
- ZAZ Sens or VAZ 2114 which is better
Connection
The wires from the camera are routed along the inside of the trunk door to the corrugation of the standard power supply harness for the lamps. You can stretch the cable using thin steel wire. Some drivers power the camera from the license plate lighting. This is not entirely convenient, since power will only be supplied when the lighting fixtures are turned on.
It is better to connect the camera to the reversing lights. When reverse gear is turned on, the video device will receive power automatically and transmit the image to the monitor. The length of the camera's power cable does not allow it to be connected to the flashlight, so it is necessary to extend the cable by 0.5 m.
Throughout the interior, wires can be laid on the floor or under the roof trim.
Many drivers prefer the first option, because a poorly secured cable under the roof can rattle when driving. The Kalina Lux package includes a standard MMC, which provides for the connection of video devices, including a rear-view camera. The radio is equipped with a mini ISO connector for connecting them. The plug is blue. The corresponding wires are connected to pins 16 (ground) and 19 (+12 V).
In order for the radio to automatically display an image when reverse gear is engaged, you need to download and install the special Cam On Off program. After activation, the MMC can be put in place. The camera is powered from any consumer that receives power after turning the key to the ACC position. This could be either the cigarette lighter or the interior light.
After testing, the dismantled elements are installed in place. It must be remembered that due to the tilt of the camera, the parking lines convey the distance to the obstacle with distortion. In reality, they show the distance to the asphalt. The true distance is determined empirically.
A properly installed and connected video system will provide the user with safety when parking a car.
Installation of a rear view camera of a luxury package! Here is the first idea and MY FIRST ARTICLE for refining my car. Installing a rear view camera to the standard radio with display. I decided to describe the installation process and the difficulties encountered. And so: I bought a camera in a license frame! In Ufa in the world of electronics on sale for 990 rubles. it allegedly cost 1,700 rubles. 1.3mr, very decent picture. The package already includes a long cable from the camera to the radio. Tulip tulip. Let's start the installation: 1) First you need to get to the back panel of the radio. In the luxury configuration, you first need to remove the climate control unit. It is held on by 6-8 clips, there are no bolts or screws. You need to pry it from the edge with a screwdriver, grab it, and pull it firmly towards you. (This is the most difficult thing that seemed to me) There is a fear of breaking the socket, but it is strong enough and you need to pull harder, starting from one side or corner.
2) After removing the control unit, remove the top panel-visor of the screen. It is also on clips and can be removed very easily. The panel on the glass side has three ears that fit into the main panel. 3) Unscrew the two bolts that hold the radio. 4) Unhook the antenna wire, otherwise the antenna wire is not long enough to pull out the radio. (It is NOT located in the radio! But under the glove compartment closer to the right passenger pillar.) 5) On the rear panel we see a blue green and yellow plug. We need a blue one, it’s called “mini ISO” (in luxury versions it’s already there, but if it’s not there, you can buy it at an electronics store) we take it out.
6) Into this plug you need to insert into the 16th and 19th cells the wires (soldered or pressed to metal things. Shown in the photo) coming from the camera 16th - minus (ground), this is the outer side of the tulip 19th - plus, internal 7) Install the program CAM ON OFF on the radio. To do this, download it, unpack it on your computer, throw the unpacked folder onto a flash drive, connect it to the radio, turn on the radio and long press on the “settings” screen, the insides of Windows Mobile will open. We go to “My Device”, find the flash drive and go in, then go to the folder with the program, launch the cab file. In the window that appears, click “ENABLE CAMERA”, then close all windows and click on the HOME shortcut on the desktop to return to the normal radio mode. You can download it here dfiles.ru/files/y3epinx5p thanks to them lada-kalina2.ru We connect our ready-made plug, put the radio in place, but without checking its functionality we don’t assemble everything to the end. 9) We will power the camera from any source for testing, I powered it from the interior lamp. Turn on the power of the camera, turn on the rear camera. And a picture should appear. If it appears, then you can put the entire panel back together 10) We lay the wires to the rear door. I laid on the seals on the top, on the passenger side and the plastic panels of the pillars. Everything is very easy and fast
11) Remove the rear door trim: Unscrew the two bolts on the handle, then remove the panel itself, it is held on by “hedgehogs” at the top and in the middle. And on the bottom of the ears. So you need to remove it from the top and pull it out to the top side. After removal, the hedgehogs will be almost dead, so new ones will be needed.
12) Install the camera where it is convenient for you, etc. You can pass the wires through by removing the license plate lights, etc., but I just drilled through the metal behind the license plate. I stretched wires from there and sealed everything so that moisture did not get in, etc.
13) my camera is powered from the rear license plate light, that is, the camera will only be supplied with power when the side lights or low beam are on. The camera will not work with DRLs, just a white screen will be displayed when reverse gear is engaged. 14) put everything back together and rejoice at the result. When you engage reverse speed, the music fades out and the picture from the camera automatically appears!
Installing a rear view camera on a car significantly improves traffic safety. This device can be installed as an addition to parking sensors (parking assistant) or separately. In any case, the rear video camera will greatly facilitate maneuvering, especially when parking.
Installation from A to Z
How should the KZV be installed and connected? If you want the radio with a rear view camera to work for a long time, follow the recommendations below. For installation you will need a diagram, which should come with the kit.
Installation process
- Remember that all electrical work is carried out with the on-board power supply de-energized. Therefore, it is necessary to disconnect the battery.
- First, the camera is installed, in particular the peephole; depending on the design features of the car, a place may be provided for this element. If it is, then you only need to dismantle the plug and install the peephole there. If there is no space, then you need to drill a hole in the bumper and fix the peephole in it using silicone or glue.
- Then the wiring from the device is laid in the luggage compartment, the negative terminal should be connected to the ground of the car, for this you can use a regular bolt. The positive terminal is connected to the optics wire, which turns on when reverse gear is activated.
Connection diagram of the camera to the car radio display
Connection to radio
- In order for the image to be displayed on the car radio monitor when turned on, you need to lay the yellow wire through the interior and secure it with electrical tape. Make sure that the cable is not kinked or affected by moving body parts, otherwise it will have to be replaced soon. If the length of the wire is not enough for installation, you can try to increase its size using a similar cable.
- Then the wire needs to be connected to the audio system; for this you need to read the instructions for the radio. The connection principle is identical in almost all systems. The end of the yellow wire, the so-called tulip, must be connected to the Video In connector.
- If you use a wireless version of the camera, the principle of connecting the system will be identical. Instead of one end of the wire, you need to install a special sensor in the Video In connector, which is included with the KZV. Actually, when these actions are completed, the installation procedure of the short circuit protection device can be considered completed. But before assembling the upholstery and preparing the car for operation, it is necessary to diagnose the operability of the system.
Checking and setting up the camera
To make sure that everything was done correctly and that the KZV type is working in normal mode, it is necessary to check the functionality of the device. To do this, connect the battery, start the car engine and put the car in reverse gear. At this moment, a picture should appear on the display of the radio - if this is the case, then everything is installed and connected correctly.
If the image is missing or poorly displayed on the display, do the following:
- Go to the car radio menu and select “Settings” or “Settings”.
- Then go to the “Cameras” or “Cameras” submenu, depending on whether the audio system is Russified or not.
- Then you need to find your camera in the available list.
- Using the settings, adjust the focus and other settings of the KZV eye.
By following these steps, you can customize the system to suit your needs.
Setting up standard MMS
No firmware is required for the radio; you just need to activate the rear view camera. To do this, download the program (To download files you need to log in to the site) and copy it to removable media (USB Flash).
- Go to the desktop (WinCE). On the radio screen, hold down the “Settings” button, then “Exit” and “Desktop”.
- Let's launch the program. My device – USB disk – Folder with the program – Run the CamOnOff file.
- We allow you to use the camera. Click on the corresponding button. We close the program, it and the flash drive will no longer be needed.
By the way, the whole process is also shown in the video:
We check the operation of the rear view camera, including reverse gear.
Let us remind you that some motorists prefer to use parking sensors instead of a camera.
Settings
The standard multimedia system does not require firmware. It is enough to launch the rear video review function using a special program. If the car owner installed the view camera with his own hands, you will have to perform the following steps:
- The CAM on/off program is downloaded to a USB flash drive by connecting to a computer. The drive is inserted into the USB connector of the radio.
- On the car radio screen, press the “Settings” button, and then go to the desktop. This provides the user with access to the WinCE operating system.
- Going to the “My devices” folder, find the “USB drive” item. By pressing the select button you go to the folder with the program.
- Run the installation file, allowing the use of the camera. The settings menu is closed.
- Engage reverse gear and check that the video system is installed correctly. Using the appropriate controls, adjust the required parameters.
If the machine is under warranty, the installation of the video system should be entrusted to specialists.
Connecting a rear view camera yourself
There are several main ways to connect a rear view camera to a car. The outgoing signal can be sent to the display of a car radio or navigator, a head unit monitor, or to a separate screen included in the delivery package.
The last option is the simplest, since there is no problem of equipment inconsistency. At the same time, the remote screen requires a separate place in the car. The easiest way is to place the display on top of the dashboard. The second disadvantage of this option is the additional costs of equipment.
If you connect the output of the device to a monitor or radio, you save both space and money. Plus, in this case the display will be located in the most convenient place for viewing.
Installing a rear view camera yourself usually does not pose any particular difficulties. First of all, you need to decide on the type of product and its parameters. If you are going to connect the device to a car radio or navigator, you must first make sure that the equipment is compatible. The video camera’s power supply voltage, the transmitted image standard, resolution, device activation option, type of connectors, etc. may be important here.
How to connect camera wires and power
How to connect power is a rather important question and not always straightforward. There is an opinion that it is best to power the device from the reversing lights. This is often the most convenient. The camera itself is located on the car in the rear of the body. So here it is not difficult to take the 12V voltage from the rear light and connect the red wire to it. Here you can also take a minus.
Note that in order to avoid the appearance of additional potential differences, it is better to take the plus and minus from one place. This will reduce the likelihood of failures and interference with electronics.
An alternative option is to connect the camera's power directly from the on-board network, directly from the battery or through the ignition (for example, from a cigarette lighter). This method may be preferable if the video signal is sent to the monitor of the head unit.
In this case, the video camera will be constantly energized while driving, warmed up and ready for use. This improves picture quality, but may lead to overheating. Many models are designed for power supply less than 12 V. It is better to connect them via an adapter (voltage converter).
The last question is which wire or connector to connect the video output to. It all depends on the type of display device used and the connection diagram. The easiest way is if a standard RCA connector can be connected directly to the radio or navigator. Otherwise you will have to use adapters.
Below we will describe how to properly connect the video camera yourself when using different connection options.