Chevrolet Niva cars have a dry clutch. It is driven by a hydraulic mechanism. If the clutch malfunctions, it needs to be adjusted. Here are a few signs that require immediate diagnosis:
- increased pedal play. If, when pressed, the pedal exceeds its travel according to the standard, this means that the clutch is not completely disengaged. In this case, the disc does not fully contact the flywheel. Untimely repairs can lead to severe wear and tear.
- Pedal travel is too small. Such a defect can lead to slipping of the gasket. At the same time, engine power drops greatly.
- The appearance of jerks when starting off. It is also possible that shocks may occur in the transmission.
The appearance of all these signs indicates the presence of problems with pedal adjustment. If they are ignored, this can lead to clutch replacement and costly repairs.
How to adjust the Niva Chevrolet clutch with your own hands - video
Chevrolet Niva clutch malfunctions are divided into two groups.
Some can be eliminated by adjusting the mechanism, while others require replacement of parts or the entire assembly. At the same time, breakdowns of the first category tend to quickly develop into the second.
Parts of an untimely adjusted clutch wear out quickly and require replacement. An unadjusted clutch drive causes inconvenience when driving a car - difficulties appear when changing gears or jerks when the car starts moving.
This harms the engine and gearbox. Therefore, the driver’s task is to correctly diagnose and eliminate the problem in the clutch operation.
When should it be adjusted?
It is necessary to adjust the pedal free play and pump the hydraulic drive in the following cases:
- Pedal travel is too long. In this case, the clutch does not disengage completely (“drives”). This leads to difficult gear shifting and intense wear of the friction lining on the driven disk.
- Small clutch travel. In this case, the disc slips, especially under heavy load on the transmission (driving uphill, in high gear).
- Jerking, knocking or squeaking noises when changing gears or when the car starts moving.
Important: operating a car with an incorrectly adjusted or “aired” clutch drive leads to accelerated wear of gearbox parts.
The design of the Chevrolet Niva clutch coincides with a similar unit of the “classic” AvtoVAZ. The only difference is in the different dimensions of the working cylinder and, accordingly, in a larger and easier pedal stroke.
How to adjust it yourself?
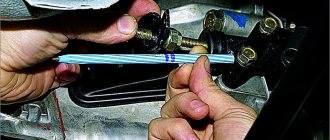
To adjust the mechanism you will need keys 10, 13 and 17, pliers and a pencil. The operation is performed on a lift or inspection pit. The work order is as follows:
- Using a 10mm wrench, unscrew the locknut of the pedal travel limiter.
- By rotating the nut, set the free play within 0.4-2 mm.
- Tighten the locknut.
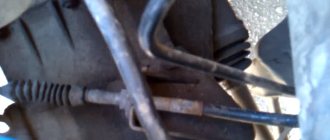
Then you need to go down under the car and adjust the free play of the pusher within 4-5 mm (to unscrew the nuts, you need wrenches 13 and 17). The check is performed as follows:
- Using pliers, remove the clutch fork release spring.
- Place a pencil against the boss of the lower mounting of the working cylinder.
- Make two from opposite the fork and 5 millimeters to the right.
- Pull the fork all the way back, selecting the free stroke of the pusher.
- The fork should stop exactly opposite the mark on the pencil.
If the gap does not correspond to the nominal one, you need to loosen the lock nut and rotate the nut to achieve the required parameters.
When adjusted correctly, the clutch begins to disengage when the pedal travel is 25-35 millimeters.
The final check is performed with the engine running. If everything is done correctly, the gears change easily, and the car starts to move if the pedal is released approximately ⅓ - ⅔ of the stroke.
How to upgrade?
Before adjusting the mechanism, you need to bleed the hydraulic drive. To do this, you will need brake fluid, a container and a flexible tube, the inner diameter of which corresponds to the size of the fitting, and a 10mm spanner. The bleeding process is similar to removing air from the brake system. As with the brakes, the work is done with an assistant. One person must press and release the pedal on command, and the second must open and close the fitting.
Chevrolet Niva (shniva). clutch problem!
The SUV's clutch is constantly closed with a central diaphragm spring and is driven by a hydraulic drive. It must also be carried out when the hydraulic drive is filled with liquid.
When the Chevrolet Niva clutch is faulty, you need to purge the hydraulic drive. But if that doesn't work,...
When the pedal is pressed, the main piston creates fluid pressure, which causes the pushrod and fork to move the release bearing clutch. The disk is replaced if the axial runout in the area of the linings is more than 0.5 mm, if they are cracked, scuffed or unevenly worn, and also if the distance from the surface of the lining to the rivets is less than 0.2 mm. Over time, on a Chevrolet Niva this mechanism fails, requiring either adjustment or replacement.
In addition, this element has a large disk thickness. Features of the clutch on the Niva Chevrolet The clutch mechanism on the Niva Chevrolet is reinforced with a thicker, larger diameter disc with dual damper springs.
Checking the clutch release bearing The clutch release bearing is sealed and cannot be washed.
Check the condition of the clutch release bearing, which should rotate easily, evenly and quietly and there should be no play in it. The working surface of the bearing acting on the pressure spring must be smooth, without cracks, local corrosion or wear.
A few more ways to improve clutch performance
If it so happens that this mechanism begins to fail, then there is still no need to rush to replace it. It's better to try several ways to adjust
b, and if this does not work out, then only when resorting to extreme measures. We have looked at several regulation options, and now we will look at three more methods that often help car enthusiasts avoid spending money on purchasing a new clutch. We are talking about the following:
- It happens that problems in the clutch system are associated with the presence of air or a faulty cylinder. In this case, it is necessary to remove the air and disassemble the unit. During disassembly it will become clear what the reason is. When removing air, it is important to add only clean liquid. If it accidentally gets on the car, it must be washed off immediately with water, otherwise it will damage the coating;
- The following operation can also help adjust the clutch: first you need to drain the oil from the gearbox, then remove the gearbox, then install the mandrel 09411-11000 to center the clutch disc and finally loosen the mounting bolts. As a result of all this, it will be possible to remove the clutch cover. It is important to check the rear O-ring and never clean the disc with solvent.
For inexperienced car owners, all of the above operations may seem complicated, although they are indeed not easy. That is why, if you have any problems with the clutch system, it is better to contact specialists who can perform such work at a high level.
Replacing the master cylinder
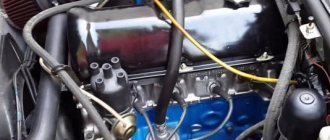
New clutch master cylinder under the hood.
- Pumping out brake fluid from the reservoir with a rubber bulb
- Unscrewing the tube, removing the hose from the fitting and unscrewing the fastening nut and removing the cylinder.
- Installing a new one follows the steps in reverse order.
Do not miss the moment of fixing the pedal pusher with a fillet (notch) on the cylinder piston, pumping the hydraulic drive.
Video about clutch problems on a Chevrolet Niva
8.2. Clutch pedal adjustment
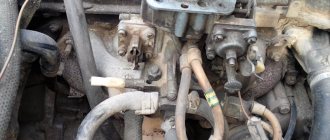
The master cylinder is secured in the engine compartment on two studs welded to the pedal assembly bracket. The Chevrolet Niva clutch master cylinder is connected by a steel tube and a reinforced rubber hose to the slave cylinder, mounted on the clutch housing using a bracket.
The working surface of the bearing acting on the pressure spring must be smooth, without cracks, local corrosion or wear. A faulty clutch release bearing can be determined without removing it from the car, for which you need to press the clutch pedal with the engine running.
If there is additional noise when you press the clutch pedal, the clutch release bearing is faulty and needs to be replaced. Apply grease to the contact surfaces of the bearing, cylinder and clutch release fork.
How to check the knock sensor?
Unfortunately, the knock sensor can also fail. In this case, a person without special knowledge will be able to notice this only by the lit indicator. No other obvious signs will be noticed. The car will continue to operate in the same mode and start without any signs of breakdown.
At this point, it is necessary to remember that this device is not mechanical, it is part of an electronic system, and therefore the breakdown is considered electronic.
A knock sensor malfunction can happen for a number of different reasons, including:
- There has been a breakdown inside the sensor itself.
- Closure.
- The signal wire or braided shield is broken.
- Damage to the engine control unit.
But those who are not looking for easy ways can always carry out this simple process on their own. Self-checking occurs according to the following scheme:
- First, we remove the protection in the garage. You will have to work directly with the engine block.
- Now we rule out a break in the signal wire and shielding braid. If it is torn or the braid is torn, you need to check the fastening of the plug and socket of the sensor. The integrity of the braid must be checked.
- If a break is excluded, the outlet itself is assessed. It is possible that its connection is faulty and requires replacement.
- You can detect faults in the device itself using a voltmeter. In this case, the car must be started and idling.
- You also need to check the condition of the device contacts.
You can check it yourself in a slightly different way. For this you need a multimeter. This device is very often found among car enthusiasts.
We set the range to 200 mV, connect the positive and negative wires to the sensor terminal and to the metal ring, respectively. Do not confuse ground and signal pin! Now you need to hit it with something metal, but not too hard. The sensor will have to detonate.
Also interesting: TOP 10 cool products for Lada Niva 4x4 from China from Aliexpress. Tuning VAZ Niva / Selections, listings, top 10, etc. / iXBT Live
You can check the sensor with another device called an oscilloscope. It will allow you to study the signal more qualitatively.
Now you need to tap the sensor lightly. The device will show detonation.
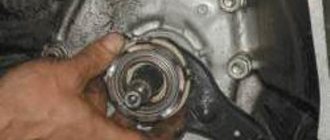
Chevrolet Niva clutch
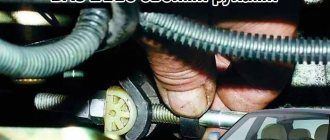
Check the free play of the clutch pedal. It should be 25.35 mm, which corresponds to a travel fork of 4.5 mm. If necessary, adjust the drive.
The adjustment begins by setting the gap to 0.1. 0.5 mm between the pedal pusher and the master cylinder piston. Naturally, it is simply impossible to “catch” such a small adjustment value without using any special measuring tools. Therefore, when making this adjustment, the free play of the pedal is measured, which should be within 0.4. 2.0 mm. This adjustment is carried out by changing the position of the pedal travel limiter in the car interior under the instrument panel.
Then the free play of the working cylinder pusher is adjusted. To perform this operation, you will have to crawl under the car, so it is better to perform it on a lift or inspection ditch.
For ease of operation, disconnect return spring 2 (Fig. below) from clutch release fork 6. Check the free play of fork 6 along pusher 5. It should be 4.5 mm. To adjust, hold the adjusting nut 4 and unscrew the lock nut 3 2.3 turns. Then, by rotating the adjusting nut 4, adjust the required free play of the fork 6, which rotates relative to the support 7. This will ensure the necessary free play of the release bearing 8. Upon completion of the operation tighten locknut 3 while simultaneously holding adjusting nut 4 from turning.
When the clutch slips, it is necessary to screw in nuts 3 and 4, i.e., move them closer to the working cylinder, several turns until the correct (4.5 mm) free play of the clutch fork appears. If this adjustment does not help, the clutch needs to be replaced (it is better to change it as an assembly).
The free movement of the working cylinder pusher 4-5 mm is regulated by loosening the limiter nut.
Chevrolet Niva - where is the clutch?
Next, a new unit is installed and the system is pumped. Automotive products Advertising Website design and development After the expiration of copyright, in Russia this period is equal to three years, the work becomes public domain. From the hose into the container there will be fluid with air bubbles.
Home Chevrolet Niva 1st generation [restyling] [ — ] Gasoline. Checking and adjusting the shutdown drive...
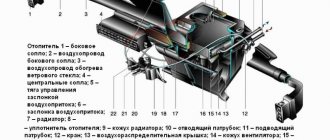
Chevrolet Niva clutch components 1 - centering sleeve of the clutch housing; 2 — casing centering pin; 3 — front bearing of the input shaft; 4 - flywheel; 5 — pressure disk basket; 6 — diaphragm spring; 7 - casing; 8 — damper spring; 9 — hub of the Chevy Niva clutch driven disc; 10 - spring plate; 11 — overlay; 12 — clutch housing; 13 — gearbox input shaft; 14 — bearing; 15 — clutch release fork; 16 — fork cover The inner ends of the fork rest against the clutch release bearing coupling and are pressed against it by a figured spring.
Parts and consumables:
It is important to check the rear O-ring and never clean the disc with solvent. For inexperienced car owners, all of the above operations may seem complicated, although they are indeed not easy. Place the other end of the hose in a container with a small amount of brake fluid so that it is submerged in the fluid. Press the clutch pedal 4-5 times and keep the clutch pedal pressed. Open the bleeder valve to release air from the system.
Liquid with air bubbles will come out of the hose into the container. After the flow of fluid from the hose stops, tighten the fitting and release the clutch pedal. Repeat steps 4, 5 and 6 several times until liquid begins to emerge from the hose without air bubbles.
This SUV is equipped with a gearbox that receives engine torque through a single-plate clutch. In this article we will find out how the clutch is adjusted on a Chevrolet Niva.
Checking clutch performance
Let's start by looking at the concept of cohesion. So, this is a mechanism whose operating principle is based on the force of sliding friction (friction clutch). It is used to transmit torque.
The Chevrolet Niva has a clutch closed with a central diaphragm spring, which is installed using a hydraulic drive. A reinforced clutch is also installed on this car, which has a large diameter and a powerful damper. In addition, this element has a large disk thickness. Over time, on a Chevrolet Niva this mechanism fails, requiring either adjustment or replacement. You can check the functionality in the following ways:
- Engage neutral gear and start the engine. Next, you need to wait a little until the engine warms up and depress the clutch pedal, engaging reverse gear. If the transmission is easily engaged, this means that the system is working properly. It’s another matter if you hear creaks - this indicates the need for repairs.
- An easier way to check is to switch gears in order and check for any extraneous sounds from below. If they are, then you need to immediately go to the service center.
- You can notice a malfunction of the mechanism when it starts to slip while accelerating. This also means that it’s time to show the car to the experts.
There is no need to worry too much about a faulty clutch, because you can bleed the hydraulic drive. If you have at least the slightest knowledge of mechanics and the desire to independently adjust the operation of the mechanism, then you do not need to go to a service station at all. Bleeding the hydraulic drive is done as follows:
- first, the hose is put on the cylinder valve, and the other side is immersed in the brake fluid;
- Next, you need to press the clutch pedal and hold it a little. This manipulation should be repeated exactly 5 times;
- then you need to open the valve and release the pressure. This operation must be performed until the liquid flows out.
How to adjust the Niva Chevrolet clutch with your own hands: video
The manual transmission on the Chevrolet Niva is equipped with a dry clutch with a hydraulic drive.
Product delivery options
Note! Below are the shipping methods available specifically for this product. Payment options may vary depending on the delivery method.
Detailed information can be found on the “Delivery and Payment” page.
Parcel by Russian Post
Available payment methods:
- Cash on delivery (payment upon receipt)
- Using cards Sberbank, VTB, Post Bank, Tinkoff
- Yandex money
- QIWI
- ROBOKASSA
Shipping throughout Russia. Delivery time is from 5 to 12 days.
Parcel by Russian Post 1st class
Available payment methods:
- Cash on delivery (payment upon receipt)
- Using cards Sberbank, VTB, Post Bank, Tinkoff
- Yandex money
- QIWI
- ROBOKASSA
Shipping throughout Russia. Delivery time is from 2 to 5 days. More expensive than regular delivery by Russian Post, approximately 50%. Parcel weight up to 2.5 kg
Express Parcel EMS
Available payment methods:
- Cash on delivery (payment upon receipt)
- Using cards Sberbank, VTB, Post Bank, Tinkoff
- Yandex money
- QIWI
- ROBOKASSA
Shipping throughout Russia. Delivery time is from 3 to 7 days. More expensive than regular delivery by Russian Post, approximately 100%.
Transport companies
Available payment methods:
- Using cards Sberbank, VTB, Post Bank, Tinkoff
- Yandex money
- QIWI
- ROBOKASSA
Delivery is possible to any locality where there is a representative office of the transport company. Delivery time is from 2 to 10 days. Sending large parcels is approximately 50% more profitable than by Russian Post.
Source
How to adjust the Niva Chevrolet clutch with your own hands
This SUV is equipped with a gearbox that receives engine torque through a single-plate clutch. In this article we will find out how the clutch is adjusted on a Chevrolet Niva.
Checking clutch performance
Let's start by looking at the concept of cohesion. So, this is a mechanism whose operating principle is based on the force of sliding friction (friction clutch). It is used to transmit torque.
The Chevrolet Niva has a clutch closed with a central diaphragm spring, which is installed using a hydraulic drive. A reinforced clutch is also installed on this car, which has a large diameter and a powerful damper. In addition, this element has a large disk thickness. Over time, on a Chevrolet Niva this mechanism fails, requiring either adjustment or replacement. You can check the functionality in the following ways:
- Engage neutral gear and start the engine. Next, you need to wait a little until the engine warms up and depress the clutch pedal, engaging reverse gear. If the transmission is easily engaged, this means that the system is working properly. It’s another matter if you hear creaks - this indicates the need for repairs.
- An easier way to check is to switch gears in order and check for any extraneous sounds from below. If they are, then you need to immediately go to the service center.
- You can notice a malfunction of the mechanism when it starts to slip while accelerating. This also means that it’s time to show the car to the experts.
There is no need to worry too much about a faulty clutch, because you can bleed the hydraulic drive. If you have at least the slightest knowledge of mechanics and the desire to independently adjust the operation of the mechanism, then you do not need to go to a service station at all. Bleeding the hydraulic drive is done as follows:
- first, the hose is put on the cylinder valve, and the other side is immersed in the brake fluid;
- Next, you need to press the clutch pedal and hold it a little. This manipulation should be repeated exactly 5 times;
- then you need to open the valve and release the pressure. This operation must be performed until the liquid flows out.
If this procedure does not help to establish operation, it means that this element needs to be replaced. Although sometimes it happens that adjusting the clutch on a Chevrolet Niva helps restore the functionality of this mechanism. To do this, you need to loosen the locknut and adjust the freewheel pedals by rotating the bolt. After this, the locknut must be tightened.
How to replace a Chevrolet Niva clutch
If all of the above operations do not help, then there is a need to replace this device. If the system does not turn on or turns on poorly, then it needs to be replaced. This procedure requires disconnecting the clutch master cylinder from the hose, and repeating all this when installing a new one. To be more precise, the action plan is as follows:
- First the hose relaxes.
- Then the cylinder bracket is removed, then the pusher, and then the working cylinder itself.
- Next, a new unit is installed and the system is pumped.
It is difficult to call this procedure easy, so it is better if it is performed by specialists. Thus, if there is a need to replace the clutch, it is advisable to contact a service station, where this task will be completed promptly and efficiently.
Main indicator of liquid
| Liquid brand | Manufacturer | Regulatory document |
| Antifreeze-TS Felix | TU 2422-006-36732629 | |
| Cool Stream Standard | TU 2422-002-13331543 | |
| Cool Stream Premium | JSC "Technoform", Klimovsk, Moscow region. | TU 2422-001-13331543 |
| ANTIFREEZE SINTEC | CJSC "Obninskorgsintez", Obninsk | TU 2422-047-51140047 |
| LLC "TC Tosol-Sintez", Dzerzhinsk | TU 2422-068-36732629 | |
| ANTIFREEZE (antifreeze) LONGLIFE | CJSC "Dolfin Industry", Pushkino | TU 2422-163-04001396 |
The air conditioner is filled with ozone-safe freon R 134 "A" Quantity - 0.4 kg
The air conditioning system uses ATMOSGU10 oil.
Liquid GRZh-12 Front shock absorber - 0.12 l Rear shock absorber - 0.195 l.
The most important characteristic that you need to pay attention to when choosing a lubricant is its viscosity. If we are talking about oil, the composition must meet the requirements of international quality standards SAE J306
This type of certification was developed in the USA and is generally accepted today.
When deciding which oil to pour into Niva axles and other components, you need to evaluate the viscosity of the composition. According to the standards, the letter “W” corresponds to this indicator. As a rule, such a symbol is indicated on seasonal compositions. If there is a letter “W” on the package, this indicates that the liquid can be used in winter. In the absence of this symbol, oil may only be used in positive ambient temperatures.
All-season formulations are also on sale. These are the so-called thickened oils. They have the characteristics of both summer and winter lubricants.
It is equally important to pay attention to the performance properties of oils. In this case there are also certain standards (APIs). Also, when deciding what kind of oil to pour into the Niva, it is worth considering its composition
Also, when deciding what kind of oil to pour into the Niva, it is worth considering its composition.
Of course, it is logical to assume that the more natural the composition, the better it will be. This fact is confirmed by the unique properties of oils of this type. When using mineral compounds, contacting parts will deteriorate much more slowly. In addition, the so-called natural compounds have excellent anti-corrosion properties.
Also, when choosing which oil to pour into the Niva transfer case or car engine, it is worth considering that mineral compounds cannot be used in the cold season. This is explained by the fact that this type of lubricant composition begins to thicken greatly at temperatures below -15 degrees. Because of this, the mechanisms cannot function normally. The use of such oils may result in the power unit having to warm up much longer.
Also interesting: Chevrolet Niva and Niva 2121: the main differences between owning these cars
Another disadvantage of mineral compositions is that they sometimes fade. Accordingly, the lubricating characteristics of the liquid decrease. This will lead to the components starting to wear out much faster, and fuel consumption will increase. In rare cases, even damage to the power unit may occur. Thus, it is recommended to use mineral-type compounds only at not very low temperatures and for cars with low mileage.
Common faults
- Knocking or vibration when releasing the pedal. The problem occurs when the driven disk is deformed or its splines are worn out. The malfunction also appears if the engine is poorly secured to the supports or the diaphragm spring of the basket is deformed.
- The pedal sinks when pressed. This happens when the main or working cylinders break down, the hydraulic drive becomes airy, or the return spring or pressure fork breaks.
- The clutch does not disengage when the driver presses the pedal. The reason for this may be clogging or damage to the pipeline and cylinders of the hydraulic drive, deformation of the driven disk, the presence of scoring on its splines, breakage or change in the shape of the pressure fork, or diaphragm spring.
- The clutch is slipping. The problem appears when the friction linings attached to the driven disk are oiled or worn, the hydraulic drive is clogged, the pressure fork is jammed or incorrectly adjusted.
- Noise when pressing the pedal. A grinding, howling or whistling sound when the discs open is due to a faulty release bearing.
To eliminate most breakdowns, it is necessary to replace individual parts or the clutch as a whole.
Working cylinder
Unscrew the plug, remove the protective rubber cap 3 (Fig. 3-9) together with the pusher 4, remove the piston and disassemble it, having first removed the lock ring 11.
Rice. 3-9. Parts of the clutch release cylinder (slave cylinder):
1 - body; 2 - fitting; 3 - cap; 4 - pusher; 5 - sealing ring; 6 - piston; 7 - sealing ring; 8 - plate; 9 - spring; 10 — washer; 11 — retaining ring.
After disassembly, carefully wash and inspect all parts as specified for the master cylinder. Installation of a deformed pusher is not allowed.
After checking, proceed with assembly (the order is the reverse of disassembly), lubricating the parts with brake fluid.
Source
What's better here?
For the first time, the Niva VAZ-2121 was modernized in its fifteenth year of life. Then, in 1993, it was replaced by the carburetor model 21213, which soon turned into the injection model 21214. In August 2009, production of the third generation Niva began (trademark - Lada 4x4). Now we have before us “Lada 4×4 21214-046”. Outwardly, it is the same as its predecessor, but there are a lot of technical differences. It was possible to improve driving performance, higher comfort, reliability, some components and parts were unified with the Chevrolet Niva.
We talked about preliminary plans for modernization a year ago, in ZR, 2008, No. 9 - now let’s see what of the plans was embodied in the hardware.
Let us remind you that the engine, which now complies with Euro III or Euro IV standards (depending on the configuration), remained without major changes - reliable gaskets with silicone rollers and a water pump with an improved oil seal were used.
The fuel filter has been moved under the body - there are fewer pipes, reducing the likelihood of a fire in the engine compartment. The flywheel, as planned, has a diameter increased to 215 mm. And, of course, the Valeo clutch along with the slave cylinder and automatic freewheel adjustment. As a result, pedal force is reduced by 40% and free play adjustment is no longer necessary as wear occurs.
Particular attention was paid to coordinating the characteristics of the front and rear suspensions. Increased energy consumption and service life of the front suspension
The lower ball joints are 2123, the upper ones are 21214, they have a forged body and a larger pin swing angle.
The consequence of the changes was the track widened to 1440 mm. To “expand” the dynamic suspension travel, the compression and rebound buffers were shortened by 10 mm.
Modernization of the chassis made it possible to improve handling, smoothness and stability - in fact, the entire range of driving qualities of the Niva.
At the next stage (in six months to a year) there will be new door trim and body side panels, a redesigned rear seat with an ISOFIX child seat mounting system, CV joints in the driveshafts and improved interior sound insulation.
Rules for installation and dismantling work
When performing them you need:
- Provide high-quality lighting for workplaces. The operator must have permission to operate the equipment. When performing commissioning and operation, it is necessary to ensure telephone communication with employees.
- Before starting work, diagnostics of the serviceability and performance of the tool is required.
- All employees must be removed from the area where the load may fall.
- Obstruction of the passage on both sides of the machine is not allowed.
When starting the combine engine, the magnetic starter located in the track is first turned on. Then the irrigation system is activated, the lever of the magnetic station is moved to the appropriate position. It is necessary to turn on the irrigation pump and fan. Then a warning signal is given, the conveyor and the electric motor of the actuator are activated.
Question answer
Question. What clutch for the field do you recommend?
Answer. For a long time I did not answer this question, because I considered it not very correct. The turning point was the history of a taxi company in one Russian city. There were several “sevens” in the fleet, which were equipped with different kits. The Luk clutches “outperformed” the mileage of the Sachs, and almost all drivers said that the Luk tires the leg less, in the city start-stop mode and constantly changing gears.
Question. A person on a field or field wants to change the clutch, but does not know what he has installed.
Answer. There are two options. If this is a new Niva-M, then with a 90% probability, a Valeo kit is installed, that is, a clutch from Shnivy. But there is an option when the factory took and installed clutches from a Niva (that is, classics). Externally, this can be recognized by the clutch slave cylinder. On the RTS Shnivy, the boot is in the form of a rubber accordion, which stretches along with the rod, and on the RTS Classics there is a regular boot in the form of a rubber cap.
Question. Are Niva and Classic clutches interchangeable or not?
Answer. They are completely interchangeable because they have the same catalog numbers. The clutch forks and clutch slave cylinders are also identical.
Master cylinder
Unscrew plug 3 (Fig. 3-8), remove protective rubber cap 7 and retaining ring 8. This will allow you to remove piston 9, sealing ring 10, floating piston 11 with sealing ring and piston return spring 12 from the cylinder body.
Rice. 3-8. Master Cylinder Parts:
1 - body; 2 - sealing gasket; 3 - plug; 4 - gasket; 5 - fitting; 6 — lock washer; 7 - cap; 8 — retaining ring; 9 — pusher piston; 10 - sealing ring; 11 — piston of the main cylinder; 12 - springing
The cylinder mirror and the outer surface of the piston must not be damaged or scratched. The internal diameter of the cylinder should be between 19.035-19.075 mm.
Check the condition of the piston return spring and replace it if it has lost its elasticity.
Replace the O-rings. Check the protective cap at the rear end of the cylinder and if the cap is damaged, replace it with a new one. Before assembly, carefully clean and rinse the parts with brake fluid. Do not allow mineral oil, gasoline, kerosene or diesel fuel to come into contact with parts, as these substances cause rubber seals to swell.
After checking all parts, reassemble the master cylinder in the reverse order of disassembly; At the same time, lubricate all cylinder parts with brake fluid or preservation fluid NG-213.
Replacing the knock sensor
If it requires replacement, then it is necessary to purchase a new device and install it as soon as possible. All car enthusiasts are primarily interested in the price of a new device. It is low and depends on the make of the car and on the country in which the part was manufactured.
You might be interested in this article -
Thus, the knock sensor is a simple device, yet very useful for an electronic control system. It is not difficult to determine its malfunction; you can check it yourself, even in rural areas.
It will also be inexpensive to replace the sensor.
It doesn’t matter whether this is done by a specialist or independently