02/04/2022 19 181 VAZ 2115
Author: Ivan Baranov
When using a vehicle for a long time, the clutch system is subject to wear and mechanical damage. A drive that is not properly adjusted is inconvenient for the driver. In addition, untimely adjustment can lead to clutch failure, which entails a time-consuming and expensive replacement procedure. In this article we will look in detail at how to adjust the clutch on a VAZ 2115 - a video of this process will help you further understand it.
[Hide]
Self-adjustment of clutch VAZ-2115
As a vehicle ages, all its main components and mechanisms also wear out.
For this reason, it is extremely important to periodically inspect the machine - this will allow you to identify the problem in time and fix it before it leads to a more serious breakdown. Timely adjustment and inspection of the clutch on the VAZ-2115 will avoid failure of this unit and eliminate the need to replace it. In a car service, as you know, this procedure is not cheap, and it takes a lot of time.
At the same time, an improperly adjusted clutch makes driving uncomfortable for the driver.
In this material we will tell you in detail exactly how to correctly perform this operation and the sequence in which to perform all the necessary actions.
Examination
To make sure that the clutch really needs to be replaced with a clutch releaser on a VAZ 2114, it is first recommended to check it thoroughly for malfunctions. This will allow you to determine whether this device is really the cause of the problem.
The bearing allows the disc to disengage from the basket, plus it additionally ensures that the clutch is engaged and disengaged.
There are two types of squeezers:
- Roller. They work on the basis of a rigid bunch of rods.
- Hydraulic. The hydraulic system ensures power transmission.
Even an inexperienced car owner can detect a faulty release bearing. The failure of this element manifests itself as follows:
- When moving, extraneous sounds and noises arise;
- Gear shifting is difficult;
- When overtaking, the clutch may completely disappear;
- Slippage occurs during acceleration, etc.
If the squeezer turns out to be truly faulty, it is the responsibility of every car owner to replace it immediately. This can be done with the help of service station technicians, or with your own hands.
When adjustment is necessary
The clutch drive, as a rule, if it is not adjusted properly, is located either slightly above the brake pedal or slightly below. As a result, it becomes completely inconvenient to use, which ultimately significantly increases the risk of creating an emergency situation on the road.
The problem arises primarily due to the fact that the position of the pedal changes as the spacers installed on the driven disk wear out. The longer the vehicle is in operation, the more noticeable this defect is.
For VAZ-2115 cars, the manufacturer has established the standard travel of the clutch control pedal - a minimum of 12.5, a maximum of 13.5 centimeters. The maximum permissible deviation in this case cannot be more than 16 centimeters.
Among other things, it is necessary to carry out adjustments in a situation where the unit in question has stopped completely shutting down or is slipping. The procedure itself involves debugging by shortening or lengthening the clutch cable, as well as its sheath.
When is clutch adjustment required?
VAZs use a dry type of clutch, that is, there is a basket consisting of two parts - driving and driven
Clutch adjustment of the VAZ 2114, and other vehicles, is carried out in cases where defects associated with the operation of this mechanism appear. Such malfunctions include:
- clutch pedal adjustment;
- clutch cable adjustment;
- pedal height adjustment;
- clutch adjustment.
In another case, the need to adjust the clutch drive may arise due to previous incorrect adjustment. It is possible to reduce or increase the working stroke of its pedal.
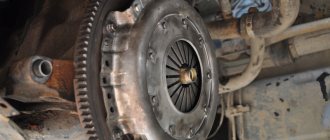
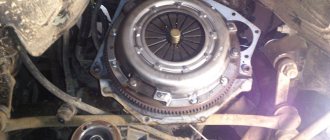
The photo shows the clutch of a VAZ 2114
As a result, malfunctions occur in the operation of the drive - the clutch begins to “slip” or “drive”, gear shifting becomes difficult, jerks appear when starting from a standstill, fuel consumption increases, etc.
Video: Clutch adjustment VAZ 2114
Determining the pedal stroke
First of all, you will need to determine how much the clutch pedal has deviated from the standard values. To take a measurement, you need to do the following:
- the pedal is lowered by hand to the highest possible level;
- then she is released;
- In parallel, you will need to determine the stroke length of the drive using a ruler or tape measure.
First, find out what the distance is from the center point of the pedal to the floor of the cabin in the lowered position, and then take a measurement in the raised position. If it turns out that the deviation from normal permissible values exceeds the maximum, you will need to adjust the clutch.
There is also an option to check without exact measurements. In this situation:
- the machine is installed where there is a completely flat area;
- first gear is engaged;
- The drive is smoothly released, after which forward movement begins.
Debugging will be needed if the vehicle moves only when the pedal has reached the lowest point.
Checking the working stroke of the clutch pedal VAZ 2114
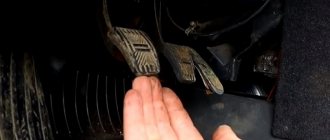
Let's measure the travel of the car's clutch pedal. Before doing this, we move the carpet on the floor of the car back so that the measurements are more accurate.
- Using a tape measure, measure the distance from the floor of the car to the bottom edge of the clutch pedal
- The image shows how best to do this.
- It should be approximately 18-20 cm.
- Press the clutch pedal all the way with your hand and measure the distance from the floor to the bottom edge of the pedal.
- It should be 6-7 cm
- Subtract from 18-20, 6-7, it turns out 13-14 cm
This is the norm for the full travel of the clutch pedal of VAZ 2108, 2109, 21099 cars and their modifications. Many repair manuals indicate a working stroke size of 12.5-13.5 cm, which is also very close to our measurement.
If the clutch pedal travel differs more or less, it is necessary to adjust the clutch drive.
Adjustment
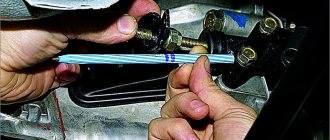
The essence of the adjustment is to change the length of the cable, or rather its sheath. This is done using the above-mentioned keys - they loosen or, conversely, tighten the existing 2 nuts that secure it directly to the bracket.
- raise the hood;
- dismantle the air filter;
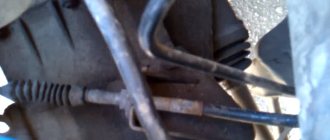
- underneath it, near the generator, is the cable itself;
- The nuts we need are located below.
Unfortunately, VAZ designers did not care too much about the convenience of the person servicing the car, for this reason you will have to suffer quite a bit during the adjustment process.
As the nuts rotate, the length of the cable changes, as previously reported. To reduce the amplitude of movement of the drive, it is necessary to loosen the fastening element located directly inside the bracket. At the same time, you will also need to tighten the nut located from the outside.
If you need to lengthen the stroke, everything is done exactly the opposite - the inner nut is tightened, and the outer one is loosened. Under no circumstances should the cable sheath be over-tightened or left slack. In the first case, it will break very soon, in the latter, it will be impossible to completely disengage the clutch.
Sometimes it happens that the threads on the nuts have oxidized - in this situation a special compound will help or, at worst, a little:
- gasoline;
- brake fluid;
- machine oil.
Upon completion of the adjustment, it is imperative to check the operation of the unit and compliance with standards. This is done in exactly the same way as described above. If you have not made any mistakes, the clutch pedal travel as a whole will not be more than 13.5 centimeters.
If your efforts lead to nothing, you will most likely need to completely replace the entire assembly.
To get a more complete picture of the adjustment process, you should watch the video below:
DataLife Engine – Softnews Media Group
WELCOME TO OUR SITE!
Here you will find a lot of useful information about the VAZ gearbox , you will be able to get qualified advice on the rules of operating the gearbox, fault diagnosis, repairs, tuning the gearbox, and if necessary, sign up and carry out repairs in our service. We are located: Moscow, Severyaninsky proezd, property 9. tel;. Opening hours from 8-20.00 seven days a week.
How to replace the clutch disc on the inspection hole yourself?
Author: admin from 03/17/2013, 21:40, views: 13244
How to replace the clutch disc?
There are a large number of methods for replacing the clutch on forums online, but they all involve a large amount of unnecessary work. I'll give you mine, which I've been using for decades. This method is fast, rational, and does not require draining the oil, dismantling CV joints, and so on. Judge for yourself! For example, let's take the injection VAZ 2115.
The procedure for replacing the clutch on the inspection pit (overpass):
How to adjust the clutch cable on a VAZ 2110 yourself.
Author: admin from 06/21/2012, 09:53, views: 33538
Adjustment of the clutch cable must be done when: replacing clutch discs, replacing the clutch cable and wear of the friction linings of the driven disc.
The clutch pedal travel (all the way to the mat) should be 125mm (+-5mm). The maximum permissible pedal travel is 160mm. To adjust the clutch, you need to unscrew or tighten the nut, and after completing the adjustment, tighten the locknut. Tighten the rubber washer as much as possible to the fork... Everything seems simple and clear, but many have mats of different thicknesses, and the thermal and noise insulation is laid differently. How to adjust the clutch if the carpets are removed, say, drying after heavy rains?
How to adjust the clutch cable on a VAZ 2108-2115
Author: admin from 06/13/2012, 19:10, views: 40909
A short overview of clutches.
Author: z25 from 09/29/2011, 23:33, views: 4943
The KRAFT tech clutch is manufactured in Turkey under a German license. If you want to forget about the clutch for a long time, then you can't go wrong with this clutch. It’s hard to find fault with this product: it has a soft squeeze, is not afraid of overheating in traffic jams, and practically does not wear out the flywheel. The only negative is the fragility of the release bearing. Although it has already been modified more than once, it runs on average 35-50 thousand km. The basket and disk itself last at least 120 thousand km. Of the cars we have observed that have a KRAFT clutch installed, so far only a durability record has been recorded - 130 thousand km. And then we could not observe this car further, because... it was sold. How much it actually runs will remain a mystery. PS My VAZ 21102 has this clutch installed and at the moment it has covered 200 thousand km. And thus breaking the previous record. And I don’t drive like an angel at all.
All about clutches
Author: admin from 09/29/2011, 22:38, views: 4401
If you think that serious car tuning ends with a powerful engine, large “fashionable” wheels and a pair of spoilers, then you are deeply mistaken. This is just the beginning. After all, the increased potential of the engine must still be transferred to the wheels. And the clutch takes the hit first. The clutch consists of a large number of parts. But we will be interested only in the actuators, which include: the driven clutch disc (in everyday life – just a clutch disc), the pressure clutch disc (the so-called “basket”) and the clutch release clutch with a bearing (or “throwout bearing”).
Briefly about the design of a friction clutch and its purpose
Any self-respecting motorist will study the design of the unit before adjusting the clutch on a VAZ 2114. This will help you approach the issue wisely and avoid mistakes.
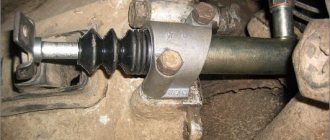
The mechanical drive design is simple and reliable. Compared to hydraulics, the cable requires minimal maintenance, and changing it is not labor-intensive. The mechanical drive consists of the following elements:
- Adjustable sheathed cable.
- Control pedal.
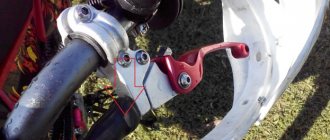
- Clutch release fork lever.
- Bracket for fastening the end of the cable sheath.
- Brake and clutch pedal bracket.
The mechanism serves to transmit force from the pedal to the release fork, which, in turn, removes the friction disc from the flywheel. Using a cable drive avoids major problems such as fluid leaks and periodic bleeding of air from the clutch control system. The weakest link in this chain is the cable, the quality of which at times leaves much to be desired. Therefore, replacing a cable on a Samara is a fairly common occurrence.
Purpose, design and typical malfunctions of the clutch bearing
It cannot be said that this is a “weak link” in the clutch of the VAZ 2110, however, this nuisance can and does remind you of itself with enviable consistency. Well, it “whistles”, even if it continues to “whistle”, it doesn’t affect the speed. Sometimes car owners think this way. For the time being.
The release bearing, or rather its clutch, is intended to directly act on the diaphragm (leaf) spring of the clutch basket, as a result of which the driven disk is disconnected from the flywheel and the pressure plate of the basket. We can say that this is the last link that disengages the clutch.
A malfunction of the release bearing is fraught with more serious and unjustifiable repairs, in which replacement of one bearing is no longer sufficient. This may be damage to the clutch fork, guide bushing, or breakage (bending, fracture) of the clutch basket diaphragm spring petals. The stingy one pays twice, and the lazy one in this case probably pays three times.
Of course, the noise or rustling of the release lever is not a direct command to replace it with the inability to continue driving the car, but you should not delay the repair. The need to replace the bearing manifests itself in the form of a characteristic sound (whistle, squeak, squeal - whatever you like). Sometimes it can occur after starting the engine, while all the components and assemblies of the car are still “cold”, and disappear when they warm up, or constantly remind themselves during operation of the power unit when the car’s clutch is disengaged.
In another, more serious case, when the release bearing fails, it can “grind” against the diaphragm spring, which can cause rapid wear on the clutch basket petals. In this case, the count will go on in kilometers and the sooner the bearing is replaced, the better and safer. It cannot be repaired, only replaced with a new one. Fortunately, the price of the bearing is low.
When is it necessary to adjust the Lada Samara clutch drive?
As practice shows, the culprits of clutch failures are most often the car owners themselves. A sharp start with “slipping”, as well as prolonged holding of the pedal in a depressed state, negatively affects the performance of the mechanism. The presence of noise or vibration when shifting gears indicates a problem in the transmission line. Below are a few signs that may require adjustment:
- Loss of power due to “slipping”, i.e. unreliable connection between the disk and the flywheel.
- Difficulty changing gears.
- Changing the travel distance of the clutch pedal (the norm is from 125 to 135 mm ).
- Jerking or sticking when pressing the pedal.
Motorists who know which clutch to choose for the Lada 2114 will most likely install it together with a cable. Replacing any element of the clutch should end with adjusting the drive, as well as changing the pedal stroke.
The pedal stroke is measured with a ruler, which is pressed against the floor. The distance between the lower and upper points of the pedal position should be within 125-135 mm. The maximum permissible value is 160 mm. If the pedal stroke goes beyond these parameters, then we can talk about wear of the friction linings of the driven disk.
Main clutch malfunctions
Clutch malfunctions should be divided into two categories - malfunctions of the clutch itself and malfunctions of the clutch drive. So, the problems of the clutch itself include:
- wear and damage to the driven disk linings;
- deformation of the driven disk;
- oiling of the driven disk linings;
- wear of the splines of the driven disk;
- wear or breakage of damper springs;
- broken or weakened diaphragm spring;
- wear or breakage of the clutch release bearing;
- flywheel surface wear;
- wear of the pressure plate surface;
- jamming of the clutch release fork.
Let's take action: how to adjust the clutch on a VAZ 2114 car yourself?
The essence of the operation is to force a change in the length of the cable “jacket”, due to which the clutch pedal stroke changes. To complete the process there is no need for high qualifications - a little free time and desire are enough.
Experts have developed a good algorithm for how to adjust the clutch cable on a VAZ 2114; it consists of the following points:
- Open the engine compartment and disconnect the negative battery.
- For ease of operation, disconnect the hose from the air filter and remove it.
- Using two 17" wrenches, rotate the tip nuts and set the desired pedal stroke.
- Press the clutch pedal several times and measure again the distance from the lower to the upper point of the pedal position.
- Tighten the nuts and install the air filter in its original place.
During setup, you should pay attention to the condition of the cable. If there are abrasions on the “shirt” and the steel fibers are partially torn, then you will have to replace the Lada Samara clutch drive cable. Often there is corrosion on the tip, making it difficult for the nuts to rotate. WD-40 will work to solve the problem. It would be a good idea to inspect the pedal bracket bushings and replace them if they are severely worn.
How to change and adjust the cable yourself?
We figured out why the pedal creaks, now let's talk about adjusting the clutch on the VAZ 2114.
Correct adjustment and tension of the clutch pedal cable on a VAZ 2114 8 valve is carried out exclusively on the working mechanism.
When there are problems in the functioning of the system, they must be eliminated. One of the most common problems is a broken cable. Therefore, if the pedal fails, then before properly adjusting and tightening the cable, it must be changed.
If you are experiencing problems with your pedal squeaking, check out the video that demonstrates the procedure for lubricating the device. Filmed by VikiNow.
Required Tools
To adjust the tension and replace the cable, you will need the following devices and tools:
- the cable itself;
- Litol lubricant;
- set of open-end wrenches;
- ruler;
- pliers.
How to replace it correctly?
To repair the cable, you need an assistant:
- Open the hood of the car and remove the bolts securing the battery terminals.
- You need to disconnect the connected cable from the pedal itself. Using a 17mm wrench, unscrew the nuts securing the bottom of the product. Then remove it from the retainer and remove it from the plug installed in the engine compartment.
- Further steps are carried out in the car interior. Move the carpet away from the driver's seat. There is carpet under the pedals, it needs to be removed. This will allow you to find the place where the cable is attached to the pedal; the clamp must be disconnected from it. There will be no problems, since this element is simply removed from the hook.
- After which the cable itself is removed from the seat. To do this, the device must be pushed away from you towards the engine compartment. When the product is difficult to push out, most likely its fastening has soured. Then lubricate the retainer with WD-40 and work it out a little, moving it in different directions. If you have an assistant, while you are developing the cable, he can pull it from the side of the engine compartment, this will speed up the procedure.
- After dismantling the product, a new one is installed. Before this, the bushing that secures the cable is removed from the clutch pedal. If its condition is poor, it is worn out, it is advisable to replace the bushing. The retainer itself is lubricated with Litol before installation.
Channel Sdelaj Sam! Pljus interesting! A video has been released showing the procedure for replacing a product with your own hands.
How to adjust free play?
After repairs, the cable is adjusted in height. If you do not adjust the stroke adjustment and adjust it, you will have difficulty changing gears. Before tensioning and adjusting the cable, it is recommended to test drive the machine. It will allow you to figure out how to properly tighten the pedal - raise or lower it.
- If the car begins to move at the end of the pedal stroke, open the hood and locate the cable attachment location. There are two nuts here that can be unscrewed with a 17mm wrench. To reduce the free play of the pedal, that is, lower it, the bolt located inside the bracket is unscrewed. The outer screw must be tightened with a wrench.
- If, when starting to move, you realized that the free play should be increased, that is, raise the pedal, then the inner screw on the metal clamp should be tightened, and the outer one should be loosened. If there is rust on the free play adjustment nuts, it must be removed using WD-40. If there is no fluid, motor oil or brake fluid is used.
- If the adjustment is successful, check the free play with a ruler. If the actions are performed correctly, its length will be from 12.5 to 13.5 cm. This distance will be directly from the pedal itself in the car to the floor.
How to properly adjust the clutch on a VAZ 2114
Modern domestically produced cars have moved away from the classics. Standard clutch adjustment of the VAZ 2114 and other vehicles of the family is performed by tightening the cable rather than by adjusting the hydraulic mechanism, which increases the reliability of the unit.
This mechanism requires periodic adjustment - the steel cable tends to stretch under load, which disrupts the original characteristics.
The drive must be tightened in such cases.
- Violation of the accuracy of gear shifting - squeaks, crackles or other extraneous sounds emanating during manipulations with the gearbox.
- There is a dissonance between the increase in engine speed and the acceleration of the car. This is a clear sign that the clutch disc is slipping under load. A secondary symptom is a burning smell after sudden acceleration or dynamic acceleration.
- The pedal fails or spontaneously rises or falls relative to the reference value.
- The clutch engages early or late, which leads to the car jerking while shifting into gear.
Why the clutch slips: reasons, do-it-yourself adjustment
Hi all! Clutch failure does not bode well for the car and its owner. The sooner signs of problems can be detected, the better. A fairly common question on this topic is why the clutch slips or slips. Different terminology is used, but the essence remains the same.
It is important to understand that modern cars use dry and wet, also known as oil, clutches. In the first case, we are talking about simple friction, while in the second, the procedure is carried out in a special oil, which additionally cools the clutch discs and other elements. Most often we encounter the dry type. Wet is used on cars with dual clutch and robotic gearboxes. It is difficult to adjust and repair a wet clutch with your own hands. This requires the help of specialists.
The most common sign of unit malfunction is slipping. Moreover, for some it happens constantly, while for others it sometimes stalls, sometimes not. This can happen both hot and cold, that is, before and after the unit warms up.
How the problem manifests itself
Most often, the cause of clutch slipping is normal mechanical wear of the assembly elements. This allows you to diagnose an impending problem even before serious consequences appear. This is done by simply observing changes in the behavior of the machine.
If you notice one of the following signs on your Niva, passenger car or scooter, be sure to diagnose the clutch or contact a service center.
- Extraneous sounds occur during system operation. They appear in the form of knocking noises when the pedal is depressed or released;
- If the noise disappears when the clutch pedal is depressed, the problem is most likely in the release bearing;
- There are signs of vibration on the pedal;
- In this case, the pedal may sink too much or be pressed too hard;
- A characteristic burning smell emanates from the clutch. The clutch usually burns if the driver operates it incorrectly.
The manufacturer provides each vehicle with instructions that indicate all recommendations for routine maintenance and replacement of clutch assembly elements. Most often, the driven disk needs to be replaced.
Before you try to adjust the system yourself, be sure to familiarize yourself with the principle of operation of the clutch. In our previous article we discussed this issue.
Possible consequences
A slipping clutch is a fairly common occurrence. This is especially true for domestic cars, motorcycles and cars with high mileage.
Practice and experience clearly show that slipping is usually associated with wear and damage to elements. This can happen on any car or other vehicle. Judging by the requests of fans of self-repair, most often the problem of a slipping clutch is solved on the following vehicles:
- VAZ 2107;
- VAZ 2114;
- IZ Planet;
- UAZ Bukhanka;
- Jupiter;
- KAMAZ;
- Minsk;
- VAZ 2110;
- Renault Logan;
- Kia Rio;
- Lada Priora;
- GAZelle, etc.
Despite the obvious cause of such problems, many car owners stubbornly continue to ignore all recommendations for maintenance and timely repair of the unit.
If you feel characteristic signs of problems, you should take prompt action.
When buying a used car or getting behind the wheel for the first time, some people think that they are simply driving the vehicle incorrectly, are not yet fluent in manual shifting techniques and are making some mistakes. In reality, it may turn out that the clutch is failing.
It is important to pay attention to the characteristic signs. Namely:
Safety kit
- the car loses dynamics;
- cravings drop;
- the car is difficult to climb;
- speed is gained slowly;
- the pedal vibrates;
- there is a smell of burning in the cabin;
- the pedal is too tight;
- the pedal fails;
- gear shifts with a crunch;
- Extraneous uncharacteristic sounds appear when switching.
If you do not pay attention to this in time, the engine flywheel is highly likely to be damaged, not only the coupling unit, but also the gearbox will suffer. The problem mainly affects the gearbox input shaft.
Instructions for adjusting the clutch with your own hands on a VAZ 2114
- Phillips screwdriver or No. 8 head;
- set of open-end wrenches for 13 and 17;
- WD 40 or similar product;
- ruler/construction tape measure/other measuring instrument.
The principle of adjustment is to tighten the cable drive. There are no hydraulics or complex mechanics here - everything is changed and repaired literally “on the knee”. You can see how this is done in the video:
How to adjust the clutch cable
To properly tighten the cable, it is necessary to carry out this procedure.
- Drive the car onto a level surface and put the handbrake on.
- For safety's sake, disconnect the terminals from the battery.
- In the cabin, near the corresponding pedal, place a ruler parallel to its movement. Ideally, the lever pad should be within 13 cm. An error of up to 5 mm is allowed. In case of large deviation, adjustment is required.
- The hood opens.
- There is an air filter near the battery. You can remove it by releasing the air duct clamp (with a screwdriver or a No. 8 socket).
- Under the dismantled can you need to find the clutch cable itself. The part is located near the gearbox housing.
- There is a tensioner lock on it (it looks like several nuts threaded onto the casing and pressing the mounting plate on both sides).
- Use wrench No. 17 to loosen the locknuts. If necessary, you can treat the mount with WD-40 or its equivalent.
- Then, using a 13mm horn, loosen the thrust nuts (1 and 2).
- Next, the tension of the shirt is adjusted. Nuts No. 1, 2 rotate counterclockwise. Thus, the pedal settles closer to the floor; to raise the lever, you need to do the opposite.
- After calibration, the mechanism is assembled in the reverse order.
- Next, you need to press the corresponding pedal 5-6 times all the way and repeat the procedure with the ruler. If there is no position failure, everything is fine.
Replacement
The procedure is not so simple, therefore, if you lack experience, it is not recommended to do it yourself. If you have enough skills and abilities, get to work.
- Disconnect the clamps and remove the release bearing along with the clutch.
- Remove the input shaft from the bearing.
- After fully releasing the clamps, remove the damaged bearing from the coupling.
- Install a new part, but first make sure of its quality. If the bearing moves freely, there is no need to worry, it works well.
- Lubricate the clutch and the release tool itself. This device loves high-quality lubrication. Then install it on a release sleeve that has been pre-treated with machine oil.
- Using special clamps, place the new element in its rightful place.
- The final stage will be reassembling and installing the gearbox in its original position.
The work can be considered completed. It is quite possible to do it yourself, but just do not forget about the accuracy and consistency of your actions.
A high-quality squeezer lasts a long time, so you won’t have to perform such operations regularly. Of course, provided that you have correctly replaced the old bearing and your clutch is functioning efficiently.
https://youtube.com/watch?v=d1bb0mbPPsA
How to tighten the clutch on a VAZ. Adjusting the clutch on VAZ 2115,2114,2113,2199,2109,2108
When using a vehicle for a long time, the clutch system is subject to wear and mechanical damage. A drive that is not properly adjusted is inconvenient for the driver. In addition, untimely adjustment can lead to clutch failure, which entails a time-consuming and expensive replacement procedure. In this article we will look in detail at how to adjust the clutch on a VAZ 2115 - a video of this process will help you further understand it. How to adjust? An out-of-control drive is located several centimeters higher or lower relative to the brake. This makes the drive inconvenient to use and can cause accidents.
The drive position changes as a result of wear on the driven disk linings during prolonged driving of the vehicle. For VAZ 2115 cars, pedal travel is considered normal to be 125-135 mm. The maximum safe stroke does not exceed 160 mm. Adjustment is also necessary if the unit does not turn off completely or is slipping. Debugging is carried out by changing the length of the clutch cable and its sheath.
Tools 2 keys for 17. On the VAZ 2115, the lower end of the cable “jacket” is held on two fasteners, which are loosened using these keys.
17" wrenches - the main tools for adjusting the clutch cable 17" wrenches - the main tools for adjusting the clutch cable Step-by-step instructions Initially, it is worth measuring the pedal deviation from the norm. To do this, you need to push the drive to the maximum, then release it. It is necessary to measure the stroke length - the distance from the center of the pedal pad in its lower position, when it is resting on the floor, and in its upper position. If the deviation from the normal length is significant, the pedal should be adjusted. Before adjustment, you need to measure the stroke length of the clutch pedal. Before adjustment, you need to measure the stroke length of the clutch pedal. Deviations from the norm can be detected without measurements. To do this, you need to place the car on a flat horizontal surface, engage first gear and, smoothly releasing the drive, start moving. If the car starts moving only at the end of pressing the pedal, debugging is necessary. In order to adjust the drive of the VAZ 2115, it is necessary to change the length of the cable jacket. To do this, you need to loosen or tighten the two nuts with which it is attached to the bracket. Adjusting the clutch cable Adjusting the clutch cable Open the hood. Remove the air filter. We find the cable and nuts that secure it to the bracket. They are located on its threaded part. Unfortunately, on the VAZ 2115 these parts are located inconveniently. When manipulating the nuts, the length of the cable jacket changes. In order to reduce the stroke, loosen the nut located inside the bracket and tighten the nut outside, and vice versa, if you need to increase it. It is important to remember that constriction, as well as weak tension, are unacceptable. When overtightened, the cable will quickly break, and if the tension is weak, the clutch will no longer disengage completely. If the threads are rusty, you can use liquid to make the threads easier to remove. If there is none, you can use engine oil or brake fluid. After debugging, you should check changes in the operation of the node. This should be done in the same way as during the initial check for deviation from the norm. After correct adjustment, the stroke does not exceed 135 mm. If the procedure does not lead to anything and the clutch of your VAZ 2115 continues to slip, then the element has become unusable and needs to be replaced.
Video How to tighten the clutch on a VAZ. Adjusting the clutch on a VAZ 2115,2114,2113,2199,2109,2108 channel Sergey Serge
Clutch pedal adjustment
Periodic adjustment of the VAZ 21014 clutch pedal is carried out for the following reasons:
- When driving on a non-adjustable clutch pedal, subsequent repairs are possible, because exaggerated energy costs for incorrect operation of the mechanism will cause malfunctions of other components of the car.
- Due to improper functioning, the clutch pedal periodically does not function. This leads to the fact that the pressure plate of the unit is forced into “engagement” with the motor flywheel, as a result of which they are subject to accelerated wear.
- If the pedal stroke is insufficient, the vehicle slips, i.e. the required torque of the wheel pair is lost.
To carry out diagnostic work on adjusting the clutch pedal, you need to use an arithmetic ruler to measure the length of the pedal stroke to the floor. If it does not correspond to 16 cm, then adjustments are necessary.
Signs of incorrect operation of the clutch mechanism: there is no possibility of a smooth start from a standstill, movement from a standstill is accompanied by jerks and jolts, when changing gears the transmission makes increased noise, the pedal of the mechanism falls to the lower position. In practice, it turns out this way: if the vehicle began to move from the moment the pedal began to be lowered, then the free play does not correspond to the required value. When the pedal is completely released, the vehicle does not move, which means there is no free movement in the car.
Clutch pedal adjustment:
- Unscrew the nut located under the clutch pedal.
- Tighten the locknut located below until it stops.
- Next, screw in the fasteners located under the clutch pedal.
- We tighten the rubber washer to the clutch fork as far as possible.
- To increase the pedal stroke, you need to screw the fastener onto the tip. To reduce the pedal stroke, you need to unscrew this fastener. The VAZ 2109 clutch pedal is adjusted until the limit of 12-13 cm is reached.
- After completing the pedal adjustment operations, you need to: depress the pedal three times, measure the length of the pedal stroke, adjust the operation until the required stroke length is achieved.
To adjust the hydraulics you need:
- Remove the spring from the mountings of the working cylinder and the clutch fork.
- Adjust the fasteners located on the clutch cylinder rod.
- The recommended free play value is 0.5 cm.
Often, a large pedal stroke depends on the height of its location from the driver's floor, and this creates certain difficulties. To adjust the height, a series of simple plumbing operations and a wrench set to “12” are required:
We find two fasteners on the steering column shaft, one is a thrust screw that limits the height adjustment position, the second is a lock nut that changes the movement of the pedal.
- Unscrew the stop screw.
- We give it rotation until the pedal movement normalizes.
- Screw in the locknut.
If slippage is observed after adjusting the clutch, then the following operations must be performed:
- Remove the stem locknut.
- Move it until there is no free movement.
- Return the rod one full turn.
- Determine whether the clutch has free play.
- Test the operation of the transmission gears. If there is an incomprehensible noise, you need to perform the above operations again.
- Screw in the locknut.
Do-it-yourself tightening of the clutch cable on a VAZ-2114: adjusting the mechanism
The clutch design itself on the VAZ-2114 (Samara-2) car has been changed and differs from what was installed on the “classic” models of the VAZ family. The main changes affected the system of adjustment, control, and movement of the clutch fork. And, if previously they were hydraulic, now its movement is driven by the clutch cable.
Step-by-step procedure for tensioning the clutch cable on a VAZ-2114
In order to change the length of the clutch cable, we only need a wrench.
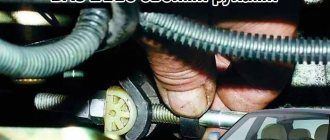
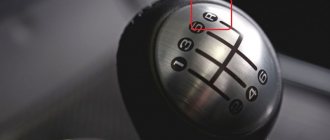
1. First of all, open the hood and look for the nuts on the gearbox housing located at the very end of the adjustment unit. Two 17mm bolts.
The clutch cable is marked with a red marker.
2. Next, loosen the locking nut, and then change the position of the adjusting nut, tightening or unscrewing it to the required length.
The nuts will unscrew easily with any pressure.
3. When the nut is screwed on, the clutch pedal will rise, increasing the length of its distance, and if it is unscrewed, the distance to the floor will decrease, pressing the pedal closer to the floor.
The arrow marks the nut for fixing.
There is no doubt that such work is much easier to carry out in the company of an assistant.
4. Upon completion of all adjustment work, the locking nut is tightened as close to the adjusting nut as possible.
When carrying out such procedures, make sure that the clutch cable itself is intact, that there is no damage or scuffing on its body and shell, and that it moves freely inside the elements supporting it. If something like this is discovered, then it is best to replace the cable with a new one, since the wear of the supported one will only increase, and it is impossible to talk about the reliability of the work performed.
Checking work
After you have completed this work, you need to check the correctness of the work performed.
- First, measure the travel of the clutch pedal.
- With the engine turned off, depress the clutch pedal several times and return it to its place.
- Next, we take a new measurement and clarify the received readings.
- If they have not changed compared to the first measurements, then the work has been completed, correctly, and the first stage of verification can be considered completed.
- And if they differ from the first indicators, it means that the locking nut was not tightened tightly, and the adjustment process must be carried out again.
There is one rule among car enthusiasts! A properly adjusted clutch should begin to engage approximately halfway through the pedal stroke.
The following test can definitively indicate the serviceability and correctly adjusted clutch:
- The car must be placed on a flat surface, the handbrake must be turned on, and the engine must be running.
- Next, we turn on the gear and try to start moving.
- If at this moment, when the clutch pedal is not pressed, the car stalls, this means that the adjustment was made correctly.
- And if this does not happen, the car is running in gear with the clutch pedal not pressed, then this will indicate clutch slipping, which will need adjustment.
Clutch Specifications
Technical requirements for brakes
- The clutch lining must be firmly glued with VS-YUT glue. Peeling of the overlays is not allowed.
- The thickness of the new clutch lining is (5±0.1) mm. The permissible thickness of a worn lining is 3 mm.
- Driven disk. 1. When replacing friction sectors, select them with a thickness variation of no more than 0.1 mm.
- The non-flatness of the friction surfaces of the driven disk is allowed no more than 0.3 mm under a uniformly distributed load of 150 N (15 kgf). Disc straightening is allowed.
- The thickness of the new driven disk with linings is (13.5±0.47) mm. The permissible thickness of a worn disc is 10 mm.
Technical requirements for pressure plate flange
- The difference in the weight of the levers is allowed no more than 0.01 kg.
- Fluctuations in the load of the coupling springs are allowed no more than 20 N (2 kgf).
- The width of the groove for the roller is 6±0.18 mm. The permissible gap between the roller and the wall of the support groove is no more than 0.7 mm. The permissible gap between the lever fork and the flange support is no more than 1 mm. The permissible gap between the pin and the hole for it in the flange support is no more than 0.3 mm.
- Non-flatness of the friction surface of the pressure plate is allowed no more than 0.15 mm.
Technical requirements for the drive disk
- Non-flatness of friction surfaces is allowed no more than 0.15 mm.
- The thickness of the new drive disk is (23±0.105) mm. The permissible disc thickness is 22.4 mm.
Technical requirements for the engagement clutch
- The internal diameter of the flange coupling slider is 72±0.074 mm. The diameter of the flange for the slider is 72±0.174 mm. The gap between the slide and the flange is 0.1...0.248 mm. The permissible gap between the slide and the flange is 0.61 mm. The maximum gap is 1 mm. The outer diameter of the slider for the bearing is 90±0.025 mm. The permissible gap in connection with the bearing is no more than 0.005 mm.
- The inner diameter of the bushing for the lever pin is 17±0.07 mm. Finger diameter 17±0.15mm. The permissible gap between the bushing and the lever pin is no more than 0.5 mm. The maximum gap is 0.7 mm.
- The thickness of the bearing housing cover flange is (9±0.1) mm. The permissible flange thickness is 6 mm.
- The gap at the joint of the sealing rings should be no more than 1.5 mm.
Design
The mechanical drive on the VAZ-2114, despite the fact that it has the least simple design, is in no way inferior in reliability to its hydraulic counterpart. Its system consists of a cable adjustable in length, sealed in a special anti-corrosion sheath, and the clutch pedal itself located in the car's interior, which, through free movement, is designed to transmit the pressing force to the clutch fork.
Despite the fact that such a scheme is simple, in general it is quite reliable.
Clutch diagram
A new product in the form of a clutch cable for VAZ-2114 cars helped to avoid all the problems that all owners of classics encounter. First of all, this refers to the leakage of hydraulic fluid from the system, and as a result, loss of control over the car. It would also require work to remove air from the clutch system after repair.
At the same time, periodic checking and adjustment of the clutch pedal has remained the same.
Why is it necessary to adjust the cable travel?
This procedure is necessary so that when the pedal, and with it the clutch cable, reaches certain values, the most squat pressing of the flywheel with the basket to the driven disk is made, at the moment when its operation is necessary. At the same time, thanks to the precise adjustment of this drive, the clutch is released at the moment the clutch pedal is released.
Note! During operation of this system, when the lever is in the neutral position, or when it is turned on, no extraneous sounds or crackles should come from the gearbox housing.
You can monitor the condition of the clutch, preventing such a situation from occurring, visually by positioning the clutch pedal relative to the floor of the car, using only a ruler.
The optimal values should be from 125 to 140 mm , when measuring readings first with the pedal pressed and then with the pedal released. The maximum value that is allowed when measuring such indicators is 160 mm , and if they exceed these values, then this will mean severe wear of the friction linings, and therefore, after adjusting it, the clutch itself may soon need to be replaced.
We measure the result along the bottom edge of the pedal - in the photo the result is normal.
Clutch mechanism
The clutch acts as a link between the transmission and the engine and is designed to disconnect and connect the gearbox input shaft from the crankshaft flywheel. Changing gears in a vehicle with a manual transmission is only possible with the clutch pedal fully depressed. At this moment, no torque transmission is observed, since there is no connection between the gearbox and the flywheel. As for the structure of the node in question, it is represented by the following components:
- A flywheel that takes on torque and transfers it to the gearbox through the basket. The basket, in turn, is attached to the flywheel.
- The pressure and driven disks are closely connected to each other. Their contact is affected by the position of the clutch pedal, which is located inside the car.
- The shutdown fork ensures that the disks are disconnected.
- The primary shaft of the gearbox, to which torque is transmitted.
- Additional elements include a casing, damper springs designed to soften vibration, a clutch release bearing, and friction linings. The latter are put on the driven disk and provide mitigation of friction between the basket and the flywheel.
The flywheel is directly connected to the pressure plate and rotates with it. A splined clutch with a gearbox input shaft located inside ensures transmission of rotation to the driven disk. The gear shift mechanism looks like this:
- transmitting pressure to the release fork through the drive system;
- displacement of the release bearing together with the clutch by means of a fork towards the release springs of the pressure plate;
- temporary disconnection of the basket from the flywheel under the influence of bearing pressure;
- lowering the pedal after changing gears, ceasing pressure on the springs from the bearing, and resuming contact between the flywheel and the basket.