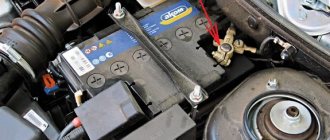
We prepare the car for the job. Disconnect the negative terminal of the battery
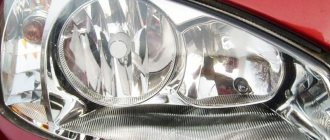
Replacing light bulbs in a headlight
To replace headlight bulbs:
Press the latch shown in the figure with an arrow.
Remove the cover from the headlight housing
Disconnect the wire block from the lamp terminals
Removing the rubber cover
We press on the ends of the spring clamp and remove them from engagement with the hooks of the reflector
Remove the clamp from the lamp
We remove the lamp from the headlight housing
Do not touch the bulb of a halogen lamp with your hands. You need to remove dirt from the lamp with alcohol.
Install the H4 lamp in the reverse order.
We replace the lamp in the left turn signal by pressing the socket and turning it counterclockwise. In the right headlight block, turn it clockwise.
Remove the lamp socket from the headlight housing
Press the lamp and turn it all the way in a certain direction and remove the lamp from the socket
We install the new PY21W lamp in the reverse order.
To replace the side light lamp and daytime running light in the left headlight, move the air filter to the side.
There is no need to do this in the right headlight.
Turn the lamp socket counterclockwise and remove the lamp socket from the headlight housing
Pulling the lamp, remove it from the socket
Install a new W21/5W lamp in reverse order
Replacing the headlight
Disconnect the negative terminal of the battery. Removing the front bumper (article - How to remove the bumper of a Lada Granta car)
Use a 8mm socket to unscrew the screw for the front headlight mounting
Using a 8mm socket, unscrew the screw of the lower fastening of the headlight unit
Unscrew the screw on the top fastening of the headlight unit.
We move the headlight forward along the direction of the car.
Press the lock of the working cylinder of the headlight range control and by turning the cylinder counterclockwise until it stops, remove the working cylinder of the headlight range control from the headlight housing
Disconnect the wiring block from the headlight lamp, remove the sockets with the turn signal and daytime running lights.
We remove the headlight block. Install the headlight in the reverse order.
Replacing the turn signal and replacing the lamp
We remove the turn signal when replacing the wing and when replacing the light bulb.
Move the side turn signal towards the front of the car
Removing the repeater from the hole in the front fender
Turn the lamp socket counterclockwise and remove it from the housing
Removing the lamp
Install the W5W lamp.
Install the repeater in the reverse order.
If the gasket under the repeater is damaged, it needs to be replaced.
Replacing lamps and removing the rear light
We prepare the car for the job. Disconnect the negative terminal of the battery.
In the luggage compartment, bend the flap of the trunk upholstery
Turn the socket for the brake signal and side light lamps counterclockwise and remove the socket with the lamp from the housing
Press the lamp, turn it all the way counterclockwise and remove the lamp from the socket
The double-filament brake and side light lamp has two protrusions located at different levels
When installing a P21/5W lamp, the protrusions on the lamp must fit into the grooves of the socket.
The reverse lamp P21W and the turn signal lamp PY21W are changed in the same way.
The turn signal lamp has two protrusions located asymmetrically relative to the axis of the lamp.
The type of lamp is indicated on the flashlight body next to the socket of each socket.
In order not to confuse the installation locations of the cartridges in the flashlight body, the fixing protrusions on the cartridges and the cutouts in the flashlight body have different shapes
Reasons for a non-working headlight
Often, replacing low beam lamps on a Lada Granta sedan or liftback is carried out in the event of a burnout of the filaments.
But we note that the headlight may not work due to a blown fuse or damage to the wiring that powers it.
Therefore, if you detect inoperative headlights on the Lada Granta, you should check the corresponding fusible elements in the safety block, as well as the integrity of the wiring.
Even if the lamps are in good working order, they must be changed every 3-4 years of vehicle operation. This is due to the fact that the bulb of the element gradually becomes cloudy, due to which the intensity of the glow decreases.
You may also like
Early next year, Suzuki will unveil a new 48V hybrid powertrain that will be offered in the Swift Sport, Vitara and SX4 S-Cross. Japanese automaker ...
Mazda 2 supermini has been updated for 2022 to bring it in line with new rivals, and can now be ordered with first drive examples in dealerships. The entry-level SE-L…
Ford Focus FanThe car accelerates, when it accelerates, the Ford Focus runs away with acceleration. At low speed the car is crying, Ford Focus 2 is being pushed so hard on the Internet, trying...
Bentley has revealed a modified Bentayga SUV that will take part in the Pikes Peak race, unofficially called the Race to the Clouds. Rhys Millen will drive the car. O…
Hydraulic compensators are components of the gas distribution mechanism, which are part of the valve parts. They are designed to automatically adjust thermal clearances...
Gearbox control:
1. jet thrust; 2. transmission control rod; 3. basis of the control mechanism; 4. Gear shift lever
The transmission control unit consists of a control mechanism, a control rod, a gear shift rod and a gear shift mechanism. The control rod, on the one hand, is secured by a clamp to the shank of the gear shift joint, and on the other. through an axle connected to the gear shift lever.
To prevent spontaneous disengagement of the gears due to the axial movement of the transmission when the vehicle is moving, a control rod was introduced into the control drive of the gearbox, one end of which is connected to the power unit, and the other end. with base. control mechanism.
At the lower end of the ball joint, there is a plastic insert that fits into the ball joint cage and is preloaded with a spring. When the shift lever is moved down (to engage reverse), the bushing also moves downward with the lever, compressing the spring, which allows the focus of the shift lever shaft to be locked into the bracket pads to lock reverse gear.
New Lada: Instead of a French manual transmission, they began installing a VAZ manual transmission on the Lada Vesta
The universal joint is attached to the end of the shift rod with a screw. The screw has a conical surface on which it is secured to the rod. The shifter (lever) is attached to the inner end of the shift rod, which operates a three-handle shift lever.
Gearbox control mechanism in floor tunnels
: 1. bracket cover blocking the switching on of the substrate transfer; 2. gear shift lever axis stop
The gearbox has three axles. One has a three-hand gear selector, a gear lever and two locks. The other axis passes through the holes in the holding brackets, blocking them from rotation. The rod-mounted gear selector operates the gear selector lever, which in turn locks forward gears with one hand and reverse gears with the other. The reverse fork is mounted on a separate axle.
Hinge:
1. screw; 2. loop with handle
The factory gearbox is filled with gear oil designed to last 75,000 kilometers. The oil level should be between the control marks on the oil level indicator.
Source
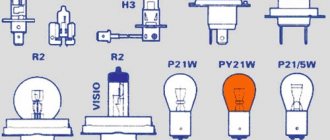
Type of lamps used on Lada Granta
The Lada Granta uses halogen double-filament lamps with an H4 socket. One such lamp, thanks to the presence of two filaments, allows the headlight to operate in two lighting modes - low and high beam.
At the same time, the characteristics must indicate the luminous power of each thread.
For lamps intended for use on Granta, the high beam filament power should be 60 W, and the low beam filament power should be 55 W.
The disadvantage of such lighting elements is the fact that if at least one filament burns out, the lamp will have to be completely replaced, although the second filament remains working. But at the same time, the two-strand layout makes the replacement process easier.
The thread responsible for the low beam operating mode usually burns out. This happens due to the fact that this mode is used much more often and for longer than high beam.
Solution
How to change the oil in the box of a Lada Granta? If you decide to do the cleaning work yourself, you need to be very careful not to damage the tube. Otherwise, moisture will begin to leak through the damaged area, which, if it gets on the electrical wires, will lead to a short circuit.
First of all, the unit is disconnected from the power supply, the products are removed and the shelves are pulled out. Moving the refrigerator away from the wall reveals a clear, flexible plastic tube. It goes from the center of the housing downwards towards the tank on the compressor. At the bottom of the refrigerator compartment, you need to find a hole for draining and use a special brush to remove the dirt that has accumulated there. The set of refrigeration units often includes this tool; if it is not there, you can use ear sticks.
Then, draw a small amount of warm water into a large syringe and pour it through the hole under pressure. You don’t need to take a lot of water, otherwise it will overflow through the walls of the container and flood the compressor. Cleaning can be considered complete if nothing obstructs the passage of water.
If it cannot pass, it means that the blockage is deeper and much denser. In this case, you need to take a long soft wire and bend the end of it into a loop. The edge should not be sharp, otherwise you may pierce the tube. Slowly, rotating the wire, you need to push it inward until what it is plugged with is in the container.
After this, the system is flushed with water drawn into a syringe. Instead, you can use a medical bulb. This procedure will help remove the blockage, water will be able to move freely through the system, but it will be possible to completely get rid of the unpleasant odor.
When the drainage tube is plugged in refrigeration units equipped with a No Frost system, ice forms at the bottom of the freezer compartment. This leads to a sharp decrease in performance and increases the load on the compressor. As a result, this mechanism wears out faster and there is a chance that it will burn out.
In almost all cases, the drainage hole in units with a No Frost system will not be able to drain water due to the fact that the tube freezes. In this case, you need to turn off the refrigerator for several days and wait until the ice melts. The procedure for cleaning drainage in equipment with No Frost is quite complicated.
The refrigerator must be carefully looked after and monitored in what condition it is in. To avoid breakdowns, systematically wash, remove remaining food, and if water is found under the trays, remove the blockage. Timely cleaning will protect the equipment from malfunction.
We provide access
The peculiarity of the work on replacing lighting elements on a Lada Granta is that the bulbs are removed from the inside of the headlight (under the hood on the engine side), and the space where they are located is limited.
To improve the convenience of work, you can remove some elements from the power unit to make it easier to get to the light sources.
So, to improve access to the left lamp (on the driver's side), you can unscrew the fastening of the air filter housing and move it to the side.
As for the right headlight, you can remove the engine protective cover from this side by unscrewing the oil filler cap and pulling out the clips. In this case, after removing the engine lining, the oil filler cap must be replaced.
Please note that it is not necessary to remove these elements from the engine. If you have the skill and the driver has already carried out the replacement and knows the specifics of the work, then it is quite possible to carry out this operation without removing any elements from the engine.
The procedure for dismantling the lights
You should know that the Lada Kalina 1118 flashlight system consists of:
- housings;
- glass (polycarbonate);
- lamps;
- reflector;
- wiring;
- lamp plugs;
- decorative inserts (masks).
As for the ease of removal and subsequent replacement of the lamp on the 1118 model, the process usually involves removing the front bumper. After this, the screws on the top and bottom of the lighting fasteners become accessible. After dismantling them, you can immediately remove the headlight unit, not forgetting to first remove the blocks with wires.
Removing the front optics
However, not all car enthusiasts have a lot of time to replace the lighting system or experience in removing the bumper. For this reason, a more popular method is to change the Kalina headlight without removing the bumper.
To do this you will need to use:
- key for 8 and 10;
- a set of screwdrivers (flat and Phillips);
- new lighting system component.
A set of tools
in order to adjust the block lighting on the Lada. You will need to complete the following steps:
- Remove the air filter housing, as well as the coolant unit.
- Remove the PTF plug using a screwdriver.
- Unscrew the bolt on the lower fastener of the lighting component using a 10mm wrench. Insert your hand into the PTF hole.
- Remove the bolts located on the upper fastener of the light block component. They are located closer to the radiator. Use the key at 8.
- Unscrew the screw securing the product to the car fender using a large Phillips screwdriver.
- Expand the Lada Kalina headlamp so as to move the part closest to the radiator closer to the car engine. This measure will allow you to remove the lower fasteners from the seat.
- Remove the lower iron fasteners of the headlight. To do this, you will need to remove a couple of bolts with a short head.
Removing the headlight on Kalina
- Remove the car light by moving towards you. At the same time, try not to damage the paint layer, since during dismantling the lamp will be located as close as possible to the bumper and fender.
After this, you can install a similar device in reverse order.
Replacement algorithm
To change the low beam lamp on a Lada Granta, in general, no tools are required. But it is advisable to have a long screwdriver, a battery-powered headlamp (ideal), a clean napkin and alcohol (alcohol-containing liquid) on hand.
The technology for replacing lighting elements is the same for both headlights, so let’s look at the algorithm using the example of the left one.
The sequence of actions is as follows:
- Turn off the lights on the car, turn off the engine and turn the ignition switch to position “0”;
- Open the hood;
- Shine a flashlight under the upper cross member on the left side to find the headlight cover;
- Find the locking tab in the upper part, press it and remove the cover;
- We pull the chip with the wiring from the lamp terminals (it fits tightly, so you need to pull it with force, but at the same time carefully);
- We move the chip to the side;
- Remove the protective boot placed on the body. To do this, there are three tabs around the circumference of the boot that you need to pull;
- Remove the lamp clamp (the clamp consists of two brackets that need to be removed from the eyes of the mounting strip);
- We take hold of the terminals of the lamp and remove it;
- We install a new light bulb in place of the old element and fix it;
- All that remains is to put the boot in place, put on the chip with wires and close the headlight with the lid.
We carry out a similar operation with another headlight. You can take a closer look at how to replace a low beam lamp on a Lada Granta in the video presented.
Lada granta liftback odyssey › logbook › how to get rid of manual transmission howling
An intriguing name?) So, I already described how on Saturday I changed the transmission oil to synthetic ZIC GF TOP, plus on Sunday I installed additional door seals RGI-135 and RKI-19. Yesterday I traveled, walked a little more than two hundred km, along the highway and around the city.
I share my impressions. As I thought, a miracle did not happen. The box continues to howl, but it still works with a softer noise and is quieter. I drove backwards out of the yard and even “lost” the engine noise, as if the car had stalled. In neutral, it also seemed to rumble somehow softer, I don’t know.
Regarding the seals, we can definitely say that the thresholds are now perfectly clean. The doors feel a slight increase in resistance when closing, but still close well. The slamming sound, which was already good, became even more dull. I remember when I inspected the car for the first time, I immediately liked that the locks were hidden in the doors, like on foreign cars.
When driving at high speed, the wind continues to whistle somewhere right behind your head))) I was very unpleasantly surprised. What's whistling there? What gap? It's like the window isn't fully closed. This was upsetting at first. But when I was driving home with a passenger, I suddenly noticed that it had become more comfortable to talk, I could hear my interlocutor better, I didn’t have to speak louder for him to hear me.
You don’t need to turn up the volume of the radio much at speed to drown out the noise... That is, the cabin has become really quieter. Zero good!) Well, in cold weather it should be warmer in the cabin due to the fact that it has become more airtight. We need to think at our leisure how and where else to compact =)
Back to the main point. To the howl of the box. Having realized that this problem could not be overcome with oil, I began to observe at what moments this sharp, irritating sound appeared. And this is what I noticed. With this car, I quickly realized that the engine pulls well and higher gears can be stuck in early.
That is, I slowed down in front of an unregulated intersection, for example, quickly turned my head to see that there was no one there, stuck the third one in and accelerated (that’s where it howls)). Or, for example, he slowed down to move over the rails more smoothly, then a third and forward, howling again.
Well, similar situations when the third gear is stuck at low speeds, when there are few revolutions. At this moment this nightingale song begins around 2000 rpm. I guess anyone whose gearbox howls in third gear, like me, has the same driving style))
I checked, if I’m not lazy and first turn on second gear, accelerate to closer to 3000 rpm, and then switch to third, then there’s no howling. Yes, when accelerating in second and third, a more serious roar of the engine appears from faster acceleration (personally, I’m quite happy with it), but the box doesn’t squeal.
In order to drive like this, you need to change your driving style a little, to more accurately feel your speed, when it is better to go to second and when to third. Otherwise, it may be that when you turn on the second car, the nose may nod off, if the speed still turns out to be high, you need to hold the throttle more in such cases when you release the clutch.
More about Shumka. I sat in the cabin, leafed through a VAZ magazine and read a funny thing. They write something like this. Like the owners of non-luxury Grant cars do the sound insulation on their cars themselves. But the manufacturer believes that it is not necessary to sizing the car, but to eliminate the sources of these noises.
PS: An hour after I wrote this, I drove around the city. Once again I tested my theory with gear shifting... It's all bullshit))) In city mode it's impossible to drive like this (in the sense of taking the second gear all the time to accelerate at 3000 rpm), it's too fast.
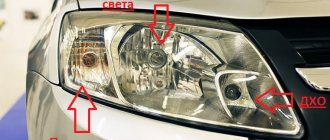
Lamps installed in the headlight
The Lada Granta uses combination headlights, which include:
- DRL/side light bulb (socket type P, power 21 W – main filament, 5 W – additional);
- High/low beam lamp (base type - H4, high beam filament power - 60 W, low beam - 55 W);
- Turn signal (base – P, orange bulb, power – 21 W).
All of the indicated lamps in the Lada Granta headlight are changed individually.
What can you supply?
Standard for this car are halogen lamps. But it is quite possible to install other types of lighting elements. The following types of lamps can be installed on Granta:
- XENON. The light of such paws is provided by the creation of an electric arc in an environment of inert gases. They are distinguished by high brightness, relatively small dimensions and a significant service life;
- LED. They are becoming increasingly popular among car enthusiasts. Their advantages include significant light brightness, low power consumption, and long service life.
But it’s still better not to experiment with light, but to use the Granta lamps that are indicated in those. documentation for the car, namely halogen.
With their quite good performance indicators, such lighting devices are the most inexpensive, and there is a large selection of them, which allows you to choose the best option for use.
Exhaust system
Grants are equipped with a catalytic converter, which burns exhaust gases, making them less toxic, as well as an exhaust manifold.
The entire structure together is called a catalytic collector. On old Grants it often failed, burned out, and was very sensitive to fuel quality. When it breaks down, and it is expensive, many owners of cars that are not under warranty simply throw it away. They installed a dummy instead, followed by flashing the control unit for Euro-2.
Also regarding the exhaust system, at one time there were frequent complaints about strong vibration of the exhaust system at the moment of starting movement. The culprit was the corrugated insert of the additional muffler, which did not dampen vibrations from the engine. There have never been any problems with the main muffler - it’s an ordinary can, there’s nothing to break.
What does the market offer?
Below are some options for halogen lamps of different price categories that can be installed on the Grant:
- PHILIPS H4 COLORVISION. A set from a German manufacturer, characterized by bright light and the ability to choose the color of the glow (blue, green, yellow). Price – about $35.
- OSRAM COLOR BLUE HYPER. Halogen lighting elements made in Germany, with a declared color temperature of 5000K. The flask is painted blue. Price – about 17$.
- MTF LIGHT STANDARD. Korean light bulbs with a transparent bulb, the color temperature of which is 2900K, which allows them to be used in headlights with plastic housings. They will cost only $6.
- KOITO DENSO VWHITE. Products made in Japan, with transparent bulbs and a color temperature of 3700K. Features high light intensity. Price – about 28$;
- EVO VISTAS. Halogen lamps from China have a completely transparent body, their light color temperature is 3200K. Will cost $25.
- LIGHTHOUSE ULTRA. Budget option made in China. The base is transparent, the characteristics of the products are fully suitable for installation on Granta. Cost – $4.
And these are just a few types of halogen lamps. In general, the range of such lighting equipment is very extensive and allows any car owner to find a suitable option both in terms of price and quality of work.
Reviews
| Prevention, replacement with new ones | ||
| Whistle from under the expansion tank cap | Inspection | Replacement |
| The motor takes a long time to reach operating temperature | Inspecting the antifreeze level | Adding fluid, replacing the thermostat with a new one |
| The temperature sensor systematically shows false data | Inspecting the electrical circuit, measuring the sensor resistance | Replacement with new one |
| No circulation in the main line | Inspection through the expansion tank with the engine running | Washing, removing air pockets |
| № | Positive |
| 1. | Vasily: I’ve been driving a car for a year and a half, no comments. I carry out technical inspections in a timely manner, fill up with high-quality fuel and oils, and have a moderate driving style. |
| 2. | Gennady: at 50,000 km the standard thermostat jammed, replaced it with a new one under warranty. There were no more breakdowns, the machine works like a watch. |
| 3. | Kirill: the rubber pipe burst once where it was fixed with a clamp, I think it was my mistake, I overtightened it. I'm happy with the build quality, no complaints. |
| 4. | Vladlen: I’ve heard negative reviews about Granta, saying that the system is often overstuffed. This happens, but extremely rarely, the defect is not widespread. |
| 5. | Ignat: in order for the machine to work properly and the parts to last longer, it is necessary to treat it with care, care for it, and maintain it. |
| 6. | Dmitry: Six months have passed since the purchase of the car, so far the work is perfect, no investments except for the purchase of consumables. |
| 7. | Valentin: I am satisfied with the build quality of domestic transport; breakdowns do occur, but they are insignificant and can be easily repaired. The engineers managed to combine good quality at an affordable price. |
| Negative | |
| 1. | Ivan: negative experience during operation of the car, already at 45,000 the thermostat jammed, then the bearing flew off. The model is still crude, there are many shortcomings, the manufacturer does not strive to quickly eliminate them. |
| 2. | Vladimir: the build quality is low, after two months of using the car, the rubber pipe cracked and antifreeze began to leak. |
| 3. | Vyacheslav: Lada Granta or Renault Logan - obviously the latter. The manufacturing quality of the French automobile industry is an order of magnitude higher than its domestic counterpart. |
Conclusion As practice shows, most calls to service stations are caused by a jammed thermostat on the Lada Grant. The reasons are different. The factor of manufacturing defects cannot be ruled out, but the fault also lies with the owner of the car.
Buy original spare parts, maintain your car in a timely manner - then the number of breakdowns will be reduced several times.
The coolant must be replaced as part of maintenance. It changes every 75 thousand kilometers or 5 years, whichever comes first. Today we will tell you how to replace antifreeze with your own hands.