The design and principle of operation of the VAZ 2114/15 stove
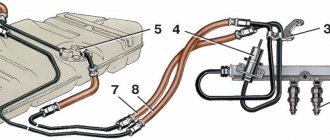
The heating system of the VAZ 2114/15 is designed to heat the air entering the passenger compartment. Its design is the same in cars with injection and carburetor engines. The coolant heated by the engine flows from the cooling system into the heater radiator, which is blown by a fan. The flow of warm air created in this way enters the cabin through the air duct system. The intensity and direction of air flow is regulated using deflectors and dampers. The interior heating system of the VAZ 2114/15 can operate in several modes.
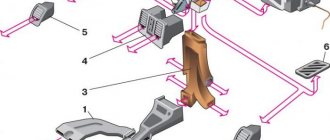
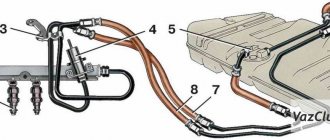
The VAZ 2114/15 stove is designed quite simply: 1 - assembled heater; 2 — protective casing; 3 - seal; 4 — front air duct; 5 — rear air duct; 6 — rear air duct; 7 — right nozzle; 8 — right side air duct; 9 — right side nozzle; 10 — intermediate body; 11 — central nozzle; 12 — draft of the windshield heating flap; 13 — heater control levers; 14 — control handle for the heated windshield damper; 15 — heater control handle; 16 — symbol plate; 17 — control handle for the foot heating damper; 18 — right air duct; 19 — interior heating air duct; 20 — heater control damper rod; 21 — heater valve control rod; 22 — heater valve; 23 - leg heating damper rod
FakeHeader
Comments 7
I cut a piece of metal from a nail of the same diameter and fused it into plastic))))
I thought about doing this too) what was the result? Doesn't the nail fall out over time?
No, that’s how the former Logan sold it, it seems to me that it turned out even stronger than the standard one, now I’ll have to do it on the Sander, otherwise passengers have a bad habit of twisting the deflector until the crap...))))
I should also try soldering a stud)
I cut a piece of metal from a nail of the same diameter and fused it into plastic))))
I don’t even understand where the carnation is and why?
There are 4 latches in the “curtains” of the deflector, reminiscent of some kind of pistons. They broke off from the author. This problem is common, and in order not to buy a new “flap”, a piece of nail similar in diameter and length is soldered into place of the broken piston
The overall impression of a car's interior is made up of little things. Only a set of measures to improve the interior make it truly attractive and unique. Let's consider one of these modifications, which concerns air duct deflectors and can significantly change the interior of the Lada Largus.
Stove design
The VAZ 2114/15 stove consists of the following elements:
- Fan.
- Windshield defroster.
- A distribution flap that directs air flow to the central and side deflectors, to the lower and upper parts of the cabin.
- Control valve.
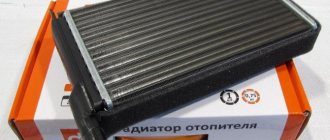
- Stove radiator.
- Duct that directs air flow to the legs.
- Internal air duct.
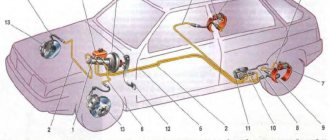
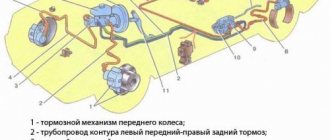
The stove consists of a fan, dampers, radiator and air ducts. Blue and red colors indicate the flow of cold and hot air, respectively.
Features of the heating system at Pyatnashka
On the VAZ 2115, the heating system includes the following elements:
- the VAZ stove itself, which includes a plastic housing, a radiator assembly, and a ventilation device;
- VAZ heater valve, used to block the access of antifreeze to the radiator device and the mechanical drive of the unit;
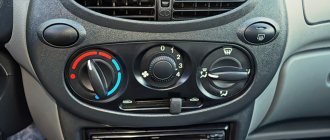
- a control unit used to regulate air flow, located in the center console.
Complete installation of a “tag” heating system
Heater fuse and reasons for its failure
Often the cause of malfunction of most components and systems of a car is a blown fuse. The stove is no exception. Failure of a 30A heating system fuse causes the fan motor to stop and air to stop flowing into the cabin. In this case, find an element marked F7 in the fuse block and replace it. The new fuse should also be rated 30A. If the fan does not work after this, the problem should be looked for elsewhere.
Heater fuse F7 is located in the mounting block under the hood on the driver's side
It is often difficult to determine that it is the fuse that has blown. It can fail due to a short circuit in the electrical wiring, a malfunction of the electric motor, severe clogging of the cabin filter and in a number of other situations. The difficulty lies in the fact that fuse F7 is simultaneously included in the rear window heating electrical circuit and is responsible for the cigarette lighter, glove compartment lighting and headlight washer motor. If it fails, all these components will not work.
Major electrical failures of the heating system of the VAZ-2115
If no changes occur in the heating system at any position of the switch knob, then most likely the system motor is faulty (the brushes are worn out) or there is no voltage at the terminals. But also in this case there may be problems with the ignition switch or mounting block (fuse F4 has blown).
It is important for the proper operation of the car's heating system that there is no more than 3 ohms at the engine ground (installed under the hood).
If the heater works normally at maximum engine speeds, and problems arise only at low speeds, then the cause of the malfunction most likely lies in the speed switch button or additional resistors.
If you turn on the interior heating system and hear a noise and the heater is not blowing properly, this also indicates an engine problem. Malfunctions may include jamming of the impeller or armature bearings. Malfunctions can be eliminated by replacing components or, if necessary, lubricating them. But, as a rule, these actions have a short-term effect and the problem returns.
Over time, any equipment breaks down and requires repair. Therefore, the heating system is no exception here, and the least that needs to be done for preventive purposes is to at least carry out periodic visual inspections and diagnostics. Don’t forget that over time the system ages and wears out, so the older the car, the more it needs to be prepared for the heating season.
Source
Why the stove does not work or does not heat the air
If the stove fails, it either does not work at all, or it works but does not heat the air. In the first case, first check the fan wiring, starting with fuse F7. If the fuse is blown, replace it. Then they check the relay, which may not turn on the first time or only when the engine is warm. In this case, the relay is replaced with a new one.
Then the serviceability of the electric motor is assessed. To do this, power is directly supplied to its contacts from the battery. If the electric motor starts to operate at maximum speed, then it is in good condition. Otherwise, it will need to be repaired or replaced.
The intensity of the air flow is adjusted using a resistor having two spirals with resistances of 0.82 Ohm and 0.23 Ohm. In the first mode, the current flows through both spirals, in the second - only through a spiral with a resistance of 0.23 Ohms, in the third - bypassing the spirals, that is, without resistance at all. If the resistor is faulty, the fan will only operate in the third mode at maximum speed (handle in the extreme right position). The problem is solved by replacing the resistor, which is located on the driver's side above the accelerator pedal.
If the resistor is faulty, the heater fan will only be able to operate at maximum speed.
If cold air enters the cabin, this may be due to:
- Airlock. It could have formed when replacing the coolant, when the system was depressurized, or because there was insufficient amount of coolant in the system. To remove the plug, remove the heater radiator pipe, use a watering can to add antifreeze to the maximum and put the hose back in place. After starting the engine, coolant under pressure will displace the remaining air from the system.
- Stove tap jammed. This happens if the tap was not initially opened all the way, and during operation, oxide and scale formed on the inner surface, preventing the normal circulation of the liquid. You can try to open the tap using pliers or immediately replace it with a new one.
- The stove radiator is clogged. When using low-quality coolant, the radiator honeycombs may become clogged. The problem is solved by flushing or replacing the heat exchanger. The feasibility of washing is determined by the scale of contamination.
- Installation of a low-quality radiator. In a defective product, the honeycomb may be incorrectly soldered. The radiator should be replaced.
- Low pressure in the cooling system. If heat transfer increases at higher speeds, the pump needs to be replaced.
- Low coolant level. It is necessary to check the level and add antifreeze if necessary.
- Damage to the heater fan impeller. The impeller is carefully inspected and replaced if mechanical damage is detected.
- Cabin filter dirty. If it is heavily polluted, the power of the electric motor will not be enough to pump warm air into the cabin. The filter is replaced with a new one.
- Damage to the cylinder head gasket. If the cylinder head gasket is blown, white smoke will come out of the exhaust pipe. The problem is solved by replacing the gasket and dismantling the cylinder head.
If the stove is clogged, warm air will stop flowing into the cabin.
Heater dampers don't work
The distribution of air flows throughout the cabin is carried out by dampers, which, in turn, are controlled using cables. When these cables fail, problems arise with directing the air flow to the windshield or to the foot area. In addition, the damper that blocks the flow of air from the street begins to work incorrectly. In this case, adjustment of the damper drives is required.
Such situations can arise even on a new car. Slightly warm air begins to flow from the lower, upper and side deflectors, and hot air begins to flow from the center console. This is due to the poor build quality. There are gaps between the joints of the air ducts and the dampers, which leads to warm air entering only from the center console and heating the panel from the inside.
The drive cable is always taut. Therefore, over time it bends, breaks off or stretches. In this case, it is necessary to adjust the damper drive, which is performed in the following order:
- In the stove, we look for a bracket with which the cable sheath is held on the heater body.
- A galvanized metal lever located on the left side is pulled back. This position corresponds to the maximum opening of the damper.
- The length of the cable is tightened and adjusted. The long lever on the lever block in the extreme right position should open the damper completely.
- After adjustment, the cable is securely fixed.
Video: stove repair using the example of a VAZ 2114
Deflectors for car windows and hood: installation and removal instructions
Deflectors on car windows and hoods are used everywhere. Most vehicles on the road are equipped with black or body-colored visors pasted over the sliding windows.
Some vehicles have a similar design in the front part of the hood. What are these devices used for? How to choose and install a deflector with your own hands?
Why are deflectors needed?
The structures under consideration have several functional purposes, which include:
- Protection of the hood from mechanical damage - a deflector mounted in the front part of the hood changes the direction of the air flow flowing around the car. Together with the upward flow, small stones and wheel spikes are diverted from the car, flying out from under the vehicle in front. In the absence of the so-called “fly swatters” all this ends up in the windshield of the car. In addition to the above, the deflector mechanically protects the edge of the hood from flying sand and dust.
- Protection of the windshield from insects - the direction of the oncoming flow changing under the influence of the device helps to remove mosquitoes and midges, which in warm weather literally stick to the windshields of cars that are not equipped with protective devices. Installing a fly swatter solves this problem.
- Improving the design of the car - visors and fly swatters significantly improve the appearance of most cars. Black elements look best when installed on light-colored cars.
- Protection from splashes in the cabin - a deflector on the car windows allows you to open them a little even in heavy rain. Of course, if the window is completely lowered, the device will not save you.
Criteria for choosing car deflectors
Installation of deflectors begins with their selection and purchase. It is necessary to select products based on several parameters. First of all, the visors must match the shape of the door or hood where they are planned to be mounted
It is important that the coincidence of all angles is accurate. Otherwise, the installed deflectors will not last long and will soon disappear
The second selection criterion is the method of attaching the products to the glass. There are plug-in and self-adhesive visors. Installing a hood deflector is always done in one way, so there is nothing to choose from.
The quality of a product is determined by its manufacturer. It is preferable to purchase goods from a monobrand manufacturer. However, devices of acceptable quality can also be sold by brands that develop several car models at once.
The most famous companies today are the following:
- Mono-brand (products for one brand of vehicle): climair, airpiex, heko.
- Multi-brand (products for several brands): autoclover, mobis.
- Little-known (not very common, usually Russian manufacturers): strelka, cobra, comfort.
Fly swatter installation procedure
Installing a fly swatter on the hood requires some knowledge. Violation of the installation technique leads to damage to the paintwork. The result is accelerated corrosion of the metal under the deflector.
Things to consider before installation
Before gluing the deflectors to the car, you should evaluate the condition of the hood edge.
Corroded areas should be cleaned, treated with a rust converter, puttied, primed and painted. The device should not be placed on rusty surfaces, as moisture almost always accumulates under the device. This will lead to the final destruction of the metal within several months.
The second factor to consider is the speed at which you plan to travel. On relatively low-speed vehicles, installation of deflectors can be carried out using adhesive tape or standard fasteners. For high-speed vehicles, additional fastenings should be made.
If installation is planned using glue or tape, the temperature in the room where the work is being carried out must be at least 10 °C. Otherwise, the fixing compounds will not stick to the paintwork and the deflector will fall off at the first shake. Installation using mechanical clips or bolts can be done at any temperature.
Replacing and connecting the stove
Installing a new heater radiator is done in the reverse order. When installing rubber hoses, it is recommended to treat them with sealant. When connecting electrical connectors, use the markings applied during disassembly.
After assembly, coolant is poured into the system. To prevent an air lock from forming, remove the hose from the throttle assembly after loosening the clamp. Antifreeze should be poured into the expansion tank slowly, observing the disconnected hose. As soon as coolant flows out of it, the hose should be put back on the fitting and tighten the clamp. If everything is done correctly, the operation of the stove will not cause any complaints.
When installing a new heater radiator, it is recommended to pre-treat the pipes with sealant
Video: dismantling the VAZ 2114 stove
How to dismantle central deflectors and install new ones
Removal of deflectors may be necessary in one of the following cases:
- they are clogged and require cleaning;
- a deeper cleaning of the system with removal of the air ducts is necessary;
- the deflectors were pressed into the air duct;
- The deflectors are broken and need to be replaced.
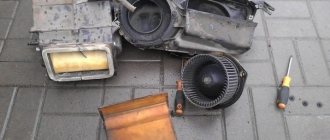
In any case, whatever the reason for dismantling them, it is quite simple to do and does not require a lot of free time or special tools. The entire process of removal and reinstallation takes place in just a few steps, the first of which is removing the dashboard panel.
In order to do this, you need:
- disconnect the battery;
- remove the receiver/radio tape recorder, disconnect the cable harness from it;
- remove the center console screens;
- remove the cigarette lighter by disconnecting the harness of suitable wires;
- remove the ashtray light bulb and disconnect the wires that go to it;
- remove all protruding buttons and adjustment knobs (to do this, carefully pry them off with a screwdriver);
- Use a Phillips screwdriver to unscrew the screws holding the instrument panel panel (one each on the left and right);
- Unscrew two screws located above the dashboard and two screws located under it;
- pry and remove the rear window heating plug;
- Unscrew the self-tapping screw located under this plug with a Phillips screwdriver;
- move the panel back and to the right;
- disconnect all blocks with wiring harnesses from the switches and on-board computer.
Heat from side deflectors
We return heat from the side deflectors
using pliers. VK group: Instagram: .
How to remove double-sided tape and replace window deflector
Once the panel is completely detached, the deflectors themselves can be removed. To do this, you need to unscrew the three screws responsible for fastening the central deflectors. One of them is located under their body, the other two are on its sides. After this, all that remains is to remove the deflector, clean it (if necessary), and install it back.
Assembly of the front panel and its installation are also carried out according to the above described scheme, but in the reverse order.
Before installing the deflectors in their place, it will be very useful to cover their perimeter with sound-absorbing material, such as modelin.
https://youtube.com/watch?v=7OUuphinDvo
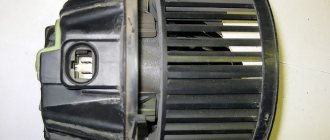
Fan motor repair
If the electric motor malfunctions, it should first be removed and then the feasibility of repair should be determined. It is necessary to evaluate the condition of the brushes, armatures, windings, and check the integrity of the wire insulation. The contact area of the brushes on the armature can be cleaned with zero grade sandpaper. You should also pay attention to the bushings and bearings - clean the rubbing parts from dirt and apply lubricant (for example, Litol). All elements with signs of wear must be replaced.
When installing a new heater radiator, it is recommended to pre-treat the pipes with sealant
Heater radiator repair
Usually, if mechanical damage is detected, the stove radiator is replaced with a new one. However, some car owners try to repair cracks and holes using soldering. A copper radiator is quite easy to solder, and it is much easier to restore than an aluminum one. To repair an aluminum heat exchanger, you will need special flux and tinning solder, as well as a powerful soldering iron. The damaged area is first cleaned of dirt and degreased. Then flux and solder are applied to it with a soldering iron. After soldering, it is recommended to check the radiator under pressure to make sure there are no leaks.
Cleaning and flushing the radiator of the VAZ 2114/15 stove
You can increase the efficiency of the stove by cleaning and flushing the radiator. The procedure can be performed without dismantling the radiator or with dismantling it. In the first case, you will need to remove the outlet and inlet pipes from the heater and pour a cleaning solution into it. Citric acid, plumbing cleaners (for example, “Mole”), etc. are used as such a solution. Then the radiator is washed with running water and coolant is added. You can clean the radiator better by removing it from the car. This will allow you to wash it not only from the inside, but also from the outside, removing dirt between the honeycombs. Washing is usually carried out with running water.
If after performing these procedures the stove does not work better, the radiator must be replaced.