The VAZ 2108 is the first-born of the front-wheel drive “eight” family of cars from Tolyatti. This is a debut model that did not have an Italian prototype, and was completely developed by domestic designers. The family, in addition to the three-door hatchback VAZ 2108, included the five-door hatchback VAZ 2109 and the sedan VAZ 21099. Their brakes are designed exactly the same.
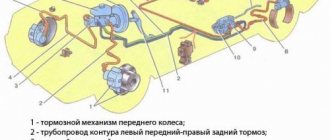
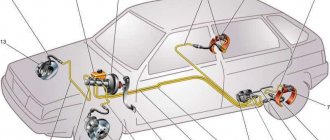
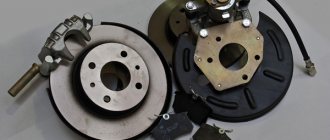
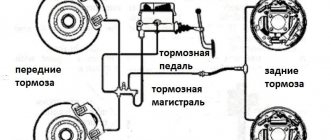
Diagram of the VAZ 2108 brake system and its features
The VAZ 2108 has two brake systems:
- working;
- parking
The working one ensures that the car slows down and stops when moving, and the parking one fixes the VAZ 2108 in the parking lot. The VAZ 2108 uses a dual-circuit brake system as a working brake system. One circuit provides braking for the left front and right rear wheels. The other stops the right front and left rear wheels. This ensures increased directional stability of the VAZ 2108 even if one of the circuits fails. Neither side of the car is left without a braking wheel. This is a very important factor in ensuring the safe operation of the VAZ 2108.
The brake system of the VAZ 2108 demonstrates high continuity with the brakes of rear-wheel drive models. They have proven themselves well when used in Russian conditions. It was considered justified to replace the rear disc brakes of the Italian prototype Fiat 124 with drum brakes, more adapted to domestic conditions. Unlike the first generation of rear-wheel drive models, the VAZ 2108 brakes have a vacuum booster and a pressure regulator in the rear wheel cylinders.
The VAZ 2108 brakes work like this:
- To stop the car, the driver presses the pedal with his right foot.
- The lever system transmits the action to the vacuum booster.
- He, using a connection with rarefied air in the engine crankcase, transmits force to the main brake cylinder.
- In turn, this unit distributes pressure between two diagonal hydraulic circuits of the system.
In each of the diagonal circuits, pressure is transmitted through pipelines to the front disc and rear drum brakes. The pressure on the rear brakes is transmitted through a dual-circuit pressure regulator, which ensures an increase in braking force as the load on the rear axle increases.
The parking brake of the VAZ 2108 has a cable drive and is connected to the brakes of the rear wheels. It is activated using a lever with a locking ratchet located under the driver’s right arm, next to his seat.
Ineffective brake operation
It is much more difficult when the system works, but is inefficient or unstable. There may be a lot of surprises here. For example, if the right and left brake cylinders operate unevenly, you most likely need to pay attention to the pressure regulator. It either does not work at all or requires adjustment and improvement. It may also turn out that even after the system has been completely restored, lubricant has got onto the working surface of the brake pads of one of the wheels, as a result of which the braking will be uneven, one pair of pads is oily, and the second is working normally.
Less often, but such a problem as incomplete disinhibition also occurs. If this applies to all wheels at once, then in this case it is enough to adjust the free play of the brake pedal. In this case, you need to check the play on the vacuum booster rod. Its value should be within 1.5-2 mm for a VAZ 2109. If one of the wheels does not release the brakes, in this case, again, either the pressure regulator or one of the brake cylinders must be blamed. The fact is that the piston could get stuck in a certain position and prevent the brake pad from fully releasing the wheel.
The vacuum brake booster of the Nine rarely fails, and its habits are well known to all owners - if the pedal suddenly becomes wooden and stiff, then the booster requires repair or adjustment. Most likely, the problem is in the hose that connects the booster reservoir and the engine intake tract.
Of course, these are not all the surprises of the Nine’s braking system, but other troubles are derivatives of the main problems. The main thing you need to remember is to change the brake fluid on time, prevent it from getting dirty, change the pads according to the regulations, or even earlier, and occasionally check the brake system for leaks. Then the system will last a long time and will not create problems on the road. Reliable brakes to everyone!
Basic faults and brake repair options
The best fix is prevention. When operating the VAZ 2108, it is necessary to strictly adhere to the scheduled maintenance periods for the brake system. This applies to the friction linings of the front disc and rear drum brakes. Complete wear of the friction linings threatens unexpected brake failure in an extreme situation. Periodically check the condition of the linings, monitor their level of wear, and replace if necessary.
Carefully monitor the brakes of the VAZ 2108 in terms of fluid leakage through worn gaskets and seals. Excessive wear of the sealing elements is fraught with the risk of insufficient force in the brake cylinders, failure of the pedal when driving the VAZ 2108, and an increase in the braking distance. All this creates very serious risks. Brakes are a critical safety system for drivers, passengers and other road users.
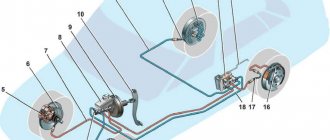
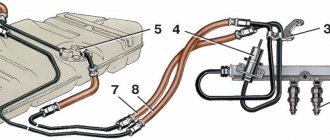
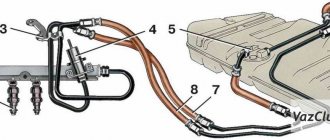
Replacing brake pipes
The VAZ 2108 brake pipelines include elements of two types:
- rubber reinforced hoses;
- steel tubes.
Both of them cannot be repaired. When they fail, they are replaced. If the pipeline leaks while on the move, it can be temporarily insulated with several layers of electrical tape, but only in order to get to the service center and replace the damaged element. Beware of buying hoses from unreliable sellers; there are a lot of crude fakes on the market. Try to purchase spare parts from branded stores and car service centers.
Some VAZ 2108 owners replace corrosion-prone steel tubes with more reliable copper ones. They cut off a copper tube of suitable length, flare the ends and install them in place of the standard ones. The corrosion resistance of such a pipeline increases significantly, but the justification of the costs remains controversial.
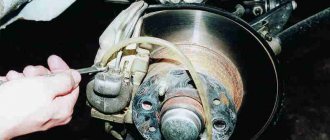
Replacing brake discs
When braking a VAZ 2108, friction linings rub against the brake disc of the front wheel. The temperature in the contact patch can reach 800 degrees Celsius. In this case, not only the linings wear out intensively, but also the disc itself. From time to time it has to be changed.
The minimum standard value for the thickness of the VAZ 2108 brake disc is 10.8 mm. The measurement is made using a caliper with the wheel removed. The thickness of the disk should be measured in three or four places, turning the hub around its axis. The minimum thickness value must exceed the standard value. If the VAZ 2108 disk is thinner than it should be, replace it.
The order of work is as follows.
- Remove the two screws securing the brake caliper to the steering knuckle.
- Without disconnecting the hose, secure the caliper by hanging it using a suitable piece of wire from the shock absorber strut spring.
- Spray WD-40 onto the pins that secure the brake disc to the hub.
- Let sit for 15 minutes and remove the pins.
- Carefully beating the disk with a mallet from the inside out, dismantle it.
The new disk is installed on the VAZ 2108 in the exact opposite order to that described.
How to bleed the brakes on a VAZ-2106 alone, step-by-step video instructions
Before you start bleeding the brakes on the VAZ-2106, you should thoroughly clean the brake cylinder fittings. Over time, a huge amount of dirt sticks to these parts. It is also necessary to remove the rubber caps from them. The next sequence of actions is as follows:
- Add brake fluid to the appropriate reservoir if necessary.
- Press the brake pedal several times.
- At this stage we will need a gas stop. For this purpose, for example, a gas stop from a VAZ-2110 is perfect. The brake pedal must be fully depressed. The same gas stop is installed between the floor and the pedal.
- We bleed all existing brake fluid from the cylinder along with air. Thus, the gas stop independently begins to exert pressure on the brake pedal, pushing it all the way to the floor.
- It is necessary to bleed all four wheels of the car until all the air leaves the brake system.
Using a rubber syringe
Many car enthusiasts do not know how to bleed the brakes on a VAZ-2106 using a rubber syringe. Therefore, let us dwell on this issue in more detail.
A hose of suitable diameter must be placed on the syringe spout. It is best if it is completely transparent. But if you don’t have a transparent hose at hand, it doesn’t matter, you can use what you have.
The syringe is compressed as much as possible. The main essence of this task is to make sure that the least amount of air remains in the syringe. Having fixed the device in this position, a fitting is put on the free end of the hose.
The syringe should be hung in such a position that the hose coming from it is in a vertical position.
Now you need to press the brake pedal quite sharply 3-5 times. But you should release the pedal slowly. This will create excess pressure in the car's brake system. Then we unscrew the fitting a little and through the transparent hose we observe how the brake fluid along with air is sucked into the syringe. In order to completely bleed the brake system of your VAZ-2106 yourself, you will need 2-3 similar approaches.
The only thing left to do is to disconnect the device from the fitting and drain the liquid from the syringe into a jar. A similar action should be performed for each individual wheel.
Bleeding the brakes when using a medical syringe
The sequence of actions is as follows:
- Brake fluid is drawn into the most ordinary medical syringe.
- The syringe is connected (hermetically) to the cap of the brake fluid tank. To do this, you can use sealants or mechanical seals if you don’t have time to wait for the sealant to dry.
- Place a bottle under the leakage area and unscrew the fitting.
- We press on the syringe plunger, thereby creating pressure. Thus, pumping brake fluid into the system.
- In turn, a trickle of brake fluid along with air should appear at the exit point.
In order to be completely sure that there is no more air left in the brake system, in this simple way you should push absolutely all the fluid through the system.
Replacing the pressure regulator
The breakdown of the rear brake pressure regulator of the VAZ 2108 is most clearly evidenced by the car’s tendency to skid when braking on a straight, flat, dry road. If the regulator breaks down, it is recommended to replace it as an assembly. Repairing this unit in a private garage is extremely difficult, and the brakes directly affect safety. If you are forced to repair your brakes yourself, but do not have the proper experience and training, replace the entire adjuster. Do not disassemble it to avoid problems with the brakes.
The regulator is replaced in a pit or on an overpass. Work order:
- Use a screwdriver to lift the bracket of the regulator drive lever, remove the lever from the hole and remove the bracket from the lever.
- Unscrew the hydraulic hose fittings from the regulator body and remove the hoses.
- Plug the pipe fittings to prevent liquid from leaking out.
- Unscrew the two screws securing the regulator to the bracket.
- Remove the regulator.
Install the new regulator in the reverse order.
Preliminary activities
By properly preparing for the upcoming brake system bleeding, you can seriously save on car service costs. Watch the video, read our instructions to gain the necessary experience and upgrade the vehicle yourself
Among the preliminary activities, we highlight the following.
- Check the current brake fluid level in the expansion tank. If it is less than the MAX mark, you will need to add a little fuel fluid to the required level.
- Prepare any empty plastic container by pouring a small amount of brake fluid into it.
- Find a hose of sufficient length, the diameter of which will correspond to the diameter of the brake cylinder fittings.
- If the car is on a lift, that is, the rear wheels are hanging, you will need to block the pressure regulator. To do this, simply insert a flathead screwdriver between the piston and the plate.
- Be sure to invite a friend, an assistant. One person is needed to help build up pressure inside the brake system.
- Loosen the fittings before starting work.
Leveling up
Now let’s proceed directly to bleeding the brake system of your VAZ 2109. By following certain instructions and observing the sequence of actions, you will be able to complete the task more easily with four hands.
- Have a helper press the brake pedal about 9 times. This is how pressure will be created inside the system. The pedal does not need to be lowered after the last press. It is necessary to keep it pressed to the floor.
- At this time, you should put the rubber hose on the cylinder fitting. By loosening the fitting, air is released from the system.
- Brake fluid will begin to leave the system along with the air.
- It is not difficult to determine the presence of air inside the vehicle, since bubbles appear in the brake fluid in the container into which the mixture is drained. Make sure that the other end of your hose is lowered inside the container and touches the TJ that was poured there in advance.
- Tighten the fitting, after which the assistant will need to create pressure in the system again. That is, the brake pedal is pressed again.
- Using the instructions provided and the sequence of bleeding the wheels, excess air is expelled from the entire brake system of the VAZ 2109.
- You should pump until you get rid of all the air, that is, the fuel fluid begins to come out without forming bubbles inside the container.
During the pumping process, the coolant will gradually come out of the expansion tank. As the quantity decreases, do not forget to fill it with new composition. It is not worth pouring fuel fluid from the container for pumping, since, as you remember, there are air bubbles there.
Having completed the procedure for bleeding the brake system, tighten the fittings and put the caps on them.
Installing rear disc brakes
Since the time of the VAZ 2101 “kopek”, the front brakes of Zhiguli have been disc, and the rear have been drum. The decision to use such a combination is explained by the peculiarities of domestic roads and off-road conditions. Drum brakes, more familiar to our car enthusiasts, in the second half of the sixties, when the first Zhiguli models were being developed, demonstrated significantly higher mileage than the disc brakes adopted in Europe. Since then, technology has come a long way, and the service life of disc brakes has increased significantly. But they still retain the advantages in braking efficiency. If you are not embarrassed by the prospect of changing friction linings and brake discs more often, tuning the VAZ 2108 brakes, which consists of replacing drums with discs, makes sense.
If you have the proper experience and appropriate equipment, you can perform such a replacement yourself at your own risk. Keep in mind that you will not be able to pass the inspection without a bribe. Such modernization is not provided for by the design of the VAZ 2108 and, accordingly, is prohibited. What is not allowed is not allowed - this is a matter of safety, and not only yours.
If you decide to replace, keep in mind that the diameter of the rear brake discs should be 2–3 cm smaller than the diameter of the front ones. If the front brakes have a 13-inch diameter disc, then the rear brakes should use a 12-inch diameter disc. Otherwise, the VAZ 2108 becomes prone to skidding when braking, even on a dry, hard-surfaced road. Especially with a lightly loaded rear axle.
Do not attempt to grind a brake rotor yourself. Even if you are a lathe operator, you will not find professional non-destructive testing equipment in a private garage. This is about safety, better not take risks. In automobile stores you can buy ready-to-install disc sets for the VAZ 2108, including a new flange and a special spacer to match the dimensions of the hub and caliper disc.
Dismantling the drum brake is carried out with the wheel removed.
| Procedure | Subtleties |
| Unscrew the nut securing the parking brake cable, remove the drum mounting bolts. | If the drum is stuck and cannot be removed, tap it with light blows from all sides and remove. |
| Disconnect two guides and one tension spring. Remove the pads and body of the old brake, then the hose and plug it. Remove the brake cylinder. Remove the hub and flange of the suspension arm. | The flange should not be reused. If it was not supplied with disc brakes, please purchase it separately. |
| To install VAZ 2108 disc brakes, start by installing the hub with the disc on the flange. | To do this you will need bolts 5mm longer than before. |
Install the brake pads. Remove the plug and connect the hydraulic drive hose. Secure the parking brake cable to the appropriate bracket.
After completing the installation of the brakes on both rear wheels, bleed the brake system to remove air introduced into it during work.
Self-leveling
To perform the operation discussed in this article, you must use a compressor. A device is required that can maintain the pressure in the system at least 2 atmospheres. The pedal is not activated in this situation.
The work is done like this:
- select a cap suitable for replacing the one that is screwed onto the fuel tank of your VAZ-2115 (suitable for canisters in which motor oil is sold);
- drill a hole with a diameter of 14 mm in it;
- insert the fitting from the tubeless wheel into the hole;
- the joints must be treated with sealant;
- fill the tank with liquid to the maximum mark;
- Unscrew the cap from the brake cylinder fitting;
- put on the tube and place the other end in the bottle;
- Connect the compressor to the tank and activate.
When the air stops coming out, tighten the fitting and move to the other wheel.
At the last stage of the procedure, it is necessary to add brake fluid to the reservoir intended for it to the maximum and screw the cap tightly.
Next, all that remains is to check how the system works after removing the air.
The feasibility of installing a vacuum brake booster
The vacuum booster dramatically improves the driving comfort of the VAZ 2108. It reduces the pedal effort required to stop the car. All modern cars are equipped with a vacuum booster. Domestic and imported. Nowadays, it is impossible to imagine a car without a vacuum brake booster.
The amplifier is aggregated with the master brake cylinder and is mounted on a shield separating the engine compartment from the interior of the VAZ 2108. It is connected to the engine crankcase with a flexible hose to supply rarefied air necessary for the operation of the amplifier. A malfunction of the amplifier is clearly indicated by a noticeable increase in the force on the brake pedal. Braking acceleration decreases.
Continuing your trip with a broken amplifier is very risky. You can drive to the nearest car service center with caution. A cracked hose can be wrapped with several layers of electrical tape. If replacing the cracked hose and check valve does not produce results, the unit must be replaced.
Work on removing the amplifier is carried out in this order.
- Disconnect the negative battery terminal. De-energize the electrical system.
- Disconnect the wiring block from the hydraulic reservoir cap located on the brake master cylinder body.
- From the passenger compartment, remove the amplifier pusher pin using pliers. Disconnect the pusher.
- Disconnect the hose going to the engine crankcase.
- Unscrew the two nuts securing the brake master cylinder.
- Move the cylinder away from the amplifier housing. Leave it hanging from the metal hydraulic pipes.
- Unscrew the four nuts securing the amplifier bracket to the engine shield and carefully remove the amplifier.
- Unscrew the two nuts securing the amplifier to the bracket. Disconnect the bracket and amplifier.
Install the new VAZ 2108 vacuum booster in the reverse order.
Brake fluid leak
You can find out where the brake fluid goes only by visually inspecting the brake valves, front calipers, and rear cylinders. The presence of drips will indicate a leak. If the fluid leaves, but no traces of it are visually visible, most likely the master brake cylinder is to blame, which allows fluid to pass into the vacuum brake booster chamber. This problem also does not arise instantly and before reaching a critical point, when the pedal goes to the floor and the brakes do not work, it will lose elasticity for some time until air enters the system.
There can be quite a few reasons, but the main ones can be outlined as follows:
- wear of the cuffs of the main or working brake cylinders;
- wear of the mirror surface of the working or master cylinder;
- violation of the tightness of the brake hoses on the front struts of the VAZ 2109;
- fluid leakage due to wear of brake pads due to a critical increase in operating
- stroke of the working cylinders.
In short, the easiest way to deal with a brake fluid leak, especially an obvious one, is to simply eliminate the cause of the leak and bleed the brakes.