We repair Niva VAZ-21213; 21214: Illustrated Guide
This section presents auto parts for products of the Volzhsky Automobile Plant (VAZ), the largest manufacturer of passenger cars in Russia. If you need to replace a failed device or component of your Lada or Niva, you have come to exactly the right place; all the necessary spare parts for the VAZ are presented here.
The section contains more than 25,000 items of goods. Thanks to a convenient search and electronic catalog, you can easily find parts for any line of cars from the leader of the domestic automobile industry: we have spare parts for both new VAZ models (Granta, Kalina, Priora, Largus), and for rear- and front-wheel drive long-known to Russian motorists (Samara , OKA, “classic”, etc.), as well as all-wheel drive VAZs (Niva, Chevrolet Niva). You will find gearboxes, cylinder blocks, engines, clutches from various manufacturers, pistons, shock absorbers, oil seals, steering rods, clutch actuators and much more for your car here.
We cooperate with leading manufacturers of VAZ spare parts, suppliers of the Tolyatti Automobile Plant conveyor. Each product meets all necessary quality standards.
Sources
- https://examiner.edocar.ru/skachat-rukovodstvo-po-ekspluatatsii-niva-21213.html
- https://www.avtoall.ru/vaz/search/Brake light switch/
Chevrolet Niva | Adjusting the parking brake
Adjusting the parking brake
The parking brake is structurally completely independent from the service brakes. Therefore, there is little wear on the parking brake. Brake drum corrosion or dirty brake pads reduce braking torque. If old pads are being adjusted, the parking brake must be run in.
To do this, from a speed of 40 km/h, carefully tighten the parking brake until the braking process begins. Maintaining speed, tighten the brake one notch and drive for about 400 m.
Thus, traces of corrosion are removed and deposited wear products are removed.
Adjustment of the parking brake is required when: a) Replacing the parking brake pads. b) Replacing the brake drum. c) Adjusting the position of the pads. d) The need for a large tightening (more than 10 teeth).
The parking brake cable and all moving elements must move easily.
| 1. Remove one wheel bolt from both rear wheels. 2. Raise and place the vehicle on stands. |
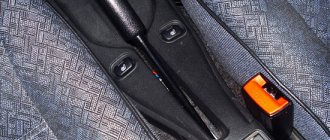
3. Remove the parking brake lever cover forward through the handle. Refer to accompanying illustration.
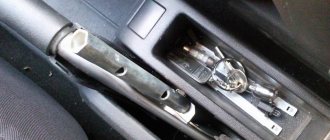
| Service stations use a special device BMW-341030 to adjust the parking brakes. The device consists of two socket wrenches that fit into each other, adjusted to different sizes of the locknut and the adjusting nut. If there is no such device, it is necessary to remove the lever cover and, if necessary, the center console. |
4. Remove the parking brake lever cover. To do this, loosen the bolt (4). Unscrew the bolts (5) and (6), having first removed the caps. Remove the cover. To do this, pull the cover up from the back towards the driver's seat and remove it.
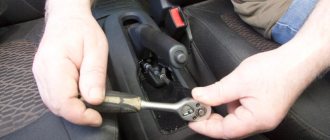
5. Unscrew the two locknuts and adjusting bolts (arrows in the accompanying illustration) of the parking brake cable. Loosen the cables completely.
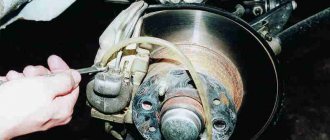
6. Completely remove one mounting bolt on each wheel. Rotate the wheel so that the hole is in the lower position. Shine a flashlight into the hole. The adjusting nut should be visible.
| The wheel, as shown in the accompanying illustration, does not need to be removed. |
7. By rotating the adjusting nut (1) with a screwdriver (2), press the brake pads so that the wheel cannot be turned by hand. After this, turn the adjusting nut back 8 teeth. If the adjusting nut on the left side of the car rotates in the direction of the arrow (refer to the accompanying illustration), the brake pads are adjacent to the drum. On the right side of the car, the nut rotates in the opposite direction.
8. After adjustment, check whether the wheels rotate freely. If not, unscrew the adjusting nut. The wheels must rotate freely.
9. Adjust the brake cables. To do this, tighten the brake lever by 4 teeth and screw in the adjusting nuts (arrows in the illustration) so that the left and right rear wheels can turn evenly by hand. Release the parking brake lever and check that the wheels rotate freely. Repeat the adjustment if necessary.
10. Release the brake lever completely. 11. Turn on the ignition. The parking brake warning light should not light up. 12. Tighten the parking brake lever 1 tooth. In this case, there should be no braking of the rear wheels. Otherwise, the adjustment must be made again. 13. Tighten the parking brake lever 2 notches. The indicator light should now light up. If not, bend the enable contact on the brake lever. 14. Turn off the ignition. 15. Tighten the locknuts while holding the adjusting nuts. 16. Secure the side cover of the parking brake lever. Replace the bolt caps. 17. Hook the front parking brake lever cover from below and secure from above. 18. Lower the car onto its wheels. 19. Screw in the two bolts securing the rear wheels and tighten them to a torque of 100 Nm. Install the wheel caps.
Source: www.allanda-auto.ru
Brake problems: hard or soft pedal - diagnosis and repair
In my article today I want to talk about the brake pedal, namely what it should ideally be, tight or, on the contrary, soft, how to find this golden mean?
By and large, the brake pedal can have several positions and states.
The first state is the one provided by the manufacturer, when when you press the brake pedal there are no dips or jerks, and no special effort is required. There are also two other unpleasant pedal conditions that can cause driver anxiety.
This refers to the state of the pedal when it is excessively tight or, on the contrary, very soft. Both one and the second phenomenon are equally unacceptable and indicate malfunctions and the need for urgent repairs of the brake system.
A stiff brake pedal can become stiff for several reasons, and they may not necessarily be associated with the traditional “sores” that are typical for all brake models. However, I still propose to consider the most common of them, and I will also try to give practical advice on how to eliminate them.
Most problems that cause the brake pedal to become soft are related to either the vacuum booster or the brake master cylinder.
1. Clogged air filter of the vacuum booster. Treated by replacing the air filter;
2. Sticking of the valve body in the vacuum booster. The vacuum booster needs to be replaced;
3. The vacuum booster diaphragm is damaged. Solved by replacing the vacuum booster;
4. Faulty vacuum booster tip. The tip should be replaced;
5. Sticking or failure of the check valve in the vacuum booster. To eliminate, it is necessary to replace the check valve;
6. The check valve of the vacuum booster is faulty or the seal is broken, resulting in fuel entering the chamber of the vacuum booster. The vacuum booster with check valve should be replaced;
7. Damage to the hose that connects the vacuum booster and the intake manifold, or the hose fastening on the fitting is loose. It can be treated by replacing the hose, or, if possible, by tightening the fastening clamp. The condition of the hose should be regularly monitored, this is especially true in the cold season.
As long as the hose is cold, it retains the necessary rigidity - the brakes function normally. However, after several tens of minutes of motor operation, the hose heats up and becomes more elastic. If, for example, during inspection you do not find delamination, the capacity of the hose will decrease, which in turn can cause problems with the brake pedal.
8. The sealing rings in the working wheel cylinders are swollen; this often occurs as a result of fuel and lubricants getting on their surface, or as a result of using low-quality brake fluid. To correct this situation, it is necessary to repair the working brake cylinders and replace the brake fluid
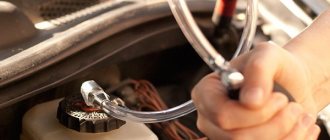
Here are several ways to independently check the performance of the vacuum booster.
First of all, start the engine to allow a vacuum to occur in the system. After this, press the brake pedal; if the pedal is hard, this is a clear sign of a faulty hose or amplifier. Then turn off the engine and wait 5-7 minutes, do not press the brakes.
It is necessary to specify the malfunction; to do this, press the pedal. If it is still hard, most likely the fault lies in the vacuum booster valve.
There is also another test. When the engine is not running, it is necessary to depress the brake pedal several times in order to remove the vacuum in the brake system. After this, without releasing the pedal, you need to start the engine; if the pedal begins to move down a little, the amplifier is in order.
Also interesting: How to disable abs on a Chevrolet Niva
Cause of soft brakes
A soft brake pedal, as a rule, simultaneously indicates several breakdowns in the brake system. More precisely, there are many reasons why the brake pedal can become soft. Sometimes this phenomenon is also called brake pedal failure.
https://www.youtube.com/watch?v=06Jj1Cy_KxQ
Air brake system. Troubleshooting occurs by bleeding the brakes and removing air from the brake system.
1. Low level of brake fluid in the expansion tank, depressurization of the brake system;
2. The main brake cylinder is faulty. A malfunction of the working cylinder occurs as a result of boiling brake fluid or when the piston jams. This malfunction can be eliminated by repairing the brake cylinders, or replacing the brake fluid.
I wish you success in carrying out independent diagnostics and repairs of the brake system. Don’t delay this, no matter how you twist it, working brakes are the key to your safety, as well as other road users.
Replacing the rear parking brake cable
Replace the rear cable if it is excessively stretched (impossibility of adjusting the parking brake), mechanical damage and loss of mobility in the sheath.
You will need: keys “8”, “13” (two), cobra pliers, pliers.
Loosen the locknut on the front cable end.
While holding the tip from turning with pliers, unscrew the lock nut and the adjusting nut to the end of the tip.
While holding the tip from turning, remove the lock nut, adjusting nut and spacer from the tip
Remove the guide from the tip and disconnect it from the cable
Remove the cable from the rear axle beam bracket and.
. from the body bracket hole.
Remove the two bolts securing the cable sheath holder to the brake shield.
Disconnect the end of the parking brake cable from the drive lever
Pull the cable out of the hole in the brake shield
Similarly, remove the right branch of the cable and remove the rear cable from the car.
Install the new cable on the vehicle in the reverse order of removal.
Soft brake pedal: reasons
So, the most common problem is poor, low-quality fluid, due to the fact that it may not be suitable for a certain car model, and corrosion of the hoses may gradually appear. Rubber elements are not able to withstand such liquid; they delaminate and increase in diameter, which leads to loss of tightness. If the brake pedal has become soft, it is best to undergo diagnostics of the entire brake system, replace the fluid and defective elements.
The second reason is rust in the rods. There is only one way out - replacing them completely. You can determine such a malfunction by holding down the brake pedal; if it remains down and you have to “lift” it with improvised tools, there is definitely a problem in the rods.
The incorrect gap between the pedal and the cylinder is also determined by the pedal being clamped. If pressing immediately occurs easily and smoothly, and at the end the applied force has to be doubled, most likely the gap is incorrectly adjusted; the pressure present does not allow the pedal to be lowered and raised normally. You will have to adjust and bleed the brakes.
Air locks also cause a lot of trouble, appearing due to wear and tear of the hoses; they lead to breakdowns in the vacuum pump. The brake cylinders lose some of the pressure, the pads do not move apart, and therefore cannot press against the disc. The pads should be checked for any wear.
Having figured out why the brake pedal can be hard, you should pay attention to an equally common problem when the brake pedal has become soft. In such a situation, the brakes may be weak and perform poorly, which is no less dangerous than a hard pedal.
If bleeding has already been carried out, there is a high probability that mistakes were made, undetected breakdowns, brake fluid leaks, etc. occurred. For example, drivers often encounter a problem when, after replacing the brake pads, the pedal is soft, the brake pedal falls off after replacing the brake fluid, after bleeding the brake pedal fails, but the fluid does not drain, etc.
One way or another, the main reason is depressurization of the brake system. Pipes fray and crack, problems with brake cylinders are possible, dirty brake fluid damages the cylinder mirror. Jamming of the TC pistons should not be ruled out.
At the same time, it is necessary to inspect the locations of all connections, fittings and other elements, since even a few drops of brake fluid leakage have no effect on the level in the reservoir, but air still enters the system, which is the cause of the soft pedal.
If the brake fluid is dirty, old and has lost its properties, it may boil due to heat. This leads to the brake pedal sinking or becoming too soft (“cotton”). This situation is dangerous because the problem may have a so-called “floating” nature. If such symptoms appear, you need to start with a complete replacement of the brake fluid.
Also interesting: How to change the handbrake cable on a Chevrolet Niva
Introduction
A car with faulty brakes is a dangerous weapon that can lead to mass destruction. Various technical problems can render a vehicle uncontrollable. At the same time, a car whose entire brake system has failed can be stopped only by a collision that occurs with any other car, the nearest building or poles.
Impeccable brake performance is very important when traveling
If you do not pay attention to such a significant drawback of the braking system, the car owner may soon face bleak prospects - you can either become a victim of an accident or the culprit. And all only because of one’s own carelessness or laziness. Timely diagnostics will allow you to remove all defects and replace the brake fluid if necessary.
How to replace the handbrake cable
Release the handbrake and check that the rear wheels rotate freely. Tighten the wheel bolts to the specified torque. Automotive products Advertising Website design and development After the expiration of copyright, in Russia this period is equal to three years, the work becomes public domain.
This circumstance allows you to freely use the work, while respecting personal non-property rights - the right of authorship, the right to a name, the right to protection from any distortion and the right to protect the author's reputation - since these rights are protected indefinitely.
Tags: beams, rear, Nissan, silent blocks, Sunny
« Previous entry
How to tighten or replace the Chevrolet Niva parking brake cable with your own hands
Sometimes adjusting the handbrake does not bring the desired result due to the fact that the rear cable is overstretched. In this case, the only way out of the situation is to replace the Chevrolet Niva hand brake cable. In addition, the cable will have to be replaced if it regularly jams in the protective sheath or breaks due to wear.
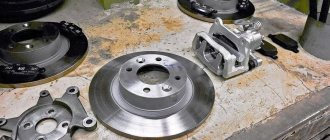
- To carry out the replacement, the rear of the vehicle must be in a hanging position. Therefore, lift it using a lift or jack and remove the brake drums from the rear wheels.
- Using a “12” wrench, loosen the locknut on the adjusting rod and completely unscrew it together with the adjusting nut. You must first remove the spring from the rod, as it will not allow you to unscrew the nuts.
- After this, you can easily remove the cable equalizer and remove the cable itself from it.
- Next, by pulling the cable towards you, remove the ends of the shell from the brackets located on the left and right on the bottom of the body.
- Using manual force, remove the right and left branches of the cable from the rear axle beam brackets.
- Using a wrench, unscrew the bolts securing the holders to the brake flaps.
- Now, having disconnected the cable ends from the brake pad drive levers, pull it to remove it from the hole in the brake shield.
After dismantling, install a new Niva rear hand brake cable. To do this, also use these instructions, but perform all the steps in reverse order. And with this, the replacement of the Chevrolet Niva handbrake cable is completed, and finally, do not forget to adjust the degree of its tension
It is also important to lubricate the adjusting threads on the rod upon completion of repair work to avoid problems with unscrewing the nuts during the next adjustment or replacement
As on any other car, the Chevrolet Niva parking brake is an integral part of the braking system. Its purpose is to prevent spontaneous movement of the vehicle during parking or temporary parking with the engine running. But the handbrake can also replace the main brake system in the event of its failure, which allows you to safely get to the repair site.
You have to use the handbrake quite often, so its cable and brake pads are subject to intense wear. As a result, car owners over time have to take measures to adjust the system or replace its individual parts. While some people turn to a car repair shop for this, others prefer to carry out repair work themselves.
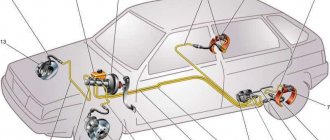
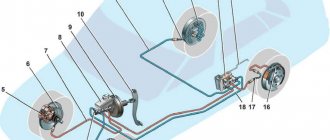
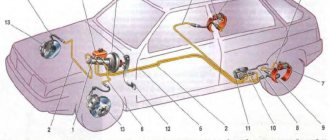
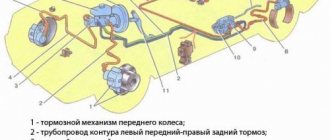
The design of the parking brake of a Chevrolet Niva is quite simple and is not much different from similar systems in other passenger vehicles. It consists of the following main parts:
- Handbrake lever - serves to transmit the force of the human hand to the actuator, which, in turn, acts on the brake pads to lock the rear wheels.
- The handbrake cable is a carbide, specially manufactured steel wire that runs under the bottom of the vehicle and operates the brake pads on the rear wheels.
- Brake pads are the final elements of the brake system, made of friction materials. By pressing against the brake drum or disc, they immobilize the wheel.
The manual braking system also includes such functional elements as a spacer sleeve, a brake pad drive lever, a spring, a protective sheath for the rear cable, a cover for the front handbrake cable, and a ratchet mechanism for the lever.
The handbrake system contains many structural elements
NIVA.RU
The rear brake regulator is also a sorcerer. adjustment
- print version
The rear brake regulator is also a sorcerer. adjustment
- Quote
Post by David » Dec 20, 2022, 03:51 pm
Hello everyone! I want to share with everyone some information regarding the rear brake adjuster and what to do with it. 1. You can’t refuse it, no matter how much they tell you. He's really needed. Any imitation of his work will not lead to anything good. 2. It can be adjusted in two ways, but the best is the second, which I will describe below. 3. After 7 years of operation on the car, it is better to replace the regulator with a new one, as well as the brake pipes and reservoir pipes under the hood. Because over time they swell, expand and lose their elasticity and rigidity. 4. Torsion thrust for some sources should be set at a distance of 15 cm, for others - 20 cm.
Method one: hang up the rear axle so that the wheels hang. Next, we unscrew the bolt that secures the long part of the torsion bar to the bridge, or more precisely to the X-shaped bracket. We take out the small silent block and bushing from the round eye of the torsion bar so as not to lose it. Loosen the two bolts on the bracket of the regulator itself. Then we take a ruler, rest it against the body or floor of the car, mark 15 cm there, bring the long, free part of the torsion bar to this mark, fix it, and someone else (assistant) moves the regulator along the adjustment guide of the bracket until the regulator itself The torsion bar arm will not be positioned so that it barely touches the adjuster piston. Once this is done, the regulator can be tightened with two bolts, and the torsion bar itself can be returned and secured in its place. From me personally: such a scheme and such a plan of action is not possible purely physically, because at this distance and ruler from the floor, it is not possible to adjust the torsion bar and the regulator itself so that the torsion bar barely touches. Tested by me personally. There won't be a miracle.
Second method: the initial stage is the same, but we take measurements with a ruler from a rectangular beam, on which the regulator brackets and the torsion bar itself are actually attached. My opinion is that this should be done from this beam. Also, in my opinion and logic, the plane from which you need to push off should pass along the level of this beam (the lowest point from the body, and not where it is attached). We carry out all other manipulations in exactly the same way. At least now it is more feasible to install the torsion bar itself at a distance of 15 cm and bring the regulator itself to the lever so that the actuating part of the torsion bar barely touches the regulator piston.
In the first case, this is simply not realistic to do. Because the torsion bar constantly puts pressure on the piston, and it should only put pressure when the rear of the car rises during braking, the front end receives heavy loads during braking, because there is also the mass of the engine, and the rear is empty. When the car is loaded, the torsion bar lever is relaxed and does not put pressure on the piston at all, which means it does not overlap and the forces are almost the same as the front ones. And also, for information, to check the torsion bar for its correct geometry, place it on the table and press its edge, for example the long part (the one with the round eye). So, from the bottom edge to the plane it should be in the range of 6-7mm. This is the situation with most of them. Of course, we take measurements not from the round eye, but from the lever itself, which has a round cross-section. These distances must be the same. These data were obtained by measurements on a new, factory torsion bar. A small addition: I will describe all the adjustment measurements to achieve these 15 cm from the beam or 20 cm from the floor, as well as the results after all the tests on the car after completely bleeding the brake system.
Why do you need a handbrake on a Chevrolet Niva?
The parking brake is necessary to reliably hold the car in place during a short stop or long-term parking, which is especially important on uneven ground or roads. For inexperienced drivers, the handbrake will become an indispensable assistant when starting uphill; it helps not to roll back, but to immediately start moving forward.
If you need to leave the car for a short time, but don’t want to turn it off (for example, in the morning, when warming up), then using the parking brake is mandatory so that the started car does not roll (an unstarted car can stand “at speed”).
It is also prohibited to leave a car on a slope without a parking brake, in order to avoid creating an emergency situation. The parking brake must be in working order, adjusted and keep the vehicle on the slope, according to the recommendations described in the Operator's Manual.
Another extremely important property is that it will help stop the car if the main braking system has failed. In the event of a failure of the main brake system (usually hydraulic or pneumatic), it is necessary to smoothly tighten the cable of the mechanical handbrake by pulling its lever up, the main thing is not to overtighten and not let the car skid
With a mechanical handbrake this is not difficult, but with modern electronic ones it is impossible. Fortunately, the Chevrolet Niva has a mechanical parking brake and its setting and adjustment is done manually.
Will you find the answer: How to tighten the Handbrake on a Lada Vesta?
Be that as it may, the task of the handbrake is to hold the car securely while parking. In this case, the handbrake lever should not block the rear wheels in more than 3-4 clicks, and the car should be held with the wheels locked on a slope of 23-25%.
How to tighten the handbrake?
How to tighten the cable
- Use a wire brush to clean the threads of the adjusting rod.
- Loosen the locknut.
- Move the position of the adjusting nut by tightening it the required number of turns.
- Once adjustment is complete, tighten the lock nut until it is pressed firmly against the adjusting nut.
How to tighten the handbrake on a Chevrolet Lacetti?
In order to adjust the handbrake cable, you first need to remove the cup holder. Then we remove it from the floor tunnel lining. We hang the rear wheels and raise the handbrake by 2 teeth (clicks). Next, turn the adjusting nut 12 clockwise with the head.
How to tighten the handbrake yourself?
To pull the handbrake from under the car, you must:
- Raise the handbrake 2-3 clicks (depending on the car model, this indicator may vary);
- Use a jack to raise the car.
- Loosen the tightening nut on the adjusting unit.
Replacing Jeep Grand Cherokee parking brake cables
Replacing parking brake cables
| All models under consideration are equipped with an airbag. The airbag is constantly in an “alert” state and can operate (inflate) at any time when the battery is connected. To prevent accidental airbag deployment (and resulting injury), turn the ignition key to the LOCK position and disconnect the negative cable from the battery whenever performing any work on any safety system components. After disconnecting the cable from the battery, wait at least two more minutes before proceeding (the system is equipped with a capacitor that takes time to discharge). For more information about the operation of the security system, see Chapter On-board electrical equipment system. |
Front cable
| EXECUTION ORDER | |
|
|
|
- Inside the car, disconnect the electrical connectors of the parking brake switch and the airbag module (there are two electrical connectors in the front of the module).
|
- Loosen the mounting bolts and remove the airbag module, sliding it to the side to provide access to the parking brake lever.
|
- Loosen the parking brake lever mounting bolts, remove the lever assembly and turn it upside down to provide access to the drive cable.
- Disconnect the parking brake cable from the lever and pull it through the floor panel.
- Remove the floor panel insert from the old cable and slide it onto the new one.
- Install in reverse order.
- Upon completion of work, do not forget to adjust the cable (Section Adjusting the parking brake).
Rear cable
| EXECUTION ORDER |
|
Video about “Replacing parking brake cables” for Jeep Grand Cherokee
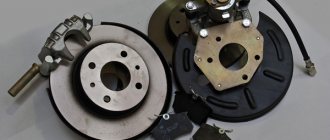
Removing the brake cylinder, caliper, handbrake pads, brake disc, mounting nuts
How to properly adjust the handbrake.
Heater dampers kit for Jeep Grand Cherokee WJ.
Why do you need a handbrake on a Chevrolet Niva?
The parking brake is necessary to reliably hold the car in place during a short stop or long-term parking, which is especially important on uneven ground or roads. For inexperienced drivers, the handbrake will become an indispensable assistant when starting uphill; it helps not to roll back, but to immediately start moving forward.
If you need to leave the car for a short time, but don’t want to turn it off (for example, in the morning, when warming up), then using the parking brake is mandatory so that the started car does not roll (an unstarted car can stand “at speed”).
It is also prohibited to leave a car on a slope without a parking brake, in order to avoid creating an emergency situation. The parking brake must be in working order, adjusted and keep the vehicle on the slope, according to the recommendations described in the Operator's Manual.
Another extremely important property is that it will help stop the car if the main braking system has failed. In the event of a failure of the main brake system (usually hydraulic or pneumatic), it is necessary to smoothly tighten the cable of the mechanical handbrake by pulling its lever up, the main thing is not to overtighten and not let the car skid
With a mechanical handbrake this is not difficult, but with modern electronic ones it is impossible. Fortunately, the Chevrolet Niva has a mechanical parking brake and its setting and adjustment is done manually.
FakeHeader
Comments 14
Also sometimes the handbrake switch is buggy, but the recipe is simple - raise the handbrake, if the handbrake lamp does not light up with your finger, I press/release the handbrake switch and the light comes on)))
This trick didn’t work for me, an autopsy showed oxidation of the contacts...
Wipe with alcohol and it will be as good as new)))
At such prices for alcohol, it’s easier to leave it for wiping your own body)))
I installed a warning light on the brake pedal - it’s even simpler and more reliable.
Can you tell me more about this procedure?
Finally freed. We were overwhelmed with work, and the customer also came from another city