Tolyatti "tens" were equipped with engine mounts of good quality. The average service life before repair could be 100-150 thousand km. Today, these cars have several times more mileage and some still have their original bearings. The main thing is that the importance of the functionality of damper parts is underestimated by car owners. As a result, replacing the VAZ 2110 engine mounts has been shelved. Some drivers don't realize that in addition to discomfort from vibration, damage to the transmission can be caused. And this will entail more serious expenses for repairs.
On a note! It is possible to replace the airbags with your own hands on a VAZ 2110 (engines with 16 and 8 valves) in 6 hours. The repair schemes are almost completely identical. The only difference is the number of parts. V-1.6 engines have 4 supports, instead of 3 on the simpler V-1.5 engine.
What is needed for repairs
Content
First, you need to determine which support on the VAZ 2110 engine should be changed (if you do not want to change all the damper mounts at once). To do this, you need to do an independent inspection of these parts. Sometimes, the power plant seems to be tilted horizontally on one side or tilted along the central axis of the car. This is the first sign to replace the damper mounts.
| Locksmith kit | Rolling jack |
| A couple of short boards | Angle grinder (grinder) |
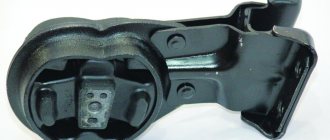
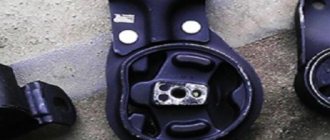
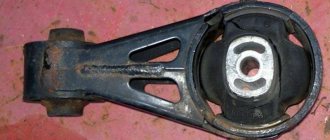
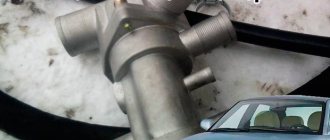
Two cushions (side) secure the engine to the left and right side members in the engine compartment. And one (rear) fixes the motor to the bottom. Therefore, it is necessary to lift the machine on a lift or install it on a viewing hole. The wear is immediately visible. The rubber has tears and core failure. Depending on the result of visual diagnostics, you should purchase the required number of parts for installation.
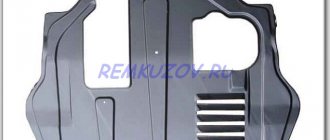
You will need a tool. In most cases, a standard locksmith set consisting of open-end and box-end wrenches with heads will be sufficient. In addition, to replace engine mounts on a VAZ 2110 you will need a rolling jack and a pair of short boards. It is advisable to have electricity and a cutting machine with a disc, since you may have to cut off the mounting bolts.
Helpful information! A couple of hours before repairs, it is strongly recommended to apply universal lubricant “Liquid Key” to the threaded connections. Damper supports are changed very rarely, therefore, unscrewing them without prior preparation is quite difficult.
The appearance of sound, play and creaking
Generally speaking, the appearance of sound in the wings indicates either wear or the initial low quality of the cushion, and both options are essentially equivalent, since there is only one way out - replacing the wing cushion of the VAZ 2110. Many VAZ cars, due to the structural features of the design, often have the support is, to put it mildly, not of high quality. This fact becomes obvious when the car is not driving on a level surface. The sound is so noticeable that it becomes noticeable even to the driver who is in relative sound isolation.
Note: If you hear a sound in your car that was not there before, you should visit a technical service department or your own garage as soon as possible to determine the cause of the defect. Since if the defect is not identified immediately, the economic costs will be many times higher. Because the best way to fight is prevention in the first place.
The insidiousness of knocks lies in their irradiation onto the body, and often they even reach directly into the cabin itself. In this case, the gearshift knob rattles so much that it is not very pleasant. Propagation of sound and ways to solve the problem is a separate technical chapter. This article is devoted to the rocker pad, which creates many unnecessary technical problems, including poor gear engagement.
Replacing the left engine mount of a VAZ 2110
Place the car on a level and solid surface. Disconnect the negative terminal from the battery. Remove the crankcase protection. We place a jack under the engine, and use a piece of board (as a spacer) to lift the engine. The power plant is suspended in this way and the supports do not experience any load.
Next, we perform the following steps:
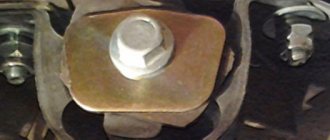
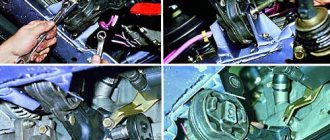
- Unscrew the nut of the central stud (15 mm wrench);
- unscrew the two fixing bolts of the protective cover (13mm wrench);
- under the bracket, unscrew the 3 bolts that connect it to the spar (17 mm wrench);
- then, we take out the worn-out pillow;
- We replace the damper part with a new one and assemble the structure in the reverse order.
On a note! Spare parts from imported suspension manufacturers, such as: Lemferder, SWAG, RUVILLE, SKF, can provide high-quality and long-lasting performance. If they are not in the store, they can be delivered to order.
Do I need to change
There are no recommendations for replacing pillows depending on their service life, but once you determine that they are faulty, you should not delay replacing them. Vibration processes can not only worsen the comfort of the driver and passengers, but also lead to destructive processes in the engine or gearbox itself.
Having decided to repair the engine mounting elements, you need to decide whether you will change the cushions themselves or the mounts assemblies. In principle, if the metal support itself is not damaged, it can be left, replacing only the pillow.
The price of a set of pillows for a VAZ 2110 costs around 1,300 rubles. The cost of a complete set of supports is about 2,500 rubles.
For the work of replacing engine mounts or mounts at a service station, you will be charged at least 300 rubles for each.
For eight-valve engines
- Prepare the car for repair: place it on a flat surface, place stops under the rear wheels, remove the engine protection.
- Unscrew the generator belt tensioner bolt and remove the belt (key 13).
- Place the jack under the engine, place a thick wooden beam or board under its upper part. Raise the engine to remove the load on its mounts.
- Unscrew the nut of the central fastening of the right pillow (15 wrench).
- Unscrew the bolts securing the pillow to the bracket (key 13).
- From the bottom side of the right arch, unscrew the 3 bolts securing the bracket to the spar (17 key).
- Remove the bracket and replace the old cushion with a new one.
- Carry out installation in reverse order.
- Move the jack under the gearbox and lift it up.
- Unscrew the nut of the central fastening of the left pillow (15 wrench).
- Unscrew the two bolts securing the support and remove it (key 13).
- Replace it and reassemble the structure in reverse order.
- Unscrew the two 17 nuts securing the cushion to the body, and then two more nuts securing it to the gearbox (removal and replacement of the rear support is carried out from the bottom of the car).
- Remove the rear support.
- Unscrew the nut securing the pillow to the bracket (19mm wrench). Remove the old pillow and install a new one.
- Install the rear support in reverse order.
For sixteen-valve engines
Removing and replacing side airbags is done in the same way as for 8-valve engines.
Work to replace the front lower airbag is carried out from underneath the machine.
- Unscrew the bolt securing the front lower support rod to the front suspension cross member (15 wrench).
- Unscrew the nut of the bolt fixing the support to the engine bracket (2 wrenches x 15). Remove the bolt.
- Remove the support, replace the pillow or the entire structure.
- Carry out installation in reverse order.
- In the engine compartment, unscrew the bolt securing the upper front support to the body, holding its nut with your hand (17 wrench).
- Remove the bolt and nut.
- Unscrew the bolt securing the front upper support to the engine bracket (15mm wrench). Remove the bolt and nut.
- Remove the support, replace the pillow or the entire structure.
- Install it in reverse order.
Replacing the right engine mount of a VAZ 2110
Place the jack under the box. We hang the engine and remove the load from the cushion. Completely disconnect the battery and remove it (this will be more convenient).
Next, we move in the following sequence:
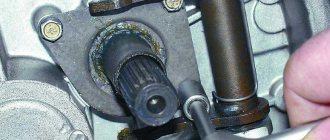
- Unscrew the nut of the central stud (15 mm wrench);
- Unscrew two bolts (13 mm wrench);
- We take out the central pin (you will have to loosen the jack a little);
- We take out the support bracket and replace the pillow with a new one;
- We insert the new support into place and raise the engine;
- We tighten the damper assembly with the bolts in the reverse order.
On a note! The support mounting areas on the side members may be in poor condition (rust). In order to extend their “life,” you should cover the damaged area with Movil immediately before installing the bracket.
Functionality check
Before you start replacing the pillows, it is recommended to check whether they have really lost their functionality. It is likely that vibrations can occur for other reasons.
To check you need to do the following operations:
- Place the car on stands;
- Place a jack under the oil pan, placing a block or board at the same time;
- Raise the engine until the mounts relieve the weight of the engine;
- Check the pillows;
- Inspect them for cracks;
- Check if they come off easily from the metal backing;
- Has the original hardness of the material been preserved, or has it become too elastic;
- If no visual defects are found, check the play between the plates and the frame;
- Treat the cushions with protective compounds, return the engine to its place;
- Sometimes, to return the supports with cushions to normal operation, it is enough to tighten the fastening nuts.
If the check shows that the pillows have already served their purpose, then the only correct solution is to replace them. These elements are not subject to restoration.
Replacing the rear engine mount of a VAZ 2110
If, when dismantling/installing the left and right supports, the work was carried out in the engine compartment, then to remove the rear damper you will have to crawl under the car. It’s good if there is an inspection hole in the garage, since the ground clearance of the “ten” is quite low and it’s very difficult to crawl up on your belly.
The replacement process looks like this:
- We install a jack under the box and hang the rear part of the engine;
- Unscrew the two support nuts from the body (17 mm wrench);
- Using 2 19 mm keys, unscrew the support mount from the gearbox;
- We remove the support from the seats and take it out from under the car;
- We take out the bolt and replace the damper with a new element (a vice may be needed);
- We return the knot to its place and tighten it;
- We lower the engine with a jack and install the crankcase protection.
After you have managed to change all the engine mounts on the VAZ 2110, the engine should take a level position. You should start the engine and carefully observe the vibration. It should be minimal. This means that the repair was carried out correctly.
Useful tips
Please note that when engine vibrations occur, you should not always immediately change all the supports “in a circle”. It happens that even on a relatively “fresh” car, only one element fails, while others are quite suitable for further use. This occurs as a result of technical fluids getting into contact with the rubber part of the cushion, etc.
However, as for basic recommendations, if the car has a mileage of about 80-100 thousand km. and more, and all engine mounts have the same service life and have begun to fail, it is better to immediately replace all such mounts.
The reason is obvious - if the rubber begins to deteriorate from old age, after replacing one clearly faulty element, after a while the next cushion will also no longer cope with its task.
We also recommend reading the article on how to check the ignition module of a VAZ 2110. From this article you will learn what signs indicate that the ignition module is malfunctioning, as well as how to diagnose the ignition module 2110.
It is also important to select only original products or high-quality analogues for replacement, as well as purchase parts from trusted sellers. The fact is that there are a large number of spare parts on the market for VAZ cars, but not all of them are of high quality. Moreover, you often come across cheap fakes of an original of unknown origin.
Features of replacing engine mounts with a 16-valve engine
The main difference in the mounting of the 16-valve engine is the absence of a rear lower support. The engine is attached with a rear support from above to the number plate of the body. Another additional damper bracket is located at the bottom front. It connects the motor and the lower beam of the radiator (TV) frame. These parts are called “guitar”. After hanging the engine with a jack, they change simply.