To maintain a given temperature in the interior of a Lada Kalina car, two methods are used - a temperature sensor built into the lighting platform on the ceiling and a heater damper motor. In this article we will talk about the case when the gearmotor does not perform its functions. In this case, the damper does not close completely, which is why warm air mixes with cold air and the interior does not warm up properly. Replacing and repairing the heater damper gearmotor on the Lada Kalina will help correct the situation.
What is the damper responsible for?
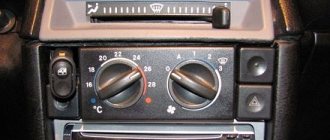
While the engine is running in the cooling system, the heated liquid moves through the heater radiator, while it heats the air flowing through it. The volume of air passing through the radiator and outside it is controlled by the main heater damper. Depending on how the temperature control knob is located on the dashboard, the amount of incoming air will depend.
You can distribute air movement throughout the cabin by turning the handle that regulates the position of the damper. But there are cases when the damper jams and it is impossible to properly regulate the flow of heat into the Kalina’s cabin.
If the problem is only with the valve, then you can correct the situation quite simply by tightening its cable. If after these actions the situation has not changed for the better, then you need to conduct a visual diagnosis of the condition of the mechanism and perform a number of simple steps.
How to replace a gearmotor
To replace the gearmotor, you need to remove the beard on the dashboard and remove the pedal assembly, but you do not need to completely dismantle the torpedo. Then you will need to unscrew the three self-tapping screws and remove the required element.
Then remove the old heater gear motor along with the plastic element and replace it with a new one.
But keep in mind that to replace the gearmotor you will need the help of a friend, since doing it alone is a little inconvenient and quite problematic.
First of all, connect the contacts to the new engine. Then install it so that the screw holes line up. Then ask an assistant to turn the temperature regulator and at the same time press on the element. If the squares match, this means that you have done everything correctly and the part is installed correctly, the supply of air at the specified temperature will be ensured.
The next installation step is to screw in the screws and scroll the gearmotor from the blue mark to the red mark in the opposite direction. This must be done so that the heating system remembers the operating range and works correctly in the future.
How to choose the right heater radiator
| When the engine is running, heated fluid from the cooling system circulates through the heater core, heating the air passing through it. The amount of air passing through and around the radiator is set by the central heater damper, depending on the position of the temperature control knob installed on the instrument panel. |
The air distribution throughout the cabin can be adjusted by rotating the control knob for the air distribution flaps, as well as by turning the flaps and guide blades of the instrument panel ventilation grilles.
First of all, you need to pay attention to the metal from which the heating system element is made. Cheap options are made of aluminum
If it cracks, the owner has only one choice - throw it away and buy a new one.
Meanwhile, the brass-copper model, although more expensive, can be easily repaired - cracks in it can be easily sealed.
It is also important that the swirlers of the new radiator are made of durable plastic. As practice shows, such models last for many years and rarely become clogged.
Before choosing a stove radiator, you should know that they can be either aluminum or copper-brass. It is difficult to clearly prioritize the choice of one material, but each one has specific features of its work. These features are dictated by the properties of the material. Copper has a slightly lower thermal conductivity than aluminum, and therefore warms up more slowly. This cannot be said to be bad, since the thermal inertia of such a radiator is quite large. This means that it may not cool down for a long time.
We recommend: How to choose speakers for a car
An aluminum radiator is the opposite. It warms up quickly, but cools down just as quickly. It has a few more disadvantages. Firstly, the aluminum radiator cannot be repaired. Once it drips, you can throw it away. Copper is soldered quite simply and as many times as necessary. You just need to choose it correctly, because when selling, especially in the car market, you may come across a repaired copy with the partitions removed. It won't leak, but it won't provide heat either. Antifreeze will simply pass through such a radiator as if through a pipe.
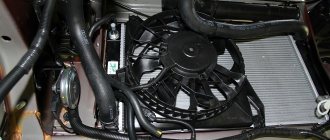
The stove has a simple design. Its main element is the heater radiator. During the first 20-30 minutes, the engine heats the coolant to a temperature of 40-50 degrees, and then it circulates through the cooling system and enters the heater radiator. Warm air is distributed throughout the cabin using fans.
Each type, depending on the properties of the material, has its own advantages. The thermal conductivity of copper is less than that of aluminum, so it heats up more slowly. But it also retains heat for a long time. Copper products have high maintainability and can be soldered a large number of times.
Aluminum, on the contrary, heats up quickly and cools down quickly. The disadvantage of an aluminum radiator is low resistance to mechanical damage and non-repairability. If it leaks, it should be replaced. The advantage of aluminum devices is their low cost.
Swirlers in pipes
In any case, it is better to buy original products to avoid fakes. The car owner decides which radiator is best to purchase.
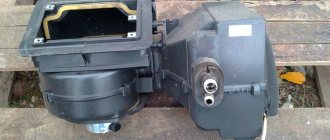
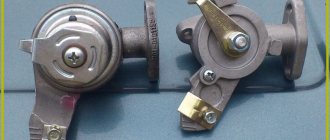
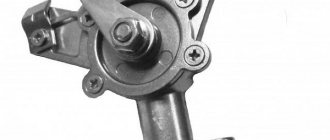
Heater damper gear motor
Heater damper gear motor
The heater damper gear motor, as the name suggests, is designed to regulate the amount of warm air directed, which allows you to control the temperature and maintain comfortable conditions for the driver and passengers. It is located under the hood of the car on the steering wheel side and next to the brake booster, so you can find it without any problems.
Causes of device failures
If, when you turn the handle, the intensity of the flow of heated air into the cabin does not change, then this will be a reason to pay attention to the condition of the heater gear motor. There are only three reasons for a device malfunction:
- The integrity of the entire electrical circuit is broken, which leads to a lack of power to the gearmotor from the battery (operation can be checked by checking the voltage at the output of the gearmotor with the ignition on and the damper adjustment knob in the middle position).
- There are problems in the autonomous unit, which directly controls the heater, which leads to the inability of the gearbox to provide the required heater temperature.
- Failure of the gear motor itself, which may be due to natural wear and tear (the most pressing problem for older cars).
Features of drive selection
A special feature of heater gearmotors is a large number of variants and designs that were used on VAZ brands of various years of production, so it is important to first correctly determine the model.
In some cases, the gearmotor can be repaired. To do this, bend the pressed side and remove the lid. Assess the condition of the bearings, brushes and commutator and, if necessary, replace faulty elements. Reassemble the entire structure, having previously lubricated the bearings with silicone grease.
How to replace the gear motor of a VAZ stove
The procedure does not take much time and is not difficult, but for convenience we recommend taking an assistant. In general, the work includes the following steps:
- unscrew the nuts securing the wiper arms;
- pry the lever with a flat screwdriver and remove it from the mounting slots;
- remove the hood insulation and the polymer lining that protects the windshield from damage (frill);
- remove the trapezoid with the windshield wiper drive motor (do this carefully so as not to damage the steel frame);
- disconnect the 2 plugs that supply power to the gear motor of the VAZ stove;
- unscrew the 3 screws securing the damper (a Phillips screwdriver is required), holding the entire structure with your hand at the same time;
- remove the gear motor by gently pulling it to the side so that it comes off its mounting points.
New Lada: Lada Kalina - price, equipment, review of Lada Kalina, cost of modifications to the Lada Kalina car.
Installation of a new VAZ heater damper micro-reducer proceeds in the reverse order, and after completion of the work it is advisable to carry out testing. To do this, measure the resistance at its outputs (it is advisable to do this on an old device to monitor performance). Depending on the position of the damper control handle, it should be:
- at the extreme blue mark - 800-1200 ohms;
- in the middle position - 1200-1600 ohms;
- at the extreme red mark - 3600-5000 Ohms.
These numbers are relevant for controllers 1303.3854, 1313.3854, 1333.3854. If a 1323.3854 controller is installed on your gearmotor, then in the position on the red point the resistance will normally be 1200-1600 Ohms, and on the blue point - 3600-5000 Ohms. To measure, you need to wait 15 seconds after turning the handle, and then start the engine by disconnecting the controller from connector X1 (resistance is measured between contacts X1.4 and X1.1).
FakeHeader
Comments 66
Hello! Tell me, have you tried heating this damper? Could it be affected by the temperature, well, the time “Yagodka” is 10 years old, I also started to notice that the heating has gotten worse, but I have a “climate” and the damper is not a cable one. Everything is fine with the SOD.
Unfortunately, I haven’t tried it. In theory it should be heat-resistant.
On my damper there is a type of soft rubber around the edge from the factory. It is pressed tightly against the radiator.
It’s not on this damper, I had them on all of them except this big and yellow one.
Hello! The one on the right, from grants or K2, the last picture, “bottom” And where is the flap, did you get hold of it?!
Two left viburnum 1, right grant. I bought the damper in a place with a heater that was broken, for 700 rubles.
Yes, with the Kalinovskaya stove it’s just white, and actually with SOD. They got tricky in the design room with SOD. Like winter, there’s only so much talk about SOD and the stove. True, this cup has passed me by. I immediately sharpened the rod on the thermostat and now the temperature is stable at 90. Instead of springs for tightening It’s the damper itself that I did differently; I unscrewed the damper control cable one turn at a time and now the damper fits all the way (although judging by your photos I already doubt that it’s all the way). But that’s not all, I stuck a piece into the pipe that goes to heat the throttle tubes of a smaller diameter (Tobish reduced the cross-section of the pipe) which, it seemed to me, increased the pressure on the stove. The same thing comes after the remote control, but the cross-section of the reduced pipe is enough for both the throttle and the HBO, it was possible to mix something up with a tap instead of a pipe, but I didn’t I wanted to take a steam bath and it turned out very well. At least in cold weather - 15, which is not so often where I live, the stove heats perfectly. The HBO works perfectly, the temperature is stable at 90 degrees.
Why does the stove blow cold on Kalina
The interior heater of the Lada Kalina has a radiator connected directly to the engine cooling system. Therefore, when the engine is warm, it will always be hot. The flow of air entering the cabin from the outside is controlled by dampers, the position of which can be changed using a mechanical control unit located on the front console. There are three handles on it.
The left handle is designed to control the air temperature in the cabin. Using a cable drive, it controls the damper, which directs the air flow either to the stove radiator or bypassing it.
The middle handle is designed to turn the fan into one of 4 operating modes.
The main reasons for cold air entering the interior of a Lada Kalina car can be either a malfunction associated with the damper drive, which controls the air flow through the heater radiator core, or a malfunction of the engine cooling system itself.
If the damper that controls the air flow through the radiator core is lowered and in this position the cable is unhooked from the lever that controls it, then no matter how much you rotate the temperature control knob, cold air will still flow into the cabin, since the damper in this position it blocks the radiator core, and it is impossible to move it to another position due to the detached cable drive. A similar situation will occur if the sheath of this cable is not securely fastened to the heater body. In this case, it jumps off the place allocated for it and temperature adjustment becomes impossible.
A rubber sealing tape is glued along the outer edge of this damper.
There are cases when this sealing tape falls off from the damper, as a result of which, when this damper is lifted up, it will not tightly block the air duct opening.
As a result, cold air, through the resulting gap, will also begin to enter the car interior. The air flow always moves along the path of least resistance, so it will not flow through the radiator core in the required quantity.
Some malfunctions of the cooling system also lead to cold air entering the vehicle interior.
If the thermostat jams and the coolant begins to circulate only in a large circle, then in winter it will not warm up to operating temperature, which means that the heater radiator will be a little warm and will not warm up the air entering the cabin well enough.
The same consequences will result from an insufficient level of coolant in the expansion tank and air pockets that form in the engine cooling system.
Interior ventilation of Lada Kalina
Air is extracted from the passenger compartment in all trim levels due to the vacuum generated near the rear of the body when the car is moving. Exhaust deflectors are built into the body under the rear bumper.
Dear customers, in order to avoid errors when sending the gearmotor HCC D 266-SDBAA 01 (619852) Kalina 2 (white label), top-bottom damper drive, in the “Comment” line indicate your car model and year of manufacture, and with which climate control system (“Panasonic” or “HALLA”), the color of the label (blue, yellow, white) on the gearmotor.
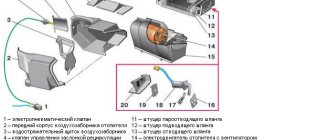
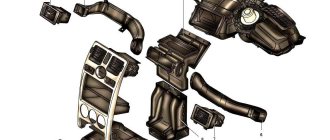
The stove heater device is designed for an automatic microclimate control system for the VAZ 2192. Air from outside or from the passenger compartment enters the fan housing, which is helped by the fan itself. Further along the air duct, the air enters the heater housing, where its temperature is regulated and the air flows are distributed as required. For example, the flow goes to the windshield, feet or to the center of the cabin through nozzles. The operation of the heater is controlled by an electronic control unit.
On the heater block with control assembly 21920-8101010-00, two gearmotors are installed (with a white HCC D 266-SDBAA 01 (619852) and a yellow HCC D 267-SDBAA 01 label) with sliders of a complex configuration, which are connected to the electronic control unit.
The gearmotor HCC D 266-SDBAA 01 (619852) with a white label controls the operation of several dampers, one distributes air to the windshield or to the central nozzle, the second rotates the damper, which opens and closes the air flow to the feet. By the way, the windshield airflow is not completely blocked in any mode.
The gearmotor HCC D 267-SDBAA 01 with a yellow label with a complex configuration slider controls the temperature damper. The principle of temperature control: air passes either directly or through the stove radiator, in proportion to the angle of opening of the damper. If the damper is completely lowered, no air flows through the radiator, and we have the same temperature at the heater outlet as at the inlet. We begin to lift the damper: part of the air goes through the radiator, and at the exit we have warming. The higher the damper, the more air goes through the radiator, the hotter the flow at the outlet.
On the housing of the heating system fan assembly 21920-8118010-00 there is a gear motor 619797 (blue label) with a complex configuration slider, which is connected to the electronic recirculation control unit. The slider rotates the valve. When the damper is fully raised, air is taken from the passenger compartment, and when completely lowered, air is taken from the street.
How streams are distributed:
1. in the “on glass” position, the upper flap completely closed the central nozzle and the lower flap exited to the feet. The air goes to the windshield and through thin air ducts through the upper non-adjustable deflectors to the front side windows.
2. in the “center” position, the upper damper almost blocked the exit to the windshield (the damper does not completely block the flow to the windshield), the lower damper is closed. Air flows through the central deflector and to the side adjustable deflectors, which can be closed with individual flaps. The central deflector can also distribute the flow vertically and horizontally.
3. in the “feet” position, the lower flap almost completely blocks the upward flow, the air flows through the side openings to the legs of the front passengers and at the same time through the air ducts to the rear passengers.
4. In the “glass-legs” position, the dampers are in an intermediate state.
The VAZ 2192 automatic climate control controller is installed on the instrument panel console and is necessary to maintain a constant comfortable climate in the car, which is set by the driver using three handles. Actually, with their help the management process takes place.
In this case, the handles are divided into right, central and left.
— Using the left one, you can set the direction of air flow in the cabin;
— The central handle allows you to adjust the fan speed modes: automatic “A”, manual (adjustment - 4 positions) and adjust the air intake (from the street or from the cabin);
— The right handle can set the desired temperature in the cabin and allows you to turn on the air conditioning.
The automatic climate control controller receives the necessary information about how the heater damper is located. The position of this damper is adjusted in accordance with the data set by the driver.
Other article numbers of the product and its analogues in the catalogues: 21920-8101010, HCC D 266-SDBAA 01, 619852.
VAZ 2190, VAZ 2192, VAZ 2194, VAZ 21925.
Any breakdown is not the end of the world, but a completely solvable problem!
How to independently replace the heater gearbox HCC D 266-SDBAA 01 (619852) Kalina 2 (white label), top-bottom damper drive on a Lada Kalina 2 car with automatic microclimate control (heater and air conditioner).
AvtoAzbuka online store, repair costs will be minimal.
Just COMPARE and BE SURE.
Don't forget to share the information you find with your friends and acquaintances, because they may also need it - just click one of the social networking buttons located above.
Attention! Open the received parcel at the post office, in the presence of a postal worker! Only in this case can we guarantee the quality of delivery by Russian Post.
TRANSPORT AND FORWARDING
Transport carries out delivery of consolidated cargo and parcels, road, container, air and rail transportation in any direction across the territory of the Russian Federation, and also performs loading and unloading operations and packaging of cargo. Carrying out road transportation throughout Russia since 2001, it has established itself as a reliable partner for tens of thousands of customers, which has allowed it to become one of the leaders in the provision of transport and forwarding services.
TRANSPORT AND FORWARDING
The transport company KIT carries out urgent delivery of cargo from 1 kg throughout Russia by road. The company specializes in the delivery of consolidated cargo between major cities of the Ural region and from other cities of Russia to the Urals and the Siberian Federal District.
TRANSPORT AND FORWARDING
The First Forwarding Company transports consolidated cargo across Russia from 1 kg to 20 tons. Today it is one of the largest cargo carriers in the country, whose services have already been used by more than 350 thousand customers.
TRANSPORT AND FORWARDING
The cargo delivery service is the largest freight forwarding company in Russia, providing rail and road transportation, as well as groupage cargo forwarding on the territory of the Russian Federation.
TRANSPORT AND FORWARDING
TransCargo is one of the largest freight forwarding companies in Russia, transporting goods on the territory of the Russian Federation.
TRANSPORT AND FORWARDING
Baikal-Service is one of the largest freight forwarding companies in Russia, transporting goods on the territory of the Russian Federation.
TRANSPORT
Transport Company Energia professionally carries out transportation of groupage cargo throughout the cities of Russia, the CIS and China. Founded in May 2004 in Novosibirsk, TC Energia today has branches in 110 cities of Russia from Krasnodar to Nakhodka, more than 20 in the CIS and China. We have our own fleet of more than 300 vehicles that perform daily flights, so delivery of groupage cargo is not a problem for us. We try to provide maximum service for shippers and consignees. New information tools can reduce the time spent on sending, receiving and tracking cargo.
How to repair a stove on Kalina
Let's start with the cooling system. Since it and the heating system are closely connected, many of its problems also affect the stove. You should start by checking the antifreeze level. Its quantity should be between the min and max marks on the tank itself. If there is too little antifreeze, it should be added immediately.
A jammed thermostat can also be a problem. It’s easy to check its functionality - warm up the engine to the temperature at which the thermostat operates and touch the upper radiator hose. Normally it should be hot. If this is not the case, the thermostat will have to be replaced.
Sometimes air pockets occur in the cooling system. In general, they should disappear on their own, exiting through the expansion tank, but in some cases this does not happen.
How to overcome airiness? First you need to carefully tighten all the clamps. Next, diagnose the expansion tank cap and replace it if necessary (if the valve is faulty).
Inspect the pipes for cracks and small holes, if necessary, replace them with new ones.
In some cases, even the water pump seal may leak air. However, in this case, it is advisable to wait until the timing belt is replaced, so as not to remove and then install a bunch of units twice.
If everything is in order with the cooling system, problems should be looked for in the heating system. The first element to check is the temperature sensor. It is located behind the decorative surface of the lampshade. As you can easily guess from the name, it records the temperature in the cabin.
At the same time, the received data is analyzed and compared with the value that you specified. The sensor then sends a command to the gear motor. This, in turn, regulates the temperature of the supplied air.
The main sign of a sensor malfunction is that the stove blows air at the same temperature, and any manipulations with the regulator do not bring results.
If the stove makes strange sounds or does not work at all, there is most likely a problem with its motor. It is better to entrust the solution to this problem to specialists.
As you can see, dear readers, some stove problems can be easily fixed with your own hands, but there are also those with which it is better to go to a service station. However, before doing this, it would be a good idea to localize the cause of the malfunction. You can probably handle it yourself, and even if not, it will be much easier for the service technicians to deal with the problem when you tell them what exactly is wrong.
Lada 2106 Beige Shakhina › Logbook › Installation of electric heater tap and switch from viburnum
Actually, what initially bothered me was that in the dark the heater switch button and the faucet and damper control levers were simply not visible, so at first there was an idea to organize illumination of these controls, but after a little reflection, the decision was made to replace the standard faucet with an electric one from the Gazelle, it seems . Well, I also decided to replace the switch with a Kalinovsky one plus resistance from a Chevy Niva
I started thinking about how to arrange it all in the car. How to place controls. I decided to redo the panel. To do this, the old heater control unit cover was dismantled and slightly modified. Photos are attached
Next, the antifreeze was drained and the panel was disassembled
Next, the radiator was modified. Instead of a standard tap, a long tube was screwed on and cut to the length of the upper tube
A resistance is installed in the stove block
The faucet is located in the engine compartment using the necessary hose and tubes
Then everything was connected. The tap was connected according to this diagram
And the switch is on this one
Then everything was connected, assembled, checked, tested and washed))) It works perfectly and the appearance is aesthetic. Everything is illuminated and pleasing to the eye. Next photo
Due to temperature, malfunctions occur in the operation of the damper heater gear motor
- A break in the electrical circuit, that is, when the motor does not receive the required voltage and, therefore, may not work.
- Malfunctions of the autonomous control unit Problems.
- heater in the design of the gearmotor itself.
Often in Kalina gearmotors, the slider flies off the contact track in the extreme position. This happens due to the fact that this platform with tracks has a play in the mounting housing of the gearbox. Sometimes you can solve this problem by moving it in a certain direction and grab How.
How to independently adjust and replace the heater dampers on a Lada Kalina
Probably every car enthusiast eventually encounters poor heater performance. The owners of the Lada Kalina, unfortunately, are no exception. Sometimes it is very difficult to understand the true reason for poor interior heating when a normally working heater suddenly begins to fail to cope with its task.
The problem of weak heating can be solved by replacing and adjusting the heater damper on the Lada Kalina.
What is the damper responsible for?
While the engine is running in the cooling system, the heated liquid moves through the heater radiator, while it heats the air flowing through it. The volume of air passing through the radiator and outside it is controlled by the main heater damper. Depending on how the temperature control knob is located on the dashboard, the amount of incoming air will depend.
You can distribute air movement throughout the cabin by turning the handle that regulates the position of the damper. But there are cases when the damper jams and it is impossible to properly regulate the flow of heat into the Kalina’s cabin.
If the problem is only with the valve, then you can correct the situation quite simply by tightening its cable. If after these actions the situation has not changed for the better, then you need to conduct a visual diagnosis of the condition of the mechanism and perform a number of simple steps.
How can I check the operation of the heater damper?
- Set the temperature control knob on Kalina to the extreme position of the blue sector, and the fan speed to the maximum value.
- Turn the damper control handle on the block and at the same time watch for changes in the direction of the air flow.
If the air flow remains unchanged, this indicates a breakdown of the mechanical control unit of the stove. Most likely, the rod fell off and stopped screwing onto the roller due to its malfunction. Or the second option could be that the damper is stuck. If your car has climate control, then check the damper micromotor and check the condition of the ventilation control unit, heater and air conditioner.
How to get to the damper?
To see where the central heater flap is located, you will need to partially disassemble the dashboard, and specifically, unscrew the beard. This is the location on the dashboard where the heater switches are located.
- Remove the ashtray.
- Squeeze out the 2 plugs located next to the emergency lights button.
- Remove all control knobs.
- Unscrew the 2 self-tapping screws of the center console and carefully pull it out, while prying it at the latches.
- Disconnect all wires.
- Now you can easily reach the damper.
- Replace the damper or its drive components.
Very often, the cause of the malfunction may be a broken damper drive mount. If the situation is not critical, then you can simply glue the part that has fallen off using superglue.
There are cases when the valve drive mount breaks off due to an undeveloped cable that is very difficult to lower. In this case, it must be developed manually, after which this problem should not arise.
How to adjust the heater damper on a Lada Kalina?
- The first step is to adjust the heater valve.
- Remove the bracket that holds the cable sheath to the faucet body.
- Remove the cable from the faucet lever.
- Open the tap to the maximum.
- Unhook the cable from the lever block.
- Remove the old cable.
- In the future, the tap may not be closed at all.
If you don’t like the method described above, you can use another one:
- Adjust the length of the sheath and cable so that in the extreme right position of the lever on the block the tap opens completely.
- Secure the cable located in this state using a latch.
- Then we proceed directly to adjusting the heater damper.
- Remove the bracket that holds the cable sheath on the heater body and feel for the yellow galvanized lever located on the left.
- Pull the lever towards you - this will be the maximum open state.
- Adjust the length of the cable so that in the right position of the long lever on the lever block the valve is open to the maximum.
- Lock it in.
- Do not forget that with the help of one lever both dampers are simultaneously controlled: both the tap and the large one.
Definitely, the heater in the Lada Kalina heats much better than in previous models of the VAZ automobile industry line.
But incorrect operation of the heater dampers, unfortunately, is a very common “disease” of the Lada Kalina. Therefore, after purchasing, try to prepare in advance for the heating season, especially since you can do this yourself quite quickly and easily.
Device repair
Repairing this part of the heater, unfortunately, is not always possible, but you can still try to do something.
- To begin, slightly bend the pressed side and remove the cover from the gearmotor.
- Look at the condition of the commutator, brushes and bearings.
- If possible, replace or correct faulty parts.
- Be sure to lubricate the bearings, but to do this, use silicone-based lubricants, they extend the life of the parts.
- Try to repair the damper if it is faulty or simply replace it with a new one.
- If there is no positive effect from the actions taken, replace the gearmotor with a new one.
The stove installed by the manufacturer copes quite well with its task of heating the interior. But there is one thing - the drive of the central heater damper of the Lada Kalina often suffers. This problem is not serious and in most cases, by following simple steps, you can get rid of it quite easily.
Source
The stove doesn't heat well. The stove blows cold air Lada Kalina
A lot of Lada Kalina car owners are not happy with the performance of its stove. Moreover, there are a lot of different symptoms that require an individual solution. For some, the stove on Kalina simply does not work well, for others it blows cold air or blows in the wrong direction as you point it.
Why does Kalina's stove blow cold air?
Here is one of the real cases, on Kalina the stove was blowing cold air at idle, it was warm only at high speeds. Replacing the thermostat did nothing. It turned out that antifreeze was leaking a little, the level was constantly minimal, I had to add more.
First, the location of the leak was determined, it turned out that it was the pump gasket, this problem was eliminated without removing it, just tightened the connections a little. Then antifreeze was added and Tashkent came to the car.
Another common reason why cold air blows from Kalina’s stove is that the gasket above the head burns out, part of the exhaust gets into the cooling system, and as a result the stove becomes airy.
Many people do not monitor the level of antifreeze, but in vain, part of it naturally disappears during the summer season, the minimum level directly affects the stove, some managed to return it to normal operation only by restoring the level.
The thing is that in the control unit of the heater levers, there is an unpleasant defect associated with large gaps in the mechanism, as a result of which the heater begins to blow, for example, all the time at the feet, while bypassing the glass or, vice versa. The air intake damper does not fit tightly, warm air mixes disproportionately with cold air
The air intake damper does not fit tightly; warm air mixes disproportionately with cold air.
Tips on how to get the stove to heat up in a Lada Kalina:
1. If your windows heat up poorly or take a long time, you can install additional “flaps”, which are on sale specifically for Kalina. This is what they look like: More heat begins to reach the glass from the stove, and they thaw much faster.2. An old-fashioned method known to many VAZ owners, including Kalina, installing cardboard on the radiator significantly helps in the operation of the stove, the car warms up faster and cools less when driving.3. Replace the cabin filter in a timely manner. A clogged filter in the Lada Kalina creates an additional load on the stove; it makes the windows difficult to warm up in severe frost.4. Be sure to first check the coolant level in the expansion tank; a simple top-up can revive the operation of the stove. 5
Pay attention to the thermostat, its operation can be checked without removing it; if the lower radiator hose is cold on a hot engine, then most likely it is faulty
Doesn't heat well, the stove is on Kalina. Airlock
You have checked all the main systems, the dampers are functioning, the thermostat is working, the coolant level is normal, but the stove on your Kalina is not heating well. In this case, most likely there is an air lock in the cooling system, which prevents it from working normally.
How to remove an air lock from the system?
On a hot engine, you need to open the expansion tank cap; when you open it, you should hear a characteristic “splash”; if after this the coolant level rises significantly, you need to repeat this 15 times, with an interval of 2-3 minutes.
If you do not hear a “zilch”, then the valve on the plug is most likely faulty.
Kalina stove control
Cold stove on viburnum.
The stove on Kalina is considered one of the best and warmest, this is confirmed by many owners, but until they encounter a defect, which we wrote about above, or they catch an airlock that will ruin the whole impression.
It is very easy to control the operation of the stove on the Lada Kalina, both on the old version and on the new one.
DIY heating system repair
To change this or that part of the heating system, it is not at all necessary to seek help from specialists. This will help save time, but not money. If you follow the recommendations, you can replace some system components yourself.
Heater fan
Even beginners can replace the Kalina stove fan. The main problem is its location. For this reason, most of the time is spent not replacing the part, but dismantling it.
Fan replacement with panel removal
The method is recommended by AvtoVAZ engineers, but it is not the simplest. Not everyone decides to use it in a regular garage. When performing work, you must follow the instructions:
- First, turn off the power to the on-board network by disconnecting the battery terminals.
- Drain all coolant and remove the cabin filter.
- After unscrewing the fastening nuts, lower the steering column to its lowest position.
- Release the brake light switch from the wires, unclip the clips, and remove the upholstery from the pillars.
- Unscrew the screws and remove the front panel (cladding), then remove the dashboard along with the deflectors.
- Now you can begin dismantling the fan. To do this, you need to disconnect the terminal with wires from it, remove the ventilation hose, and unscrew the fastening nuts.
After installing the new fan, all further actions are carried out in the reverse order of dismantling. The procedure requires attention and accuracy and takes a lot of time. At some points, the help of a second person will be required.
Replacing a fan without removing the panel
It is not practical to remove the entire dashboard just because of the heater fan. You can replace the device without removing the dashboard - you just need to lift its right side. Next, you should “arm yourself” with a knife and a flashlight and crawl under the panel. The noise insulation is cut off, the fasteners are unscrewed, and replacing the Kalina stove motor becomes much easier. This method will significantly save time and nerves, although it will create some inconvenience.
Replacing the temperature controller
To dismantle the part and replace it, it is necessary to remove the control unit assembly. The procedure looks like this:
- the on-board network is de-energized by removing the “negative” terminal from the battery;
- the radio tape recorder (if any) is removed, and the terminal block of wires is unhooked from it;
- the damper control lever is removed;
- Next, the handle for controlling the temperature and direction of air flow is dismantled;
- there are plugs located at the bottom of the control unit - they need to be removed and the fastening screws underneath must be unscrewed;
- the center console should be carefully pulled towards you;
- After removing the console, disconnect the terminal blocks from the switches.
After replacement, everything is assembled in the reverse order. This operation is simple and only requires a couple of different screwdrivers to get the job done.
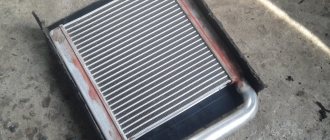
Replacing the heater core without removing the panel
Changing the heater radiator on a Lada Kalina, as on all front-wheel drive VAZ cars, is not an easy task. You will have to remove most of the front panel. To work, you will need a new heater radiator, hoses, clamps, an angle grinder and a standard set of tools. First you need to carry out some manipulations in the engine compartment:
- drain antifreeze from the cooling system;
- remove the battery and air filter housing, ensuring unhindered access to the heater pipes;
- you need to disconnect all the rubber pipes from the stove in the engine compartment, unscrew the nut securing the metal shield that covers the hoses going to the stove into the cabin.
Now you need to go to the salon and perform the following steps:
- unscrew the three fastening nuts and remove the gas pedal;
- move the brake pedal as far as possible to the side;
- Having made a cut on the metal shield, cut off the radiator pipes with a knife;
- Unscrew the fastening screws and pull out the heater radiator towards the pedals.
A hose with a thicker end is attached to the upper radiator outlet, and a narrower end to the lower outlet. The other ends, without being confused, need to be installed instead of the old ones. It is advisable to treat the place where the hoses from the passenger compartment enter the engine compartment with soundproofing material.
Replacing the stove radiator will help solve the problem of insufficient heating. Due to the labor-intensive nature of most work on troubleshooting a heating system, prices for such services at specialized service stations may seem quite high. It is not surprising that many “folk” repair methods have appeared.
Repair operations for Lada Kalina starter manufactured by Bosh
1. Remove the starter from the car (see the article “Removing and installing the Lada Kalina starter”).2. Unscrew the nut securing the power bus to the contact bolt located on the solenoid relay. Disconnect the power bus from the contact bolt of the traction relay.
3. Unscrew the 3 screws securing the traction relay and remove it.
4. Remove the traction relay armature by lifting it so that the armature loop is removed from the lever.
5. Remove the two pinch bolts (the bolts run the entire length of the starter inside the housing) and remove the drive-side cover.6. Remove the rubber seal from the lever support7. Disconnect the gearbox with the drive from the starter and remove the lever from the drive washer, pulling its side rods with a screwdriver.
Solving the problem when the stove on the Lada Kalina does not heat well
With the onset of cold weather, many car enthusiasts notice that the stove on the Lada Kalina does not heat up. The malfunction can be in different elements of the system and sometimes it is not easy to determine the cause. Let's try to figure out in detail how to determine the cause of the malfunction, and then repair the Lada Kalina stove with your own hands.
How to check the operation of the Lada Kalina stove
We carry out all actions with the engine running. Before checking the heater, study the diagram and structure of the Lada Kalina stove.
Checking the ventilation and heating system fan:
- We set the air temperature regulator knob on the control unit to the extreme position of the blue sector.
- We alternately switch the fan speed knob, starting with the first speed and ending with the fourth.
- We check the intensity of the air flow coming from the air ducts. It should get stronger with each switch.
If the heater does not work on the Lada Kalina, check the integrity of fuse F5, as well as its power circuit. If the fan does not operate in all modes, or the air flow intensity does not change linearly, check the additional resistor and switch. If the air flow is weak, replace the cabin air filter.
Checking the heater dampers:
- Set the temperature regulator to the extreme position of the blue sector, and the fan speed to maximum.
- We turn the damper control knob on the block and at the same time monitor changes in the directions of air flows.
Unchangeable air flows indicate a malfunction of the mechanical heater control unit (the draft has flown off, or does not screw onto the roller due to its breakdown), or the damper is jammed. If the car uses climate control, then check the damper micromotor and the ventilation, heater and air conditioning control unit.
- Warm up the engine to operating temperature.
- Turn the air temperature regulator to the extreme position of the red sector.
- Warm or hot air should come out of the air ducts
If the air temperature has not changed, check the serviceability of the mechanical heater control unit (the rod has come off, or does not screw onto the roller due to its breakdown), or the damper is jammed. If the car uses climate control, then check the damper micromotor and the ventilation, heater and air conditioning control unit. Make sure the engine cooling system is working properly.
Checking the interior temperature sensor:
The interior temperature sensor is installed in the lampshade on cars equipped with a climate control system. Most often, a sensor malfunction can be determined by the operating mode of the stove. If only hot or cold air blows from the panel nozzles, regardless of the position of the handle on the heater control unit, then most likely the ceiling air sensor has failed.
A couple of useful tips
Have you noticed that the heater on the Lada Kalina blows cold? Proceed according to the scheme “from simple to complex”, first check the simplest elements of the heating and ventilation system, for example, the air filter and the presence of coolant. Then gradually move on to more complex design details.
Another good way to find out which part has failed is to replace it with a known working part and check the operation of the system. And you don’t have to buy a new spare part if you borrow it from a friend. You can also try to negotiate with the seller in the store, take a new part for testing, leaving a deposit.
Statistics of malfunctions of the Lada Kalina stove
According to the results of the survey “Why does the stove on the Lada Kalina not heat well?” The main causes of the malfunction were identified:
- 32% voted for problems with the heater damper.
- 14% of votes were given for a faulty heater fan.
- The same number of votes (13%) were given for a failed ventilation and heating system control unit and a faulty heater radiator (replacement).
- For 9% of survey participants, the fault in the heater’s malfunction was the damper’s micromotor reducer.
The remaining votes were given for other problems with the Lada Kalina stove: a faulty additional resistor for the stove, a cabin temperature sensor and a dirty cabin filter.
Let us remind you that you can find various modifications to the car systems in the Lada Kalina tuning section.
Lada Kalina: don't touch anything!
LADA > Kalina
There is such a joke. The son approaches the programmer, exhausted by work: “Dad, why does the sun rise in the east and set in the west?” He, immersed in his thoughts, clarifies: “Have you checked? And so every day? And does it work? Then, for God’s sake, don’t touch anything!”
In the first editorial report on the Lada Kalina with the VAZ-21927 index, purchased at the beginning of autumn last year, the air conditioning system was mentioned. Literally: “And there is also climate control - albeit without automatic flow distribution, but independently maintaining the set temperature.” And after the article “Natural Minced Meat,” letters from readers poured in as if from a meat grinder.
We were offered to correct the mistake - they say that the Kalina has a full-fledged climate control system; in order to maintain a comfortable temperature, it can change both the intensity of the airflow and the direction of the flow. But how, Holmes?! In all the cars from my practice, costing from half a million to 12 million rubles, equipped with climate control, the control logic is standard: in forced mode, the air direction is set by non-locking buttons, the choice is visible on the display, but you should entrust the creation of the atmosphere to automation by pressing the appropriate key - on the screen the symbolic vortices are replaced by the inscription Auto. The Kalina has no buttons - the direction of the flow is regulated by a rotating washer with fixed positions: in the face, in the legs, on the glass... Moreover, in the manual supplied with the car (for the meticulous - p. 64), even in the section "Automatic mode" maintaining the set air temperature in the cabin”, manipulations with the knob are mentioned: “For the most effective operation in the automatic mode of maintaining the set temperature, it is recommended to set handle 4 to the “face” position.” Which is what I reported in my response to readers. Without forgetting to mention that I have no complaints about the efficiency of ventilation and heating (which I can’t say about the climate control systems of some much more expensive cars).
The reaction was not long in coming: readers again pointed out the error. To dot the i’s, I called the AvtoVAZ engineers and found out that the Kalina’s air conditioning system is really complete and can not only play with the fan speed, but also move the dampers, changing the direction of the air flow. But what is the algorithm! The automation is turned on if you move the speed control to the Auto position, and it does not matter what state the flow distribution handle is in. But as soon as you turn it, the air will flow through the selected channel. And if you click the speed controller to a certain value and return it back, everything is “automated” again.
I repeat, I have never encountered this on any of the dozens, if not hundreds, of tested machines. And I’ll emphasize once again: despite the controversial logic, the installation functions without any complaints. Just an anecdote: did you set it to Auto? Works? Great, don't touch anything!
This, by the way, is the only “adventure” associated with our “Kalina” worthy of mention. In six months, the car covered 15,000 km - in grueling city traffic jams, rare trips outside the capital and occasional rally sprints. And without a single breakdown - except for the tire damaged at the special stage (the patch cost 500 rubles) and a few “crickets” in the cabin. It’s nice, especially considering the difficult operating conditions.
The car honestly deserved TO-2 - in fact, it is the first for cars with 16-valve engines, but AVTOVAZ, as we began to guess, has its own logic. The rule “it works, okay” didn’t disappoint this time either: make an appointment by phone with the Moscow TECHINCOM dealer, wait an hour for an appointment and a wash, and now the car is on a lift.
All routine maintenance took an adequate 2 hours. But we will no longer undergo maintenance with the officials. We will refuse the guarantee, because we are going to thoroughly “touch” the car - we will prepare it for the amateur circuit racing Russian Hot Hatch Club Championship, held in ten stages at five racetracks in the country. We will test effective brakes and sports suspensions, boost the engine and modify the transmission - and see how fast and reliable the Kalina will prove to be on track days. We sincerely hope that after the intervention everything will work even better!
What if you turn the standard radiator upside down?
So, friends, with the arrival of cold weather, I noticed that the stove was heating rather weakly, and at an outside temperature of -10°C, the windows thawed only after 30-40 minutes of intense traffic. It was impossible to drive like this, and during the next thaw I decided to start the third (I hope the last) replacement of the stove radiator.
By this time, I had come to the understanding that enough experimenting and I still needed to install the original heater radiator from Kalina. ideal in size and shape. Moreover, before installation, it must be carefully sealed with foam rubber so that the air from the fan passes through the radiator fins and not past it.
At that moment, I didn’t yet know how I was going to install a standard radiator, but I still didn’t intend to cut out the air ducts or disassemble the dashboard. It seemed to me that there must be some simpler and more logical way to install a standard radiator. Having purchased new pipes and a heater radiator from Kalina in advance (650 rubles), I removed the installed radiator from the gazelle and tried to install the standard radiator in its place.
After dismantling the radiator from the gazelle, I began to think about how to install a standard radiator without breaking anything. I twisted and turned the radiator, placed it this way and that way, and suddenly an idea came to my mind: what if we turn the heater radiator over with the fittings not towards the engine, but towards the driver?
The idea, although bold, was viable, so after 4 hours hot air was already blowing from the heating system deflectors. Now, let's look at the whole process of replacing the stove on Kalina from start to finish using the radiator reverse method. Let's start by making a list of everything we'll need.
Repair Repair
The design of this part of the heater, unfortunately, is not always possible, but you can still try to do something.
- To begin, bend the slightly pressed side and remove the cover from the gearmotor.
- what, Look at the condition of the commutator, brushes and bearings.
- If possible, replace faulty parts or replace them.
- Correctly lubricate the bearings, but use silicone-based lubricants for this, they extend the service life of the parts.
- Try to fix it if the damper is faulty or just replace it with a new one.
- If the actions taken do not produce a positive effect, replace the gearmotor with a new one.
The manufacturer's installed stove copes quite well with its task of heating the interior. But there’s one thing - the central damper drive of the Kalina Lada heater often suffers. This problem is not serious and in most cases, by following simple steps, you can easily get rid of it.
There has been no news since the winter, and all because nothing good or bad happened to Kalina... And then to Kalina! I reminded you of myself with new “wants”. From time to time I began to hear clicks in the Dumal area. The stove started leaking, but it turned out that the damper gear motor was broken.
This thing cannot be repaired, but it costs a thousand rubles! Yes, because of the small gear you need to pay 1k. Part number for cars with air conditioning: 8127200-1118-02
If you insert a new gear motor into the damper rod and turn the temperature dial, it becomes clear why the teeth broke. The stroke of the curtain to both sides is less than the stroke (71 degrees) of the gearmotor at the axis!
I suspect that this was done for the purpose of a specially tight fit of the damper in the extreme positions of the controller, but I do not exclude the possibility of a design miscalculation. Whatever it may be, in extreme positions the gears are always under great pressure. It is very difficult to hold the gearmotor with your hand; it tries to turn the gear to its extreme position, and the damper (or hand) prevents this.