If the windshield of a Lada Priora car is fogged up and looks as if it was smeared with greasy hands after eating pirazhki - driver, beware, your heater is leaking! Maintaining normal temperature in the cabin at different times of the year is necessary in order to feel comfortable behind the wheel. In winter, the stove on the Priora saves you from freezing, which provides the heat a person needs. But you need to take care of it and prepare it for winter in the summer, because being left without heating in winter is not the greatest pleasure. The sore spots in the system that break down more often than others are the gear motor and the heater damper. Priora is a warm car - the original DAAZ is very good, it warms, and is warm in winter, because its radiator has the correct structure and fluid circulates inside. If you install the Chinese Luzar, you will freeze at -20 - I checked it personally. I put this luzar on, then took it off. The heater radiator is available for cars with and without air conditioning. The structure of the node is slightly different.
The stove block of the Priora car is indicated below in the figure. As you can see, in addition to the block, the entire assembly consists of many spare parts. On the Priora, the stove has a conventional design - having taken the time to diagnose, you need to completely check the entire system in order to make an “investment” in the future - in winter you will need to look for a heated garage for repairs. If the Priora blows cold air or does not heat well, these are signs that something is wrong inside, and this malfunction needs to be sorted out.
Features of the Priora stove
The climate control of this car on some versions is designed for the installation of air conditioning. Therefore, the design of this device in this case is slightly different than that of the VAZ-2110 heater. This article discusses the standard heater option. Although they have a lot in common. The Priora stove (heater without air conditioning) includes the following large components:
- Stove body.
- Air duct system.
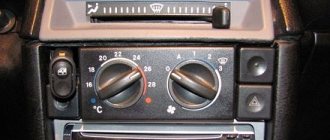
- Heater electronic control unit (ECU) with control console.
These are, so to speak, three basic nodes. All of them, except the ECU, are disassembled and consist of various subsystems. To be honest, the control unit can also be disassembled if desired. But you shouldn't do this. This is a delicate electronic device and can only be repaired by a specialist. But with the other two there are options.
Frame
After the control unit, the stove body is the most complex object. The fact is that it includes several elements:
- Housing consisting of two parts.
- Blower electric motor with fan.
- Small heating radiator with pipes.
- Variable resistor.
- Heater air damper.
- Micromotor gearbox, heater damper drive.
- Cabin filter.
All of the listed elements sometimes fail, and it is quite possible to replace them yourself, without resorting to the services of a specialist.
Location and access
As on the VAZ 2110 model and modifications, the heater is located outside the passenger compartment. It is located in the engine compartment. Right under the windshield. It is separated from the engine by a special fabric and cardboard partition. And the top is covered with a plastic double casing, which hides this compartment, in which, in addition to the heater, a brake vacuum and a windshield wiper drive are also installed.
To gain access to the Priora stove, these elements must be dismantled. Disconnect the cooling system hoses. Unscrew the 3 fastening nuts and remove the housing. This process is described many times and shown in the attached video. Therefore it is not worth repeating here.
Cabin filter
Most often, it is this part that fails or exhausts its resource. It simply gets clogged with dirt and dust. This is expressed in a decrease in the intensity of fan operation. Sometimes, it becomes so dirty that the heater fuse blows. The load on the electric motor increases so much that the fuse simply blows. The purifier is located at the air inlet into the heater. Near the right wing of the car. It is closed with a decorative plastic cover.
Electric stove motor
To remove and replace the electric motor of the stove, on a Priora without air conditioning, you have to completely dismantle the heater. Or at least push it forward a little. The fact is that this motor is located on top of the Priora stove and is located under the supporting part of the windshield.
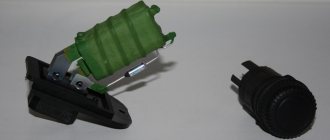
Heater resistor
This element serves as a kind of fan rotation speed switch. It has several resistance levels. Each step is speed. A faulty resistor is easy to determine. If none of the speeds except the maximum one work, then in 99 cases out of 100, it is the resistor. And only 1 switch, in the control unit.
It is also located at the top. But it can be easily removed without dismantling the entire stove. It is enough to remove the connector and unscrew 1 screw fixing the resistor. That's all.
Micromotor gearbox
In the Priora climate control system, there is no option to disconnect the radiator from the car’s cooling system. That is, the hot liquid constantly circulates in it. The supply of cold air is ensured by directing the air flow from the fan using a special damper that blocks the radiator and allows the flow to pass by.
This part is moved by a special device - a micromotor-reducer. It is controlled by the control unit. It can also be replaced without completely removing the heater. Although it is located between the vacuum brake booster and the heater housing. However, its diagnosis and replacement has features that will be described in a separate topic.
Heater air damper
One of the key devices of the system, despite its simplicity. The damper moves on an axis rotated by a micromotor gearbox. Located inside the Priora stove. Therefore, to repair or replace, naturally, the stove must be dismantled.
However, if you still have a Priora with a plastic flap, then the drive protrusion on it may break off. This is quite easy to determine. Turn on the ignition, and having removed the casing separating the niche with the heater from the engine compartment, observe the gearbox, switching the flow temperature control handle from hot to cold. You can see that the drive rod rotates, but the temperature does not change. This means the damper needs to be replaced. There will be a separate article about this procedure.
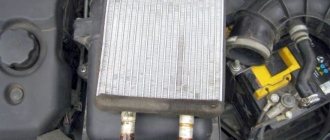
Radiator
And the main heating unit is the stove radiator. It is also located on the right side, near the damper drive. Naturally, to replace it, the Priora stove will have to be removed. It is attached to the body with three self-tapping screws. And after removing the heater, it is easy to pull it out by unscrewing these screws. Clean the radiator seat and install a new one. This part is made of plastic and aluminum and cannot be repaired. Replacement only.
Determining a radiator leak is quite simple. Although on these heaters the coolant does not enter the cabin when there is a leak from the radiator, but when it appears, in any position of the damper, the evaporation immediately falls on the windshield. They form a clearly visible cloudy film with a pungent odor of antifreeze. This is a clear signal to replace the heater radiator.
Electronic heater control unit
This is a mini-computer with its own program. The convenience is that it is initially connected to the computer diagnostics channel. Therefore, many faults can be identified by connecting diagnostics to the Priora diagnostic connector. But this interesting topic will be described in a separate article.
Useful video on the topic “Removing the Priora stove”:
The Lada Priora stove only works in the max position - causes of the malfunction
I want to share my experience in repairing my Priora (with Panasonic air conditioning), or rather the stove in it. The point is this: the stove only works in the max position. In all others there is silence. There are several problems that lead to this. 1. In general, on Priors with Panasonic air conditioning there is a Rotation Speed Controller (RFV) for the fan. As a rule, it burns out, and the airflow button on the console starts blinking and the fan does not blow.
Heater radiator malfunctions
Another reason why the heater in a Lada Priora car does not work (cold air blows from the deflectors) may be the accumulation of dirt in the heat exchanger. When the cooling system operates, deposits accumulate in the engine block itself over time, which are then spread throughout the entire system, including into the heater radiator. These deposits prevent it from working effectively. The system will heat the air worse. In this case, the heater radiator can be replaced entirely. It is removed from the engine side. Before starting work, be sure to drain the antifreeze from the cooling system. Then dismantle the windshield wiper arms, the frill trim and move aside part of the soundproofing shield. After this, disassemble the stove body, disconnect the wires, remove the fan motor along with the impeller and remove the heat exchanger, disconnecting the supply hoses from it.
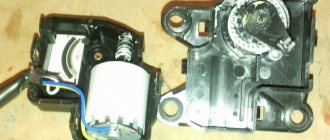
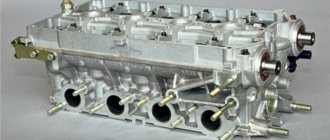
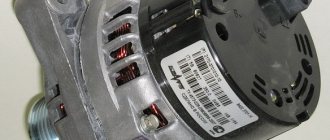
Purpose of the heating gear motor on the Lada Priora
A gearmotor is a device consisting of several plastic gears driven by a small electric motor. The main task of the gearmotor is to open and close the heater damper depending on the position of the regulator on the dashboard.
Geared motors on Priora are made only in plastic, non-separable housings
The plastic from which the gears are made deteriorates quite quickly. After which the driver is forced to change the gearbox. This device cannot be repaired, because, firstly, it is not possible to find spare parts for it, and secondly, it is not so easy to open the plastic housing of the gearbox without breaking it. So there is only one option left: replacement.
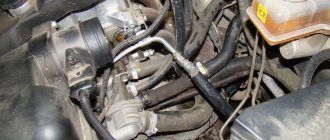
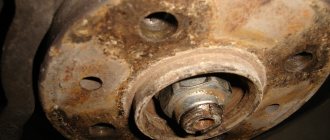
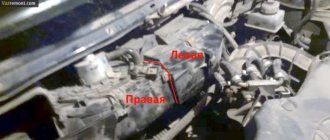
Gearmotor location
The gearmotor on the Lada Priora is located near the expansion tank, under the windshield.
The gearmotor on the Priora is located under the windshield near the expansion tank
It is built into a niche on the wall of the engine compartment and covered with a thick layer of sound-insulating material. This material will have to be removed, since otherwise it will not be possible to get to the gearmotor.
see also
Comments 33
The gearmotor is located on the left top of this plate, you don’t have to take off the panel to replace it, but cut out the window behind the dashboard and that’s it
there’s not a word about this gearmotor here)
www.drive2.ru/l/7358362/ look at me. It might help you figure it out.
Yes, that’s exactly what I wanted to see, thank you!) But what confuses me is that your gearbox clicked (made sounds) when you tried to change the position of the flow, but I don’t have any sounds at all, I don’t understand how to check)
Signs and causes of gear motor failure
There are two signs of a gearmotor failure on a Priora. Here they are:
- when starting the heater, a loud grinding or knocking noise is heard from under the dashboard, which becomes louder as the heating fan speed increases;
- inability to adjust the oven temperature. The heater blows either only hot air or only cold air. The position of the temperature regulator on the dashboard does not matter in this case.
All of the above happens for very specific reasons. Here are the most common of them:
- one or more teeth on one of the gear motor gears has broken. The tooth fragments rotate together with the damaged gear and hit the plastic housing of the gearbox from the inside. As a result, a characteristic dull rattle or knock occurs, which is clearly audible in the cabin;
The gears in the Priora gearmotor are made of very fragile plastic and break quickly
A burnt-out gear motor can also cause malfunctions in the Priora heater.
Incorrect operation of the cabin temperature sensor
There is another reason why the stove on the Priora does not work correctly. It occurs due to a malfunction of the cabin temperature sensor. It is located in the ceiling lamp.
The element, measuring the air temperature in the cabin, gives a command to the damper gearbox to open or close. This way the microclimate in the cabin is regulated. Its serviceability should also be checked.
Replacing the heating gear motor on a Lada Priora
First of all, it should be said that replacing the gearmotor on a Priora with and without air conditioning is done in the same way, since the gearbox is located quite far from this device. It should also be noted that today there are several known ways to remove the gearmotor from a Priora. One of them involves removing only the trapezoid along with the wipers and expansion tank, the second allows you to get by with removing only the tank. But to use these methods, the driver must have extensive experience in self-repair, otherwise problems are inevitable. Therefore, the third method will be discussed below, with the complete removal of all necessary parts. Yes, it will take more time from the car owner, but it is almost impossible to break anything. Now it's time to decide on the tools. Here's what we need:
- new gear motor for Priora;
- 2 screwdrivers - flat and Phillips.
Sequence of work
First you will need to perform a few simple preparatory steps. It is necessary to disconnect the throttle valve assembly and move it slightly to the side.
To get to the Priora gearbox, the sound insulation will have to be removed
Then use a Phillips screwdriver to unscrew the screws holding the sound-insulating material.
- There is a wiring harness next to the gearmotor. It is mounted on plastic holders that open manually. The tourniquet is pulled aside.
The wiring harness is mounted on two plastic holders that can be opened manually
The heater is held on by three screws. It only needs to be moved a few centimeters
You need very long fingers to reach the block on the damper sensor.
To open the spring lock, you will have to move it down a couple of centimeters
The gearmotor is held on by only three self-tapping screws, unscrewed with a Phillips screwdriver
The gearmotor, freed from the fasteners, is carefully removed from the niche
One mechanic I knew used a very original device to remove the gear motor - an ordinary one and a half liter plastic bottle. This bottle was cut obliquely so that it looked like a semicircular scoop. This thing was carefully slipped under the gear motor, and only after that the fastening screws were unscrewed. When I asked why such complications were needed, the answer was: so that the screws do not fall into the engine. Taking a closer look, I realized that this solution makes sense: if the unscrewing screw accidentally falls into the engine pan, it will be almost impossible to get it out of there.
Video: we change the Priora gearmotor ourselves
The damper drive does not work
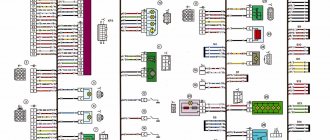
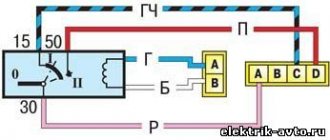
It is impossible to check whether the Priora recirculation valve is working (on cars with the Panasonic climate system) by viewing errors in the operation of the system - the corresponding codes are simply not provided. Therefore, it is necessary to perform the following actions in accordance with the algorithm described in the diagnostic card:
- Use a multimeter to measure the voltage level between ground and contact No. 1 going to the mode switch;
- if the obtained value corresponds to the on-board network voltage, there is an open circuit in the recirculation switch section;
- otherwise, you need to measure the voltage between ground and contact No. 2 of the recirculation button when it is pressed;
- if the measured value is equal to the on-board network voltage, the switch itself is faulty, and then it must be replaced;
- otherwise, use a multimeter to measure the state of the recirculation key;
- if the value is equal to the on-board network voltage, there is an open circuit in the area between the mode activation key and the SAUKU heater controller;
- if not, we proceed to measuring the voltage in the area between ground and contact No. 1 of the damper solenoid valve (the button for turning on the recirculation mode must be pressed);
- if the obtained value corresponds to the voltage of the on-board network, there is a break in the electrical circuit in this area;
- otherwise, there will be an open circuit in the ground circuit of the damper drive valve.
Important points
There are a couple of nuances, without mentioning which this article would be incomplete:
- The old gearbox should be removed very carefully. A long shank sticks out of it. If you remove the gearbox at an angle, you can damage the edge of the hole for the shank. If this happens, installing a new gearbox will not be so easy. Therefore, advice: when removing the gearbox, it should be pulled in a plane parallel to the floor;
- When buying a new gearbox at a car dealership, you should only buy the original VAZ one. Yes, its quality leaves much to be desired. But this is still better than buying a fake gearmotor, which the spare parts market is literally flooded with now. You can spot a fake by price. A normal gearmotor on a Priora costs 700 rubles and more. And a fake rarely costs more than 300 rubles.
So, replacing a heating gear motor is not a very difficult task and even a novice driver can do it. If a person has held a screwdriver in his hands at least once, he can handle it. All you need to do is follow the above recommendations exactly.