The VAZ-2107 heater tap is replaced very quickly, but the resource of this element is extremely low. In general, on the “classic” the stove tap causes a lot of trouble not only in winter, but even in the warm season. This is one of the most short-lived parts not only in the cooling and heating system, but in the entire car as a whole. Leaks appear very often, and when used infrequently, the faucet gets stuck in one of the extreme positions. There is no point in repairing it; you need to install a new one.
CHANGING THE HEATING VALVE FOR A VAZ 2107
Having discovered a leaking faucet, the owner of the “seven” will be forced to replace it. This device cannot be repaired, since it is not possible to find spare parts for the VAZ membrane valve on sale (and besides, it is very difficult to disassemble the body of the standard membrane valve on the “seven” without breaking it). So there is only one option left: replacing the part. But before we start, let's decide on the tools. Here's what we need:
- set of spanners;
- pliers;
- crosshead screwdriver;
- new fuel valve for VAZ 2107 (preferably ceramic).
SEQUENCE OF OPERATION
First of all, you need to turn off the engine of the VAZ 2107 and cool it well. This usually takes 40 minutes. Without this preparatory operation, any touch to the heating tap can lead to serious burns to your hands.
Now the interior of the car opens. The screws holding the storage compartment and glove compartment are unscrewed. The glove compartment is carefully removed from the niche, allowing access to the fuel tap from the passenger compartment.
The hose through which antifreeze enters the heating radiator is removed from the tap pipe. To do this, the clamp that holds the pipe is loosened with a screwdriver. After this, the hose is pulled off the pipe manually.
Now you should open the hood of the car. Just below the windshield, in the partition of the engine compartment, there are two hoses connected to the fuel tap. They are also held on by steel clamps, which can be loosened with a screwdriver.
After this, the hoses are removed from the nozzles manually. When removing them, extreme care must be taken: antifreeze almost always remains in them. And if the driver has not cooled the engine well, the antifreeze will be hot.
Now you need to unscrew the fuel valve fasteners. The faucet is held on by two 10mm nuts, which can be easily unscrewed with a regular open-end wrench. Having unscrewed the tap, it must be left in the niche.
In addition to the hoses, a cable is also connected to the fuel tap, with which the driver opens and closes the tap
The cable has a special fastening end with a 10 nut, which is unscrewed with the same open-end wrench. The cable is removed along with the tip.
Now the fuel valve is not held in place and can be removed. But first you need to pull out the large gasket that covers the niche with the pipes (this gasket is removed from the passenger compartment).
After removing the gasket, the valve is pulled out of the engine compartment and replaced with a new one. Next, the VAZ 2107 heating system is reassembled.
Common fuel valve malfunctions
All malfunctions of the fuel valve on the VAZ 2107 are in one way or another related to a violation of the tightness of this device. Let's list them:
- The fuel valve started leaking. It’s impossible not to notice: a large puddle of antifreeze forms under the feet of the passenger sitting in the front seat, and a characteristic chemical smell spreads throughout the car’s interior. As a rule, a leak occurs due to the fact that the membrane in the fuel tap has become completely unusable. This is usually observed after two to three years of operation of the crane;
- The fuel valve is stuck. It's simple: the diaphragm fuel valve mentioned above is susceptible to oxidation and corrosion. Almost all drivers in our country close this tap in the warm season. That is, at least three months a year the tap remains in the closed position. And these three months are quite enough for the rotary rod in the faucet to oxidize and become firmly “stuck” to the body of the device. Sometimes it is possible to turn such a rod only with the help of pliers;
- antifreeze leaking from under the clamps. On some “sevens” (these are, as a rule, the latest models), the valve is attached to the pipes with steel clamps. These clamps weaken over time and begin to leak. And this is perhaps the most minor problem with the fuel tap that a car enthusiast may encounter. To solve it, simply tighten the leaking clamp with a flat screwdriver;
- The faucet does not open or close completely. The problem is due to internal contamination of the device. It is no secret that the quality of antifreeze on the domestic market of fuels and lubricants leaves much to be desired. In addition, counterfeit coolant is also found (as a rule, antifreeze from well-known brands is counterfeited). If the driver is used to saving on antifreeze, then gradually the fuel tap becomes clogged with dirt and various chemical impurities, which are present in abundance in low-quality antifreeze. These impurities form hard lumps that do not allow the driver to turn the valve stem all the way and completely close (or open) it. In addition, low-quality antifreeze can cause rapid corrosion of the internal parts of the standard "seven" diaphragm valve, and this can also prevent the fuel valve from being tightly closed. The solution to the problem is obvious: firstly, remove and thoroughly rinse the clogged tap, and secondly, use only high-quality coolant.
When is it necessary to change?
The car heater valve is designed to regulate the supply of coolant. If it is open, the coolant enters the radiator in a heated state and heats the air coming from outside, circulating thanks to the fan. The heated air serves to heat the interior in winter. In the summer, the tap shuts off the flow of coolant into the radiator, and it goes bypassing the stove, so it does not affect the microclimate of the cabin.
Heater valve VAZ 2107
Replacing the heater tap is necessary if it becomes jammed. This occurs due to oxidation of the locking mechanism, as well as contaminants that are deposited on the internal walls.
Often the stove faucet has to be replaced if it begins to leak, which is a consequence of depressurization of its body. In this case, the coolant level in the expansion tank decreases, a wet spot appears on the floor under the front passenger’s feet, which is formed due to a leak, and a specific smell of antifreeze or antifreeze appears.
Basically, the body of the heater valves cannot be disassembled, so their repair is impossible. If a malfunction is detected, the part must be replaced (video author: Jena Pon).
A little worldly wisdom
Experienced Zhiguli drivers know, but beginners should adopt one small everyday trick - in order to save themselves from many unexpected troubles, it is worth keeping a small set of spare parts in the car, the replacement of which may need to be replaced suddenly, but will inevitably occur. And on this list, among the generator brushes and old but working side light bulbs, there simply must be a new heater faucet, several gaskets and a pipe that can be screwed to the faucet at your leisure.
Faucet options for installation
Repair of the VAZ-2107 heater or why the “stove” does not heat?
Why does the VAZ-2107 stove not heat up? And again the weather threatens with cold weather. For those who have problems with their heater, the most important question is how to make the “stove” heat up? First of all, let's determine the cause of the malfunction. The culprit may be an underheated engine, an airy cooling system, or a malfunction of the heater itself. If the stove fan does not spin, the electrical wiring is faulty - see here.
Often, the cause of cold in the cabin is an underheated engine.
Signs: the temperature on the gauge is in the white zone, the engine takes a long time to warm up. Normal warming up at a temperature of -20 looks like this: start the engine, in 8-10 minutes at idle the engine should warm up to 40-50 degrees (the very beginning of the white sector of the temperature gauge scale). If the temperature rises higher, it’s good, less is bad. Thermostat is faulty. Then we drive in 1-2 gear, and in 5-8 minutes the temperature rises to 80 (the border of the white and green zones). The thermostat did not warm up to 80 - the thermostat needs to be replaced! Temporarily, you can get by with insulating the radiator with cardboard or something else. But don’t forget that if you put a load on the engine (it’s stuck and slipping), it can boil. Therefore, the cardboard should be pulled out easily and quickly.
Air in the cooling system
First of all, we check the antifreeze level in the expansion tank and the serviceability of the radiator cap. If the antifreeze is diluted with water, it’s bad, it will harden, it needs to be replaced. If the radiator cap is faulty, air will remain in the system, and this will lead to poor circulation and coldness in the cabin. We buy and install a new plug, add antifreeze and the deficiency disappears.
An air lock may remain even after repairing the cooling system. Remove the air by driving the car, preheated to 80 degrees. engine, uphill to raise the front end. Then, having removed the radiator cap, drive the engine at 2000 - 3000 rpm for several minutes. After the air comes out, all that remains is to add antifreeze and close the radiator cap.
Next, check the correct position of the stove control levers
Blue - controls air supply. Red - antifreeze supply tap. They must be open (all the way to the right). Sometimes the tap turns sour. Find it under the glove compartment and check - it should open all the way, you can help with your hand, simultaneously with the lever. Just work carefully, the parts are thin and fragile and can be broken. It is convenient to move the lever with your left hand and turn the tap with your right.
VAZ 2107 heater valve in the open position
Heater valve in closed position
We check the operation of the air damper with the fan turned on. The lever to the right from the stove blows strongly, to the left it blows much weaker. If there is no difference, it’s bad - the cable has come off, the stove will have to be removed.
Only two new ones are better than new
A little higher, I already mentioned in passing that replacing the heater tap in a Zhiguli is a complex procedure. That is, along with the tap, the short pipe also changes (you can, of course, not do this, but its low cost still speaks in favor of replacement). Moreover, technologically you still have to screw this pipe to the faucet, so it’s better to screw a new one. And just for the sake of curiosity, just look into the old one to see how much its throughput has been reduced due to solid deposits.
Another part, the replacement of which is also necessary and care when purchasing which is very important, is the rubber gasket. You need two of them and both need to be chosen very carefully. The photo shows what unscrupulous sellers can sell in the store. Therefore, you can insure yourself in only two ways, and it is advisable to combine them:
- 1. When purchasing, inspect the gasket very carefully for peeling, microcracks, tears and other defects;
- 2. Buy a dozen of these pads - they’re inexpensive, they don’t take up much space, they don’t ask you to eat or drink, and if something happens, there’s nothing to replace them with.
Disassembling the stove faucet
Why might the stove not heat up?
So, the stove does not work, it blows cold air. Since this system is quite simple, there are not many possible breakdowns, and many of them can be eliminated without incurring huge costs.
Main malfunctions and ways to eliminate them:
- Airing the system. If the antifreeze has recently been replaced, there may be an air lock in the stove system, as a result of which it will heat very poorly. In this case, you need to open the heater valve, and then carry out the standard procedure for removing air from the cooling system.
- There is scale on the heater tap, which prevents antifreeze from flowing through it. A faulty faucet prevents you from turning the stove on or off. Plain water may be the culprit of the problem if the car owner used it as a coolant in the summer. Deposits clog the tap hole and it has to be cleaned or replaced.
- There is scale or dirt in the heater radiator, while the underwater pipe is hot and the outlet pipe is cold. The formation of sediment is a natural process, even if you use only high-quality antifreeze. But VAZ drivers often make do with plain water, which causes corrosion of the metal elements of the cooling system. Rust settles in radiators and gradually damages them. You will have to remove the stove and try to clean it, and if that doesn’t work, then replace it.
- The pump does not pump. This is already serious, and is fraught with not only discomfort during the trip, but also overheating of the engine. The pump breaks down from scale deposited on it, the impeller can be worn down by solid particles and simply fail due to age. You need to check the condition of the drive belts, and if they are in order, replace the pump itself.
- In the heater radiator, the heat exchanger partition, which distributes the flow of liquid, has shifted. In this case, the antifreeze will enter the side tank of the radiator and immediately exit through the second pipe, without entering the honeycomb, then both pipes will be hot, and the radiator itself will be cold. It will have to be replaced; it cannot be repaired.
Stove faucet, a few tips.
Read
Some tips on the stove tap
VAZ
cars . VKontakte group: group in .
What to use as a pipe? The answer is in the picture on the left. We take the removed faucet and saw off from it what is painted orange in the picture. We cut as close as possible to the faucet body itself, right under the base, shown by the red arrow. It is easy to saw, because aluminum faucet. We round off the cut area with a file so that there are no burrs or sharp edges. Now we need to decide how to connect hose 5 (Fig. above) with the new hose. The no longer needed tube 6 was taken as a connecting tube (Fig. above). The flange with which it is screwed to the faucet is sawed off to the very base and processed with a file. One end of the tube is inserted into hose 5, the other into the hose that replaces the faucet. Everything is on clamps. The new hose must be adjusted and cut so that it does not protrude under the hood, i.e. was at the level of the engine compartment . From the side on which it is mounted on the manufactured pipe, the hose must be cut so that it sits normally on the pipe and goes freely, without kinks, into the hole in the partition of the engine compartment , closed with plug 9 (Fig. above).
Purpose and principle of operation of the heater tap on the VAZ 2107
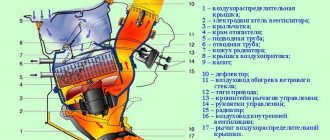
In short, the purpose of the stove tap is to give the driver the opportunity to switch between “summer” and “winter” modes of heating the interior. To understand what we are talking about, you need to understand how the heating system of the “seven” works.
The fuel taps on all “sevens” without exception were membrane valvesSo, the VAZ 2107 engine is cooled by antifreeze circulating in the so-called jacket. Antifreeze passes through the jacket, picks up heat from the engine and heats up to a boil. This boiling liquid must be cooled somehow. To do this, antifreeze is directed through a system of special pipes from the jacket to the main radiator, which is continuously blown by a massive fan.
The 7 engine cooling system has two radiators: the main one and the heating one.
Passing through the main radiator, the antifreeze cools and goes back into the engine for the next cooling cycle. The radiator (which in the early “sevens” was made exclusively of copper) becomes very hot after antifreeze passes through. And the fan, which continuously blows on this radiator, creates a powerful flow of hot air. In cold weather, this air is directed into the cabin.
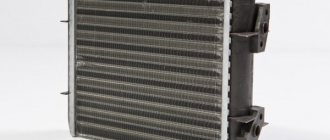
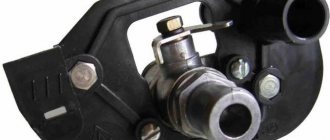
In addition to the main radiator, the “seven” has a small heating radiator. It is on this that the heating tap is installed.
The heating valve on the “seven” is attached directly to the stove radiator
In winter, this tap is constantly open, so that hot antifreeze from the main radiator goes to the stove radiator, heating it too. The small radiator has its own small fan, which supplies heated air directly into the car’s interior through special air lines.
The heating system of the “seven” has its own fan and a complex system of air ducts
In summer there is no need to heat the interior, so the driver closes the heating tap. This makes it possible to use a heating fan without heating the interior (for example, for ventilation, or when the windows are fogged up). That is, a heating tap is necessary to quickly switch between small and large antifreeze circulation circles in the “seven” heating system.
About the wealth of choice and a worthy alternative
Over the many years of operation of the VAZ 2107, the valve for the stove had to be changed more than once. I tried absolutely everything that is on sale:
- expensive and cheaper;
- factory and cooperative;
- regular and ball.
But a year or two passed, the faucet began to leak or became tightly jammed and everything started all over again. The latest acquisition in this area was the purchase of a heater tap with a ceramic shut-off element, the so-called ceramic heater tap. I immediately liked the faucet for its complete absence of any kind of play, absolute smoothness of operation and visual quality of execution, which is atypical for this category of products. The price, by the way, was also quite reasonable.
Stages of cleaning the stove on a VAZ-2107
If you follow the recommendations and follow the work plan that we have given below, then cleaning the stove will be done the first time and will not take much time.
Preparing tools and supplies
To clean the stove in a short time, you need to prepare the necessary tools and consumables in advance. For work we will need:
- a pair of rubber gaskets;
- a pair of worm clamps;
- cooling liquid;
- a container in which the coolant will be collected;
- set of wrenches.
Instructions for cleaning the stove
When all the necessary elements are prepared, you can begin to work. It will consist of several stages.
- The car engine must not only be turned off, but also cooled down. This is a mandatory condition that must be observed by car owners. Cloths must be placed under all existing pipes.
- The existing clamps in the engine compartment that are installed on the coolant inlet and outlet hoses must be loosened. The hoses that connect to the pipes on the radiator and heater tap will need to be removed, after placing a container under them to drain the coolant.
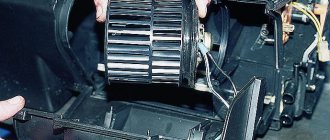
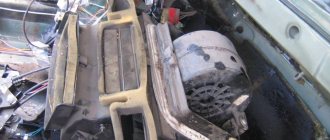
- Using a 7mm socket wrench you will need to unscrew the screws that are used to secure the seal. After the seal is removed, it is necessary to disconnect the casing on the furnace fan and the drive rod, which is located on the heater valve. The radiator pipes will need to be removed from the hole in the engine compartment partition. Now you can dismantle the radiator.
- You use a 10 mm spanner, which will allow you to unscrew a couple of bolts on the outlet pipe on the radiator. After this, you can easily remove the pipe, and with it the rubber gasket, which is located at the joints of the flanges. It needs to be replaced with a new seal. We remove the heater from the stove, or rather, the tap from it.
- Now the radiator of the VAZ-2107 stove can be cleaned, which consists of removing debris, cleaning the pipes and the heater tap. You can use a brush to clean the hoses.
- Flushing the radiator can be done in two ways. The first will require a Karcher installation and a pressure of around 5.5 atmospheres. Flushing must be continued until the water flowing out of the radiator is absolutely clean. On average, this procedure will take about 160 liters of water. If such equipment is not available, then you can use caustic soda. This solution is poured into the radiator for an hour. After this time, the liquid is drained. The liquid should pour out without changing color. The procedure is completed by blowing with compressed air using a compressor.
- All gaskets and rubber bands that were removed during operation must be replaced with new ones. Reassembling the heating system is carried out in the reverse order. Before adding cooling liquid, the heater valve must be moved to the extreme right position. When the liquid is filled, you will need to check the connections for leaks. If it is missing, you need to tighten the clamps tighter.
Carrying out replacement
The algorithm for performing the work is as follows:
- Unscrew the casing that secures the control cable.
- Remove the end of the cable from the stove faucet.
- Unscrew the nuts that secure the valve body to the radiator. Please note that antifreeze may leak out at this point, so place a dry cloth on the floor.
- Remove the old faucet.
- Remove the adapter that holds the pipe supplying hot antifreeze.
- Replace all rubber gaskets that are on the faucet.
- Install the adapter on the new device.
- Secure the valve to the radiator by tightening the mounting bolts.
- Install the control cable and ensure that the valve opens and closes completely when moving the lever.
Principle of operation
The heating system works simply - to ensure air heating, the driver uses the upper slider to open the antifreeze supply valve to the heater radiator. If the air supply damper is open (the middle slider is in the extreme right position), then the air flow through the box that separates the moisture and the damper enters the stove body. Passing through the radiator, the air heats up, and then moves depending on the location of the remaining dampers.
If the lower slider is moved to the right, then the heated air will go to the windshield area, and if it is positioned to the left, it will go to the center of the cabin and to the side windows. To supply heated air to the feet, the driver needs to lower the lower damper lever down.
When driving at high speeds, the air flow through the air intakes moves intensively, so it is not necessary to turn on the fan. But if the movement speed is not enough, the fan creates forced circulation.
Using dampers and a fan, the driver controls the stove - sets the speed of air movement, the degree of its heating and the area of distribution.
https://youtube.com/watch?v=hMBsbOiQ67s
Radiator repair
Remove severe contamination by washing with cleaning agents. To do this, unscrew the metal tubes from the radiator, after which we fill the heat exchanger with a cleaning agent, give time for the substance to take effect, and then rinse the radiator with running water.
As cleaning agents, use special liquids for cleaning radiators or use traditional methods (citric acid solution).
If flushing does not help and the radiator is blown through with force, only mechanical cleaning can help. But it is not always advisable to do this, since you will have to disassemble the radiator and unsolder it. It is not always possible to put it back together qualitatively.
As for leaks due to cracks, if they appear on the tubes, it is easier to buy new tubes than to repair the breakdown. If the radiator itself is leaking, try to solder the crack (if the radiator is made of brass). Radiators made of brass lend themselves well to soldering, but this work should be entrusted to a professional.
Aluminum radiators cannot be soldered, so if a crack forms, they are replaced.
Before installing the heater radiator in place, evaluate the condition of the foam rubber seal installed in the heater body around the perimeter of the heat exchanger seat. If the seal is in a condition unsuitable for further use, we replace it.
Installing the radiator and assembling the stove is carried out in the reverse order to that described above.
In this case, pay special attention to the places where the tubes connect to the radiator - it is better to replace the rubber seals, tighten the fasteners well
After assembling the stove and connecting it to the cooling system, during the first time the car is used, you need to periodically inspect the pipe connections for leaks.
A malfunction in the heating system of a domestic car is a fairly common occurrence. And while you can ignore this in the summer, problems with the stove in the winter cause a lot of trouble.
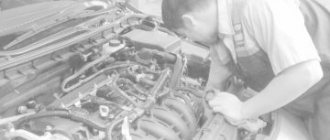
Sometimes the cause of a malfunction can be minor breakdowns, which can be repaired very quickly. However, serious malfunctions in the operation of the stove often occur that cannot be corrected without dismantling it. In this article we will look at how to change the VAZ-2107 stove on your own without the help of specialists.
Replacing the heater valve VAZ 2107
Once the faucet starts leaking, it needs to be replaced. This is quite easy to do. To do this, prepare a standard set of tools and prepare to work inside the car.
https://youtube.com/watch?v=97BWnGrgRCw
Replacement procedure:
The car must be placed on a flat surface, and an empty container must be placed under the radiator. A wide trough with a capacity of at least 10 liters is ideal for this.
The width of the container is most important. Unscrew the cap located on the car radiator and drain the antifreeze from it into a pre-prepared trough. Do not leave the car during the draining process and monitor it completely, as it happens that drivers confuse a complete drain with a simple clogged drain hole
If necessary, clean it and continue draining the antifreeze. As soon as the radiator is empty, move the container under the engine and find a special bolt on the left side of the block. Unscrew it and drain the coolant from the engine cooling system. Thus, the system is freed from antifreeze and then the tap can be easily removed.
Unscrew the hoses from the heater radiator and unscrew the heater tap mounts. It is located on the right side of the stove inside the car. To get to it, you need to twist the bottom shelf. Remove the cable in advance and dismantle the old element. After the faucet is removed, clean the installation site from the remains of the old gasket and dust and install a new faucet along with a new gasket. During installation, use automotive sealant for cooling systems. This way you will save yourself from the problem of poor sealing of the fastening. Instructions for using the sealant are contained directly on its packaging. After securing the faucet and installing the cable, attach the hoses in place and tighten all drain plugs. Pour antifreeze into the cooling system and put back the lower shelf in the car.
To avoid air locks, you can use two methods. The first is to open the radiator cap and press on all the pipes going to the engine until air bubbles stop coming out from under the cap. The second method is the simplest. The car is placed on a hill with the front facing up. The radiator cap is also unscrewed, and the driver intensively gases the engine.
This completes the replacement of the heater heater valve. As you noticed, this is not a complicated procedure at all and does not require you to have much knowledge in the field of car repair and maintenance. It is enough to have a minimal understanding of how the system works.
Preparing for repairs
First of all, it is necessary to install the VAZ-2107 on an inclined surface so that the front part is lower than the rear. In this case, you will completely drain the liquid from the cooling system. To do this, you need to place a container of at least 10 liters under the engine, then unscrew the plug with a key to “13”. It is also necessary to drain the remaining fluid from the radiator.
Carry out all work only on a cooled engine. Otherwise, you can get severe burns. The liquid must be drained with the stove tap open. But if you can’t open it, you need to loosen the lower pipe and drain the liquid from it.
Replacing the heating valve on a VAZ 2107
Having discovered a leaking faucet, the owner of the “seven” will be forced to replace it. This device cannot be repaired, since it is not possible to find spare parts for the VAZ membrane valve on sale (and besides, it is very difficult to disassemble the body of the standard membrane valve on the “seven” without breaking it). So there is only one option left: replacing the part. But before we start, let's decide on the tools. Here's what we need:
- set of spanners;
- pliers;
- crosshead screwdriver;
- new fuel valve for VAZ 2107 (preferably ceramic).
Sequence of work
First of all, you need to turn off the engine of the VAZ 2107 and cool it well. This usually takes 40 minutes. Without this preparatory operation, any touch to the heating tap can lead to serious burns to your hands.
- Now the interior of the car opens. The screws holding the storage compartment and glove compartment are unscrewed. The glove compartment is carefully removed from the niche, allowing access to the fuel tap from the passenger compartment.
- The hose through which antifreeze enters the heating radiator is removed from the tap pipe. To do this, the clamp that holds the pipe is loosened with a screwdriver. After this, the hose is pulled off the pipe manually.
Important nuances
There are a couple of important nuances that should not be forgotten when installing a new fuel tap. Here they are:
- A new faucet always comes with several rubber gaskets. They must be installed without fail, even if it seems that the gaskets of the old faucet are practically not worn out and will still serve. The fact is that standard VAZ tires, from which old gaskets are made, last a year, or two at most. After this, microcracks appear in it, which are impossible to see with the naked eye. But gradually the network of cracks grows, and the tap begins to leak again. Therefore, installing new gaskets on the tap is mandatory;
- The second point is related to the operation of the crane lever. Before closing the hood, be sure to check whether this lever works well. More precisely, whether the length of the cable is well adjusted, and whether this cable allows you to fully open and close the tap. It often happens that the old cable after installing a new tap turns out to be half a centimeter shorter, as a result of which the tap cannot close completely due to the tension of the cable. If such a picture is observed, you should remove the fastening tip, loosen the nut on it, and pull out a little cable from it (usually there is a reserve of a couple of centimeters in the tip). After this, the tip should be put back on the tap lever and check whether the tap closes tightly;
- The third point is related to checking the tightness. Before closing the hood after installing the faucet, you should open the new faucet, then start the engine and let the car run for half an hour. During this time, the antifreeze will have time to heat up. If the tightness is broken somewhere, an antifreeze leak will occur, which will be difficult to miss. If no leaks are observed after running the engine for half an hour, the procedure for installing a new faucet can be considered complete.
So, even a novice car enthusiast can change the fuel tap on the “seven”. This does not require any special knowledge or skills. You just need to have a basic understanding of the design of the VAZ 2107 heating system and strictly follow the above recommendations.
How to change the heater tap on a VAZ 2107 yourself
There is an opinion among car enthusiasts that the VAZ 2107 heater valve is replaced when it leaks. This is not entirely true. In most cases, it has to be changed due to jamming, which is caused by contaminants deposited inside. And this unpleasant fact is discovered when you try to open or close it when the ambient temperature changes - in spring or autumn. Of course, there are times when the faucet starts to leak, and there is a wet spot on the carpet under the passenger’s feet, caused by leaked coolant.
In both cases, there is only one solution - immediate replacement of the heater tap. To do this, you need to purchase a new faucet (preferably ceramic), spare rubber gaskets for the faucet and pipe, and a clamp with a diameter of up to 23 mm, if you have not already installed it to replace the factory one. Some owners of VAZ cars install a regular plumbing tap instead of the standard factory heater tap. This option has a number of advantages, but it is not applicable for VAZ 2105 and 2107 cars due to the presence of air ducts that block access to it. Replacing the faucet does not require the use of special tools; you will need:
- Key to 7;
- Key for 10;
- Pliers;
- Phillips screwdriver.
Let’s immediately answer the question of what caused the replacement of a conventional faucet with a ceramic one. Practice has shown that a ceramic faucet is better, as it is devoid of all the disadvantages of a standard one. At the same time, it fully complies with all requirements, both in terms of fastenings and throughput. It is for these reasons that experts recommend replacing the standard VAZ heater tap with a new one that has a ceramic shut-off element.
Work is carried out on a cooled engine to avoid possible burns. First you need to disconnect the supply pipe under the hood.
Next, in the cabin we remove the storage shelf and the glove compartment housing, under which there is a heater tap. In VAZ 2105 and 2107 cars, to gain access to the valve, you need to remove the right air duct, while in other classic models there is no air duct.
It is necessary to remove the air duct on a VAZ 2107 especially carefully, since in addition to the fastening nut, which is easily unscrewed with a 10mm wrench, it is held tightly by latches. You should carefully remove the air duct from all latches without breaking them, otherwise the tightness of the air supply system will be compromised and, as a result, its efficiency will be reduced. If, despite all care, the air duct is damaged, it is better to replace it or carefully seal it during assembly. Next, the heater tap is directly replaced:
The bolt securing the control cable casing is unscrewed and its tip is removed from the crane lever;
- The two bolts securing the faucet to the stove are unscrewed, and two points must be taken into account: Secure the lower nut in the groove so that it does not fall out. This can be done using plasticine;
- When you remove the valve from the heater, some coolant will leak out. Therefore, it is better to place a sponge or rag under it;
- The entire structure is removed from the body;
- The metal adapter intended for fitting the supply pipe is unscrewed.
The old heater valve has been removed, you can begin installing the new one. This involves replacing the old rubber gaskets with new ones.
The work is carried out in the reverse order and should not cause any difficulties, except for one thing - when fixing the control cable casing, make sure that the movement of the heater valve control lever completely opens and closes it. Otherwise, you should adjust the fastening of the casing until a positive result is achieved. Next, you need to put on and tighten the supply pipe with a clamp.
Before you begin assembling the air duct, you must ensure that the system is tight. To do this, you need to start and warm up the engine. This way, you will ensure that there are no leaks at the heater valve mounting points and remove any possible air pockets in the cooling system. If everything is fine and the coolant does not leak, you can safely reinstall the air duct, glove box housing and shelf. Lastly, check the coolant level and add if necessary.
This completes the replacement of the stove tap. Having done this work yourself once, in the future you will be able to replace the stove faucet without any problems. You just need to remember the features of the VAZ 2105 and 2107 in case you need to replace the tap in other VAZ cars.
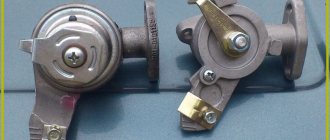
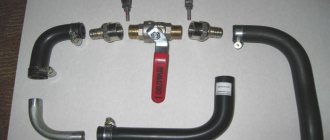
Types of fuel taps
Since the fuel tap on the VAZ 2107 is an extremely short-lived device, after two years of operation of the tap the driver will inevitably face the question of replacing it. However, fuel taps vary in both reliability and design. Therefore, it is worth understanding them in more detail.
Diaphragm type tap
A membrane-type valve was installed on all “sevens” that ever came off the assembly line. It is very easy to find this crane for sale: it is available in almost every spare parts store. This part is inexpensive - only 300 rubles or so.
The membrane heating valve on the “seven” has never been reliable
But the car owner should not be tempted by the low cost of a membrane tap, since it is very unreliable. And literally in two or three years the driver will again see coolant leaks in the cabin. Therefore, you should set the diaphragm fuel valve to “seven” only in one case: if the car enthusiast has not found anything more suitable.
Fuel ball valve
A ball fuel valve is a more acceptable option for installation on a VAZ 2107. Due to its design features, a ball valve is much more reliable than a diaphragm valve. The shut-off element in ball valves is a steel sphere with a small through hole in the middle. This sphere is attached to a long rod. And this entire structure is built into a steel body, equipped with two pipe threads. To open the tap, it is enough to turn its stem 90°.
The main element of the ball valve is the steel locking sphere
With all the advantages, the ball valve has one significant drawback, which makes many drivers refuse to buy it. The sphere in the tap is steel. And although faucet manufacturers claim that these spheres are made only of stainless steel, practice shows that in aggressive antifreeze they very easily oxidize and rust. Especially during the long summer downtime, when the tap is not opened for several months. But if the driver is forced to choose between a diaphragm valve and a ball valve, then, of course, he should choose a ball valve. The price of ball valves today starts from 600 rubles.
Faucet with ceramic element
The most reasonable solution when replacing the fuel tap on a VAZ 2107 would be to purchase a ceramic tap. Externally, this device is practically no different from a ball and diaphragm valve. The only difference is in the design of the locking element. It consists of a pair of flat, tightly fitted ceramic plates placed in a special sleeve. This sleeve has a hole for the rod.
Ceramic tap - the best option for the VAZ 2107
When the rod turns, the distance between the plates increases, opening the way for antifreeze. The advantages of a ceramic faucet are obvious: it is reliable and not subject to corrosion. The only drawback of this device is the price, which can hardly be called affordable and starts at 900 rubles. Despite the high price, the driver is strongly recommended to purchase a ceramic faucet. This will allow you to forget about antifreeze leaking into the cabin for a long time.
Water tap
Some drivers, tired of constant problems with the standard “Seven” fuel tap, solve the problem radically. They go not to the auto parts store, but to the plumbing store. And they buy an ordinary water tap there. Usually this is a Chinese ball valve for pipes with a diameter of 15 mm.
Some drivers install regular water taps on the VAZ 2107
Such a faucet costs 200 rubles maximum. After this, the standard diaphragm valve from the “seven” is removed, a hose is passed into the niche where it stood, and a fuel valve is attached to the hose (it is usually secured with steel clamps, purchased at the same plumbing store). This design lasts a surprisingly long time, and in case of corrosion and jamming, the procedure for replacing such a tap takes only 15 minutes. But this solution also has a drawback: the water tap cannot be opened from the cabin. Every time the driver wants to use the heater, he will have to stop the car and climb under the hood.
Speaking about water taps, I can’t help but recall one story that I personally witnessed. A driver I know installed a Chinese crane under his hood. But he categorically did not want to jump out into the cold every time to open it. He solved the problem in the following way: he slightly expanded the niche in which the standard faucet had previously been located using ordinary metal scissors. He drilled a hole on the handle that opens the water tap. He inserted a hook made from an ordinary long knitting needle into this hole. He brought the other end of the spoke into the salon (under the glove compartment). Now, in order to open the tap, he just had to pull the knitting needle. Of course, such a “technical solution” cannot be called elegant. However, the man still solved the main task - not to climb under the hood every time.
Purpose and principle of operation of the heater tap on the VAZ 2107
In short, the purpose of the stove tap is to give the driver the opportunity to switch between “summer” and “winter” modes of heating the interior. To understand what we are talking about, you need to understand how the heating system of the “seven” works.
So, the VAZ 2107 engine is cooled by antifreeze circulating in the so-called jacket. Antifreeze passes through the jacket, picks up heat from the engine and heats up to a boil. This boiling liquid must be cooled somehow. To do this, antifreeze is directed through a system of special pipes from the jacket to the main radiator, which is continuously blown by a massive fan.
Passing through the main radiator, the antifreeze cools and goes back into the engine for the next cooling cycle. The radiator (which in the early “sevens” was made exclusively of copper) becomes very hot after antifreeze passes through. And the fan, which continuously blows on this radiator, creates a powerful flow of hot air. In cold weather, this air is directed into the cabin.
In addition to the main radiator, the “seven” has a small heating radiator. It is on this that the heating tap is installed.
In winter, this tap is constantly open, so that hot antifreeze from the main radiator goes to the stove radiator, heating it too. The small radiator has its own small fan, which supplies heated air directly into the car’s interior through special air lines.
In summer there is no need to heat the interior, so the driver closes the heating tap. This makes it possible to use a heating fan without heating the interior (for example, for ventilation, or when the windows are fogged up). That is, a heating tap is necessary to quickly switch between small and large antifreeze circulation circles in the “seven” heating system.
Other actions
Owners of VAZ-2107 cars are well aware of most of the intricacies of repairing their iron horse with their own hands. Anyone who does not disdain such an activity understands perfectly well that replacing a part in a given car can be much easier than getting to it. Therefore, if you have disassembled almost half of the torpedo, you should take the opportunity and carefully inspect all those spare parts that are in your public domain.
It is necessary to pay attention to possible malfunctions that are visible to the naked eye, a violation of the tightness of the same stove, as well as signs of a possible imminent failure of some other spare part
DIY guide for replacing the heater valve on a VAZ 2107 car
The heater valve is part of the cooling system. How well the stove will work in winter depends on its serviceability. The article discusses malfunctions that require replacing the radiator heater valve on a VAZ 2107 car, and also provides step-by-step instructions on how to do it yourself.
When is it necessary to change?
The car heater valve is designed to regulate the supply of coolant. If it is open, the coolant enters the radiator in a heated state and heats the air coming from outside, circulating thanks to the fan. The heated air serves to heat the interior in winter. In the summer, the tap shuts off the flow of coolant into the radiator, and it goes bypassing the stove, so it does not affect the microclimate of the cabin.
Replacing the heater tap is necessary if it becomes jammed. This occurs due to oxidation of the locking mechanism, as well as contaminants that are deposited on the internal walls.
Often the stove faucet has to be replaced if it begins to leak, which is a consequence of depressurization of its body. In this case, the coolant level in the expansion tank decreases, a wet spot appears on the floor under the front passenger’s feet, which is formed due to a leak, and a specific smell of antifreeze or antifreeze appears.
Basically, the body of the heater valves cannot be disassembled, so their repair is impossible. If a malfunction is detected, the part must be replaced (video author: Jena Pon).
Replacement instructions
Repair of the heater tap consists of replacing it. This is not a complicated procedure, so the repair can be done at home.
Tools and materials
To carry out the procedure, you need to prepare the tools and necessary materials:
- a set of keys;
- Phillips screwdriver;
- new tap;
- pliers;
- clamp with a diameter of about 23 mm;
- rubber gaskets;
- rags;
- sealant;
- container for draining working fluid;
- coolant.
When deciding which is better, a ceramic faucet or a metal one, it is better to purchase a product with a ceramic locking mechanism. It meets all requirements for throughput and fastenings. In addition, it will last a long time, since ceramics are not subject to oxidation processes.
Stages
To make repairs more convenient, it is better to install the car on an inspection groove or drive it onto an overpass or lift.
For safety reasons, work should be performed with the engine cool.
Replacing the VAZ 2107 heater valve is carried out in stages:
- Work begins with draining the coolant. To do this, first remove the crankcase protection.
- Next, place the prepared container under the radiator, unscrew the drain cap on the radiator and drain the coolant.
- At the next stage, open the hood and look for the pipes going to the heater radiator. They are located closer to the passenger side. We loosen the clamps by unscrewing the fastenings with a screwdriver and disconnect the pipes. Using a “7” wrench, unscrew the mounting bolts holding the radiator.
- To complete the next stage of work, you need to move into the passenger compartment. Using a Phillips screwdriver, unscrew the screws that secure the glove box body. We dismantle the glove box.
- Next, unscrew the screws that secure the storage shelf and dismantle it.
- Under the shelf there is a faucet for the stove. To access it, you need to remove the right air duct. To do this, you need to unscrew the bracket nut with a “10” key and unhook the air duct from the latches that secure it.
- Having unscrewed the bolt securing the cable casing that controls the faucet with a key “7”, remove the tip from the faucet lever.
- Having unscrewed the fastening bolts, we dismantle the faucet.
- We install a new part in its original place, changing the gaskets and lubricating the place of contact with the radiator with sealant.
- We fasten the cable, checking its tension. The parts are installed in place in the reverse order.
- Next, tighten the cap on the radiator and fill in antifreeze or antifreeze. We check that there are no leaks anywhere. Now you can screw on the glove compartment.
This completes the replacement of the VAZ 2107 stove valve. Knowing how to replace a VAZ injector heater faucet and doing everything yourself, you can save on servicing your car at a car service center.
Tools and Safety
You don’t need any special tools for repairs; prepare:
- new faucet;
- keys for 7 and 10;
- Phillips screwdriver;
- pliers;
- container for draining coolant.
Carry out repairs on a cool engine to avoid burns.
The choice was made on the tap, article number 2101-8101150. Which, according to the description, contains two ceramic shut-off elements that prevent the faucet from “souring” and guarantees complete tightness. Well, time will tell.
How does the heater valve system work?
The fact is that, as you know, antifreeze is used to cool the engine. This is a special liquid that the car owner pours into the radiator. This liquid tends to heat up and thereby reduce the engine temperature. It is this already hot liquid that is sent to the interior heater radiator and a gradual heating of the air is observed. But this only happens when the heater tap is open. If it is closed, the air no longer becomes warm. After all, a car radiator is connected not only to the engine cooling system, but also to the fan. And as you know, it takes in cold air from outside, which passes through the radiator and heats up only if there is a supply of antifreeze. The more the heater valve is open, the more the air in the cabin will heat up and vice versa. This principle is still used on the “sevens” today. But later models, starting with the VAZ 2108, also have a damper that automatically regulates the temperature. The faucet in this case works as described above, and the damper determines the direction of the air. When it is open, the air flows completely into the radiator, where the tap is open. When the damper is closed, air no longer flows through the radiator. A combined option is often used, when part of the air comes from outside and the other from the radiator. As for controlling the damper, this occurs simultaneously with the control of the tap.
Forward and reverse sequence
Replacing the stove tap itself does not cause any difficulties. You need to start working when the engine has cooled down by disconnecting the supply and return pipes. Then carefully and carefully provide access to the tap by removing the shelf and glove compartment body. The seven differs from other classics in that it still has the right air duct in that place, which you also cannot do without removing. Now, everything is actually ready to replace the tap:
- unscrew the cable fastening and remove its tip from the lever;
- unscrew the two nuts that secure the faucet to the stove;
- put a rag down, because when removing the tap, a small part of the antifreeze is guaranteed to leak;
- remove the tap with the adapter for the supply pipe.
We install the tap with the adapter pre-screwed to it in the reverse order, carefully monitoring the accuracy of the connections and the tightness of the entire structure. Before fixing the cable, make sure that the control lever opens and closes the stove valve all the way. And at the very end, don’t forget to add antifreeze to the cooling system and enjoy the well-deserved warmth inside your car.