The cold weather is coming, so it is extremely important that the heating system of your VAZ 2114 works properly. There could be a great many reasons for her refusal to work.
To prevent breakdowns, you should periodically check the condition of all elements of the stove and carry out preventive measures. However, it is not always possible to keep track of everything.
Today we will talk about the stove valve, which often becomes the cause of heater failure. Let's look at the main causes of breakdowns and ways to eliminate them.
Main malfunctions of the VAZ 2114 heater valve
It is not clear why, but it is this element of the cooling system that fails more often than others. This usually happens in the fall, when there is a need to use a heater. There are only two main reasons for crane failure:
- souring of the locking device;
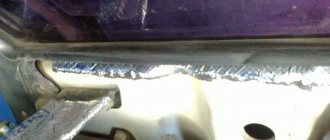
- depressurization of the housing (leaking).
In the first case, it turns out to be impossible to open or close the tap. Oxidative processes inside lead to the elements of the locking mechanism sticking to each other.
Using force to remove constipation can lead to its complete destruction. This breakdown is not critical, and allows you to operate the car in the warm season. It is enough to simply block the flow of air into the cabin using a damper.
If a leak is detected, it is not recommended to use the car. Violation of the tightness of the valve body is manifested by the following symptoms:
- decrease in coolant level;
- presence of a characteristic odor in the cabin;
- the appearance of a greasy coating on the windshield;
- traces of coolant on rubber mats or carpet under the glove compartment.
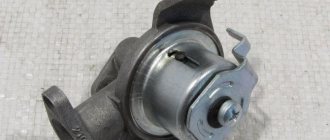
It is worth noting that the heater valve has a non-separable body, which is why it cannot be repaired. Only replacing it will help here.
Operating principle of the device
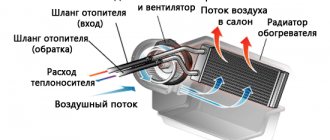
The heater valve serves as a tool for controlling the flow of coolant that flows through the radiator of the so-called heater. It is opened with the onset of cold weather, when there is a need to warm up the windshield and interior. Passing through the radiator, the working medium heats the air pumped by the fan. In the warm season, there is no need for additional heating, so the tap must be turned off.
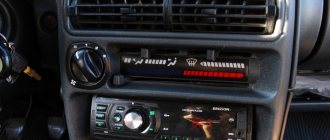
It is easy to control the flow of warm air when the system is working properly: in winter, to open the tap, just move the lower lever to the right (“red zone”) on the climate control panel in the cabin. Accordingly, in the summer, in order to shut it off, you need to turn the tap to the left (“blue zone”). We should not forget that we also need a stove in the summer. At this time, it serves for ventilation. The damper, which blocks the flow of coolant in a small circle through the radiator or bypasses it, is actuated by a cable from a lever on the panel.
Causes of breakdowns
It so happens that replacing the VAZ-2114 heater tap occurs more often than working with other elements of the car’s heater. Apparently, even at the production stage, the engineers did not think through this unit well.
The heater valve breaks for two reasons:
- Locking devices become sour. Because of this, the driver cannot open or close the tap. Oxidation provokes sticking of the locking elements to each other. If you use force, you risk breaking the locking devices. This is not so scary in the warm season, since air flows can be controlled by dampers. How to check the faucets of the VAZ-2114 stove for souring? Just give it a spin. If this requires a lot of force, the element is worn out and needs to be replaced.
- Violation of tightness. Depressurization entails a leak of coolant. Such a breakdown is indicated by a decrease in the coolant level, the appearance of a smell of antifreeze or antifreeze inside the car, the formation of greasy spots on the windshield and traces of coolant on the floor (in the glove compartment area, at the feet of the front passenger). Checking for leaks is easy. If it is broken, you will notice it immediately by characteristic signs.
Important! The stove faucet has a non-separable body. Therefore it is impossible to repair it. If an element breaks, you only need to replace it.
Work algorithm
The faucet can be replaced in two ways - with full or partial drainage of antifreeze.
The first option is suitable for those who decide to simultaneously replace the antifreeze. Before starting work, unscrew the drain plugs and wait for the coolant to drain into the container, after which we proceed to remove the assembly.
Replacement with partial drainage is suitable for those who have a supply of antifreeze for refilling. We place a container under the car at the junction of the cooling system pipe with the tap and disconnect this pipe, after which we lift its end up and fix it in this position. The loss of antifreeze will be 1.0-1.5 liters (it will drain from the heater), while the coolant will remain in the cooling system, but we will replace it after the work is completed.
Replacing the faucet of the VAZ-2114 stove is carried out using the following technology:
Loosen the clamps
Disconnecting the heater tap rod of the VAZ 2114
- We place the car on a pit or overpass and wait until the engine cools down (not completely, but so that it remains warm).
- Drain the antifreeze (partially or completely).
- We disconnect the coolant supply and drain from the faucet on the side of the engine compartment.
- In the passenger compartment, remove the side decorative trim of the console on the passenger side.
- We loosen the clamps securing the pipes to the faucet fittings in the cabin and disconnect the pipes, having first placed a rag under them. If you plan to replace the pipes, you can disconnect them from the heater radiator and remove the faucet along with the pipes.
- Disconnect the control mechanism cable from the locking diaphragm axis lever. If it is not possible to separate them from the passenger side, then you can get to them from the driver’s side (after first removing the plastic trim).
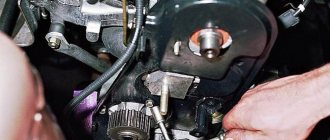
- We climb under the car. We find two nuts securing the faucet body to the engine shield and unscrew them and remove the washers from the studs.
- We move into the cabin and remove the unit.
We recommend: How to replace antifreeze on a VAZ-2109
Assembly is performed in the same sequence as dismantling.
Video: How to replace a stove faucet. Simply and easily.
Tools and spare parts
However, it is possible to change the faucet of the VAZ-2114 stove yourself and this will require not so many tools and spare parts:
- replacement valve (diaphragm, ceramic or ball);
- new clamps;
- pipes (if those installed on the car have lost their elasticity);
- antifreeze;
- container for collecting coolant;
- wrenches for 10 and 13 (heads with extensions are possible);
- screwdrivers (phillips, flat);
- rags.
For ease of work, you will need an inspection hole or overpass, since during the removal and installation process you will have to climb under the car.
HOW TO CHANGE THE STOVE TAP WITH YOUR OWN HANDS?
You will need a pit to work with because the heater valve is located at the bottom of the hood, under the side trim on the passenger side. Replacing the stove valve on a VAZ 2114 is carried out in several stages:
- On the faucet, you need to brush the fasteners, rinse them with brake fluid, and leave them for a while so that the fluid cleans the threads on the studs and the nuts are easier to unscrew. To wash studs, it is better to use WD-40, if available. This is an important stage in the work, because rusted bolts can grab the nut so much that unscrewing them becomes problematic. Sometimes when unscrewing nuts, the bolts need to be held with an additional wrench or pliers.
- In the cabin, remove the side trim. Now you can see the pipes leading to the tap. Loosen the hose clamps and remove the hoses one by one. At the same time, keep a container with antifreeze near you, which you immediately place under the emptied pipes so that the remaining antifreeze flows out.
- If you decide to replace the hoses, they must also be released from the radiator. But if they are in satisfactory condition, then when you start assembling, you will only need sealant.
- Return to the pit and use a 10mm wrench to unscrew the nuts holding the tap in place.
- Go back to the body again and try to remove the heater valve of the VAZ 2114 towards the passenger seat. In this position, remove the lock and release the cable that controls the tap.
- Now you can install the new faucet. First put the cable on it, secure it with a spring clip, and only then can you screw it into place. Install O-rings between the valve and the body. Use sealant to secure the stove pipes in place. Don't forget to pour the antifreeze back into the radiator at the end.
Replacing the stove valve of the VAZ 2115, as well as the VAZ 2113, is carried out in the sequence described above. The design of the heater in these VAZ models is the same as that of the VAZ 2108.
What to do if there is a leak in the heater core?
We have already found out that the cause of fluid leaking into the car body may be a leak from the radiator of the heating stove.
Remember, if you notice antifreeze leaking inside your car, never delay repairs even for a short period! Most antifreeze contains toxic substances, the entry of which into the body through the respiratory tract is very dangerous for your health.
Next, you will read about replacing a leaking furnace radiator:
- First you need to pour antifreeze. Next, you will need to disassemble the panel in the cabin (console, glove compartment, sides). Unscrew any screws and bolts, and also for convenience, collect them in a small container (for example, a glass or wooden box). Please note that there is an invisible screw on the console and you should not forget about it.
- After you remove everything unnecessary and give yourself access to the radiator, you will need to first loosen the clamps on the pipes and then free them, of course, not forgetting about the container for draining the antifreeze that will flow out of them. Next, you are faced with the task of removing and replacing the VAZ 2114 stove, and in particular the heating radiator.
- Assembly is completely different. Secure the working radiator in place. A little advice for making it easier to put on rubber pipes, which experienced car owners reveal. The bottom line is that you need to lubricate the fittings with soap. It is advisable to install the clamps in good working order, having purchased them in advance complete with the radiator.
- Next you need to assemble the panel, installing the glove compartment and everything else. When assembling the panel, we advise you to pay attention to ensuring that everything is secured correctly. Check the adjustment of the cables after installing and fastening them, pay attention to the fastening and functioning of the valve and faucet.
- It is very important when you pour liquid into the radiator to check that there are no air pockets. In order to avoid them, you will need to remove one of the hoses and release the air from it, and then install it again in the same place.
If you followed our instructions and were able to install everything as needed, then the problem of antifreeze fluid leaking will no longer bother you, and since the cabin will become warm and comfortable, your trips will become much better!
Articles
- 2108-8101204-20 – internal outlet hose;
- 2108-8101200-20 – supply internal hose;
- 2108-1300080-10 – clamp;
- 2108-8101150 – crane (AvtoVAZ);
- 2108-8101150-12 – faucet with ceramics (Yavva LLC);
- 21082-8101208 – external outlet hose;
- 2108-8101206 – external supply hose.
Replacing the VAZ-2115 heater tap most often worries the owner of a domestic vehicle in two cases - if the switch has soured or the motorist has discovered an antifreeze leak that has occurred in the housing.
Heater valve VAZ-2115
The VAZ-2115 heater valve, which required repair due to the first problem, is most often changed in the spring-autumn period, when with the onset of the first noticeable cold or spring warmth, the motorist does not turn on the switch, fixing it only in one extreme position (closed or open) . As a rule, souring of an element occurs due to its being in one position for a long time.
In turn, replacing the stove tap due to a second malfunction is the result of normal aging of the seals.
The heating must always be in working order, if, for example, the first case does not threaten the car owner with huge problems in the future, then the second situation should be paid attention to immediately, the cost of the consequences of such an antifreeze leak can result in a cost that is several times higher than the price of the faucet. It is worth noting that, along with other important procedures, qualified specialists recommend replacing the stove filter every fall; this element of the system is often clogged with leaves and other debris, which reduces the flow of air entering the cabin.
Reasons for replacement
If the heater valve fails, it will have to be replaced. There are two main reasons that lead to the need for such a procedure.
| Cause | Explanation |
| Oxidation | Due to oxidation, the performance of the faucet is significantly reduced. This is not the most difficult problem, but difficulties may arise when constantly opening and closing the faucet. It's better to replace it right away |
| Coolant leak | This problem is more complicated and can bring more problems. This is due not only to the likelihood that the interior will be filled with antifreeze, which will have to be washed out. Coolant leakage leads to engine overheating. |
Agree, it would be a shame to spend a lot of money on restoring or even replacing the power unit if the reason for this is a banal breakdown of the stove faucet.
To prevent such problems, we strongly recommend that at the first sign of failure of this unit, you take appropriate repair actions.
We recommend: Everything you need to know about the operation of the fuel pump in a VAZ 2106 car
How to determine a breakdown
There are several ways to detect that something is wrong with the stove:
- Inspect the unit visually;
- Check the current coolant level and monitor it if it drops sharply;
- Raise all the carpets inside the cabin, determine if there are any traces of coolant on the floor;
- Check the operation of the radiator;
- Make sure that the pipes through which the liquid passes are intact.
Traces of leakage
If the warm air supply regulator, that is, the faucet, cannot be repaired, it cannot be repaired, then be sure to urgently replace the unit. To do this, it is not at all necessary to go to a service station. This kind of work can easily be done with your own hands.
Choice
Before replacing, you must purchase a new faucet. Today, manufacturers offer VAZ 2114 owners a choice of three options:
- Factory product;
- Ball valve;
- Regulator made of ceramic plate.
Each of them has its own advantages and disadvantages, so it is impossible to single out a clear favorite among the presented options. Decide for yourself based on the cost and functionality of the unit.
Replacing the heater valve on a VAZ 2114
Today on sale you can find taps with a metal shut-off device and with a ceramic one. The latter are considered more reliable, as they are resistant to oxidative processes, however, as far as tightness is concerned, models with a metal lock are in no way inferior to them.
There are also valves with a ball locking mechanism, but they are also not particularly reliable. The table below shows the models of heater valves for the VAZ 2114. The price of the valves varies from 150 to 350 rubles, depending on the model.
| Manufacturer | Catalog number | Material locking mechanism |
| OAT DAAZ | 21080-810115000 | Metal |
| AvtoVAZ | 21080-810115000 | Metal |
| Tsn-Citron | 8.5.2 | Metal |
| "Road map" | 21080-8101150 | Ceramics |
| JAVVA | 2108-8101150 | Ceramics |
| Luzar | 2108-8101150 | Ceramics |
Tools and supplies you will need to replace the faucet:
- set of wrenches;
- Phillips and flat screwdriver;
- pliers;
- container for collecting drained coolant;
- rag.
First, we place the car on an overpass or in a pit. Let the engine cool down. Next you need to drain the coolant. This can be done by unscrewing the drain plug (key 13) on the cylinder block, after opening the expansion tank, or through the drain hole at the bottom of the cooling radiator.
Next, we find under the hood on the front passenger side two pipes leading into the cabin. Using a Phillips screwdriver, loosen the worm clamps and remove the hoses. If coolant leaks from them, substitute a container and use a rag.
Now let's go to the salon. In the front passenger seat at the bottom left we look for the pipes going from the radiator to the heater tap. For convenience, remove the left panel cover covering the radiator. Loosen the clamps securing them and disconnect the hoses. If liquid leaks, use a rag.
When the hoses are disconnected on both sides, go back under the hood and unscrew the 2 nuts on the studs securing the pump housing. Here we use the key for 10. We move into the salon and pull the tap towards us. Using pliers and a flat-head screwdriver, disconnect the drive cable of the faucet locking mechanism, after first removing the bracket that holds the rod.
We remove the broken heater tap. We begin the installation of a new faucet by attaching the cable and pipes going to the heater radiator.
Then we reassemble in reverse order. Once installation is complete, do not replace the panel cover. After pouring coolant into the radiator, start the engine and warm it up until the fan turns on.
We check the operation of the system by opening the damper, turning on the heater fan, and moving the valve control lever left and right.
We periodically visually inspect the faucet and the connection points to it for leaks. If everything is fine, replace the instrument panel cover.
Choosing a new faucet
VAZ-2114 owners are often interested in what is better to choose instead of the old faucet and how to find a good, proven element.
Some will say that only the original faucets for the stove on the VAZ-2114 perform well. This is actually a misconception. In fact, the locking mechanism of such taps is based on a rubber membrane, and the duralumin body rusts and sours. Their only advantage is the price. The cost of a new faucet will be up to 120 rubles. But if the car is used frequently, the elements will have to be changed every year.
If you are replacing the stove tap, choose one of two options. Decide for yourself which faucet to choose, based on your available budget. Both elements are good:
- Ceramic. The locking mechanism is made of ceramic, and the body is made of high quality plastic.
- Ball. The essence of such a locking mechanism is a ball with holes.
The following manufacturers can be distinguished:
- YAVVA;
- Citron;
- Road map;
- DAAZ;
- Luzar (Luzar).
Modernization methods
Experienced drivers prefer to remove the short-lived heater valve from the system, replacing it with a pair of fittings. During warmer times, a regular water tap is often installed instead (it is recommended to take an Italian one).
Drivers often prefer fittings to the heater valve
The advantage of such modernization is the increased reliability of the heating system. The downside is the inconvenience: to open the tap, you have to crawl under the hood.
Owners of 110 series cars (which include the VAZ 2114) should know that the tap in the heating system is a short-lived thing. Changing it is not difficult - you can do this procedure yourself, without using special tools.
Hello everyone. Do you close the stove tap for the summer?
Antifreeze to Maximum
by Adminrive · Published 01/02/2016
Dunlop sport max 19550 in good condition
by Adminrive · Published 02/19/2016
Node malfunctions
There are three faults in the valve of the VAZ-2114 stove, but if they occur, the unit must be replaced, since it cannot be repaired.
Crane breakdowns:
- Incomplete opening/closing of the channel. It occurs due to wear at the junction of the axle and the shut-off valve. As a result, a significant backlash appears, due to which, even when the valve lever is moved to the extreme position, the damper does not open the channel completely. This malfunction negatively affects the performance of the stove.
- Gate valve jammed. This happens because the tap has not been used for a long time and the moving element has become stuck and does not move. Attempts to open with force result in the rupture of the connection between the axle and the valve or the formation of strong backlash, which causes the valve to also become inoperable.
- Loss of tightness. The tightness of the unit is ensured by seals on the damper axis. If these elements are worn out or damaged, the liquid flows out through the mounting hole of the axle. This malfunction does not affect the performance of the stove, but antifreeze leaks will appear in the interior.
We recommend: When to change the fuel filter
The first two faults can only be identified visually by removing the valve from the car. As for the loss of tightness, a symptom of a breakdown will be traces of antifreeze on the floor mat in the cabin. And since a leak can occur due to leaks at the junction of the pipes with the heater elements, when leaks appear, first of all, find the location of the leak. If the faucet leaks, there will be traces of antifreeze on the body.
Assembly nuances
When installing, it is better to immediately connect the control mechanism cable to the damper lever, and only after that install the faucet into the engine shield. This will make assembly easier.
When replacing the faucet, we replace all the clamps, and coat the joints of the pipes with the fittings with heat-resistant sealant.
After assembling and filling the cooling system with antifreeze (topping up), we check all connections for leaks. Often air pockets form in the heater radiator, which must be expelled, otherwise the stove will not work. It would be a good idea to check the connections between the pipes and the faucet for leaks the first time after replacement.
Finally, we note that often the cause of a malfunction of the stove tap is a jammed damper. To prevent this from happening and to ensure that the unit lasts as long as possible, use the tap during periods when it is least used - open and close it so that the valve does not stick. These measures are quite enough to maintain the mobility of the shut-off part of the faucet.
WHY DOESN'T THE OVEN TAP WORK?
One of the reasons for a non-working faucet is souring. As a result of corrosion under the influence of chemical liquids, the flag loses its mobility, and the tap stops opening or closing. If this happened when the tap was open, then warm air will flow inside even when no one needs it.
Sometimes a failed heater faucet in a VAZ 2114 leads to air in the system, the stove does not heat, and cold air enters the cabin.
But the most common defect is a leaking stove tap. Antifreeze gets into the car body and stains the floor mats. In both the first and second cases, it is necessary to replace the VAZ 2114 heater valve.
If you find antifreeze under your feet, do not rush to immediately buy a new faucet. The leak can come from a burst pipe; even the heater radiator can leak. First, find out where the antifreeze is leaking from, and only then go to the auto parts store to make purchases.
Dismantling and replacing the stove valve on a VAZ-2114
It seems that to replace the faucet on a VAZ-2114 you need to remove the instrument panel. In reality, it will be enough to remove the side trim piece, as well as the glove compartment. The main rule is to unscrew all the screws that you can see.
Right sidebar
The result of our efforts is what is shown below.
The result of dismantling the cladding
And now you can see two “internal hoses”. What to do next is clear to everyone.
What can you see under the cladding on the right?
Loosen the clamps installed on the faucet side and remove the hoses. By the way, antifreeze may leak here (it is poisonous).
Under the hood
Below, near the partition, you can see two “external hoses”. Loosen the clamps and remove the hoses from the pipes. Next, use a spanner to unscrew the two nuts (see photo).
All the actions performed under the hood
Let's go to the salon.
In the cabin
Without disconnecting the rod, remove the faucet (photo 1). Then immediately remove the “holder” (photo 2). And then, by pulling the assembly outward, it will be possible to remove the mechanical rod completely.
Three final steps
As you can see, everything is simple. Installation is carried out in reverse order.
Replacing the VAZ 2114 stove tap with your own hands (step by step)
Work is performed on a cold engine:
- Unscrew the side panel of the center instrument panel on the passenger side or remove the panel completely.
- Place rags under the faucet and the passenger's feet.
- Open the hood and unscrew the clamps of the heater outlet and inlet hoses, remove the pipes from the faucet and drain the liquid into an empty container.
- Move into the cabin and use a Phillips screwdriver to unscrew the fastening clamps of the heater radiator pipes to the faucet. Remove them and place a container to drain the coolant.
- Using pliers, remove the crane lever rod bracket and remove it from the hole in the lever.
- Then move under the hood again and unscrew the two fastenings of the faucet to the shield.
- Move into the cabin and remove the faucet.
- Install the new faucet in its place.
- From the engine compartment, secure it with two nuts. It is recommended to pre-lubricate them with anticorrosive agent.
- Move into the cabin, open the faucet completely and tighten the bracket.
- Place the pipes on the engine compartment and passenger compartment sides and secure them well.
- Fill with coolant if drained completely. Or unscrew the nipple on the throttle assembly and pour liquid into the tube until it is full.
- Replace the pipe, start the engine, warm it up, tighten the clamps of the faucet pipes and turn on the heater.
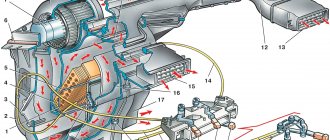
A little theory
The heated liquid moves from the thermostat to the tap, and then it either enters the radiator “30” or exits directly into the outlet pipe. These are two different cases corresponding to the extreme positions of the engine (MAX/MIN). If you look at the drawing, everything will become clearer.
This is what the heater assembly looks like
Shown here: 6 – outlet hose; 8 – supply hose; 7 and 27 – clamps (4 pcs.); 26 – internal outlet hose (to the radiator); 28 – supply internal hose (from the radiator), 33 – clamp.