Cars admin26.02.2020
Mechanical chain tensioner. This is the first “tuning” part that should be installed in a car of the Niva family. An engine from the 60s of the last century, with an oil pump that is designed to drive oil on a 1.2 liter engine, not exceeding the speed threshold of 4000 rpm. What do AvtoTAZ designers do? They hang a hydraulic chain tensioner on the poor little oil pump and also, to make it not at all boring, 8 hydraulic supports. What do we have as a result? A small furry northern animal that crept up very close. Russia produces tanks and missiles well, but everything that the “designers” contribute to the design of the Fiat engine is rejected by it.
How to check the hydraulic chain tensioner of a Niva Chevrolet
The hydraulic tensioner is designed to adjust the chain tension in the Niva Chevrolet.
Since this part plays an important role, the engine cannot operate without it. Over time, any part can wear out, especially for those parts that constantly rub against each other or rotate, and the timing chain can stretch during operation. Chain stretching, experts say, is normal. That is why a hydraulic tensioner is installed on the car.
Checking the timing chain tensioner
By pulling the chain away from the sprocket, you can determine the degree of its stretch. A mandatory check of the degree of chain elongation must be carried out every 70-100 thousand kilometers .
It is necessary to check the timing chain tension every 100 thousand km.
If extraneous noise is noticeable in the engine compartment, it is important to pay attention to the chain before the end or start of such a run.
Location
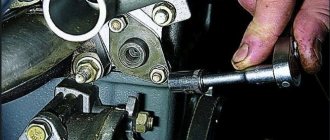
This device is located in the Niva Chevrolet in the engine compartment on the passenger side. The hydraulic tensioner is located under the cooling system pipes on the engine block.
Replacing the hydraulic chain tensioner on a Chevrolet Niva with a manual one
If the chain stretch is large, then the hydraulic tensioner should be changed. It is also important to simultaneously replace the chain, gasket and oil seal. Replacement is carried out in this order :
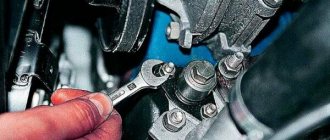
- Using a key set to “10”, unscrew the tube through which fluid flows into the hydraulic tensioner.
Using a 10mm socket, unscrew the two nuts securing the tensioner to the cylinder head.
The old hydraulic tensioner can no longer be repaired.
Assembly order
- The new device is inserted into its seat.
- Screwed with two bolts to the engine housing.
- A tube is connected through which fluid flows to the tensioner.
If the car has already traveled 100,000 kilometers, but there is no extraneous noise from the chain in the engine compartment area, then you still need to inspect it for damage and stretching.
Video about replacing the timing chain hydraulic tensioner Niva Chevrolet
conclusions
As you can see, to carry out this work you do not need to have any special knowledge or tools. Therefore, you can handle this kind of work yourself if necessary . If you follow these recommendations, it is impossible to carry out such repairs incorrectly.
The part designed to regulate the chain tension in a Niva Chevrolet car is called a timing belt (gas distribution mechanism) hydraulic tensioner. In the Chevrolet Niva timing system, the hydraulic tensioner performs a very important function, so engine operation without such a part is simply impossible. Over time, all parts of a car tend to wear out. Rotating parts of cars are especially prone to wear, weakening, stretching and breaking. This part includes the timing chain, which stretches over time and wears out. Chain stretching is normal but must be addressed. It is to eliminate chain stretch that a hydraulic tensioner is installed in the timing system. It has a wear property that is detected by loosening the chain to half the sprocket tooth.
How to detect a fault
You can detect a weakened tensioner on a Chevrolet Niva by checking the chain pulls away from the sprocket. But such a check requires removing the protective casing from the car, which is extremely irrational in cases of uncertainty about the proper operation of the tensioner. Therefore, it is recommended to carry out a mandatory check of the chain for tension after 60-100 thousand km. But, if the driver notices a rustling sound in the hood area, which resembles the sound of a diesel engine, then it is important to pay attention to this before the trip. This evidence of a rustling sound indicates that the chain has become loose and is hitting the teeth of the sprockets. Therefore, having discovered such a characteristic sound, it is worth urgently checking the tension.
Where is the device located in the Chevrolet Niva and what does it look like?
The device is located on the passenger side under the hood of the car. Having opened the hood, you need to find the cooling pipes in the area of the front of the cylinder head, under them the hydraulic tensioner itself is located. A photo of the device that is installed on the Chevrolet Niva is located below.
Location of the part in the car
Components and principle of operation of the hydraulic tensioner
As you can see in the photo, the device has a cylindrical shape; it is screwed on the outside with a lid with a small hole through which oil flows. Inside the device there is a small ball and a spring, which ensures free flow of oil in one direction and does not release it in the opposite direction. Inside the device body there is a cylinder with rings. On the inside of the housing walls there are spiral notches that have an inclined shape. When the chain is loosened, the piston, under pressure in the housing, moves to a certain notch on the housing wall. When the tension occurs, the body notches do not allow the piston to take its original position. It is carried out by engaging the piston rings with one-sided notches. This is how the tension device works.
How is the hydraulic tensioner replaced on a Chevrolet Niva?
If chain stretching is detected and the decision is made to replace only the hydraulic tensioner, then this is an incorrect assumption. It is necessary to replace all parts: chain, hydraulic tensioner, seals, gaskets. Replacement is done in the following sequence, using all the necessary tools:
- Use a spanner wrench to unscrew the tube fitting, which has a “10” head. The tube is designed to supply oil to the hydraulic tensioner.
- Having loosened the fitting, the tube is removed and moved upward so that it does not interfere with further work.
- The two nuts securing the device itself are also unscrewed using a “10” wrench.
- The device is ready to be removed from its mounting location. We grab the protruding part with our hands and pull out the device. There is a gasket on it, which also needs to be removed to replace it with a new one.
- A used device cannot be repaired and requires the installation of a new one. Before installation, it is necessary to coat the gasket with a layer of sealant to prevent oil leakage.
Replacing an old device does not require serious mental and especially physical effort. Installation of a new one is carried out in the following steps:
WORKSHOP: HYDROTENSIONER. WHAT THE CHAIN MADE NOISE ABOUT
For example, few people think about how valve timing changes if the drive chain and sprockets are heavily worn. This leads to dangerous vibrations, due to which the damper breaks off - but without it, the chain whips against the sprockets even more strongly. The valve timing also varies, tracking such fluctuations. You can rest assured that the engine will not become more powerful or more economical, not to mention durable.
Sometimes I want to exclaim: why does everything new (“progressive”) in our automobile industry turn out to be a source of problems for car owners and for us, repairmen? Here is one of them. By opening “Behind the Wheel” (2001, No. 5 and 2002, No. 1), you will learn how the timing chain hydraulic tensioner works. The idea is great - not like a primitive mechanism that requires periodic adjustment of the chain as it wears out! Before you is a product of the most advanced “hydraulic thought”: as soon as oil under pressure enters it, the plunger extends and, pressing the shoe, tensions the chain. But “the action force is equal to the reaction force” - as soon as the chain is tensioned, the volume of oil in the cavity between the check valve body and the plunger will be locked (the ball will sit in the seat). All! The length of the tensioner is fixed until the chain lengthens. Then the plunger will extend further... Excellent automation.
But listening to the noise of the Niv-21213 (their 1.7 liter engines are equipped with a hydraulic tensioner), I was more than once wary: “Something is wrong in the timing belt!” It is known, after all, how the “jokes” with the chain end if it jumps over the teeth of the sprockets. The minimum is bent valves... Like in the theater: if a gun hangs on the wall, it will eventually fire.
We didn't have to wait long. This client’s Niva arrived on a tow truck - an hour earlier he called, complaining about a “terrible roar”... For obvious reasons, without starting the engine, we removed the valve cover: wow - the chain jumped over four teeth! It dangles as if there is no tensioner. They removed it and saw that the plunger was stuck in the recessed position: the return spring had failed. We tried to pull out the plunger, but we couldn’t either, it was firmly seated! But remember: if the check valve is working properly, how could the oil escape from under the plunger?
Where is the Niva Chevrolet hydraulic chain tensioner located and its malfunctions
The hydraulic tensioner plays an important role in the mechanism that distributes the gas. Without this device, the engine will not operate. Over time, rotating parts weaken and stretch, and may even break. The timing chain wears out, and this is natural, you just need to correct the situation in time. An unsuitable gas separating mechanism chain will make it impossible for you to operate a normally functioning vehicle. That is why it is necessary to install a hydraulic chain tensioner on a Niva Chevrolet car.
Checking the serviceability of the tensioner
Checking whether the tensioner is loose is not at all difficult: you need to pull the chain away from the sprocket. It is advisable to regularly check the hydraulic tensioner for serviceability, for example, every hundred thousand km. If a car owner notices some unusual sound in the hood, similar to the noise of an engine, he should immediately check the tension. The part is located under the hood, opening which you will find the cooling pipes. It is under these parts that the hydraulic tensioner is located.
Replacement
If the chain is stretched, then you need not only to change the hydraulic tensioner, but also all other parts, that is, additionally change the chain, seals and gaskets. In order to change the hydraulic tensioner, you do not need to have deep knowledge or remarkable strength. Every owner of a Niva Chevrolet car can do this.
We invite you to read the detailed instructions:
- Unscrew the tube fitting using a spanner. Remove the tube, otherwise it will interfere with further work.
- Now unscrew the two nuts securing the hydraulic tensioner.
- Remove the device from its seat. Pull out the gasket together with the hydraulic tensioner - it needs to be replaced with a new one.
- Be sure to replace the device with a new one; it cannot be repaired. Check whether the design of the new hydraulic tensioner is identical to the old used model. Before installing it, coat the gasket with sealant. This must be done in order to avoid oil leakage.
- Secure the installed device with two fastening nuts.
- Now insert the tube and secure it.
As you can see, everything is quite simple. You don't have to worry about doing something wrong.
Well, you simply won’t be able to install the hydraulic tensioner incorrectly. After installation, be sure to check how the motor works, as well as the tension of the new chain.
After reading this article, you, dear motorists, now know how to reinstall the hydraulic tensioner without going to a service station. If your car has traveled more than a hundred thousand kilometers, it is necessary to check the chain tension, even if no characteristic sounds were noticed.
Timing belt 21213, specifics
single-row timing belt 21213
The photo shows a single-row timing belt 21213, which has already been checked and run-in. Set contents:
- Single row chain 21214
- Set of Rusmash stars
- Tensioner shoe, tensioner shoe shaft, short chain guide
- Front crankshaft cuff (Rezinotekhnika)
I'll try to explain why the new kit is better. The difference in losses between the SAME single-row and double-row circuits in terms of efficiency (efficiency) is relatively small. According to theory, about 4-5%. But we have an “ace of trumps” in our pocket. The double-row chain in timing belt 21213 is bush-type, that is, the roller does not rotate, the so-called “heavy chains”. The single-row chain that goes to this timing belt is a bush-roller chain, the rollers rotate, these are “light chains”. But in this case, the difference in friction losses is no longer a few percent, but tens of percent. There is a separate article about this bushing-roller chain. And of course, friction losses on the rubber and plastic shoe of the tensioner are clearly not in favor of the old design. Now about the chain tensioner for this unit. I recommend installing “Rusmash”. The point is this: the tensioner shoe 21213 has an iron base, and the shoe 21214 is plastic, and the TZA tensioner, with its sharp nose, will slowly break it. Mechanical tensioners were discussed in more detail earlier.
Hydraulic chain tensioner: device and principle of operation
As you know, a car engine uses a belt or chain drive for the gas distribution mechanism. The last type appeared a little earlier and is considered the most reliable. But recently the chain has become irrelevant among foreign manufacturers. But for now, domestic GAZelles and Nivas (including the Chevrolet Niva) are equipped with just this type of drive. In today's article we will look at the design of the timing chain hydraulic tensioner, its operating principle and the replacement procedure.
Mechanism characteristics
This element performs the function of adjusting the chain tension in the gas distribution mechanism drive. It is installed on all cars with this drive. The hydraulic chain tensioner compensates for low tension. Over time, the part wears out. When the motor is running, the chain constantly rotates and tends to stretch. It gets to the point where the part jumps one or more teeth. As a result, incorrect gas distribution occurs. As a result, late or early closing of the intake and exhaust valves occurs. Chain stretching is completely normal. Over its lifespan, it can stretch one to two centimeters. The hydraulic chain tensioner smoothes out this stretching.
Device
This unit consists of several parts:
- Valve bodies.
- Locking ring.
- Plunger.
- Springs.
- Retaining ring.
Also, the hydraulic chain tensioner (Niva Chevrolet is no exception) has a hole for oil supply.
How does it work?
The principle of operation of the element is based on the operation of a spring. As oil from the line flows through the valve body, the plunger presses against the plastic tension shoe. Some engines use a lever with an asterisk. Thus, continuous contact of the surface of the working element is ensured. When engine speed changes, the element plunger moves back. The spring is compressed.
How to check the hydraulic chain tensioner?
It is necessary to monitor the appearance of new knocks in the engine compartment. If impacts are detected at the cylinder head cover, this indicates a faulty tensioner. These sounds are clearly audible when the accelerator pedal is suddenly released.
Where is he located?
This element is located in the engine compartment on the left side. You need to find the cooling pipes in the front of the cylinder head - it is under them that the hydraulic chain tensioner is located.
How to change?
If the symptoms described above are observed, an urgent replacement of the hydraulic chain tensioner is necessary. To do this we need a new element, as well as a set of heads. Using a 10mm wrench, unscrew the fitting of the cylinder head cooling tube and move it upward.
What to do if the replacement did not help?
It happens that the knocking noise does not go away even after replacing the tensioner. In this case, you need to check the length of the chain itself. After 150 thousand kilometers it can stretch so much that even a new tensioner cannot compensate for it. Therefore, when this mileage is reached, the chain also changes.
Is it possible to repair the old one?
An old hydraulic chain tensioner can be repaired in 60 percent of cases. But first you need to make sure that it is faulty. To do this, press the spherical end of the element with your finger. If it does not press, then the tensioner is jammed.
Manual chain tension
To eliminate the characteristic knocking sound of the chain drive in the valve cover area without changing the element itself, you can manually tighten the part. Let's look at how this procedure is performed using the example of a VAZ-2106 car. Here a sprocket is used in the tensioner.
The cost of this element ranges from 500 to 900 rubles. If you don’t have time for repairs, you can limit yourself to purchasing a new tensioner assembly.
Conclusion
So, we have found out the structure and operating principle of the hydraulic chain tensioner. Remember that driving with knocking noises under the hood can cause engine damage. If the chain is stretched, it begins to vibrate. The valve timing will be disrupted. Follow the replacement schedule and listen to the operation of your engine.
Hydraulic timing chain tensioner Niva Chevrolet. Where is it located, what does it look like, how to change it
The part designed to regulate the chain tension in a Niva Chevrolet car is called a timing belt (gas distribution mechanism) hydraulic tensioner. In the Chevrolet Niva timing system, the hydraulic tensioner performs a very important function, so engine operation without such a part is simply impossible. Over time, all parts of a car tend to wear out.
Rotating parts of cars are especially prone to wear, weakening, stretching and breaking. This part includes the timing chain, which stretches over time and wears out. Chain stretching is normal but must be addressed. It is to eliminate chain stretch that a hydraulic tensioner is installed in the timing system. It has a wear property that is detected by loosening the chain to half the sprocket tooth.
Components and principle of operation of the hydraulic tensioner
1 – tensioner body; 2 – valve unit; 3 – check valve ball; 4 – limit pin; 5 – tensioner plunger; 6 – volume limiter; 7 – plunger spring; B – working cavity; C – installation groove; D – hole; E – reserve cavity.
Oil from the lubrication system through tube 3 (see Fig. 2-11) enters cavity “E” (Fig. 2-46) of the tensioner, then through hole “D” and valve assembly 2 enters working cavity “B” and presses onto plunger 5. In tensioner body 1 there is a hole with a diameter of 1 mm for bleeding air from cavity “E”.
The diametrical gap between body 1 and plunger 2 should be 0.018–0.024 mm and is measured as the difference between the maximum measured diameter of plunger 2 and the minimum measured diameter of body 1.
During repairs, the tensioner body and plunger form a pair in which replacing one part with another after selecting the gap is not allowed. Plunger 2 must move in body 1 without jamming by a stroke of 16 mm.
When installed on the engine, the tensioner must be free of oil, pin 4 must not protrude from the housing.
As can be seen in the figure, the device has a cylindrical shape; it is screwed on the outside with a lid with a small hole through which oil flows. Inside the device there is a small ball and a spring, which ensures free flow of oil in one direction and does not release it in the opposite direction.
Inside the device body there is a cylinder with rings. On the inside of the housing walls there are spiral notches that have an inclined shape. When the chain is loosened, the piston, under pressure in the housing, moves to a certain notch on the housing wall. When the tension occurs, the body notches do not allow the piston to take its original position. It is carried out by engaging the piston rings with one-sided notches. This is how the tension device works.
How to detect a fault
You can detect a weakened tensioner on a Chevrolet Niva by checking the chain pulls away from the sprocket. But such a check requires removing the protective casing from the car, which is extremely irrational in cases of uncertainty about the proper operation of the tensioner. Therefore, it is recommended to carry out a mandatory check of the chain for tension after 60-100 thousand km.
But, if the driver notices a rustling sound in the hood area, which resembles the sound of a diesel engine, then it is important to pay attention to this before the trip. This evidence of a rustling sound indicates that the chain has become loose and is hitting the teeth of the sprockets. Therefore, having discovered such a characteristic sound, it is worth urgently checking the tension.
Where is the device located in the Chevrolet Niva and what does it look like?
The device is located on the passenger side under the hood of the car. Having opened the hood, you need to find the cooling pipes in the area of the front of the cylinder head, under them the hydraulic tensioner itself is located. A photo of the device that is installed on the Chevrolet Niva is located below.
How is the replacement made?
If chain stretching is detected and the decision is made to replace only the hydraulic tensioner, then this is an incorrect assumption. It is necessary to replace all parts: chain, hydraulic tensioner, seals, gaskets. Replacement is done in the following sequence, using all the necessary tools:
Use a spanner wrench to unscrew the tube fitting, which has a “10” head. The tube is designed to supply oil to the hydraulic tensioner.
Having loosened the fitting, the tube is removed and moved upward so that it does not interfere with further work. The two nuts securing the device itself are also unscrewed using a “10” wrench.
The device is ready to be removed from its mounting location. We grab the protruding part with our hands and pull out the device. There is a gasket on it, which also needs to be removed to replace it with a new one.
A used device cannot be repaired and requires the installation of a new one. Before installation, it is necessary to coat the gasket with a layer of sealant to prevent oil leakage.
Replacing an old device does not require serious mental and especially physical effort. Installation of a new one is carried out in the following steps:
- The device is inserted into the new seat, having first checked that the structure is identical to the old tensioner.
- Screwed in with two fastening nuts.
- The tube is inserted and secured.
It is simply impossible to make a wrong replacement. After installation, the operation of the motor and the tension of the new chain are checked. An important point is to replace the timing chain in order to 100% protect the car and your health from unexpected breakdowns on the road. This article will tell you how to replace the chain.
Now the owners of the Chevrolet Niva can, without doubt and without errors, correct the existing problem with weakening the chain tension. Remember that if your car has traveled more than 100 thousand km, and there are no characteristic sounds from under the hood, then do not neglect the situation, but disassemble and check the looseness of the chain and the functionality of the tensioner. Happy renovation work!
Installing a new element
Before installing a new tensioner, if it is a plunger tensioner, it must be “charged”. This concept hides the need to completely insert the plunger into the housing before installation.
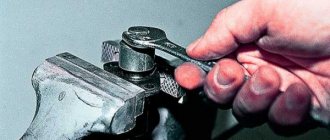
To do this, the new element is clamped in a vice, but so that it does not damage the body.
Then use a 13 key to loosen the cap nut, and the plunger will come out of the body under the action of a spring.
Next, the tensioner is removed from the vice. Then, holding it by the mounting ears with your hand, you need to rest the plunger against a hard surface and press on it so that it goes into the body.
While holding it in this position, tighten the cap nut to secure the plunger.
Afterwards, the “charged” tensioning mechanism is installed in place and secured with two nuts.
In order for the tensioner to operate and extract, you need to loosen the cap nut again, after which you will hear a click indicating that the plunger has come out and extracted.
How to replace the hydraulic chain tensioner on a Chevrolet Niva
The timing hydraulic tensioner is a part whose main purpose is to tension the chain of a Chevrolet Niva car to ensure the normal functioning of the gas distribution mechanism. The timing system in cars plays an important role in ensuring smooth engine operation. It is very important to monitor the condition of this unit, since over time, drive parts can weaken and wear out. The timing chain in a Niva Chevrolet stretches over time. This is a completely normal phenomenon, but it is necessary to identify it in time in order to eliminate it before serious problems arise. To compensate for chain stretching, the system is equipped with a hydraulic tensioner. But over time it wears out and requires replacement when the chain weakens to half the sprocket tooth.
How to identify a malfunction in time.
You can detect a loose tensioner in a Chevrolet Niva by pulling the chain away from the sprocket. To check, it is necessary to remove the protective cover from the timing chain. This work requires certain skills and special equipment, so it is problematic to carry out it whenever there is a suspicion of chain stretching. Therefore, to identify faults, you need to adhere to the regulations, which recommend checking and replacing every 60-100 thousand kilometers. The malfunction can be indirectly determined by the rustling sound that appears when the circuit is loosened. This sound is similar to a running diesel engine and occurs during a cold start.
Tensioner location.
The tensioner is located under the hood, on the passenger side. You can find it under the cooling pipes, in front of the cylinder block.
The principle of operation of the tensioner.
The tensioner has the shape of a cylinder, which is screwed on top with a lid, with a hole for oil supply. The hole is closed by a small ball, which is pressed by a spring to ensure oil flows into the housing and prevent it from leaking out. A cylinder with rings moves inside the housing. When the chain is released, the cylinder moves inside the housing under oil pressure. After the chain is loosened, the cylinder is prevented from returning to the initial position of the notch on the body.
Replacing the hydraulic tensioner.
When a chain stretches, you cannot limit yourself to just replacing the tensioner. For high-quality repairs, it is also necessary to change the gasket seals and chain.
To replace, you will need the following procedure and set of tools:
- a 10mm wrench to disconnect the fitting of the oil supply tube to the hydraulic tensioner.
- After this, the fitting is loosened and the tube is pulled upward.
- Using a 10mm wrench, remove the nuts that hold the tensioner.
- After this, the device can be removed and a new one installed.
- An old timing belt tensioner cannot be repaired. Before installing a new spare part, the seat must be coated with sealant to prevent oil leakage.
Installing a new part is carried out in the reverse order:
- The tensioner is inserted into the seat. The part must be identical to that recommended by the manufacturer.
- Tightened with two nuts. When tightening, you do not need to exert excessive force so as not to break the thread.
- We fix the tube for supplying oil to the hydraulic tensioner.
It is important to remember that without replacing the timing chain, the problem may not be corrected, since the chain may be stretched so much that this wear will not be compensated by a new tensioner.
Removing the cylinder head cover
Place the machine on a pit or ramp.
First, the holders of the brake booster pipe and the throttle valve drive cable should be disconnected from the cylinder head cover. They are mounted on special brackets on the left and right sides of the block.
Next, use a 10mm wrench to unscrew the bolt securing the air duct couplings. Move it aside. Next, using a screwdriver, slightly loosen the clamp of the crankcase ventilation pipe, which connects it to the air duct. Now use a 10mm socket to unscrew the bolts holding the cylinder head cover. The order is not important here.
OLYMPUS DIGITAL CAMERA
After that remove:
- brackets for the throttle cable and motor screen;
- lid pressure washers;
- ventilation and air hoses.
Next, all that remains is to remove the cylinder head cover.
