Purpose, location and design of the VAZ 2113–15 stove
Unlike classic Zhiguli models, the VAZ 2113–15 stove copes with its duties quite well. If it is in good working order, the inside of the car will always be warm. The air flow distribution system is also implemented quite well, so the windshield, even in severe frost, is completely cleared of ice in a few minutes.
Purpose of the heater
The main function of the stove is to heat the interior and windshield. Hot air supplied through the duct system to the windshield prevents it from freezing in winter. In the warm season, the stove is used for forced ventilation of the interior.
Location and design of the stove
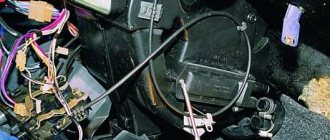
The VAZ 2113–15 stove is located in the front part of the cabin under the center console of the dashboard. Only the heater controls and deflectors through which air flows are brought into the cabin.
The interior heater of the VAZ 2113–15 is closed by the center console
The stove consists of the following elements:
- casing;
- radiator;
- tap;
- inlet and outlet pipes;
- electric motor with a cylindrical impeller;
- windshield defroster;
- control valve;
- foot air damper;
- control module (mode switch, resistor, damper control levers).
Operating principle of the stove
The operation of the stove is based on heat exchange between the heated coolant (coolant) and the air entering the cabin. The basis of the design is the radiator. It is a system of tubes within which heated coolant supplied from the power unit circulates. The tubes are equipped with thin lamellas, allowing for more efficient heat transfer to the air.
The radiator is covered by a casing, which is the body of the stove. On one side there is an electric fan that pumps air into the device. By varying the fan rotation speed with a switch that changes the resistance of a special resistor and located on the central panel, you can regulate the intensity of the air flow entering the cabin.
Circulating between the radiator lamellas, the air heats up and enters the passenger compartment through air ducts located in the front part of the heater. The distribution of flows is carried out using three dampers, one of which (control) regulates (opens or closes) the flow of air into the cabin, and the other two (air blowing for the legs and windshield) change its direction.
The basis of the design of the interior heater is the radiator
The stove can be completely disconnected from the engine cooling system using a tap that shuts off the coolant supply to the radiator of the heating system.
Diagnosis of stove malfunctions
The design of the stove is quite simple. It would seem that there is nothing to break here. The heater cannot break down completely, since its design consists of components independent from each other. However, some elements can fail quite often. These include:
- radiator;
- tap;
- pipes;
- resistor;
- mode switch.
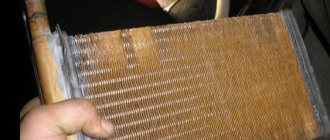
Heater radiator malfunctions
The main reasons for the failure of the stove radiator:
- clogging;
- the appearance of a leak (depressurization).
In the first case, deposits accumulate on the inner walls of the radiator tubes. They can form as a result of:
- long-term operation of the radiator;
- use of low-quality coolant;
- getting dirt, friction products, water, etc. into the cooling system.
As a result, the circulation of antifreeze in the heater radiator is disrupted or completely stopped, and the air entering the cabin does not have time to heat up normally. In winter, it will be cold inside the car, and defrosting the windshield will become a real problem.
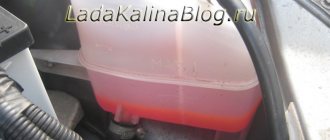
A leak in the radiator can appear as a result of corrosion and drying out. Coolant leaking from the heater usually forms a puddle on the floor under the panel on the passenger side. In addition, a characteristic odor will appear in the cabin, and an oily coating will form on the windshield due to evaporation of the coolant, reducing the driver’s visibility. The latter is especially true when driving against the sun or at night, when oncoming traffic is moving with its headlights on.
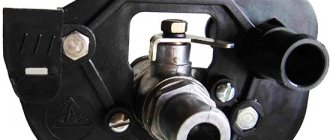
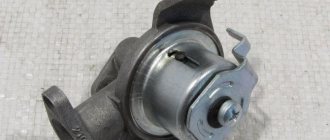
Stove tap leaking
The stove valve may fail for two reasons:
- souring of the locking mechanism;
- drying out of the device casing.
If the stove has not been used for a long time, the tap may become sour. In this case, when trying to open the tap, you should not use much force, as you can damage the tap itself or break the control cable.
When the housing dries out, the leak may not be immediately noticeable. But after some time, signs similar to those of a radiator leak will appear (a puddle of coolant on the floor, a pungent odor in the cabin, an oily coating on the windshield).
If the heater valve is faulty, coolant begins to leak into the cabin.
Wear of pipes
Antifreeze from the heater radiator may begin to leak through the inlet and outlet pipes as a result of their wear under the influence of chemically active substances included in the coolant and high temperature. In addition, the pipes can be damaged if the clamps that ensure the tightness of the connections are over-tightened.
There are a total of four pipes in the heating system of the VAZ 2113–15 - two in the engine compartment, connecting the engine to the tap, and two in the cabin, going from the tap to the heater radiator. Coolant leakage can occur in different ways. In one case, the antifreeze will flow onto the engine protection and onto the street, in the other - into the car interior. In any case, it will appear as:
- drop in coolant level in the expansion tank;
- puddles forming under the car or in the cabin;
- the appearance of an unpleasant odor in the cabin.
Resistor failure
The stove resistor consists of two windings and serves to change the resistance of the electric current supplied to the fan. The fan motor can operate in three modes, which can be changed using a switch.
Product delivery options
Note! Below are the shipping methods available specifically for this product. Payment options may vary depending on the shipping method. Detailed information can be found on the “Delivery and Payment” page.
Parcel by Russian Post
Available payment methods:
- Cash on delivery (payment upon receipt)
- Using cards Sberbank, VTB, Post Bank, Tinkoff
- Yandex money
- QIWI
- ROBOKASSA
Shipping throughout Russia. Delivery time is from 5 to 12 days.
Parcel by Russian Post 1st class
Available payment methods:
- Cash on delivery (payment upon receipt)
- Using cards Sberbank, VTB, Post Bank, Tinkoff
- Yandex money
- QIWI
- ROBOKASSA
Shipping throughout Russia. Delivery time is from 2 to 5 days. More expensive than regular delivery by Russian Post, approximately 50%. Parcel weight up to 2.5 kg
Express Parcel EMS
Available payment methods:
- Cash on delivery (payment upon receipt)
- Using cards Sberbank, VTB, Post Bank, Tinkoff
- Yandex money
- QIWI
- ROBOKASSA
Shipping throughout Russia. Delivery time is from 3 to 7 days. More expensive than regular delivery by Russian Post, approximately 100%.
Transport companies
Available payment methods:
- Using cards Sberbank, VTB, Post Bank, Tinkoff
- Yandex money
- QIWI
- ROBOKASSA
Delivery is possible to any locality where there is a representative office of the transport company. Delivery time is from 2 to 10 days. Sending large parcels is approximately 50% more profitable than by Russian Post.
Courier delivery in Togliatti
Available payment methods:
- Cash upon receipt
- Using cards Sberbank, VTB, Post Bank, Tinkoff
- Yandex money
- QIWI
- ROBOKASSA
Delivery time from 1 to 12 hours.
Pickup from our warehouse
Available payment methods:
- Cash upon receipt
- Credit, installments
- Using cards Sberbank, VTB, Post Bank, Tinkoff
- Yandex money
- QIWI
- ROBOKASSA
Pickup times must coincide with store opening hours.
The operating principle of the power unit is based on the chemical reaction of the fuel supplied to the cylinder in a gaseous state and its ignition element. As a result of the correct relationship of all elements and the choice of ignition moment, the translational movement of the piston is carried out, which is converted through numerous components of the vehicle into linear movement of the VAZ 2108.
When burned, the fuel mixture produces enough heat, the release of which does not affect the overall level of functionality of the engine. But overheating of the VAZ 2109 engine, determined by the cloud of steam billowing from the hood, indicates problems with the cooling system, which are currently presented more dramatically for the car owner. The most obvious symptom is a violation of the integrity of the rubber pipes. Some cooling system problems can be identified by warning signs from foul smells and steam coming from under the hood. Correct operation of the engine depends entirely on the owner’s timely attention to these signs of possible malfunctions.
The removal of excess heat from the engine is carried out by cooling the coolant through a radiator. The connection between the power unit and the remote radiator is provided by rubber pipes that pass the coolant through the radiator tubes, where it is cooled, dissipating excess heat outside the vehicle. The heat exchange process is carried out on a continuous basis, allowing the engine to remain at the optimal temperature.
Carrying out tuning work on the VAZ 2114 requires careful attention to the cooling system, since increased speeds and harsh operating conditions of the engine require significantly maximum heat removal. A powerful power unit with a high level of functionality is equipped with modern, highly elastic rubber products that can withstand a wide temperature range. Rubber is characterized by high thermal stability, and the reinforcement of products with thread preserves their elasticity, increasing the strength of the installed elements.
Repair and replacement of faulty stove elements
It is completely impractical to change the VAZ 2113–15 stove. First of all, this is quite expensive - buying a new stove without a tap and pipes will cost 4-5 thousand rubles. Moreover, replacing the heater is very labor-intensive - you will need to completely remove and then reinstall the panel. The job may take a full day and will require an assistant. It is much easier to identify the faulty element and replace only it.
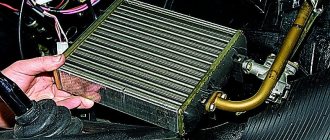
Restoring the stove radiator
If a stove radiator is clogged from the inside, you can try to clean it of scale and deposits with various household cleaning products, such as Comet, Krot, Silit, or other chemically active substances. Some car owners use Coca-Cola for this purpose.
It is better to carry out the flushing procedure with the radiator removed, but you can do without dismantling it. To do this, drain the coolant from the system, remove the pipes from the radiator and pour a cleaning agent inside. Then the engine starts, the heater turns on and runs for several hours. After this, the radiator is thoroughly washed by connecting a hose with running water to it and dried with compressed air.
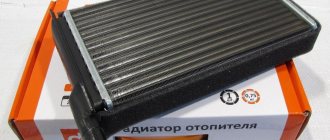
In the event of a leak, restoring the radiator is much more difficult. This can be done by soldering. However, most radiators are made of aluminum, damage in which can only be soldered with a powerful soldering iron using special fluxes and solders. But even in this case, there will be no guarantee that the radiator will be fully operational. It is much easier to replace it - a new product for the VAZ 2113-15 costs about a thousand rubles.
Replacing a stove radiator without removing the panel
The VAZ 2113–15 instruction manual states that access to the radiator can only be achieved after dismantling the panel. However, craftsmen came up with an algorithm for replacing the radiator with only partial disconnection of the panel from the body. To do this you will need:
- crosshead screwdriver;
- keys for 7, 10 and 13;
- a container for draining coolant from the cooling system with a volume of at least 5 l;
- a wide and shallow container for draining liquid from the heater radiator;
- dry rags;
- oilcloth or thick polyethylene film.
The radiator is replaced as follows:
- We drive the car onto an overpass or inspection hole.
- Disconnect the negative terminal from the battery.
- Using a 10mm wrench, unscrew the bolts securing the engine protection and remove the protection.
- Place the container under the drain plug, unscrew it with a 13mm wrench and drain the coolant.
The self-tapping screw is closed with a plastic plug
The instrument panel is secured with four self-tapping screws
The steering column cover is secured with six self-tapping screws
When replacing the radiator, you need to remove the cigarette lighter and radio connectors.
Remove the plastic covers on the damper control levers
The upper part of the console is attached to the sides with two self-tapping screws
To remove the connector you need to unscrew two screws
Before removing the console, you must disconnect all electrical connectors.
The base of the panel is attached to the floor with two screws
On the sides the panel is attached to the body with self-tapping screws at the top and bottom
In the center the panel is attached to the base with self-tapping screws
All connectors are disconnected from the control unit
The partially dismantled panel is pulled back and fixed
The pipes should be removed gradually, allowing the coolant to flow into the container without pressure.
The radiator is secured with four screws
Video: replacing the VAZ 2113–15 heater radiator without dismantling the panel
Replacing the heater tap
To replace the stove tap you will need:
- wrenches 10 (preferably socket) and 13;
- crosshead screwdriver;
- dry rags.
The algorithm of actions is as follows:
- We place the car on the inspection hole, unscrew the bolt plug and drain the coolant.
- In the cabin, unscrew the four screws securing the left panel cover.
- In the engine compartment we find pipes going from the engine to the tap. Use a screwdriver to loosen the clamps and remove the pipes.
The pipes are fixed with metal clamps
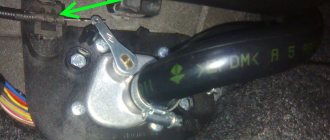
To dismantle the tap, you need to unscrew two nuts with a 10mm wrench
Before dismantling the tap, you need to disconnect the drive cable from it.
The process of replacing the VAZ 2113–15 heater tap is described in more detail here.
Replacing stove pipes
When replacing a heater radiator or heater tap, it is advisable to replace the pipes as well. To ensure access to them, you will need to perform the actions provided for in paragraphs 1–25 of the instructions for replacing the radiator. Then you need to loosen the clamps and remove the pipes from the stove tap from the passenger compartment. After this, the pipes going from the engine to the tap are disconnected from the engine compartment. All this is done using a Phillips screwdriver.
After installing new pipes, do not immediately tighten the clamps too much. First you need to assemble everything, add coolant, start and warm up the engine and check the connections for antifreeze leaks. When the rubber of the pipes warms up, the clamps can be tightened a little more.
Replacing the heater resistor
If the stove fan can only operate in one mode, regardless of the switch position, you need to check the resistor. To do this you will need:
- Phillips screwdriver;
- fine-grained sandpaper;
- multimeter
The work order is as follows:
- Disconnect the negative terminal from the battery.
- Using a screwdriver, unscrew the screws securing the right cover of the center console.
To remove the cover you need to unscrew four screws
The resistor is installed on the heater housing
To determine the health of the resistor, you need to measure the resistance of its windings
Replacing the heater switch
If, after replacing the resistor, the stove fan continues to operate in only one mode, you need to check the switch. To remove it you will need a Phillips screwdriver and tweezers or scissors.
Replaced by removing the panel
For those who do not want to spoil the panel, a method that involves removing it is suitable.
In this case, you will need the same tool as indicated above, except for a metal saw blade.
The main thing here is to have as many Phillips screwdrivers of different lengths on hand as possible.
- Remove the side panels of the center console (see above);
- We dismantle the storage box;
- Remove the center console trim. To do this, remove the tips of the heating system control sliders and the “knob” for turning on the stove fan. We remove the radio. We unscrew the screws securing the trim - at the top of the center console (hidden by a plug), above the dashboard (2 pieces) and under it (on both sides of the steering column);
- Remove the upper part of the steering column casing;
- Pull the console trim towards you. We disconnect all the connectors with wiring from it, having previously marked with a marker where each one was located (you can take a photo). After this, completely remove the cover;
- Unscrew the screws securing the panel to the body (two screws on each side near the doorways);
- We unscrew the screws holding the metal frame of the ECU (at the top under the panel and at the bottom near the floor);
- Remove the screws located above the steering column;
- After this, the panel is up and towards you;
- We move the panel towards us, and then ask an assistant or use a high jack to lift it to provide access to the radiator. You can temporarily put some kind of emphasis;
- Disconnect the radiator pipes (remembering to place a container to collect residual coolant);
- Unscrew the three fastening screws and remove the heat exchanger.
After that, all that remains is to install a new element and put everything back together.
But here are some nuances to consider:
- To reliably fix the connection points of the pipes with the radiator, the clamps should be replaced with new ones;
- It would not be superfluous to coat the joints with heat-resistant sealant;
- After installing a new heat exchanger and connecting a pipe to it, you should immediately check the tightness of the connection by filling the cooling system with antifreeze. And only after making sure that there are no leaks, you can put the panel in place.
As you can see, the second method is more labor-intensive, but the panel itself remains intact.
In addition, with this method, during assembly, you can coat all joints between the panel and the body with sealant to eliminate squeaks.
In general, both methods are good, but each of them has its own advantages and disadvantages. Therefore, which one to use is up to the car owner to decide.
Replacement without removing the panels, can you see the seams?
Sometimes owners of VAZ cars have to deal with such a problem as problems with the car heater. At the same time, it very often happens that the VAZ 2114 stove pipes inside the cabin remain completely cold even when the car is warm, which clearly indicates a problem in the coolant circulation.
WHY DOESN'T THE OVEN TAP WORK?
One of the reasons for a non-working faucet is souring. As a result of corrosion under the influence of chemical liquids, the flag loses its mobility, and the tap stops opening or closing. If this happened when the tap was open, then warm air will flow inside even when no one needs it.
Sometimes a failed heater faucet in a VAZ 2114 leads to air in the system, the stove does not heat, and cold air enters the cabin.
But the most common defect is a leaking stove tap. Antifreeze gets into the car body and stains the floor mats. In both the first and second cases, it is necessary to replace the VAZ 2114 heater valve.
If you find antifreeze under your feet, do not rush to immediately buy a new faucet. The leak can come from a burst pipe; even the heater radiator can leak. First, find out where the antifreeze is leaking from, and only then go to the auto parts store to make purchases.
Subtleties of filling new antifreeze
Before you start filling in new coolant, you need to drain the old one, and also thoroughly clean the entire cooling system of contaminants. To do this, it is better to use a special cleaning agent that can be purchased at a car enthusiast store. Make sure that all taps and plugs of the VAZ-2114 are open. You can determine whether the system has been flushed or not based on the color of the antifreeze flowing out.
The plugs and tap are closed only when the product becomes transparent. If the manufacturer describes in the instructions the specifics of using the cleaning mass, follow these rules for effective cleaning. As for the level of antifreeze filling, some drivers prefer to fill to the limit mark, others deliberately do not top up, and later, after a successful test, add more fluid.
After the antifreeze has been replaced, all that remains is to close the expander and start the car engine. The motor should idle until the furnace fan starts running.
WHICH TAP IS BETTER?
All owners of VAZ 2114, 2115 and other models unanimously claim that the original faucets that are equipped with the stoves of these cars are the most unreliable. The locking mechanism is a rubber membrane. Aluminum housings are susceptible to corrosion and quickly turn sour. True, the price of these parts is low - 80-120 rubles. Apparently, the price is calculated on the fact that the faucets will change every season.
Ceramic faucet is considered the most wear-resistant
But car owners don’t want to crawl under the car every time it gets cold, spoil their shoes with leaking antifreeze, and freeze inside the car. Yes, and this is a troublesome task - replacing the faucet on the VAZ 2114 stove. Therefore, motorists give preference to more reliable models of faucets:
- ceramic, their locking mechanism is made of ceramic plates, and the body is made of high-quality plastic;
- Ball valves, the locking element of which is a ball with holes.
Most VAZ 2114 owners prefer the Yavva ceramic faucet as one of the highest quality and most reliable. Although these models have lower heat transfer than ball models. The latter are susceptible to oxidation, but to a lesser extent than the duralumin models of AvtoVAZ cranes.
HOW TO CHANGE THE STOVE TAP WITH YOUR OWN HANDS?
You will need a pit to work with because the heater valve is located at the bottom of the hood, under the side trim on the passenger side. Replacing the stove valve on a VAZ 2114 is carried out in several stages:
- On the faucet, you need to brush the fasteners, rinse them with brake fluid, and leave them for a while so that the fluid cleans the threads on the studs and the nuts are easier to unscrew. To wash studs, it is better to use WD-40, if available. This is an important stage in the work, because rusted bolts can grab the nut so much that unscrewing them becomes problematic. Sometimes when unscrewing nuts, the bolts need to be held with an additional wrench or pliers.
- In the cabin, remove the side trim. Now you can see the pipes leading to the tap. Loosen the hose clamps and remove the hoses one by one. At the same time, keep a container with antifreeze near you, which you immediately place under the emptied pipes so that the remaining antifreeze flows out.
- If you decide to replace the hoses, they must also be released from the radiator. But if they are in satisfactory condition, then when you start assembling, you will only need sealant.
- Return to the pit and use a 10mm wrench to unscrew the nuts holding the tap in place.
- Go back to the body again and try to remove the heater valve of the VAZ 2114 towards the passenger seat. In this position, remove the lock and release the cable that controls the tap.
- Now you can install the new faucet. First put the cable on it, secure it with a spring clip, and only then can you screw it into place. Install O-rings between the valve and the body. Use sealant to secure the stove pipes in place. Don't forget to pour the antifreeze back into the radiator at the end.
Replacing the stove valve of the VAZ 2115, as well as the VAZ 2113, is carried out in the sequence described above. The design of the heater in these VAZ models is the same as that of the VAZ 2108.
HEATER RADIATOR IS LEAKING
It was said above that one of the reasons for the appearance of antifreeze in the car interior may be leakage from the heater radiator.
Important. If you discover that antifreeze is leaking into the interior of your car, under no circumstances leave repairs for later. Because ethylene glycol, which is part of most antifreezes, is very toxic. And breathing the vapors of this aggressive chemical is dangerous to your health.
Below you will learn how to replace a leaking heater radiator. First of all, of course, you need to drain the antifreeze. Then you get comfortable in the cabin and begin to disassemble the front panel: glove compartment, consoles, sides. Unscrew all the screws and screws. To avoid losing them, collect them on a magnet or in a small plastic cup. There is one hidden screw under the plug on the dashboard console, so be careful.
Main causes of malfunction
There can be several reasons for such problems, but the most common are:
- Worn or damaged pipes.
- Incorrect connection of pipes.
- Broken stove tap.
- Radiator failure.
The first of these reasons - wear of pipes - can occur for natural reasons during operation, since the chemicals contained in coolants have a corrosive effect, which is complemented by the influence of high temperature.
In addition, the hoses of the VAZ 2114 stove can be easily damaged by over-tightening the clamps on them. When such damage occurs, fluid leaks from the system.
In total, VAZ 2114 cars have 4 pipes. Two of them are located under the hood and two in the cabin.
Their damage, which led to a coolant leak, can be judged by the following indirect signs:
- there is a constant drop in the liquid level;
- a specific smell appeared in the cabin;
- A puddle of coolant forms under the car or in the passenger compartment while parked.
If at least one of these signs is observed, then urgent diagnostics of the pipes should be carried out and their replacement.
Tightening the clamps on the pipes should be done with medium force. Over-tightening may damage them.
Replacing the stove tap
It often happens that a part such as a faucet breaks (it is worth noting that on the 2114 it is not very reliable). When replacing it, you should simultaneously replace the pipes, even if they are in good working order (the location of the pipes of the VAZ 2114 stove was described above).
All faucet replacements are performed in the following order:
- place the car in the pit and secure it;
- unscrew the screw plug and drain the coolant;
- using a screwdriver, loosen the clamps on the pipes located in the engine compartment, and then remove them;
- find the tap in the passenger compartment on the passenger side (located under the panel), loosen the clamps of the pipes suitable for it, and then remove them;
- Using a 10mm wrench, unscrew a pair of nuts screwed onto the studs and securing the valve body;
- from the interior side, pull out the tap and disconnect the control cable from it;
- install a new (similar) faucet in its original place;
- perform assembly in the same sequence, but in reverse order.
Before disconnecting the pipes (especially those located in the passenger compartment), you should place a cloth under them in case of coolant leakage.
Many car enthusiasts who carry out such a replacement are sometimes interested in how to properly connect the pipes to the VAZ 2114 stove? After all, by mistake or forgetfulness, you can connect them incorrectly, which will disrupt the normal circulation of coolant.
In order not to make a mistake, it is worth remembering that the connection diagram for the connection pipes of the VAZ 2114 stove is as follows: the pipes located in the engine compartment are connected: the first - from the tap (inlet) to the hole in the cylinder head, the second - from the tap (outlet) - to "saxophone". The connections in the cabin are connected: the first - from the tap to the thermostat, the second - from the tap to the pump inlet.
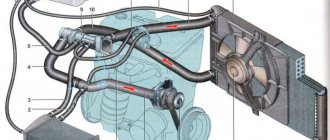
For even greater convenience, you can use the following general diagram of the heating system:
It is worth noting that the pipes located inside the cabin vary greatly in length, so it is extremely difficult to confuse their location.
How to correctly replace pipes in a VAZ-2114
The first question that experts hear from car enthusiasts is which pipes should be purchased for the VAZ-2114? Products made from silicone are considered the most durable and at the same time ideally compatible with the cooling mechanism of the VAZ-2114. The diagram below shows the location of the pipes we are interested in:
- The short ones are mounted on the couplings of the thermostat and the pump pumping water.
- Next comes the conductive hose.
- The pipe located in the lower part is responsible for removing antifreeze from the radiator unit.
What set of tools will be needed to replace the VAZ-2114 pipes
- New hoses.
- Keys of different sizes.
- Screwdrivers of different formats.
- Silicone-based lubricant.
Now let’s talk about how the well-known antifreeze differs from antifreeze. The latter is produced by a domestic manufacturer, antifreeze is produced abroad, so the composition may differ.
Therefore, ask the seller about foreign-made coolant.
Radiator replacement
Sometimes a clogged or damaged radiator causes the heater to not work properly. If this happens, you should replace it with a new, similar one.
It is done as follows (without dismantling the panel):
- Place the car in a pit and drain the coolant (the same as when replacing a valve).
- To quickly and more completely drain the coolant, unscrew the cap of the expansion tank.
- After draining, screw the plug-bolt into place.
- From inside, close the tap by moving its lever to the left position.
- Move the passenger seat back as far as possible.
- Remove the plug in the center of the panel and unscrew the screw underneath it.
- Unscrew the 4 screws securing the left panel cover.
- Unscrew 6 screws (3 on top and bottom) on the steering column casing, and then remove the casing.
- Disconnect the radio and cigarette lighter connectors.
- Remove the plastic covers on the stove adjustment levers.
- Unscrew a couple of screws in the upper part of the center console, and then remove the latter.
- Unscrew the diagnostic connector mounting bolts.
- Disconnect all remaining electrical connectors in the console.
- Remove the console completely.
- Unscrew the screws securing the panel base to the body.
- Remove the 4 screws securing the panel from the side.
- Unscrew the panel screws in the center.
- Remove the ECU.
- Lift and secure the panel.
- Loosen the pipe clamps and remove them.
- Drain the leaking liquid.
- Unscrew the bolts securing the radiator (4 pieces).
- Remove the old radiator.
- Install a new radiator.
Reassembly is carried out in the same sequence, but in reverse order.
"Folk" way
Folk craftsmen - these are brave and very desperate craftsmen - offer a much less labor-intensive method. The bottom line is that replacing the stove pipes (and the stove itself) is done without draining the coolant and without dismantling the instrument panel. The tools you will need are a set of screwdrivers, rags and a container (small) to drain the liquid from the pipes. In this case, replacing the heater radiator pipes is carried out according to the following scheme:
- Removing the terminals from the battery
- Close the heater tap
- We remove the right front seat (to make it easier to do the work)
- We unscrew the two screws securing the dashboard on the right side, and one screw located in the glove compartment, then, pulling the dashboard towards you, we place a wooden block
- Now there is a gap on the side of the passenger seat and you can get to the pipes and to the heater radiator itself
- Lay a rag on the floor of the cabin and prepare a container to collect the coolant
- Which will spill from the radiator and pipes
- We loosen the clamps of the pipes (photo above) and carefully, one by one, remove them from the radiator, replacing the container. 200 - 300 grams of coolant will drain into it
- Replace the pipes with new ones, and change the clamps, just in case.
- If necessary, unscrew the three bolts that secure the radiator to the stove and pull it down to the right
- We install the pipes and the new radiator in the reverse order.