Replacing pipes
And when it’s time to change the heater radiator pipes on your VAZ 2109, don’t be afraid to do the replacement yourself. First of all, it is important to know where the stove radiator and its pipes are located. So, the heater radiator is located on the right heater casing (that is, to the right of the panel of heater control levers), direct access is blocked by the dashboard console. The price of the pipes themselves is a pittance, but for replacement at a service station they will demand a tidy sum, why? Now you will see for yourself. There are two ways to replace pipes (the methods are also suitable for replacing a stove radiator):
- The first - (the so-called classic) is carried out in accordance with the instructions (manual) for the operation, maintenance and repair of the VAZ2109.
- It involves removing the dashboard and draining the fluid from the engine cooling system.
- The second is simpler (folk), does not require complex manipulations
- In our article we will consider both methods so that you can choose the most convenient one for you.
The device of the VAZ-21099 stove
There would be no question of any comfort while traveling in a VAZ-21099 car if the interior of this sedan were not equipped with a heating system. Moreover, ensuring a comfortable temperature in the cabin can be considered a secondary task, and the main one is heating the glass (windshield and side front doors) to ensure visibility in conditions of reduced temperatures.
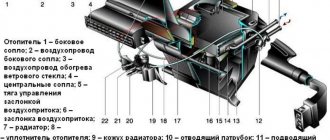
The VAZ-21099 uses a heating system that is classic for all cars, in which the air is heated using an additional radiator of the cooling system installed in the cabin under the dashboard. Thanks to this location, it is possible to provide heating for several zones - airflow onto the windshields and side windows, under the feet and directly into the cabin itself.
To ensure the efficiency of the stove, it is necessary that the flow movement is not spontaneous (due to temperature changes), but forced. And for this purpose, the heating system is additionally equipped with an electric fan.
Classic way
It is worth noting right away that it is quite labor-intensive and will take quite a lot of time. You will need a lot of patience and care (as mentioned above). The most difficult part is removing the instrument panel and installing it, as it is much more difficult to get the instrument panel into place correctly.
Tool
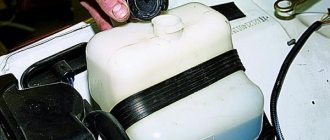
- Coolant drain container
- Screwdriver Set
- Head with a wrench to unscrew the steering wheel
Let's start in order:
- Removing the terminals from the battery
- With the heater tap open, drain the coolant by unscrewing the drain plugs located on the radiator and cylinder block (into a substitute container)
- Removing the decorative trim from the steering wheel
- We unscrew the nut securing the steering wheel so that its end is flush with the end of the steering column shaft.
- The steering wheel is seated very tightly on the shaft splines, so for safety reasons it is not recommended to completely unscrew the nut securing the steering wheel: with a sharp impact, it will jump off the splines and can cause injury
- Be sure to mark the location of the steering wheel in relation to the shaft
- Knock the steering wheel off the shaft splines with sharp blows of your hand.
- Now you can finally unscrew the nut and remove the steering wheel
- Unscrew the six screws securing the lower steering column casing
- Remove the lower casing from the steering column, as well as the lining of the ignition switch (lock)
- Then remove the upper casing from the steering column
- Loosen the bolt securing the base under the steering switches
- We remove the base from the shaft, disconnect the blocks with wires (there are two of them) from the contacts of the car horn
- Now we disconnect the block with wiring from the windshield wiper and washer switch lever
- It is recommended to mark the terminals with wiring before disconnecting. This will help you avoid confusion during assembly and save time.
- Disconnect the block with wiring from the headlight and turn signal switch lever
- Pull the carburetor choke control handle (aka “choke”) towards you so that the draft comes out, remove the handle from it
- Unscrew the two screws securing the dashboard console trim
- Removing the cover from the console
- Remove the cigarette lighter from the socket
- We take out the ashtray from the nest by pressing on the plate to extinguish cigarettes
- Remove the handle that switches the heater fan
- Then we remove the three knobs that control the stove and hook them with a screwdriver
- Disconnect the block with wiring from the heater fan switch, located under the heater control panel
- Disconnect two wires from the contacts of the lamp illuminating the heater control panel
- Remove the headlight direction adjustment handle, just pull it towards you
- Now remove the instrument cluster lighting switch knob
- Unscrew the nut securing the instrument lighting switch
- Unscrew the nut securing the headlight hydraulic corrector
- We push the hydraulic corrector for headlights and the instrument lighting switch inside the panel
- Remove the side nozzles located on both sides of the dashboard using a screwdriver
- Unscrew one screw securing the trim on both sides of the dashboard
- Using a screwdriver, use a screwdriver to remove the exterior lighting switch.
- Disconnect the block with wires from the switch. Push the block inside the dashboard
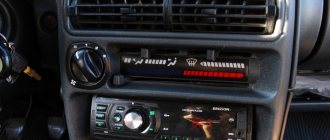
- We use a screwdriver and remove the socket intended for radio equipment. If you have radio equipment installed on your VAZ 2109, remove it first
- We remove radio equipment according to the manufacturer’s instructions
- Then unscrew the screw securing the trim to the dashboard
- We insert two screwdrivers so that we can bend the plastic latches
- Raising the dashboard trim
- Disconnect the wiring harness from the cigarette lighter
- Disconnect the block with wiring from the block for lighting the cigarette lighter
- Disconnect the block with wiring from the lamp illuminating the hazard warning switch
- We disconnect the block with wiring from the hazard warning switch, and finally remove the dashboard trim
- Gently press down and remove the speaker cover located on the left side of the dashboard. Be careful - latches break easily
- Disconnect the block with wiring from the heated glass switch
- Remove the block from the rear fog lamp switch
- Unscrew the two screws securing the instrument cluster
- We take out the instrument cluster from the dashboard, unscrew the nut securing the cable from the speedometer and disconnect it
Removing the instrument panel
Attention: Disconnect the connectors with wiring for additional equipment, if installed on your car.
- Disconnect the red block from the instrument cluster
- Then disconnect the block from the control system
- Disconnect the white block from the instrument cluster
- Disconnect the ignition switch block from the ignition relay
- Disconnect the ground wire of the ignition relay
- Disconnect the control lamp block for opening the air damper
- Unscrew one screw from the lower mounting of the dashboard on both sides
- Disconnect the drawer light lamp block
- Unscrew the two screws securing the heater control panel and lower it down
- Unscrew the two screws securing the air damper guide rod to the dashboard
- Unscrew two screws from the upper mounting of the dashboard on both sides
- We use a screwdriver and remove one plug at a time from both sides of the dashboard.
- Unscrew one screw from the side mounting of the dashboard on both sides
- Unscrew the screw of the central fastening of the instrument panel
- Remove the dashboard
- After replacing the pipes or the heater radiator itself, we assemble the panel in the reverse order
- After installing the panel, we check the operation of the switches and all devices to ensure they are connected correctly
Let's return to the heater radiator pipes; we have already removed the panel:
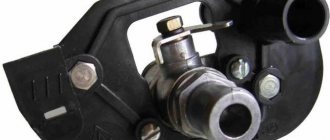
- We disconnect the plastic clamp located on the right side of the heater, which holds the damper rod that heats the windshield
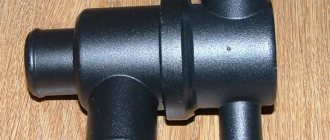
- Loosen the clamps and disconnect both pipes from the heater tap from inside the car under the dashboard
Loosen the clamps and remove the pipes
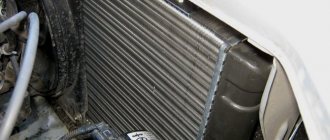
- Then loosen the clamps and disconnect both pipes from the heater valve located in the engine compartment (if you are going to remove the heater valve, otherwise skip it)
Disconnect the pipes in the engine compartment
- We replace the pipes with new ones, it’s better to replace the clamps right away, even if they are still suitable, it’s better not to risk it
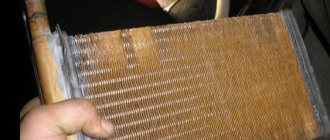
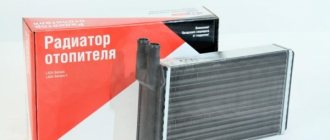
- If necessary, you can unscrew the three screws securing the radiator to the stove
- And, raising the rod, pull out the heater radiator to check its condition and replace it
This is exactly how craftsmen are required to replace the VAZ 2109 stove pipes (replacement pipes) in service centers and auto repair shops. For owners who decide to do this work with their own hands, it is necessary to take into account that it will take 4-6 hours
VESKO-TRANS.RU
AutoNews / Reviews / Tests
How to change pipes on a VAZ 2109
Replacing stove
pipes on
a VAZ 2109
is a labor-intensive task that requires time, patience and some knowledge about its structure, but it saves you money. Our instructions will help you cope with this task yourself.
Changing
heater
pipes on the engine side takes no more than an hour.
This is if you don't rush. It took me a little less. I will briefly describe the replacement of stove
pipes under the hood. For those who have a carb, I advise you to remove the air filter housing, the work is much easier.
Lada 2109
TURBO MIGRANT