What is hidden under the panel in the car interior?
The “refrigerator effect” becomes most noticeable if you still continue to use old VAZ models with front-wheel drive: 2108, 2109, 21099. Let's try to figure out whether there is any possibility of replacing the heating system yourself. Despite the visual identity of the car models, there is still some difference in these VAZ units of the 8th and 9th models.
This difference is not fundamental. It’s just that in the process of evolution, unnecessary air ducts were removed from the design, the shape of the damper and the location of the radiator were changed. But this does not change the principle of operation. The interior is heated by air, a radiator connected to the engine cooling system is responsible for heating it, and the heater itself is located under the instrument panel in the car, which is higher in the VAZ 21099 due to some design features of the stove. With the help of connected air ducts, heat flows into the interior.
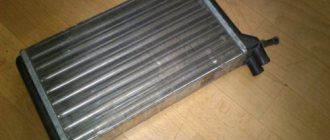
Radiator in the engine cooling system
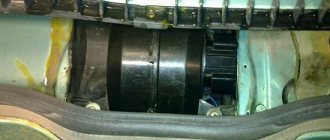
To force heated air into the cabin, a fan is located at the top of the heater, which rotates using an electric motor. The easiest way to access it is from the engine compartment. The heater radiator, mentioned above, is located in the VAZ 2109, 2108 and 21099 models near the heater itself. It has a seal in the form of a polyurethane foam gasket and consists of two plastic tanks, cooling plates and tubes arranged in two rows.
Since heating is connected to the car’s cooling system, fluid circulation through the radiator occurs using the pump of this system. You can regulate its flow using the heater tap and various levers that affect the position of valves and dampers. Warm air enters the cabin through two central and two side nozzles, inside of which there are dampers that regulate the intensity of heating. The direction of flow is also changed by blades-blinds using levers in the cabin.
After the air in the cabin is heated, it is necessary to circulate it and maintain the set temperature. It is necessary to release the waste stream outside. In this regard, on VAZ 2108 models, hot air flows out through holes located in the central body pillars. On 9-model cars, these holes are located in the corners of the rear side windows and have rubber valves that prevent atmospheric air from entering the air ducts.
Tap function
In a VAZ-2109 car, coolant circulates through two circuits.
If a large one is used, then it passes through the engine. It heats up there and then goes to the radiator of the heater itself. This element is blown by a special fan, which drives the air heated by the stove into the cabin. In summer, the large circuit is not used, and the liquid circulates exclusively through the small circuit, which includes the main radiator and power plant. The air ducts of the stove provide ventilation to the interior.
The tap itself regulates the supply of hot coolant to the heater or completely blocks its access there. Accordingly, during the warm season it is constantly in a closed position.
Bringing the radiator to life
As a rule, it is not the entire system that becomes unusable, but only some part of it. The first signs that it is necessary to intervene are a specific smell in the cabin, the appearance of steam from the exhaust vents, and very rapid evaporation of coolant. First of all, you need to check the radiator. You should not bother with checks when the engine is running or has not yet cooled down. The problem most often lies in the radiator, in the area of the heater tap or in the electrical circuit. Let's look at these weak points in more detail.
Replacing a faucet or electric motor is not the first step; first you need to carefully inspect the radiator for leaks. Then you will have to remove it and check the tightness. The radiator is removed in the following order. First you need to disconnect and (preferably) remove the car battery, completely drain the antifreeze from the cooling system and disconnect the wires from the sensor that turns on the fan motor. Then you will have to remove the fan casing fasteners, disconnect its bracket and wires, and tilt it to the side. This will allow you to remove the protective cover. All that remains is to disconnect all the hoses, slightly tilt the radiator to the side and remove it out.
Replacing the electric radiator motor
It should be noted that it would not be superfluous to replace the rubber shock absorbers located on the radiator holders.
After the unit is removed, it is necessary to put tight plugs on the pipes or holes (except one) to which they are connected. Through the remaining inlet it is necessary to pump air into the radiator. Just be careful: do not allow air pressure to exceed 0.2 MPa. After this, lower the radiator into a bath of water, preferably so that it completely covers it. If air bubbles appear, the seal is broken and replacement is necessary. If there are no bubbles, there is a chance that it is simply clogged. In this case, it is necessary to flush the device.
Selecting a heating tap and cost of the part
A driver faced with a leaking heating tap will inevitably be faced with the question: which tap to buy as a replacement? The question is not as simple as it might seem at first glance. Because there are three types of heating taps, which differ not only in cost, but also in design. Let's list them:
- faucet with membrane. This is exactly the crane that the manufacturer installed on the “nines” that came off the assembly line. Cost - from 400 rubles. This is the cheapest faucet that can be found on the market today. However, the low price should not deceive the car owner: the reliability of membrane taps leaves much to be desired. And you can purchase them only in one case: when you couldn’t find anything else;
- ball valve As the name suggests, the locking element in this device is a massive ball, which is much more reliable than a standard membrane. However, the above ball is made of steel. And therefore susceptible to corrosion. Therefore, a car owner who decides to open the tap with the onset of cold weather may be in for a very unpleasant surprise. The cost of such a crane starts from 550 rubles;
- ceramic faucet. The most reliable and at the same time the most expensive option. Corrosion is not a problem for such devices: their body is made of plastic, and the antifreeze is locked by two tightly pressed ceramic plates. The cost of a ceramic faucet starts from 700 rubles, and if the car owner is not short of money, then ceramics should be purchased.
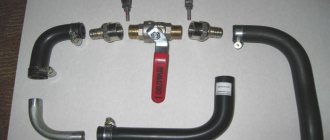
Here we should make one digression and tell a real-life incident. One driver I know experienced first-hand all the delights of domestic heating taps. Once again, having discovered a puddle of antifreeze on the floor of the cabin and remembering the domestic manufacturer with a kind word, he solved the problem radically: he disassembled the console, pulled out the leaking diaphragm valve, and replaced it with an antifreeze hose. He brought the long end of this hose under the hood and screwed it to an ordinary Chinese-made plumbing faucet. He screwed the crane itself to the right wheel arch with a piece of ordinary steel wire. Since then he has had no problems with antifreeze leakage. But such a solution cannot be called convenient: every time you need to open a tap, a person has to stop and climb under the hood. So think for yourself, decide for yourself, as they say.
Some car enthusiasts install plumbing taps under the hoods of their cars.
Replacing the faucet and fan motor – can we do it ourselves?
If checking the radiator does not fix the problem, the cause is in the heater itself. The next common breakdown is a malfunctioning faucet. But even in this case, you will have to remove the entire device, since it is unlikely that it will be possible to determine the nature of the problem, and, most likely, only a replacement can help. First you need to disconnect the hoses from the pipes on the heater tap, unscrew the faucet fastenings and remove it. Then you should dismantle the rods going to this part, remove the facing panel on the floor and disconnect the air duct located in the tunnel. Next, all that remains is to remove the heater wires, unscrew the mounting nuts and remove the device. Naturally, replacement and installation are done in the reverse order.
Malfunction of the heating device tap
Of course, it is advisable to carry out all the operations described above for the first time under the guidance of an experienced comrade (if there is one, of course). Because it is very easy to miss some little thing in the circulation of pipes and nuts, therefore it will not be easy to find an error. By the way, if your friend is a good specialist in the field of heating systems, he will probably be able to give advice on how to get rid of the old-fashioned way of saving a car radiator by wrapping it in cotton vests or cardboard boxes. The fact is that the VAZ 2108 and 9 models have a drawback in the heating operation when the engine is cooled too much. And such an unusual radiator lining can, on the contrary, lead to overheating.
A more rational approach: an additional pipe is cut into the thermostat housing and at the same time a plug is placed on the opening of the water pump. Thanks to this engineering solution, the liquid from the heater flows to the thermostat, and then continues to move through its cycle. The thermostat will be part of the automatic cooling system, and you won’t have to worry about engine overheating in the summer or excessive cooling in the winter. This method has received a patent, and therefore such “tuning” can be officially ordered at a car service center if you decide to entrust the replacement of the system to him.
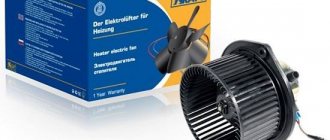
The motor in the heater, which is responsible for circulating heated air (via fans), can also break down. Replacing it is easier than repairing it, so you just need to buy the right one. Installation will not be difficult, since we have already disassembled the entire system according to the above instructions.
The VAZ 2108 stove fan, like other important parts, is the key to the car’s heating system. Like any other system, this one has its own nuances and can suddenly break down. The solution to some popular problems, even those related to replacing the product, can be found below in the article.
Tap selection
Before making a replacement, you must first select a new high-quality faucet that will serve you reliably.
The same crane is suitable for the VAZ 2108-09 models as for the VAZ-2113, VAZ-2114 and VAZ-2115. As for the factory tap, it is not of very high quality, since the membrane tap is entirely made of plastic. Therefore, VAZ owners begin to argue among themselves about which one to choose - some suggest that a plastic one will do, others say that a ceramic one will last much longer, and others even want to install a tap under the hood so that the problem with leaks no longer bothers them. Next, we will take a closer look at their types.
Types of cranes and their features:
- Factory - the standard type of DAAZ faucet, which equips the VAZ 2108 and 2109 from the factory with a plastic membrane (part code 21080-8101150-00). Its main advantage is its affordable price. If we consider the aspect of reliability and frequency of jamming, then we may encounter some disadvantages. Experts do not advise buying such a faucet unless there are no other faucets in the store.
- Ceramic - it is quite expensive when compared with the factory one, but it has quite high strength, it is also worth noting that its throughput is lower compared to the ball type. The most famous manufacturers of cranes are: Ulyanovsk YAVVA or LUZAR. The number of such a faucet will be 21080-8101150-12.
- Ball - has excellent throughput, also has high reliability and strength, but they are usually the most expensive. They are manufactured by the following companies: Ulyanovsk Simbirsk Foundry Alloy and Chance-Auto. The article number of the ball valve is 21080-8101150-14. The disadvantage of the tap from the Ulyanovsk plant is that it is difficult to open, and this is a negative factor for the stop in the plastic drive mechanism of the valves and the tap at the places where the cables are attached.
If you make a choice between the options presented above, then the most optimal, taking into account all the pros and cons, will be ball or ceramic, but still with minor modifications.
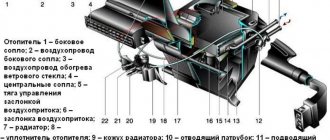
Car heating system design
The 2108 heating system consists of the following components:
- draft, which affects the heater valve of the VAZ 2108;
- damper control lever;
- additional resistor;
- a motor that affects the rotation of the fan;
- system operating mode switch.
Heater valve VAZ 2108
Operating principle of the stove
- The liquid is heated to a certain temperature and enters the radiator of the VAZ 2108 stove.
- To ensure constant circulation, rubber tubes are installed between it and the liquid cooling system, fixed for better fastening with clamps.
- Warm air enters the car interior through several openings. The heater motor with its own fan is designed to distribute air evenly.
- The air flows directly to the feet of the driver and passengers, and also exits to the panel. The heat flow is then delayed by the dampers, and therefore the air is cooled. Thus, cool air is supplied to the windshield.
If the operation of the furnace is not satisfactory, it can be modernized. This is done by installing fiberglass.
The action goes like this:
- It is necessary to disassemble the stove, wash all parts and begin assembly. This action can also be used to visually inspect parts for damage. For example, the casing ear often breaks.
- After this, you need to glue all the flaps and fill the seams with sealant. Glue the casing and wait a while until the sealant is stable.
- Assemble the “insides” of the heating system and cover it with fiberglass. Thanks to this, the temperature will increase to 10 degrees.
Replacement procedure
If you have been using the car, be sure to let its power plant cool down - otherwise the coolant will be very hot, and this is dangerous.
The car must be placed on a ramp or pit, since you will need access to its bottom.
Before changing the shut-off valves discussed in this article, set the stove regulator to the extreme right position, that is, to maximum heating. Only in this case will you be able to completely drain the coolant from the radiator.
When the preparation is complete, unscrew the cap of the distribution tank slightly and place a bucket under the car to collect the leaking antifreeze. The radiator is the first to be freed from it - it has a special plug. Next, drain the liquid from the cylinder block and hoses leading to the tap.
From the hood side, loosen the pipes that go directly to the tap. The clamps on them often rust, and therefore it is recommended to treat them with VD-40 before unwinding. The screws are unscrewed with a flat screwdriver. Go to the salon. Here, remove the side trims of the center console. They are held in place by screws, which can be unscrewed using a Phillips screwdriver.
Actually, the heater valve is located on the front passenger side. It has two pipes fixed with clamps. Carefully loosen the latter and very carefully remove the hoses (there is a risk that there is still antifreeze left in them).
Now you need to release the tap - to do this, just unscrew the three 10 mm nuts. Before this, the drive cable is disconnected from it. All that remains is to dismantle the damaged unit and install a working one in its place.
Reassemble everything in reverse order and check how the heater works, and also make sure that everything is sealed in the places where the pipes are attached.
Typical faults
As with any mechanism, problems can occur in the heating system (video author - Andrey Kuzemsky).
If the VAZ 2108 heater motor is broken, you can understand this by comparing some symptoms:
- If the motor does not work when switching operating modes, the cause of the breakdown may be hidden in the resistor. When repairing, you need to replace the resistor with a new one, because it cannot be repaired.
- If the fuse is blown, you need to check the insulation of the armature located on ground. There may be a short circuit.
- If, when switching modes, the VAZ 2108 heater fan rotates at the same speed, this may be a consequence of contamination or oxidation of the collector. In case of repair, it is worth cleaning the collector and, if nothing has changed and the fan continues to act up, you can replace the bearings.
If the VAZ 2108 stove motor does not even show signs of life, then the reason is not in its design, but in a broken circuit. To find out if this is true, you can use a voltmeter.
Which one is better to choose?
Both the duration of its operation and the reliability of the entire system largely depend on the quality of the new crane.
In total, there are three types of this unit on the Russian market. This means:
- standard, that is, native, used by the manufacturer;
- ball valve;
- ceramic.
The first one is very inexpensive, but usually lasts a fairly short period of time. For this reason, it is worth choosing it only when the car enthusiast does not have extra money or if he was unable to buy anything else.
The ceramic model is more expensive and quite durable, but its disadvantage is its relatively low throughput. If you live in the southern regions, then feel free to take this option. Otherwise, a ball valve is ideal.
This type of locking fittings is different:
- great reliability;
- strength;
- good throughput.
However, the latter option may also turn sour over time.
DIY repair
To carry out repairs yourself, you need to use the following tools:
- a Phillips head screwdriver;
- 10mm wrench.
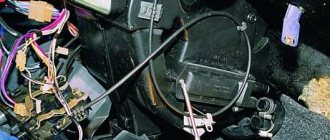
When dismantling, you need to remove the plastic trim, which is located on the outside of the windshield. To remove it, you need to open the hood and remove the 5 bolts that secure the trim to the body. Remove the rubber seal from the engine compartment and pry the casing with a screwdriver to get to the motor and oven fan. Now you can remove the motor. It is attached to the body of the VAZ 2108 with two bolts.
When the clamps are disconnected, you can turn off the power and disconnect the positive wire of the furnace under the dashboard. The negative one is attached over a special thread and pressed down with a special nut. You need to unscrew the nut by touch and fold back the negative wire. By disconnecting the wires, you can remove the motor and install a new fan. The entire structure is assembled in reverse order.
It is important to note that breakdowns associated with the stove also depend on which panel is installed on the VAZ - low or high. Both have their downsides. For example, on a high one the central flap does not open completely. It is she who is responsible for supplying cold and hot air to the car interior. To solve this, you need to adjust the damper. And to get to it you need to disassemble the dashboard.
If we talk about the low panel, this is where the thermostat often breaks. Of course, if it wears out, the oven will not work. It is recommended to change it every two or three years. And if replacement does not solve the problems, it is worth replacing the hoses that connect the stove and radiator.
Photo gallery “Stove removal and repairs”
In the photos provided below you can see in more detail how the furnace repair scheme occurs.
Purpose of the heater valve on the VAZ 2109
On the VAZ 2109 there are two circles of coolant movement: large and small. When the coolant flows in a large circle, it, having warmed up in the main radiator, leaves it for the heater radiator and heats it up. An electrically driven fan is installed behind the heating radiator. It blows air through the radiator and forces hot air into the cabin through an air duct system. In this way, the interior of the VAZ 2109 is heated. However, in the warm season there is no need to circulate antifreeze in a large circle.
Using a heating tap, the driver changes the direction of movement of antifreeze
Therefore, drivers switch the heating system to a small circle when the coolant does not enter the heater radiator. To switch, a heating tap is used, the purpose of which is to direct the flow of coolant into the desired pipeline depending on the season.
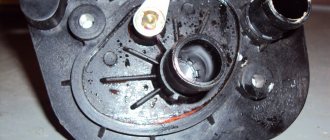
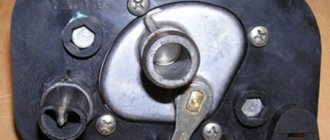
Heater valve location
The heating valve on the VAZ 2109 is built into the front wall of the engine compartment so that one pair of valve tubes is discharged into the engine compartment, and the second pair is discharged into the cabin, under the center console.
The heating valve is located deep under the central panel of the VAZ 2109
In order to get to the crane, the car owner will first have to dismantle this console. There are no other options.
Heating tap failure and its cause
It is impossible not to notice a breakdown of the heating valve on a VAZ 2109: a puddle of antifreeze appears on the floor of the cabin, on the front passenger side, and a characteristic sweetish smell is clearly felt in the cabin.
There are two reasons why a heating tap breaks:
- poor quality faucet. They are equipped with membrane taps, the tightness of which leaves much to be desired. Their service life is very short;
- corrosion. It's simple: in the warm season, all motorists turn off the heating tap. They run for three or four months with the tap closed. During this time, the valve stem becomes covered with rust and is literally welded to the body. Sometimes things get so bad that you can only turn a rusted faucet using pliers. Of course, there can be no talk of any tightness after such an operation.
Video “Heater fan VAZ 2108”
You can learn how to remove the named part from the video from the author Alexander Tselovalnikov.
Self- replacement of the VAZ-2109 stove tap, high and low panel
the heater valve usually needs to be replaced if it starts to leak or gets stuck so that its regulator stops moving. It does not seem likely to repair the old one, and it cannot be restored. Meanwhile, without this element, interior heating is not able to work normally.
How exactly to replace a damaged heater tap on a VAZ-2109 car is done is described in this article.
Replacing the VAZ stove valve
To replace the heater tap you need:
- New faucet.
- Worm clamp with a diameter of 16-23 mm.
- Antifreeze.
- Gaskets and seals.
- Rust remover.
- Metal brush.
- Socket and socket wrench for 10 and 13.
- Phillips and flathead screwdrivers.
- Silicone sealant.
It is recommended to replace the valve only on a cold engine. Before draining the antifreeze, you need to set the slider to the “Hot” mode - this will drain the liquid from the heater radiator.
It is best to carry out the replacement in the presence of an inspection hole or overpass, although if the question concerns specifically the “eight”, then you can get by with a set of socket heads with a cardan. By the way, it is also not necessary to remove the torpedo; just unscrew it and lift it up.
Step-by-step instructions for replacing the VAZ heater tap: 1. Place the car in a pit to make draining the coolant more convenient. We place a previously prepared container under the engine, unscrew the plug on the block and drain the coolant.
2. We clean the threaded connection on the two studs with which the stove faucet is attached, use WD-40 liquid and a metal brush specially designed for this purpose. Unscrew the clamps with a screwdriver.
3. We return to the salon. We unscrew the side panels in the car; for this we need a Phillips screwdriver.
4. Inspect the stove tap. The leak is clearly visible. We loosen the clamps of the pipes in the cabin; if you decide to change them, then loosen the pipes on the radiator side as well. The pipes are removed very carefully, because coolant may leak from the stove.
5. We go down under the car and, using a No. 10 socket wrench, unscrew the crane mounting nuts. Next, in the cabin we dismantle the spring clamp by disconnecting the control cable from the tap, after which the tap itself simply needs to be pulled towards itself by the pipe.
6. Replace the old faucet.
7. Then we begin to install the new one. Here it is necessary to remember that before screwing the crane, you must first connect the cable, and only then the crane can be screwed to the body.
8. Next, we assemble everything in the reverse order, and also install new seals and gaskets between the heater valve and the car body. When installing the pipe, sealant should be used.
9. You also need to remember about the sealant; it is imperative to add it at the moment when you connect the pipes in order to reduce possible antifreeze leakage in the future. We put on the pipe and secure the clamp. We tighten the drain plug and pour coolant into the radiator.
Malfunction - characteristic symptoms
The following signs indicate that the faucet is leaking:
- traces of water are found on the floor in the cabin;
- There was a corresponding smell of antifreeze in the car.
Having found one of the above symptoms, you must certainly examine the failed unit. It is important to realize that if the damage is not repaired on time, then the repairs will cost even more money, and it will most likely not be possible to do it yourself.
How to perform an inspection? It will be useful to get under the hood from the engine side. It must be emphasized that leaks can occur in different places in the cooling system, so it is useful to examine the entire system. It is more convenient to do this with a flashlight. Coolant, namely, often drips from:
- radiator;
- joints of hoses and pipes.
When it turns out that the faucet is the culprit of the malfunction, the owner needs to start replacing it as soon as possible.
See:
This requirement is even more pressing if it’s winter, because without heating in a car it will be very uncomfortable to move around and also unsafe if you have a long trip through a sparsely populated area.
Replacement
Having discovered that the problem lies precisely in a faulty, failed faucet, it will have to be replaced.
The heater valve is located on the front passenger side under the console.
To replace you will need the following set of tools and materials:
- New faucet. A ball or ceramic one will do, but at worst you can use a factory one;
- Set of gaskets and seals. It should come with the new faucet;
- The almighty WD40;
- Metal brush;
- Socket and socket wrenches for 10 and 13;
- Set of screwdrivers (phillips and flat);
- Silicone based sealant;
- Container for draining coolant;
- Fresh antifreeze or antifreeze;
- Lift, pit or overpass.
When everything is ready, you can start working.
- Drive the car into a pit, put supports under the wheels, wait until the engine cools down, apply the handbrake and disconnect the negative terminal from the battery.
- Take a container to drain the coolant, unscrew the drain plug from the radiator and drain the antifreeze or antifreeze from the system.
- After draining all the coolant, go to the pipes that go from the engine to the heater tap. Loosen the tension of the clamps on the pipes, clean the threaded connection of the pair of studs. They hold the heater tap.
- Using WD40 penetrating agent and a metal brush can effectively clean the joints. Practice shows that without this procedure, problems may arise when dismantling the stove faucet.
- Unscrew the clamps with a screwdriver.
- Remove the pipes one by one. Be careful here as coolant may continue to leak. This is due to imperfections in the coolant drain system. It is better to work with gloves and keep a container ready.
- Let's go to the car interior. Here, remove the side trim of the dashboard, dismantle the pipes, if necessary.
- If the pipes are intact and replacement is not needed, it is not at all necessary to completely dismantle them. Again, there are antifreeze residues in the pipes, so keep dry rags on hand.
- We return to the hole under the car and use a 10 mm socket wrench to remove the faucet mounting nuts.
- We go back to the salon, where we pull the tap towards us and remove the spring clamp. Now you can disconnect the control cable from the faucet.
- This way you can easily remove the old faucet, replacing the worn, damaged element with a new faucet.
- Before you put it in place, connect the cable. Only now is it possible to tighten the valve on the body.
- Assembly is performed in reverse order.
- But here many people make the mistake of leaving behind the old gaskets and seals between the body and the faucet along with the new faucet. Do not do that. Moreover, gaskets and seals are always included with a new part.
- When connecting pipes, it is advisable to use silicone-based sealant. This will help minimize the likelihood of leaks occurring at the joints in the future.
- Be sure to tighten the drain plug, and then feel free to fill the system with new coolant.
Installation process
As you can see, there is nothing complicated about replacing the heater tap on VAZ 2109 cars. The procedure is easy to do with your own hands and does not require the intervention of specialists or spending money on their services.
But if you are not confident in your abilities or you do not have time to repair it yourself, find a trusted car service center.
How is the replacement made?
If the tap does not open and you find a problem in the summer, then there is no need to rush, but the leak requires prompt elimination - after all, the cooling system is constantly losing antifreeze, and this, in turn, calls into question the normal functioning of the power plant.
You need to know that in both the older and new 2109 , the tap is located opposite the front passenger seat, under the panel.
To replace the node in question you will need the following:
- new tap ;
- a set of gaskets (usually it is sold complete with the above unit);
- a can of WD40 or its equivalent;
- wire brush;
- wrenches for 13 and 10 (both socket and ring);
- screwdrivers;
- container for antifreeze;
- new coolant.
Replacing the heating valve on a VAZ 2109
Before starting work, let's decide on consumables and tools. Here they are:
- new furnace tap;
- a pair of steel clamps for hoses with a diameter of 20 mm;
- canister of new antifreeze (4 liters);
- metal brush to remove rust;
- a set of rubber gaskets for the heating tap VAZ 2109 (in case the old ones are worn out);
- silicone-based automotive sealant;
- a pair of screwdrivers: Phillips and flat;
- socket heads for 13 and 10;
- set of open-end wrenches.
Sequence of operations
First of all, you need to pay attention to two points. Firstly, it is most convenient to change the stove valve in the inspection hole. At least on an overpass. And secondly, before replacing the valve, the engine must be allowed to cool properly, and the antifreeze mode regulator should be set to the “hot” position. This will allow the antifreeze to completely drain from the heating radiator.
- A container is installed under the car standing on the pit to drain the old antifreeze. The cap on the radiator is unscrewed and the coolant is drained.
- Under the hood there is a pair of hoses attached to the faucet pipes using clamps. These clamps are thoroughly cleaned of dirt with a wire brush. If they are very rusty, you can use WD40. Once the rust is gone and the bolts on the clamps begin to move, the clamps are loosened using a flathead screwdriver.
As a rule, a lot of rust and dirt accumulate on the heating tap clamps
The side panel is held in place by two self-tapping screws, unscrewed with a Phillips screwdriver.
After removing the panel, access to the tap opens, you can loosen the clamps and remove the hoses
The faucet is held on by three 10mm nuts; they can only be removed with a socket head
The faulty faucet has been removed from its niche - a new one can be installed
Video: changing the heating valve and radiator on a VAZ 2109
So, replacing the heating valve on a “nine” is a task that even a novice car enthusiast can do. All you need to do is follow the recommendations above and remember to drain the coolant before starting work.
Most often, replacing a stove faucet is caused by a leak or a stuck faucet. Both cases require immediate action to correct the problem.
Appearance of the device
Execution of work
The car must be placed on a pit or ramp. Its wheels are fixed with stops. You should start working no earlier than the engine has cooled down. Don't forget to apply the handbrake! You will also need to disconnect the battery - it will be enough to remove the negative wire from it.
It will not be possible to do without draining the antifreeze. Therefore, the prepared container is placed under the hole intended for this purpose and, unscrewing the plug, wait until the coolant drains out completely.
Next, you need to disconnect the pipes connecting the engine directly to the mechanism that has become unusable. The fastening clamps on them are loosened. Use a brush to clean the threads on the two studs that hold the heater tap itself. As reviews indicate, without WD40 it is most likely impossible to easily remove a faulty unit.
Checking the functionality of the heater tap
If the cold or hot air supply modes do not switch, the cause may be a loose damper control cable or souring of the mechanism itself. How to open the tap of the VAZ-2109 stove in this situation?
To do this, you need to remove the side panel of the dashboard on the passenger side. Then check the condition of the cable and if this is the reason, then connect it back into place. You can also, without removing the panel, put your hand under the dashboard, where the VAZ-2109 heater tap is located, and move the VAZ-2109 heater damper lever to the desired position. If the lever does not give in, then most likely it has gone sour and must be replaced.
Removing and replacing the heater valve
To replace the VAZ-2109 heater tap, you need a set of tools available to most drivers:
- a set of Phillips and slotted screwdrivers;
- a set of open-end wrenches No. 10 and No. 13 or socket heads of these sizes, as well as a wrench with a ratchet mechanism and a cardan;
- silicone sealant;
- container for draining coolant;
- metal brush;
- universal penetrating lubricant WD-40 or its equivalent;
- inspection hole, overpass or lift;
- rags to protect the interior flooring from antifreeze.
Ceramic, ball, and electric valves for the VAZ-2109 stove are available for sale. Which heater valves for the VAZ-2109 are better than those listed? With rare use, ball mechanisms are more susceptible to souring, and the electronic automatic heating control system “SAUO” is much more difficult to install. Ceramic mechanisms produced in Russia or “LUZAR” are free of these shortcomings.
Many experienced drivers advise simply replacing the heater taps with water taps. The benefit of this solution is not only in cost, but also in reliability - the coolant either constantly circulates or is easily closed manually at the pipe. Another way to make it easier to change the heater faucet of a VAZ-2109 is to abandon it altogether; the cabin temperature in this case is regulated by air dampers.
Instructions on how to change the heater tap of a VAZ-2109:
- Before replacing the valve of the VAZ-2109 heater, place the car on an overpass and, unscrewing the cap on the radiator, drain the coolant into a container prepared in advance.
- When the radiator is empty, use a screwdriver to loosen the clamps on the pipes going from the engine to the heater, then use WD-40 and a metal brush to clean the threads on the studs securing the part to be replaced. When finished, completely unscrew the clamps.
- Carefully remove the hoses one by one; they may contain residual antifreeze that needs to be drained.
Important! Do not skip this step, because it will not be possible to remove the valve of the VAZ-2109 stove with the hoses connected.
- Having removed the side trim of the torpedo from inside the cabin, check the condition of the pipes and change them if necessary.
- Then, under the car, using a socket wrench No. 10, unscrew the nuts securing the part to be replaced on the VAZ stove
- Returning to the car interior, pull the faucet towards you (where the right passenger seat is), remove the spring clamp and disconnect the control cable from the part being replaced.
- We take a new spare part and reassemble it in the reverse order.
Important! To prevent future leakage of coolant at the joints of the pipes, it is necessary to treat it with silicone sealant, and also to increase the service life, install rubber seals where the heater faucet is located on the VAZ-2109.
We make sure that the radiator plug is in place and fill it with coolant to the required level. Then we start the engine and, having gotten rid of air pockets, check the proper operation of the heater modes. This completes the replacement of the VAZ-2109 heater valve.