The problem with the VAZ-2109 is that over time the door becomes loose and the operation of the locks is disrupted. In most cases, adjustment and adjustment of the lock is necessary. The situation is more complicated when the lock simply jams. This often happens on the driver's side. In this case, it is worth replacing the lock, but do not knock it out with a wheel wrench. As a temporary measure, the door lock cylinder on a VAZ-2109 car can be replaced.
Repair of interior door locks
Losing keys or jamming a lock is an unpleasant situation for any car enthusiast. Do not break the door or locking mechanism. Carefully open the door so as not to damage the rods and the body of the locking mechanism. After this, proceed to the rest of the work. Instructions for removing and replacing the Euro handle cylinder are as follows:
- Remove the door trim. This job won't take much effort, but be careful not to damage the material.
- Disconnecting the rods is one of the most difficult parts of the job. Pick up the bottom one with pliers and remove it from the handle. Then it is easy to insert it back. To remove the top one, press the screwdriver against the handle, thread the unnecessary wire through the rod and pull sharply. Without a screwdriver, the rod will bend.
- Using a 8 key, unscrew the handle.
- Before further work, remember the position of the lock. Pull out the pin from the side and remove the rod.
- Remove the spring and pull out the cylinder.
- Lubricate the groove where the cylinder was located with WD-40.
- The new cylinder is supplied with the key. Do not remove it until the lock is installed. Sometimes a new part needs to be carefully finished with a file. This happens if it is made in China or is simply of poor quality.
- If the pin does not fit into the hole freely, then you need to lightly file the place for it.
Assembly occurs in reverse order. Don't forget to connect the rods and check the lock's functionality before you lock the car for the first time. This work will take you no more than an hour. The trim is always installed last, after adjusting the locking mechanism.
Recommendations for changing the cylinder in a VAZ 2109 lock
If you disassemble the core, you can avoid replacing the cylinder or the entire mechanism. When the door opens with a creak, then most likely the internal pins are not deformed. Then lubrication work is carried out and the serviceability of the device is checked. Tips from the experts:
- Partial repairs will bring life back to the castle for a short period of time. If serious problems arise, it is better to immediately replace the larva.
- It is recommended to use silicone during lubrication.
- When dismantling, you will need a set of screwdrivers: flat, Phillips, impact.
Experts advise purchasing clips in advance that hold the casing and spring, since during dismantling these parts most often become unusable.
Features of door adjustment
The adjustment work involves changing the height of the rods. The rods are attached using plastic tips that have a ball joint inside. Correct adjustment of the door lock is carried out by pulling out the groove. Next, you will need to twist slightly counterclockwise or clockwise. The lock is adjustable by selecting the ideal length. So please be patient.
How to replace a lock
The design of the locks on the front and rear doors of the car is fundamentally the same, the difference lies in the installation of the lock switch cylinders on the external handles on the front doors. Instructions on how to replace the front door lock are presented below:
- The lower seal is pressed out, and three spring clips are removed from above to secure the protective film and one from below.
- The protective film is removed from the door.
- Inside the lock, the lock switch and external handle rods are disconnected.
Disconnection points for switch rods
Tip: During assembly, sealant was applied to the threads of the screws, so when twisting, you need to use an impact screwdriver.
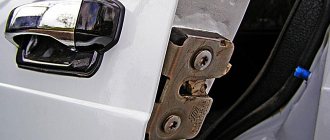
- The outside door lock is removed.
- Unscrew the two screws securing the internal handle of the device.
- The handle is pushed inside the door.
- The internal lock and handle are pulled out of the doors, as shown in the photo.
The handle and lock are removed from the door
- The rubber holder is removed from the end of the rod.
- The handle is removed from the rod. In this case, it needs to be cranked.
- The locking bracket is detached from the lever pin.
- The rod of the internal handle is disconnected from the internal lock lever.
- The plastic holder is rotated and the end of the rod is removed from the lever to lock the device.
- Unscrew the two nuts securing the outer handle of the lock.
- The handle is removable.
- The plastic rod end is removed from the door lock cylinder and removed.
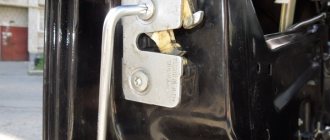
- The locking spring is removed. To do this, its ends are removed from the slots on the lock handle and cylinder.
Removing the retaining spring
- A key is inserted into the lock cylinder and the part is removed from the handle.
- Repairs and replacement of faulty elements are carried out, or a new lock is installed.
- Assembly of the unit occurs in the reverse order.
- The lock can be adjusted if necessary. To do this, loosen the screws and move the latch:
- outward, when the door is tightly closed;
- inward, if the door is not closed tightly;
- down if the door is raised when closing.
- After adjusting the device, tighten the screws.
Tip: If you need to remove the retainer, you must first trace its outline on the body pillar. This will help maintain the door lock adjustment during installation.
How the door locks are removed on a VAZ 2109 car can be clearly seen in the video.
Replacing and adjusting the trunk lock
The work is carried out in the following order:
- The casing is removed.
- Replace the support mechanism. If the lock's supporting tooth breaks. Replace not only the cylinder, but also the new body. In general, this work is no different from what needs to be done to repair a door lock.
- Adjustment is carried out using the lower clamp. Unscrew the nuts and remove the washers. Assembling and disassembling the lock will help you adjust the lock. In this case, you need to act using the selection method. The desired result is the moment when the door closes effortlessly and does not vibrate when slamming and driving the car.
More extensive work is required if the retainer bushing is broken. If you are changing the lock assembly, then before its fasteners are fully tightened, you need to adjust the latch. Only after the lock closes perfectly can you tighten the fastening nuts to the maximum.
Replacing the larva in Kalina
First of all, replacing the lock elements means that the door trim will be completely missing. Therefore, first we will figure out how to dismantle the trim on Lada Kalina cars. The second chapter is devoted to how to remove the larva and install a new one in its place. The last step will actually be the simplest.
Removing the door trim yourself
Numbers here indicate all fastening elements. But to get to them, you need to remove the screw cap “3”, as well as the inner door handle. The pawl handle also needs to be unscrewed.
If these actions are completed successfully, the casing begins to be dismantled, moving it away from the metal. Dismantling is carried out starting from any of the corners, but care must be taken: the pistons holding the plastic are fragile.
If the package includes power windows, you will need to disconnect the connector connected to the button block. Also, another similar connector is present in most trim levels - where there is a central lock. Both connectors must be disconnected.
All the steps described here involve electronics in any case.
Changing the contact group
Exploded view of the lock
From a cost point of view, replacing one contact group is the least expensive:
- All our actions are repeated in principle, as in the case described above with removing the lock, you will have to remove the casing, and so on
- To avoid the common nuisance associated with mixing up contacts, it is recommended to number them (or otherwise mark them) before disconnecting them.
- This measure will save your nerves and time
- Some models of locks have a locking ring in their contact group, and here we need an awl to remove it
- It’s important not to forget to put it back in place later.
- Then everything is assembled back and screwed to the steering column
Nuances
After the cylinder is replaced, VAZ locks sometimes stop closing the doors. As a rule, such a nuisance occurs due to improper assembly of the mechanism. The most common reason is not wearing the rod. In order not to have to worry about removing the casing once again, check the functionality of the unit before installing it.
Sometimes the problem occurs due to the locking mechanism being misaligned. Even a few millimeters matter in this case. You can avoid lengthy adjustments by outlining the part with a marker before dismantling. If you forget to do this, loosen the lock and adjust the position of the lock.
Carry out all stages of work consistently and with maximum pedantry. In this case, there will be no difficulties with installing a new cylinder on the VAZ of the model in question. And the procedure itself will take much less time.
Place all removed parts in a box to avoid loss or confusion. During the process, be sure to look at the condition of the window lift mechanism - adjust it if necessary.
And lastly, try to install only new larvae on the car. This will ensure that you will not have to change them again in the near future.
Source: ladaprofi.ru
Preparatory stage
Before you begin any repairs, visit an auto parts store. You will need door trim holders (a dozen of them will be enough).
When the upholstery is removed, the “brush” of the piston becomes wrinkled - after reinstallation, an irritating rattling sound will appear while driving.
You also need to purchase the larvae themselves - they are sold in sets.
The third cylinder is for the trunk lock.
When choosing a kit, be guided by the quality of casting of the parts - they should be without flash at the junction of the casting mold.
Do not remove the keys from the cylinders - otherwise the stoppers will fly out! To prevent their loss, wrap the cylinder cylinder with tape or tape in case you accidentally remove the key before installation.
Purpose and device
The main purpose of the lock at first was to protect the car from theft, but:
- Now, as can be seen from practice, in order to start and steal a car, car thieves do not necessarily need to have a key, or a duplicate of it.
- To put it more clearly, the defense from the castle was previously justified, but now it is “so-so”
- Equipped with modern technologies and devices, advanced car thieves are able to hack the electrical protection of the most modern anti-theft systems in just a few seconds.
- And on the VAZ 2109, the lock cylinder or the VAZ 2109 lock itself, or its Russian analogue, can generally be called entertainment for beginners
- In fact, the ignition switch is an ordinary switch that, when you turn the key, opens or closes a certain group of contacts
- The occurrence of a malfunction in the ignition switch increases the possibility of vehicle theft by a couple of times, in addition, it creates huge problems for you and, according to the law of meanness, at a completely inappropriate moment for this
- The device of any ignition switch is similar; it consists of a lock and its contact group
- And the contact group consists of two separate plates, fixed and movable
- The movable plate moves when the key is turned in the lock and the contacts are closed in the appropriate sequence
- Already at the moment, all Russian cars successfully use switches that have a similar design and procedure for closing contacts
Reasons for replacement
Typically, replacement of VAZ 2109 lock cylinders is carried out in the following cases:
- When they tried to steal a car, and the lock cylinder was damaged in the process
- If the car owner has lost his keys
- Breakage of the larva during operation
Read
The car engine may not start due to disgusting contact.
It’s not at all difficult to check; for this, it’s enough to have an ohmmeter on hand, or a multitester with an ohmmeter function and 5 minutes of time:
Replacing the ignition lock cylinder Kalina/Priora
Connection link: admitad: Service for earning money: Help for the poor ford: .
Ignition switch VAZ 21099ReplacementQuick repair
Rapid replacement
without removing the old
ignition switch VAZ
21099. New lock
VAZ
21010 price 10
Removed the casing and opened the contacts
- Disconnect the contacts and check the resistance with an ohmmeter
- Serviceable contacts should have low (zero) resistance
- Otherwise, you need to replace either the contact group, or the entire lock
We measure the contact resistance using an ohmmeter
Possible problems
Sometimes, after installing a new lock on a VAZ 2109, the door may not close. The reason is due to errors made during assembly. Most often, people forget to put on the lock rod. In this situation, the lock simply will not open. Remove the lock and install the rod in place.
The lock may also need to be adjusted. This is done using a latch. It is loosened and the lock is moved in the desired direction, achieving optimal performance. Sometimes you have to lengthen or shorten the pull. Your task is to choose its length most optimally.
Conclusion
. If all stages of the work are carried out carefully and correctly, then you will not experience any difficulties. Replacing the door lock cylinder on a VAZ 2109 in this case will happen quite quickly. Once you have done this work, you will be able to repeat it much faster. The best option is to install new parts. Otherwise, you will soon have to disassemble the door again.
We repair “Nine” locks ourselves
Let's say the key in the VAZ-2109 lock does not turn or, conversely, turns and does not unlock the door. Repairing car locks involves one of the following actions: replacing the cylinder (cylinder), replacing or repairing the internal lock. In official manuals, by the way, it is recommended not to repair the internal lock mechanism, but to replace it. Be that as it may, you first need to get to it, for which you remove the door trim. Each of the actions required for dismantling is further illustrated in the photo. The entire sequence must be considered in order.
"Nine" and the door lock device
Theoretically, the lock mechanism can be divided into 3 parts: a handle with a cylinder and a button, the main mechanism, and the inner door handle. All nodes and connections between them are shown in the diagram.
The node labeled “2” looks like this.
4 rods fit to it, that is, to this node. Two of them are connected to the external handle, and in order to dismantle it, the rods are disconnected.
If there is no electrical wiring inside the door, you do not need to disconnect the battery before performing repairs.
In other cases, that is, when power windows or locks are installed, the battery must be disconnected. To do this, as many people know, it is enough to remove the “negative” terminal. This means that before repairing locks, the hood is opened first, not the doors. Anyone who violates such a requirement will, at best, have to change burnt fuses.
Replacing the door lock cylinder
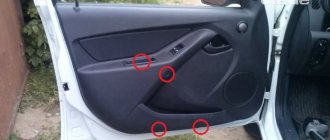
To gain access to the locking mechanism, you need to remove the trim. On the “Nine” it is quite simple to remove it - the casing is held in place by plastic pistons. These pistons are located around the perimeter; they are simply pressed out and, if necessary, replaced with new ones.
First, as is easy to understand, you need to dismantle three elements: the side handle, the window lifter handle, the socket of the inner handle of the lock. The “dog” must be pulled up, but it is better to remove the seal that protects the glass during the dismantling of the casing.
Removing and disassembling the door handle
When the door trim is missing, you can freely disconnect the two rods that go from the door handle to the lock. The following shows exactly what elements we are talking about.
By squeezing the plastic tab with a screwdriver, the rod is disengaged. We will assume that all of the above actions have been completed. Then, you can move on to the next stage.
The outer handle is attached to the metal using two nuts. One of them is located under the trim, the second is on the back side of the door. Both nuts need to be unscrewed.
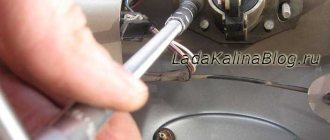
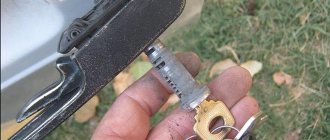
After dismantling the specified unit, it will be easy to remove the cylinder. This is done like this:
- Push out the pin holding the outer plastic cap;
- Dismantle the mounting spring (see figure);
- By installing the key and turning it, the cylinder is pulled out.
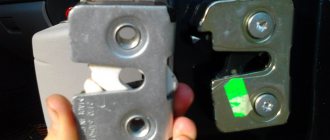
The appearance of the spring holding the cylinder and the handle together is shown below.
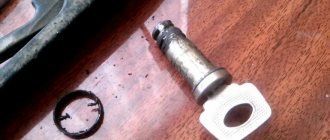
It is important to know that the knot itself, called the “larva,” needs careful handling.
Experience shows that it will be easy to lose the metal pins that ensure secrecy. The cylinder is secured inside the handle body and the pins remain in place. But if you pull the cylinder out, each pin is “free.”
We replace the lock cylinder ourselves
The result of all the efforts discussed above is shown in the following figure: