Car wipers (we are talking about the windshield wipers themselves, not the blades) are usually durable parts. They are almost not affected by aggressive factors - except moisture. For this reason, they can easily serve without replacement for the entire time that the car is in use. However, occasionally they still have to be dismantled. In particular, this must be done if, for example, you plan to replace the windshield. The procedure for removing wipers is not at all complicated, but car services will charge you money for it, which may be useful for other purposes. In this article we will tell you how to remove windshield wipers in the correct way using the example of a 1st generation Lada Kalina car.
Tools and materials:
To remove the windshield wiper you will need:
- Head or key 13, new front wiper arms, if you change them (articles: 11180-5205065-00 on the driver’s side and 11180-5205066-00 on the passenger’s side) - for front wipers;
- A wrench for 10, a new rear wiper arm, if you change it (article: 11170-6313150-00 or 11190-6313150-00 depending on the body type - station wagon or hatchback) - for the rear wiper.
Replacing front wipers on Kalina
Before you start dismantling the wipers, remember that it is better to do this on the driver’s side with the head, and on the passenger side with the key, otherwise there is a risk of scratching the hood. However, if you are careful, the hood will not be damaged regardless of the tool used.
1) First, remove the plugs from the plastic. You will see nuts under them.
2) Take the head (wrench) and unscrew the nut. There will be a washer under it, pull it out immediately, otherwise it may get lost during the process of removing the wiper.
3) Then remove the windshield wiper. That's all.
4) It should be noted that before removing it, it is worth remembering, or even better, photographing exactly how the wipers were located on the glass. When you put them back, this information will be useful to you. If you put them in the wrong position, they can hit the pad below during operation, scratching it and damaging the brushes.
Replacing the rear wiper on a Kalina station wagon
Today we will tell you the features of replacing the rear wiper on a Lada Kalina station wagon.
The building wiper on the Lada Kalina station wagon is an important element. The peculiarities of the station wagon body mean that the rear window of the car becomes very dirty with dirt from the rear wheels of the car. Therefore, the rear wiper is vital - if it wears out, a quick replacement is required.
Rear wiper size Kalina station wagon
The rear wiper on the Kalina station wagon has a rather rare size - 35 centimeters. It is not always possible to find one in stock. In principle, wipers measuring 34 or 36 centimeters are suitable. The only thing is that a longer wiper may press harder against the glass at the edges.
You can also find wipers of similar sizes for foreign cars on sale. For example, the Daewoo Matiz has a rear wiper measuring 35 cm. The rear wipers on the Scoda Octavia and Kia Sorento, as well as the front wiper on the Hyunda Getz, also have similar sizes, so you can choose wipers that fit these models
The main thing is to pay attention to the mounting adapter - it should be the same as on Kalina
How to remove the rear wiper on a Kalina station wagon?
Structurally, the mounting of the rear wiper on Kalina is similar to the mounting of the front ones. To remove the rear wiper, you need to bend it along with the arm away from the windshield.
If the old wiper has a trim (as in our case), you need to snap it off by pressing on the sides.
Then we turn the wiper around the central axis until it snaps out of the mount.
After this, all that remains is to pull the wiper together with the mounting adapter towards the rear window.
The new wiper is installed in the reverse order. Before installation, the adapter must be placed over the wiper, but do not completely snap the adapter onto the leash. First, you need to fix the wiper together with the adapter on the leash so that the adapter “sits” in its place. Only after this you need to press the wiper until there is a characteristic click, which means that the adapter together with the wiper has snapped onto the leash.
- What size are the wipers on the Lada Kalina (front and rear)
How to properly install windshield wiper blades? Preparation and replacement
Replacing a cleaning device is a simple but important step. Preparation for work includes the following steps:
- Study the device of the wipers. They consist of a holder, lower arm and brush. Only the brushes can be replaced.
- Measure the size of the brushes using a regular ruler or tape measure. This must be done in order to purchase replacement parts in advance. You can do it another way: dismantle the wipers and take them to an automotive supply store before installing the windshield wiper blades.
- Provide clear access to the windshield wipers to easily remove the windshield wipers.
Installation of new cleaning devices is carried out according to the following algorithm:
- Lift the lower arm from the windshield. You need to lift the lever all the way so that it does not return to its original position and damage the windshield.
Important! To prevent the lower arm from hitting the windshield during operation, it is advisable to protect it with a towel or soft cloth.
Advantages and weaknesses of wipers
Each type of brush has certain advantages, and at the same time, both product options are not without disadvantages. Frameless versions have great durability, because for their production manufacturers use high-quality rubber and weather-resistant plastic. Over time, although the rear brush wears out, this process is not intensive.
In operation, frameless brushes for the Lada Kalina station wagon do not emit unpleasant squeaks and do not greatly rub the surface of the rear window. Also, the products adequately withstand the onslaught of temperature changes.
Now the disadvantages. There is only one point here - it is overpriced.
In addition to the metal base, frame brushes have plastic structural components that are integrated into the frame itself. Cleaners are low-cost and widely distributed in the retail chain.
Among the disadvantages of frame options, one can highlight their small resource. After a couple of years of use, the working elements of such a brush become unusable and require inevitable replacement. A constant companion to the work of the wiper is an annoying squeak.
Replacing windshield wiper blades yourself
You do not need any special tool for this operation. Everything is done literally by hand and without unnecessary fuss. All you need to do is buy new ones that fit your car. Please note that the right and left wipers are often not the same length.
The brush replacement procedure itself is performed in a few simple steps:
- The windshield wiper arm is moved away from the windshield to a vertical position. Hold the lever carefully, otherwise it may hit the glass sharply and damage it.
Possible malfunctions and how to eliminate them?
Intermittent operation of the rear wiper mechanism is a very common situation faced by owners of the Lada Kalina station wagon. The solution is simple - you need to replace the fuse. It is located in the mounting block, which in turn is located under the panel to the left of the steering column. Sometimes a replacement requires a relay, which can be found in the same mounting module.
When the rear windshield wiper completely refuses to function after activating the button, then diagnostics of the electric drive of the LADA Kalina station wagon will be needed. The wiring goes to the electric motor itself. Here you need to make sure that the contact at the ground terminal is reliable. In most cases, the problem is eliminated by simply cleaning the contacts from oxides. If such manipulations do not give the desired result, disassembling the mechanism and probably replacing the motor will be required. Sometimes the culprit for the lack of purifier functionality is the steering column switch.
Let's sum it up
The article provides basic recommendations on how to choose the right one, as well as how to remove and install a rear windshield wiper for LADA Kalina station wagon. Situations with partial or complete loss of functionality of the mechanism, and what to do if these problems arise, are also discussed.
We recommend choosing a high-quality rear windshield wiper, which will not only effectively clean the surface of the stern glass, but will also last much longer.
This procedure will be necessary for all car owners who have a rear wiper, either a station wagon or a Lada Kalina hatchback. For this work you will need a 10 mm wrench and a screwdriver (any).
How to install brushes on Kalina
Watch the video on how to install Bosch wipers correctly:
Bosch Wiper Blades - Hook Installation Video II-1-002
Before choosing, it will be useful to become familiar with the types of wipers on the market that apply to the Lada Kalina in order to understand which ones are better. For this model, there are only two categories of these products on sale today:
How to change wipers on a car: we understand the design and manufacturers
- frame;
- with no frame.
Each type has its own advantages, but both of them are not without disadvantages.
Frameless options have great durability. The materials used for their production are high-quality rubber and durable plastic. Time on this type of product does not have a strong effect and does not cause significant wear. The cleaners are characterized by soft operation and no squeaking. They are also not afraid of temperature changes.
Now about the disadvantages. There is only one – high cost.
The frame elements are made of metal with the use of plastic parts in the design. These components are integrated inside a metal frame. Brushes have a low cost and are sold in almost any retail chain.
The disadvantages of this type of product are very varied. Production does not involve the use of high-quality materials, so the wear and tear of such products is observed with enviable intensity. Two years of moderate use render the brushes completely unusable, after which the inevitable moment of replacement comes. Creak is an eternal companion to the work of frame products. It is also possible that the working component may break, which makes cleaning much more difficult.
The wipers are tired — Lada Kalina Universal, 1.6 l., 2014 on DRIVE2
I apologize for such a title, but there’s no other way to say it, but that’s putting it mildly. Like many owners of the second Viburnum, I’m not satisfied with the quality of cleaning the windshield; I’m generally keeping quiet about the rear one for now. Not only do standard brushes creak, but they also don’t clean them, leaving behind streaks and stains. Believe me, I’m not being picky, on the first Kalina everything was just super. Well, I think the problem will be solved by purchasing frameless brushes. How wrong I was... I bought it, installed it and... returned it, because... on the passenger side there was an uncleaned area right in the middle. Damn. I went online to see if anyone has the same problems. It turned out I'm not alone))).
My next attempt was to buy leashes from Kalina-1. Externally, the brush holders are not very different, but the length of the spring on the Russian leash is twice as long.
No comments necessary
I have already prepared a camera to share my happiness with dvukalinovodami. But another bummer came out: the leash on the driver’s side began to touch the plastic trim near the windshield with a metal wire and lift up the rubber seal. I started looking for differences, it turned out that the angle of the Russian leash was different, I decided to return it, not without problems, but they accepted it back at the store. Therefore, my advice is to check the brush holders without leaving the cash register. Maybe, of course, I came across a bad option, but I think that they are not suitable for LK2 without modification. Today I solved the problem by purchasing Bosch FRAME brushes... and lo and behold, I’m happy with everything. Nothing creaks, nothing remains on the glass.
bosch brushes
And don’t tell me after this that frameless ones clean better. Fact, not always and not on all machines. Apparently the windshields of LK2 have some kind of fantastic convexity that they do not lend themselves to frameless ones. IMHO
PS I managed to find a leash from K1 and take a photo of it in comparison.
On top is a leash from K1 at the bottom of K2. The height is different from the base. Result - the bracket touches the seal
Price: 280 ₽ Mileage: 1300 km
Video “How to replace a trapezoid and a motor with your own hands?”
The procedure for replacing these devices of the windshield wiper system on Kalina is given below (author - channel In Sandro's garage).
Parts and consumables:
- Windshield wiper blades
- Rags
- Brush detergent
Note:
The brushes have different lengths. The length of the left (driver's) windshield wiper blade is 600 mm, the length of the right blade is 410 mm.
When do you need to change wipers?
Warning:
Be careful when removing the brushes: the lever under the action of the spring may suddenly drop onto the glass and break it.
1. If the brushes are dirty, they must be cleaned with a rag moistened with water or a special product. If they are sufficiently dirty or when they are covered with ice, they should be removed and cleaned. If the wear of the brushes is already clearly visible, as well as if they are damaged, they must be replaced with new ones. To do this, move the lever with the brush away from the windshield.
2. Press the brush locking tab and move the brush down from the lever hook so that the brush lock comes out of the hook.
3. Remove the brush from the lever.
4. If you need to replace the brush retainer, move it from the brush axis and remove it.
5. Similarly, remove the other windshield wiper blade.
6. Install the brushes in reverse order.
The article is missing:
Photos of parts and consumables
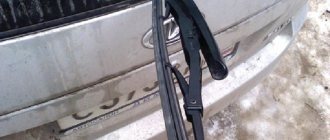
Removing the rear wiper blade
The whole procedure is carried out with the wiper removed, it’s not all very convenient to do, but it won’t be difficult to figure out. You need to pull the brush itself, and at the same time use a screwdriver to slightly release the latch, which is marked in the photo below with a yellow arrow.
Putting it back is much easier; you just need to insert the brush into the place where it is attached and press with a little force until it clicks.
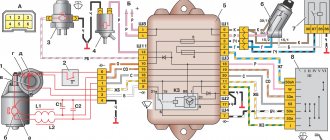
Lada Kalina dashboard diagram
1,2,3,4 — blocks of the instrument panel wiring harness to the blocks of the rear wiring harness;
5,6 — blocks of the instrument panel wiring harness to the blocks of the front wiring harness; 7 — block of the instrument panel wiring harness to the block of the wiring harness 8 — block of the instrument panel wiring harness to the block of the front wiring harness; 9 — lighting control module; 10 — ignition switch; 11 — on-board computer mode switch; 12 — windshield wiper switch; 13 — sound signal switch; 14 — light signaling switch; 15 — instrument cluster; 16 — evaporator temperature sensor; 17 — interior air temperature sensor; 18 — air conditioner switch; 19 — controller of the automatic climate control system; 20 — heater damper gearmotor; 21 — rear window heating switch; 22 — alarm switch; 23 — brake signal switch; 24 — cigarette lighter; 25 — electric amplifier control unit; 26,27 — blocks of the instrument panel wiring harness to the radio; 28 — backlight lamp for the heater control panel; 29 — illuminator; 30 — mounting block: 31 — heater electric motor switch; 32 — heater electric motor; 33 — additional resistance of the heater electric motor; 34 — lampshade lighting of the glove box; 35 — glove box lighting switch; 36 — control unit of the APS-6 automobile anti-theft system; 37 — driver airbag module; 38 — passenger airbag module; 39.40 — blocks of the instrument panel wiring harness to the blocks of the ignition system wiring harness. KZ - additional starter relay; K4 - additional relay; K5 - relay-interrupter for direction indicators and hazard warning lights; K6 - windshield wiper relay; K7 - headlight high beam relay; K8 - sound signal relay; K9 - relay for turning on fog lights; K10 — relay for turning on the heated rear window; K11 — electric seat heating relay; K12 - air conditioning compressor clutch activation relay;
Instrument panel wiring harness - 11186-3724030-20.
For Lada Granta, Kalina, Priora
The resistor shown in the photo is responsible for the number of strokes. Our task is to replace (using a soldering iron) it with a resistor with lower resistance. To get two sweeps of the wipers after washing the windshield, it is enough to solder a resistor with a resistance of 47 to 68 kOhm (0.25 W). To make three swings - from 70 kOhm. The result of the modernization on video:
It is worth noting that on sale you can find a wiper relay with advanced capabilities:
- There is a pause adjustment, that is, you can set any time between sweeps of the wipers;
- Three strokes after the washer, instead of four (there is no problem with the wipers squeaking on the glass);
- After the washer, the first stroke is delayed.
However, replacing a resistor in a relay yourself will cost only 5 rubles, and a functional relay will be 70-100 times more expensive.
Removal and installation of gearbox Lada Kalina 1117 2004 - 2013
Tools:
- Open-end wrench 8 mm
- Open-end wrench 10 mm
- Open-end wrench 17 mm
- Open-end wrench 19 mm
- Straight box spanner 13 mm
- Straight box spanner 19 mm
- Driver for socket attachment
- Knob attachment 10 mm
- Knob attachment 13 mm
- Knob attachment 15 mm
- Knob attachment 17 mm
- Knob attachment 19 mm
- Knob attachment E-14
- Extension for socket bits
- Adjustable stops 2 pcs.
- Medium Phillips screwdriver
- Medium flat screwdriver
Parts and consumables:
- Wooden blocks 2 pcs.
- CV joint grease-4
- Studs M12x1.25 mm 2 pcs.
- Transmission oil
- Rags
- 3.5 liter capacity
- Funnel with hose attached
Note:
We carry out the work with an assistant on an inspection ditch or overpass.
1. Drain the oil from the gearbox as described here. Disconnect the wire terminal from the negative terminal of the battery. Remove the air filter as described here. Remove the starter as described here. We remove the clutch cable lead from the groove of the clutch release fork lever, following the instructions described here. Remove the left mudguard of the power unit, as described here. Disconnect the wire block from the reverse gear lock solenoid.
2. Disconnect the wiring block from the reverse light switch.
3. Disconnect the wire block from the speed sensor.
4. Using a 10mm wrench, unscrew the three bolts securing the lower clutch housing cover.
5. Remove the clutch housing cover.
6. Remove the right and left front wheel drives, as described here. Using a 13mm spanner, loosen the tightening of the nut of the coupling bolt of the clamp securing the control rod to the shank of the gear selector rod hinge. Then disconnect the transmission control rod.
7. Using a 19mm wrench, unscrew the nuts of the two bolts securing the clutch housing to the gearbox housing (which also secure the torque rod bracket), holding the bolts from turning with a head of the same size.
8. We remove the reaction rod with the bracket from the gearbox.
9. Disconnect the plastic throttle cable holder from the gearbox bracket.
10. Using a 13mm socket, unscrew the bolt securing the ignition coil bracket to the clutch housing.
11. Using a 19mm socket, unscrew the two upper bolts securing the gearbox to the cylinder block, which simultaneously secure the bracket with the holders of the throttle cable and wiring harness. The front bolt (in the direction of vehicle travel) is shorter than the rear bolt. We remove the bracket with the cable and wiring harness from the gearbox.
12. Remove the left front suspension brace as described here. We install adjustable stops through wooden blocks under the engine oil pan and gearbox housing.
13. Using a 19mm spanner, unscrew the nut of the lower rear mounting of the gearbox to the cylinder block.
14. Using a 19mm socket, unscrew the bolt of the lower front fastening of the gearbox to the cylinder block.
15. Using the “E-14” head, unscrew the two screws securing the front left support bracket of the power unit to the support.
16. Using a 15mm socket, unscrew the three nuts securing the bracket for the front left support of the power unit to the gearbox.
17. Remove the bracket.
18. Using a 19mm socket, unscrew the two outer bolts 1 securing the rear support bracket of the power unit to the gearbox, and using a 17mm socket, unscrew the middle bolt 2.
19. We move the gearbox away from the engine, removing the input shaft from the hub of the driven clutch disc.
20. When removing and installing the gearbox, do not rest the gearbox input shaft on the clutch diaphragm spring petals so as not to damage them. Before installing the gearbox, apply a thin layer of CV joint-4 lubricant to the splined end of the input shaft. To facilitate the operation of installing the gearbox, we screw two guide pins M12x1.25 mm (with sawn slots for a screwdriver) into the front lower threaded hole of the cylinder block and into the rear upper hole.
21. We insert the input shaft of the gearbox into the splines of the driven clutch disk and, orienting the gearbox so that the two guide pins fit into the corresponding holes in the clutch housing, and the standard pin of the clutch housing into the hole in the cylinder block, push the gearbox all the way into the engine cylinder block . Use a screwdriver to unscrew the guide pins from the holes in the cylinder block. We carry out further assembly operations in reverse order.
22. Fill the gearbox with oil as described here.
The article is missing:
- Photo of the instrument
- Photos of parts and consumables
- High-quality photos of repairs
Do-it-yourself troubleshooting
To do this, you need to remove the trapezoid, which is located under the plastic decorative trim under the windshield. Windshield wiper repairs are carried out in the following order:
- unscrew and remove the windshield wiper blades along with the leads;
- unscrew and remove the plastic cover, for which you will need a TORX T20, or “star”;
- unscrew the trapezoid, which is attached to the car body with a nut and two bolts;
- disconnect the windshield wiper drive from the battery;
- remove the trapeze together with the drive.
If you do not remove the trapezoid, then when installing the bushings you can bend the hinges, which will lead to improper operation of the wipers. Therefore, it is better to remove the entire trapezoid and replace it not with weight, but with emphasis.
The destroyed bushing is immediately visible. It can be simply removed using wire cutters. To insert a new one, it and the locking ring must be steamed in hot water, otherwise it will not be possible to put it all on the hinge. Before putting on the locking ring, the bushing should be treated with lubricant (for example, lithol). All disassembly and assembly work takes a maximum of 40 minutes.
But if the central bushing “flies”, then most likely the entire windshield wiper mechanism will have to be replaced. Replacing a windshield wiper trapezoid is an even simpler task than the process of removing and installing new bushings. All work is carried out according to the algorithm described above.
Naturally, a complete replacement of the windshield wiper trapezoid will cost more than repairing the windshield wiper. But it will be more reliable. New ones are almost guaranteed to last longer than refurbished ones. Although some Lada owners claim that a rebuilt and repaired Kalina wiper trapezoid can easily last two years. Well, you should always base it on whether you are willing to spend time or money.
Replacing the rear wiper Kalina station wagon
Car wipers (we are talking about the windshield wipers themselves, not the blades) are usually durable parts. They are almost not affected by aggressive factors - except moisture. For this reason, they can easily serve without replacement for the entire time that the car is in use. However, occasionally they still have to be dismantled. In particular, this must be done if, for example, you plan to replace the windshield. The procedure for removing wipers is not at all complicated, but car services will charge you money for it, which may be useful for other purposes. In this article we will tell you how to remove windshield wipers in the correct way using the example of a 1st generation Lada Kalina car.
Tools and materials:
To remove the windshield wiper you will need:
- Head or key 13, new front wiper arms, if you change them (articles: 11180-5205065-00 on the driver’s side and 11180-5205066-00 on the passenger’s side) - for front wipers;
- A wrench for 10, a new rear wiper arm, if you change it (article: 11170-6313150-00 or 11190-6313150-00 depending on the body type - station wagon or hatchback) - for the rear wiper.
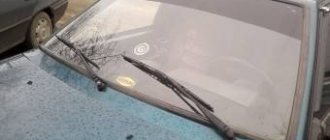
Replacing front wipers on Kalina
Before you start dismantling the wipers, remember that it is better to do this on the driver’s side with the head, and on the passenger side with the key, otherwise there is a risk of scratching the hood. However, if you are careful, the hood will not be damaged regardless of the tool used.
1) First of all, remove the plugs from the plastic. You will see nuts under them.
2) Take the head (wrench) and unscrew the nut. There will be a washer under it, pull it out immediately, otherwise it may get lost during the process of removing the wiper.
3) Then remove the windshield wiper. That's all.
4) It should be noted that before removal it is worth remembering, or even better, photographing exactly how the wipers were located on the glass. When you put them back, this information will be useful to you. If you put them in the wrong position, they can hit the pad below during operation, scratching it and damaging the brushes.
5) Install the windshield wipers in the reverse order.
Replacing rear wipers on Kalina
This procedure is only relevant for owners of a Lada Kalina hatchback or station wagon, since sedans were not equipped with a rear wiper. Remembering the location of the wiper will be useful here too, so take the time to take a photo of it before removing it.
1) First, lift up the metal cap that covers the nut.
2) Take a 10mm wrench and unscrew the nut. Just like on the front, there will be a washer under the nut, don't forget to remove it. Rock the wiper back and forth and pull it towards you, it will come off quite easily.
3) Reinstallation is carried out as usual, in the reverse order of removal.
Conclusion
Hatchback and station wagon cars are considered more practical, but sometimes they can have their own disadvantages. For example, on the new Kalina, the rear wiper does not press as hard as on the first generation models, which is why the wiper blade does not clean the rear window well, leaving uncleaned areas. Let's look at several ways to solve this problem.
How to change the rear ones
Rear wipers are also installed on hatchbacks and station wagons, since the rear window in such cars is quite large and gets very dirty, and a good view through it is also important.
The design of the rear wiper mounts is very different from that of the front ones. It is impossible to give universal advice here, since the rear wipers are mounted differently on all cars. Let's take the Kalina station wagon as an example.
The sequence of actions in this case is as follows:
Fines for crossing the stop line and speeding will no longer bother you!
- It is necessary to lift the protective metal cap of the wiper, under which there is a fastening nut.
- Take a 10mm wrench and unscrew the nut. Please note that there is a small washer under it to prevent it from being dropped. Slightly turning the wiper, pull it towards you and it can be removed without much difficulty. Now you need to remove the brush itself.
- With the wiper removed, you need to pull the blade, and at the same time, use a screwdriver to slightly release the latch that holds it to the lever. The brush will come off. You can change it as described above.
When purchasing new wipers, it is important not to make mistakes with the size and compatibility of the mounts. Please note that self-installation of frameless brushes on a car with frame brushes requires a special adapter. You need to pay attention to the shape of the bend of the brush, as it affects the efficiency of cleaning the windshield. It is advisable to treat new brushes with soapy water before use.
What to look for when choosing?
It is no secret that the level of visibility to the rear depends on the efficiency of the brush, which is especially important when maneuvering in cramped conditions and in bad weather. When choosing, you should lean toward high-quality branded products that will not subsequently emit an annoying squeak when rubbing against the glass and do not have to think about how to remove and replace the wiper. You should also inspect the integrity of the working element of the brush, which initially should not have cracks or breaks. An important role is played by the force with which the rear wiper is pressed to the surface of the glass, as well as the material from which the product is made.
Replacement
The process of replacing old windshield wiper blades with new ones does not cause serious problems
It is only important to carry out all actions carefully, not to break the plastic fastener included in the kit. The replacement process includes the following steps:
lift the wiper up, it is fixed in this position - perpendicular to the windshield;
Next, you need to take the brush body in your hand and squeeze it, then move it down - slight swaying will simplify the procedure;
then the brush is simply removed from the lever.
The installation process is performed in reverse. Many brush models are supplied with special adapters.
They must be used carefully. Plastic is usually fragile
If it is damaged, it will be impossible to install the brush in place. What will lead to the impossibility of using it?
When choosing a brush, it is important to focus on the brand. To date, Bosch, Champion and Denso have proven themselves well.
It is important to replace brushes in a timely manner, since road safety directly depends on this. Otherwise, precipitation falling on the windshield simply will not be removed in time
Instructions for installing wipers on viburnum
First of all, you need to remove the blades and unfasten the lock on one end of the wiper. After this, you will need to remove the rubber bands that are attached to the frame.
But this must be done carefully, as they can be tightly pinched by plastic.
Now you should compare the new rubber bands with the old ones and, if necessary, trim them. It is not recommended to use a knife or pliers for this; it is best to take scissors.
New rubber bands must be placed tightly on the windshield wipers. This can be done in 2 ways: either straighten the terminals with a screwdriver, or try to insert the rubber bands yourself. With the first option, there is a risk of damage to the terminals, and with the second, you can carry it for a long time. Everyone decides for themselves what is more convenient for them. But if you act carefully and take your time, you can try changing the rubber bands using the first method, saving time and effort.
After placing the rubber bands, you need to fix the fastening lock and lightly press the holders on the frame with pliers. You should act carefully as there is a risk of breaking the fragile plastic.
Repairing and replacing wipers is a fairly simple process that does not require any special skills from the car owner. This will only take a few minutes. The main thing is to have a good understanding of the operating features of the system. Replacing the electric drive or tightening the nut connection on the gearbox will not create any problems.
WIPERS / Replacing wipers with frameless ones
It is worth remembering to be careful when performing all types of windshield wiper maintenance. Before using windshield wipers in winter, you need to make sure that they are not frozen, otherwise the blades will scratch the windshield, which will entail its replacement and extra money.
Windshield wiper blades for Lada Kalina 2004-2018: sizes and articles - AutoExpert
Windshield wipers are important elements in any car. They, by clearing the windshield of dirt, enable the driver to view the roadway in bad weather. If these elements are faulty in bad weather, then driving such a car will pose a danger not only to the person in the car, but also to all other road users.
In the video, replacing wiper blades with frameless ones.
Size of wipers on Lada Kalina
The following are standard for Lada Kalina:
- Driver's side brush – 60 cm.
- Passenger side brush – 40 cm.
Editorial Kalina kindly agreed to pose to show the size of the wipers
Alternative brush sizes
Some Kalinovods from our community change the passenger wiper blade to a 43 cm size. We tried it, end to end. But, you can adjust the trapezoid, and it will be better. But we didn't like it!
Replacing wiper blades (+ video)
The blades are removed and the lock on the end of the windshield wiper is unfastened. Next, the rubber bands that are mounted on the frame are removed. Work must be done carefully. Next, new brushes are installed. If necessary, they are trimmed. You need to use scissors for this. The new rubber bands are tightly attached to the windshield wiper. Here you may need to straighten the fasteners or push the brushes under them. In the first option, you can accidentally damage the terminals, and in the second, you can fiddle with the work for a long time. Here everyone should choose the most convenient method for themselves.
As you can see, replacing and repairing wipers is a fairly simple job. This does not require certain skills and knowledge from the driver. The main thing is to understand the design of this system and know where to look for a fault. You also need to be quite careful when carrying out work. In winter, you need to make sure that the brushes are not frozen and there is no ice on them, as this can lead to damage to the glass.
Selecting wiper blades
Denso frameless wipers are good, but the “hook” will have to be finished off a little with a grinder
Depending on the purpose, wiper blades may be different. They are distinguished by:
- Degrees of resistance to low temperatures.
- Size.
- The cycle of work.
Frame
Frame wipers are the most reliable (in my humble opinion)
Frame brushes are made of metal with plastic inserts. If they are used frequently, their resource quickly runs out. All fastening elements in them become loose. Also, these wipers cannot work at low temperatures.
Frameless
Frameless wipers for Kalina ACLO, in any Auchan in the country
They are based on plastic and rubber. They are arched. The advantage of this type of brushes is their resistance to low temperatures and the absence of noise during operation. They can also last for a long period of time. They can be easily updated if necessary. To do this, you just need to choose the appropriate size brushes.
Problems with the wipers
Therefore, it is recommended to constantly monitor the operation of the wipers and promptly correct various problems. The principle of operation of wipers is simple, and most problems can be resolved independently. The main question here is to know a little about the operating principle of this unit.
In the case when the wipers on the Lada Kalina start to work poorly, you first need to check the mounting block, as well as the integrity of the fuse. As noted, this reason is the most common. Even a beginner can fix it.
To replace the fuse, you must remove the cover from the fuse box. It is located under the steering wheel on the left. There is a diagram on this cover that will help you figure out where each fuse is located.
It must be found, checked and replaced if necessary.
Intermittent operation
In this case, attention should be paid to the relay.
Appearance of the wiper relay
Wiper relay number K6.
Fuse box diagram
Also, if necessary, replace the relay. It is located next to the fuses in the mounting block. If the relay is working properly, then you need to check the drive. All contacts are inspected for oxidation. If necessary, they are replaced with new ones.
Possible causes of the malfunction and ways to eliminate them:
When the windshield wiper is on, the electric drive does not work:
Fuse blown:
- remove the cover located to the left of the driver, under the steering column, under it there is a mounting block;
- on the cover of the mounting block there is a diagram of the location of the relays and fuses of the car, we find the required fuse and change it if necessary;
Relay fault:
If the wipers on the Lada Kalina do not work intermittently, you need to change the relay located in the mounting block, next to the fuses.
Wiper motor malfunction:
- we check the ground terminal of the electric motor, screwed to the car body next to the rack;
- we clean it and the attachment point;
- install in place;
VAZ 1117 If this does not have a result, disconnect the connector for the electric drive of the windshield wiper, located under the windshield frame.
Using a tester or any other continuity test, we check whether power is coming to the connector. If power comes in, then it is necessary to change the wiper motor.
Disconnect the terminals from the battery. Remove the decorative caps from the leashes. Unscrew the nuts securing the leads and remove them. Remove the plastic grille under the windshield frame by unscrewing the bolts that secure it. Having unscrewed the trapezoid fastening (two bolts and one nut), remove the electric motor from the box and disconnect it from the trapezoid. We install a new one, repeating the procedure in reverse order.
If power does not come to the connector, the steering column switch must be replaced. Disconnect the battery terminals. Remove the plastic steering column cover. Disconnect the switch block and, pressing the latches on both sides, remove the steering column wiper switch. Install a new one by repeating the process in reverse order. Assembling the casing.
When turned on, the wipers on Kalina do not work, but the electric drive rotates
It is necessary to check the condition of the gearbox and wiper trapezoid.
Unscrew the plastic grill under the windshield frame. First remove the wiper arms and unscrew the nuts that secure them. We check whether the gearbox axis of the electric windshield wiper drive rotates.
If the axis rotates and the trapezoid is stationary, check the splined connection of the gearbox and trapezoid, and if necessary, tighten the fastening nut. If the connection is severely worn, it is necessary to replace this unit.
If your windshield wipers on your Lada Kalina do not work, this is not a reason to despair. As a rule, the cause is a minor malfunction. Such as a blown fuse or a loose nut on the spline connection between the gearbox and the windshield wiper drive, which can simply be tightened.
The windshield wiper electric drive system is quite reliable and does not require special maintenance. It is enough to follow basic operating rules. If during the winter period the wipers are frozen to the windshield, then before turning on the windshield wiper, it is necessary to free them from ice. And they will serve you without causing any problems.
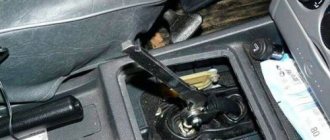
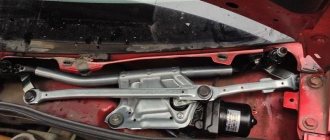
Removing the windshield wiper mechanism completely is quite an easy job, for this we need 10 by 13 heads, a ratchet, a knob, a 10 and 13 ring spanner, you can also use an open-end wrench.
First of all, you need to get down to work on removing the wiper arms and plastic linings; detailed information on removing the plastic linings can be read here: Replacing the cabin filter on a Lada Kalina.
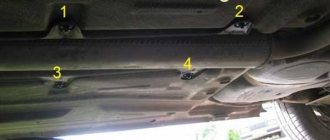
If you have sorted out the removal of the plastic covers, we proceed to the process of unscrewing the trapezoid mounting bolts. First, unscrew it on the left, as shown in the picture.
Then in the center.
After this, unscrew the nut on the right side; for this it is better to arm yourself with an open-end wrench.
Now there is nothing holding the trapeze, you need to slightly tilt it forward.
We take it out of the seat.
The final step when removing is to disconnect the power plug of the motor. To do this, you just need to bend the plug lock and remove the plug. First you need to disconnect it from the body; the plug is attached to a clip.
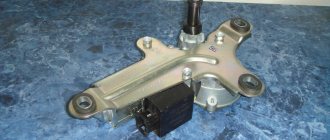
Removing and installing the windshield wiper motor on Lada Kalina
The motor is connected to the trapezoid by 3 bolts and one nut. So we unscrew the 3 bolts using a 10mm socket.
After this, unscrew the nut securing the trapezoid and the motor shaft.
You can remove the motor, since there are no more fasteners.
If there is a need, we replace the trapezoid or motor and assemble it in the reverse order.
The wipers stopped working - we find out and eliminate the cause
Poor quality work of any component and element of your car is not just discomfort during the trip, but also a certain irritating factor. Every time you have to deal with the fact that some piece of technology does not work in a decent way and does not offer a high enough quality of functioning. This is especially difficult for idealists, for whom everything should work at the highest level and without problems. One of the most annoying problems is the failure of the wipers. If the windshield wipers stop working, wave randomly, or stop when the control knob is turned off right in the middle of the glass, you should think about possible problems. Here we should highlight several main components that can break. Trapezoid, wiper fuse, intermittent wiper relay, power handle and other elements.
You can find the cause yourself, or also seek help from specialized forums where similar problems are discussed. Often on forums you will find the same symptoms of a problem and you can easily repair your car. If the wipers stop working, you will have to do something quickly. Otherwise, you will have to experience significant difficulties when traveling in rainy or simply wet weather. In winter, the inability to clean the glass from sticking dirt and constantly sticking snow will simply not allow you to drive normally. You will have to stop every two minutes and clean the windshield. Let's look at the most common problems with wipers in modern cars.
Trapezoid - the mechanism for direct operation of the wipers
One of the most complex mechanisms in the wiper system kit is the trapezoid. Today, no car manufacturer has such a reliable wiper drive mechanism to guarantee long-term operation of the device. Banal jamming of brushes or excessive emphasis on the glass, improper activation of the wipers, freezing to the glass in winter - all these reasons can be detrimental to the trapezoid. Among the possibilities for restoring this mechanism, it is worth highlighting only a few possible steps:
- purchasing a new trapezoid is often the best step for domestic cars, in which the wiper mechanism costs about 1000-1500 rubles;
- for foreign cars, purchasing a new trapezoid will cost exorbitant amounts of money, so in this case, repairs should be made and broken parts restored;
- Often the bushings and tips in trapezoids fail, which are often plastic and are terribly resistant to frost, so they can simply be replaced;
- if it is not easy to find a repair kit for a trapezoid for your car, you can try installing bushings and other parts from other cars of a similar class;
- Direct replacement of the trapezoid is necessary if even repair work does not eliminate the problem, or after repair the mechanism begins to tap during operation.
If the rear wiper of the Lada Kalina 2 does not clean well (the reason is the leash, not the brush)
07 April 2022 LadaOnline 39 286 Hatchback and station wagon cars are considered more practical, but sometimes they can have their own specific disadvantages. For example, on the new Kalina, the rear wiper does not press as hard as on the first generation models, which is why the wiper blade does not clean the rear window well, leaving uncleaned areas. Let's look at several ways to solve this problem.
Installation of wiper arms from Lada Kalina 1
The difference between the rear wiper arms is the length of the spring. On the new Kalina, the spring is short and is not able to press the blade firmly enough against the rear window. The design allows you to install on Kalina 2 a wiper arm from Kalina 1, catalog numbers:
- Rear windshield wiper arm Kalina station wagon - 1117-6313150;
- Rear wiper arm Kalina hatchback - 1119-6313150.
To change the leashes, first remove the old one by unscrewing the nut, and then install the new one, that’s it!
Modernization of wiper arms for Lada Kalina 2
It is not always possible to buy a wiper arm for the first Kalina; in this case, the design can be modified. It is necessary to remove the leash and tension spring. Then drill a new hole in the metal bar of the lever closer to the brush. We install the spring using a screwdriver, clinging it to the new hole. Now the tension will be stronger, which will allow the rear wiper to clean the glass better.
Result on video:
By the way, another way to solve the problem of poor cleaning of the rear window is to install a frameless wiper. Let us remind you that the front wiper blades can be installed in larger sizes.
Photo: logbook iosif-waitberg and c0de
Keywords: Lada Kalina windshield wipers | Lada Kalina accessories
1 0
Found an error? Select it and press Ctrl+Enter..
Similar materials
- What size of wipers (windshield wipers) is better to choose for Lada Priora
- Removing the rear light and replacing lamps Lada Kalina 2
- What size to choose for Lada Granta, Kalina 2 wipers
xn--80aal0a.xn--80asehdb
What is it for?
Some car owners mistakenly believe that it is advisable to change the cleaning elements on the car’s windshield wipers only when they are completely worn out. In fact, the serviceability of the wipers is not a trifle, but an important factor in the serviceability of the car, on which driving safety also depends.
Here are signs that indicate that the cleaning elements need to be updated urgently.
Presence of stripes on the surface of the windshield
Due to streaks on the windshield, you will not be able to closely monitor the condition of the road. You can extend the service life of car brushes by turning on the wipers only when the windows are clean.
Important! Of course, wear and tear is inevitable sooner or later, but if you keep your windows cleaned, your cleaning devices will last longer.
Dirty, uncleaned areas
The cause of this problem is the deformation of elements due to contamination or temperature changes. If the deformation occurs due to contamination, then replacement is not necessary. It is enough to wash the cleaning elements in water at room temperature using a mild detergent.
What to look for when choosing?
It is no secret that the level of visibility to the rear depends on the efficiency of the brush, which is especially important when maneuvering in cramped conditions and in bad weather. When choosing, you should lean toward high-quality branded products that will not subsequently emit an annoying squeak when rubbing against the glass and do not have to think about how to remove and replace the wiper. You should also inspect the integrity of the working element of the brush, which initially should not have cracks or breaks. An important role is played by the force with which the rear wiper is pressed to the surface of the glass, as well as the material from which the product is made.
What are wipers and when should they be changed?
Windshield wipers are a device in which a metal arm is connected to a rubber wiper surface . The wiper blade is secured to the lever with a special holder with a plastic plug. They come in two varieties: framed and frameless.
Frame brushes have moving parts called rocker arms. They hold the cleaning surface on the windshield. The fundamental disadvantage of such “wipers” is the presence of hinged joints, which are vulnerable to the ingress of snow and ice, which disables the wipers. In addition, the rubber brush often does not adhere tightly to the glass, which makes its work ineffective.
Wiper frame design
Frameless wipers have a spring instead of rocker arms, which presses the blade to the surface of the windshield. Such windshield wipers look more organic in appearance, clean the glass better and do not wear out so quickly. You can recognize them by the characteristic curve of their shape. Windshield wipers of this type are installed on most modern cars and have the following advantages:
- They look much better.
- Can be used on glass of any curvature;
- They do not impair the aerodynamic properties of the body.
- Less sensitive to icing.
- Does not interfere with visibility when folded
Frameless design wiper
At the same time, it is not possible to replace only the rubber part in such “wipers”; you will have to change the whole thing. Often, a frameless windshield wiper needs to be selected for a specific car model based on the length of the blade and the curvature of the windshield.