If the voltage regulator unit, capacitor and not a tight fit of the brushes are faulty, or if they are worn out, the vehicle's supply voltage deviates from the norm. In this case, it is necessary to check the above listed elements and, if necessary, replace them. In this article we will talk in more detail about diagnosing and replacing generator elements in a Lada Kalina car.
To remove the Lada Kalina voltage regulator you will need the following tool:
flat-blade screwdriver, 8mm and 10mm open-end wrenches and 7mm, 8mm and 24mm socket wrenches, hammer, soldering iron, universal meter (with DC voltmeter and megger)
Checking the functionality of the voltage regulator on the Lada Kalina generator
1. Move aside the rubber insulating cover of the positive terminal from the generator.2. Start the engine and allow the engine to warm up so that the vehicle operates normally at idle speed.3. Measure the voltage between the positive terminal and the body (negative terminal). The voltage should be 14.5-15.1 volts.
If there is a deviation from the specified range, the voltage regulator must be replaced. See also checking the Lada Kalina generator regulator in the section “Replacing the voltage regulator”
Checking the functionality of the Lada Kalina generator capacitor
The capacitor is usually checked with a specialized meggometer, since not all universal devices have a measurement of up to 10 MoM. The device is set precisely in the range of 1-10 MΩ. Before connecting to the capacitor, the device shows infinity. If connected to a working capacitor, it begins to charge and an electric charge accumulates on its plates - current flows and, accordingly, the resistance on the device drops. After charging it (saturating the capacitor plates), the resistance again becomes infinite.
Replacing the voltage regulator Lada Kalina
carried out as follows
1. Disconnect the negative cable from the battery.2. Disconnect the excitation block from the generator.
3. Disconnect the positive terminal from the battery by unscrewing the nut.
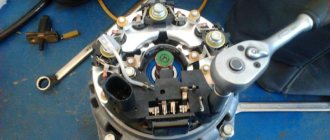
4. Remove the factory seal from one of the screws holding the plastic casing and remove the screws. Remove the protective plastic cover.5. Remove the two screws securing the regulator and remove the voltage regulator.
6. Check the ease of movement of the brushes. They must protrude at least 5 mm from the voltage regulator housing.7. You can check the voltage regulator by connecting a 12 V lamp to its outputs and applying a voltage in the range of up to 12 volts to its inputs, while the lamp should light and the voltage is more than 12 V to 16 V.
If the voltage is too high, the lamp should go out. If this algorithm does not work, then the regulator must be replaced. Installation of the regulator is done in the reverse order.
Replacing the rectifier unit with a capacitor Lada Kalina
1. Using a soldering iron, unsolder the six leads and remove the 3 bolts.
2. Remove the rectifier unit from the generator. Installation of the rectifier unit is carried out in the reverse order
Checking diodes on the rectifier block Lada Kalina
1. Dodas are checked with a universal device. (6 diodes in total) Connect the black “negative” probe to the negative plate, and the positive “red” probe alternately to the three contact terminals of the diodes. The resistance should be 580-620 Ohms.
Attach the red “positive” probe to the negative plate, and the negative “black” probe alternately to the three contact terminals of the diodes. The resistance should be 580-620 Ohms.
Checking the windings of the Lada Kalina generator
1. Check the generator windings with a device. All windings should have approximately equal resistance, without significant deviations. Deviations indicate a break or short circuit.
Any electrical equipment fails sooner or later. Thus, the most common generator malfunction on the Lada Kalina remains the regulator relay. Replacing this element is not difficult, but requires certain knowledge and skills.
Video on replacing the voltage regulator relay on a Lada Kalina:
This video story tells about replacing the generator regulator relay on a Lada Kalina, the nuances of installation and configuration.
Replacing generator brushes for Lada Kalina sedan (VAZ Kalina)
If the voltage regulator unit, capacitor and not a tight fit of the brushes are faulty, or if they are worn out, the vehicle's supply voltage deviates from the norm. In this case, it is necessary to check the above listed elements and, if necessary, replace them. In this article we will talk in more detail about diagnosing and replacing generator elements in a Lada Kalina car.
To remove the Lada Kalina voltage regulator you will need the following tool:
flat-blade screwdriver, 8mm and 10mm open-end wrenches and 7mm, 8mm and 24mm socket wrenches, hammer, soldering iron, universal meter (with DC voltmeter and megger)
Checking the functionality of the voltage regulator on the Lada Kalina generator
1. Move aside the rubber insulating cover of the positive terminal from the generator.2. Start the engine and allow the engine to warm up so that the vehicle operates normally at idle speed.3. Measure the voltage between the positive terminal and the body (negative terminal). The voltage should be 14.5-15.1 volts.
If there is a deviation from the specified range, the voltage regulator must be replaced. See also checking the Lada Kalina generator regulator in the section “Replacing the voltage regulator”
Checking the functionality of the Lada Kalina generator capacitor
The capacitor is usually checked with a specialized meggometer, since not all universal devices have a measurement of up to 10 MoM. The device is set precisely in the range of 1-10 MΩ. Before connecting to the capacitor, the device shows infinity. If connected to a working capacitor, it begins to charge and an electric charge accumulates on its plates - current flows and, accordingly, the resistance on the device drops. After charging it (saturating the capacitor plates), the resistance again becomes infinite.
Replacing the voltage regulator Lada Kalina
carried out as follows
1. Disconnect the negative cable from the battery.2. Disconnect the excitation block from the generator.
3. Disconnect the positive terminal from the battery by unscrewing the nut.
4. Remove the factory seal from one of the screws holding the plastic casing and remove the screws. Remove the protective plastic cover.5. Remove the two screws securing the regulator and remove the voltage regulator.
6. Check the ease of movement of the brushes. They must protrude at least 5 mm from the voltage regulator housing.7. You can check the voltage regulator by connecting a 12 V lamp to its outputs and applying a voltage in the range of up to 12 volts to its inputs, while the lamp should light and the voltage is more than 12 V to 16 V.
If the voltage is too high, the lamp should go out. If this algorithm does not work, then the regulator must be replaced. Installation of the regulator is done in the reverse order.
Replacing the rectifier unit with a capacitor Lada Kalina
1. Using a soldering iron, unsolder the six leads and remove the 3 bolts.
2. Remove the rectifier unit from the generator. Installation of the rectifier unit is carried out in the reverse order
Checking diodes on the rectifier block Lada Kalina
1. Dodas are checked with a universal device. (6 diodes in total) Connect the black “negative” probe to the negative plate, and the positive “red” probe alternately to the three contact terminals of the diodes. The resistance should be 580-620 Ohms.
Attach the red “positive” probe to the negative plate, and the negative “black” probe alternately to the three contact terminals of the diodes. The resistance should be 580-620 Ohms.
Checking the windings of the Lada Kalina generator
1. Check the generator windings with a device. All windings should have approximately equal resistance, without significant deviations. Deviations indicate a break or short circuit.
Any electrical equipment fails sooner or later. Thus, the most common generator malfunction on the Lada Kalina remains the regulator relay. Replacing this element is not difficult, but requires certain knowledge and skills.
Video on replacing the voltage regulator relay on a Lada Kalina:
This video story tells about replacing the generator regulator relay on a Lada Kalina, the nuances of installation and configuration.
Operating principle
The basic principle of operation of the generator is as follows: a three-phase alternating current is induced in the stator winding, which is converted into direct current using a rectifier unit attached to the cover of the device. On the cover there is a unit consisting of an electronic voltage regulator and a brush holder. The rotor rotates from the crankshaft of the car engine via a serpentine belt.
The Lada Kalina generator has the following characteristics:
- maximum output current - 85-90 A;
- voltage - 14.4-15.1 V;
- direction of rotation is right.
4 bolts secure the stator and covers of the device. The covers contain bearings in which the rotor shaft rotates. The rear bearing is located on the rotor shaft; it is mounted in the rear cover with a small gap. The front bearing, which slides along the rotor shaft, is installed in the front cover with a slight interference fit and covered with a pressure plate. The device is covered at the back by a plastic casing.
The generator connection diagram is quite simple. When the car's ignition is turned on, voltage is supplied to the voltage regulator through the low battery warning light. When the engine is started, the field winding receives power from 3 diodes that are installed on the rectifier block.
Typically, checking the alternator is easily done using the battery charging warning light. If the device is working properly, this lamp should light up when the ignition is turned on, and when the engine starts, it should go out. If the lamp burns brightly or at full intensity, then the generator needs to be replaced or repaired because it is faulty.
Causes of malfunction
There are several reasons for the failure of the regulator relay on a car. Let's consider the main ones :
- A short circuit in the on-board network, which led to the failure of the regulator relay. This happens quite often because the generator itself serves as the power source and there is no fuse between it and the current produced to protect it.
- Wear . Like any part in a car, the regulator relay can wear out.
- The brushes are worn out .
How to determine that the regulator relay has failed?
Let's consider the main options:
- Insufficient battery charge means that after the ignition is turned off, the car has difficulty starting or may not start at all.
- The light shines normally at 2000 rpm, but dims at idle.
Once the root causes have been sorted out, you can move on to the replacement process.
The process of replacing the generator regulator relay
So, the process of replacing the generator regulator relay will require dismantling the product itself, but it will not require a pit, and all operations can be carried out from the engine compartment. Let's take a step-by-step look at how to replace the generator regulator relay on a Lada Kalina:
- We remove the “minus terminal”.
- To replace the relay, you will have to dismantle the generator.
- Having loosened the generator mounts, let it loose a little and remove the belt.
- Remove the wire block from the connector.
- We unscrew the nut that holds the contact group of wires and dismantle it.
- We unscrew the bolts of the upper and lower fastenings and take them out.
- We dismantle the generator.
- When the generator is removed, you can proceed to replacing the relay.
- We unclip the three plastic latches of the back cover and remove it.
- Disconnect the diode bridge.
- Unscrew the nut and remove the bushing on the contact group bolt.
- Unscrew the two screws that hold the regulator relay in place.
- We dismantle the relay.
- Assembly is carried out in reverse order.
Thus, the Lada Kalina generator regulator relay was replaced.
Choice for Kalina
Selecting a Lada Kalina relay regulator is quite easy. There are no original analogues, but it fits with VAZ 2110, Priora or Grants.
Therefore, as experience and practice show, car enthusiasts, as a rule, install the original, if they do not change the generator to a more powerful one.
Main process
Replacing the generator in the case of Kalina with an 8-valve or 16-valve engine involves performing the following steps:
- First of all, you will need to install the car on the repair site and fix the position of its wheels using wheel chocks. It is also necessary to turn off the engine and disconnect the terminals from the battery to ensure the safety of the work being carried out.
- After this, you need to loosen the belt tensioner roller, which fixes the position of the generator. To do this, you will need to unscrew the fasteners and dismantle them.
- The next step is to disconnect the plug secured by a plastic latch. To remove it, you need to lightly press it and pull it to the side. If everything is done correctly, the plug can be removed without problems.
- You will also need to remove the wire terminals located under the protective cap. Therefore, the car owner will first need to dismantle the protective cap by prying it off, and only then remove the terminals.
- Once the top bolt of the generator is removed, you can proceed to the bottom one. The actions are the same - a knob, a ratchet handle, a light knock and dismantling. However, in this case, it is recommended to hold the nut on the reverse side so that it does not turn.
- Next, you should begin dismantling the rod. This should be done carefully and carefully, since there are bearings and bushings inside. They will need to be held so that they do not fall and get lost.
The final step will be to dismantle the generator, clean the internal space of dirt, rust, possible traces of oil, and install a new unit - a standard generator or its equivalent.
You can check the functionality of the generator with a multimeter by connecting it to the battery terminals. The voltage reading should not be less than 13.4 volts.
The pitfall when replacing a Lada Kalina generator with air conditioning is its changed position, so you will have to approach it from the other side.
Thus, in order not to have to change the generator frequently, it is recommended to regularly inspect the technical condition of the car and, if necessary, repair certain parts, devices, and systems. Undoubtedly, repairs will cost the owner of Kalina somewhat less than buying new spare parts and entire units.
conclusions
Replacing the generator regulator relay on a Lada Kalina is quite easy and simple, since no special knowledge or skills are required. The choice should be taken carefully, since the market already consists of 50% fakes. When purchasing, you should check for quality certificates and holograms.
Replacement of brushes occurs in the following order.
2. To do this, you will need to unsolder the wires.
3. It would also be a good idea to clean the contacts and check the elasticity of the springs.
After you have completed the dismantling and preparatory work, proceed directly to replacing the generator brushes.
2. Slowly, carefully install the regulator into place. Be careful, the part is very fragile, so try to proceed with extreme caution.
That's all, the brushes have been replaced!
Replacing brushes is not a complicated procedure; it is only important to understand the principle of operation of the device, as well as to have some skills. I hope this article will help you understand all this.
Source
How to dismantle the generator
Now we need to tell you how to remove the generator. To do this, proceed according to the following principle:
- Disconnect the battery.
- Disconnect all wires going to the generator.
- Pre-treat threaded connections with penetrating lubricant such as WD-40.
- Unscrew the nut from the top mounting of the generator. The bracket can also be removed.
- Unscrew the nut from the lower mounting bolt. Hold the bolt head from turning.
- Remove the Kalina generator belt from the roller. There is no need to perform any manipulations with the air conditioner and power steering.
- Remove the generator from its seat.
Detailed description of replacement
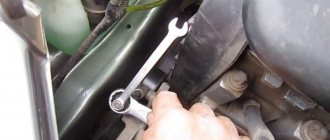
First, you need to disconnect the negative terminal of the battery to prevent a short circuit. After this, remove the protective plastic cover by slightly pressing the three latches on it, as shown in the photo:
Then you need to pry up the small power plug with a screwdriver and pull it up with the force necessary to remove it. Personally, in my case, the wire was very tight on the contact, so I had to try hard before removing it. It is better to do everything carefully so as not to tear the solder off the voltage regulator.
After this, you can unscrew two small bolts, as shown in the photo:
And the last one will be a large bolt, which does not need to be turned out completely, you can just loosen it slightly:
And freely remove the voltage regulator along with the brushes, as clearly shown below:
If a part needs to be replaced, buy a new one and install it in the reverse order of removal. The price for a voltage regulator along with alternator brushes for a Lada Kalina will be about 350 rubles.
Source
Actions when charging disappears
The generator on a Kalina with air conditioning has more power than on cars without an air conditioning system. The design and faults are the same. What to do if charging is lost? Don't panic and check immediately:
- Voltage regulator. The easiest and most expensive way is to replace it with a known good one. But you can also apply voltage of 12 V and 15 V to check operation. Regardless of whether the regulator is mechanical or electrical, it will behave the same. In the first case, voltage will be supplied to the excitation winding, but in the second - not.
- Alternator slip rings and brushes. You can use a simple lamp probe to check the contacts. The length of the brushes must be more than 5 mm, otherwise they should be replaced.
- The integrity of the field winding can be checked with a tester. Moreover, there is no need to remove the generator, just crawl up to the slip rings and check the resistance between them. Please note that they should not short to ground.
- The condition of the stator winding and diode bridge can be assessed only after dismantling the generator.
The generator must always be in good working order
Any modern car is equipped with electrical equipment that is absolutely necessary for the vehicle:
- without a starter it is impossible to start the engine;
- a car cannot be driven without lighting at night;
- The heater motor creates heat in the cabin;
- The wiper motor clears the windshield of rain and snow;
- FM radio makes it possible for the driver not to get bored on the road.
But all these devices cannot work without electricity, so the car must have a power source.
The current from which all consumers in the car are powered is produced by the generator, and the performance of the entire electrical circuit of the vehicle depends on its condition.
Therefore, the generator must always be in good working order, and if any breakdowns occur with it, they must be eliminated in a short time.
Let's sum it up
As it turned out, repairing or replacing the generator in a LADA Kalina car does not require much effort, so such manipulations are accessible even to inexperienced owners; a connection diagram is used to make the task easier. An important point in operation is periodic diagnosis of the condition of both the unit itself and its component elements, including the tension system. Timely prevention will significantly extend the life of the unit, and the owner of LADA Kalina will have considerable savings.
Is it possible to restore brushes?
In emergency situations, when you can’t count on help, you can use the advice of experts on emergency restoration of the brush assembly. However, reliable operation of the brush assembly can only be fully ensured by using high-quality spare parts recommended by manufacturers. Recovery is always a temporary solution; As soon as the opportunity arises, you need to go to the service center.
The procedure for replacing brushes, despite its apparent simplicity, requires certain skills and special knowledge. Therefore, it is better to go to a car service center, where diagnostics and maintenance of your car’s electrical equipment will be performed quickly and with a quality guarantee.
Installation and repair features
Installation occurs in reverse order. If necessary, the generator is replaced or repaired. In some cases, repair will be impractical, since there are many unusable components, including stator and rotor windings. Restoration will be expensive; it will be much easier to completely replace the generator on Kalina. The cost of a new generator in stores is 4-5 thousand rubles. At "showdown" you can buy it 2-3 times cheaper.
Generator Lada Kalina
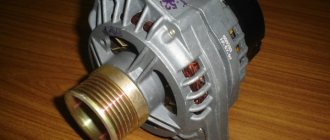
Lada Kalina cars are equipped with three-phase generators that produce alternating current; to produce direct current, a rectifier unit is included in the generator circuit.
AvtoVAZ equips VAZ 1118 cars with generators of the type 5132.3771
or 9402.3701-06
, there are many different manufacturers producing spare parts for VAZ cars.
The generator for the Lada Kalina can be of different power; the industry produces current sources of 85, 100, 90, 115, 120, 135 Amperes.
Among the most famous manufacturers of VAZ parts are:
- Pramo;
- StartVOLT;
- KZATE;
- LKD (China);
- Eldix (Bulgaria);
- ISKRA (Slovenia);
- BATE (Belarus);
- Bosch.
Signs of generator failure
To diagnose the generator set, it is not necessary to remove it. Here are some typical symptoms of breakdowns:
- The presence of a hum and whistle from the generator indicates that the bearings are damaged. If you start it, the rotor may jam and the belt may break.
- Whistling, short-term ignition of the charging control lamp - the alternator belt on the Lada Kalina is worn out, or it has low tension. If the lamp is constantly on, there may be a break.
- If the charging lamp is on, this means that there is no voltage at the generator output. The reason may lie in the windings, voltage regulator, slip rings, diodes, wiring.
Causes of malfunction
View of the old and new voltage regulator relay
There are several reasons for the failure of the regulator relay on a car. Let's consider the main ones :
- A short circuit in the on-board network, which led to the failure of the regulator relay. This happens quite often because the generator itself serves as the power source and there is no fuse between it and the current produced to protect it.
- Wear . Like any part in a car, the regulator relay can wear out.
- The brushes are worn out .
The arrow indicates worn brushes. Their length is 3 mm instead of the required 5 mm.
How to determine that the regulator relay has failed?
Connection diagram of the generator to the electrical circuit
Let's consider the main options:
- Insufficient battery charge means that after the ignition is turned off, the car has difficulty starting or may not start at all.
- The light shines normally at 2000 rpm, but dims at idle.
Once the root causes have been sorted out, you can move on to the replacement process.
Kalina generator design
The process of replacing the generator regulator relay
So, the process of replacing the generator regulator relay will require dismantling the product itself, but it will not require a pit, and all operations can be carried out from the engine compartment. Let's take a step-by-step look at how to replace the generator regulator relay on a Lada Kalina:
Searching in auto parts stores for such small, but sometimes very necessary parts as generator brushes, starter brushes, heater motor for my car (VAZ-11174, 2010 onwards, mileage at the time of writing 135,000 km) in my region (I live in a village, I work in a small town) led to a disappointing conclusion - you will find horseradish (((. Please, the entire assembly is assembled - either in stock or to order. The experience of reassembling the KZATE 85A generator speaks in favor of the last option (due to the hassle of removing and installing) I removed the old one I immediately installed a new one (preferably BOSCH, especially relevant for lovers of music and heating everything and everyone, since the KZATE 85A does not keep the windshield heated when connected to the “north” - I installed it and connected it myself while I’m using it to the “South”).
If you have time to tinker, and if you have “direct hands”, you will definitely find a useful resource on the details of starter-generators on the Internet. The downside is that it is English-language.
We find the required article and then search the Internet resources of local auto stores. In my region I can find something in ASTA and Dvizhkom stores.
Generator operating principle
To visually visualize the operation of the installation, use the generator connection diagram. The second component of the installation is a voltage regulator, which is included in the power circuit of the rotor winding. The instrument panel contains a charge control lamp that:
- Lights up when the ignition is turned on and there is a breakdown in the generator set.
- Does not light up in normal mode and when there is a proper charge level.
A relay with normally closed contacts is used to power this lamp. Therefore, when the ignition is turned on, it lights up. Further, as soon as you start the engine, the generator begins to generate voltage. The relay winding is connected to the rotor power circuit; when voltage appears, the contacts switch - they open and the lamp goes out.
Device
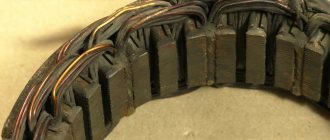
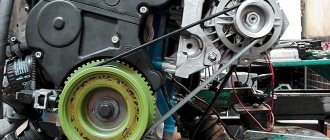
The Lada Kalina generator consists of the following parts:
- housing (front and back cover);
- pulley;
- stator windings;
- armatures (rotor);
- voltage regulator relay (charging relay);
- diode bridge (rectifier unit);
- two armature bearings;
- rear plastic casing.
Inside the generator housing, along its walls there is a stator with a winding, and a rotor is located in the center.
At the back of the case there is a diode bridge and a voltage regulator relay; the diode bridge is covered with a plastic casing to prevent dirt and dust from entering.
There is a pulley in front of the housing; it is put on the rotor shaft and secured with a nut.
The generator is driven by a drive belt placed on a pulley.
About the principle of operation of a car generator
The operation of the Lada Kalina generator unit is based on the following principle: an alternating current is induced in the stator winding, which is subsequently transformed into direct current through a rectifier module located on the body of the unit. The generator cover is also equipped with an electronic voltage regulator and a brush holder. The rotor of the device receives torque from the crankshaft pulley. The transmission link is a poly V-belt.
The basic characteristics of the generator set include the following parameters:
- maximum generated current – 85-90 Amperes;
- operating range of on-board voltage – 14.4-15.1 Volts;
- rotation ratio of the motor and rotor – 1:2.4;
- right-hand direction of rotation.
The housing of the unit is held together by pins that tighten the stator with the covers. The mounting sockets of the indicated covers contain bearings, which ensure the ability of the rotor to rotate. The rear bearing is installed inside the cover with a minimum gap. The front element is equipped with the ability to slide along the surface of the rotor shaft. It is fixed inside the front cover with a slight interference fit, and a pressure plate covers it from the outside. The back of the device is protected by a plastic casing.
Let's move on to the switching diagram of the generator with the on-board network. The connection diagram is very simple. After turning on the ignition, power begins to flow to the voltage regulator through the battery discharge lamp circuit. When the motor starts, the excitation winding is supplied with supply voltage from three diodes mounted in the rectifier unit.
Using the indicated signal lamp, the generator unit can be checked. If the device is working properly, the lamp lights up when the ignition is on. It goes out when the engine starts. When this phenomenon is not observed and the lamp continues to shine, the generator set should be diagnosed for the presence of malfunctions. In some cases, replacement is required, and many are interested in how to remove the generator?
Changing bearings in Lada Kalina
The rectifier units present in the designs of generator sets of the AvtoVAZ model range have received a considerable number of negative reviews during operation. This statement is also true for the Lada Kalina we are considering.
These modules can break down even after a mileage of 10 thousand km, which requires repair or replacement of the device. It has also been revealed in practice that the cause of most malfunctions is the generator set bracket. However, bearings can also fail prematurely.
It is gratifying that the owners are able to cope with such a problem on their own.
To repair the generator module, it will require preliminary disassembly. For this purpose, we “grab” the tips of the stator cables with a screwdriver and slightly pull them out of the springs present in the diode bridge. Next, you need to unscrew the bolts holding the bridge itself. In addition, unscrew the connecting bolt.
Replacing bearings
AvtoVAZ cars are very often subject to fair criticism from the owners of cars produced by this company. The Lada Kalina model was no exception to the general rule. Almost all current converters installed on cars of this brand break down after 10 thousand kilometers, after which the generator requires repair or replacement.
As practice has shown, the cause of many breakdowns is not only the bearings, but also the Kalina generator bracket. Car owners often fix this problem on their own. Doing this with certain skills is not so difficult.
To repair the generator, it is necessary to disassemble it. To do this, use a screwdriver to hook the tips of the stator wires and pull them out a little from the springs of the diode bridge. Then unscrew the bolts that attach the diode bridge. After this, the connecting bolt is unscrewed.
After disassembling the generator, check whether the rear bearing is in good condition. To do this, you need to twist its outer ring. If it rotates easily, without noise or rattle, and there is no play, then the bearing is in good condition. At the slightest suspicion of a malfunction, it is better to replace the bearing.
Next, you need to dismantle the Kalina generator bracket. Using a screwdriver, the stator is picked up and removed from the device casing. The bracket includes a bearing, which should also be checked. If a malfunction is detected, the part must be replaced.
The front bearing of the unit is rolled into its casing. Although AvtoVAZ does not recommend changing it, it would still be more advisable to do so, because otherwise you may then need to buy an expensive new generator for Kalina.
The bearing is removed by removing the pulley and spacer plug. After this, the rotor is removed from the rubber using a hammer, and the front casing of the unit is clamped in a vice. The bearing is carefully removed.
Vehicle voltage
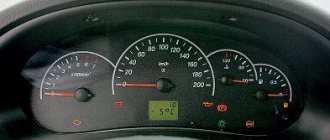
For normal operation of all consumers in the car, the generator must maintain a certain voltage; for the Lada Kalina on-board network, with a working generator, it must be in the range from 13 to 14.8 volts.
Within specified limits, the voltage is provided by a relay regulator, and with any deviation from the specified norm, various problems arise:
- At high voltage, the electrolyte in the battery banks boils, and the battery quickly fails;
- If there is insufficient charging, there is not enough current for consumers, as a result the battery quickly discharges.
The voltage generated by the current source is measured in the following way:
- On a digital multimeter (voltmeter), set the limit to 20 volts;
- We connect the probes of the measuring device to the battery and start the internal combustion engine, the voltmeter should show a voltage of about 14 volts;
- Without turning off the engine, we turn on the load - headlights (high beam), heater motor at maximum speed, windshield wipers, radio, etc. If the generator is in good condition, when the engine is idling, the voltage should not fall below 13.2V, optimal The voltage is considered to be 13.7-13.9 V.
Replacing the generator regulator relay on a Lada Kalina: photos, videos, articles
A three-phase voltage regulator (charging relay) is installed on the generator. Responsible for maintaining the voltage of the on-board network within a given limit in all operating modes.
The output voltage may be affected by changes in rotor speed, electrical load, and ambient temperature.
Failure is considered one of the most common problems associated with the operation of the generator. Replacing an element does not require practical skills.
Replacement process
The process of removing the generator on Kalina depends on whether it has a tensioner on it or not. A belt without a tensioner can only be removed together with the generator or simply cut (if it’s old).
- Disconnect the negative wire from the battery.
- Loosen the generator and remove the belt. Use a 13 key to loosen the tensioner and remove the belt.
- Disconnect the wire plug. By pressing the latch, we snap off the plastic block.
- 10mm wrench , unscrew the nut that secures the terminal of the two wires, hidden under the rubber boot. Lift the boot and unscrew the nut by 10.
- Remove generator mounting bolts The mounting bolts are located at the top and bottom of the generator.
- Remove the generator from the car.
- Using a flat-head screwdriver, pry up the 3 latches and remove the protective plastic cover of the generator. The latches are located on the side surface of the cover.
- Disconnect the wire plug connected to the diode bridge.
- Use two keys to unscrew the bushing. Mounting the regulator relay: 1 – contact under the bushing, 2 – bolts securing the relay body.
- Remove the 2 washers located behind it.
- Using a Phillips screwdriver, remove the 2 screws holding the charging relay.
- Remove the part from the generator. View of the generator with the relay removed.
- Assembly of the unit is carried out in the reverse order of removal. After assembling the unit, it is necessary to check the reliability of the wire connections and tighten the generator belt.
Replacing Generator Brushes Kalina 16 Valves
Replacing the voltage regulator and checking it for viburnum
Welcome! Voltage regulator. it is installed on the generator and is specially connected to it, due to which all the current that the generator generates changes and flows more evenly, for example, the more you rotate the engine around the car (increase the speed in other words) the generator will work harder and produce much more current, all this is because the generator is connected to the engine (in particular, it is connected to the crankshaft), but the voltage in the on-board network will also change from this (The more current the generator generates, the more it will increase. This is across the entire on-board network of the vehicle means), because as the speed increases, the light will constantly shine, and if it decreases, it will decrease with the decrease in current, especially regardless of whether a voltage regulator has been invented, due to which the current in the network remains constant all the time, but it changes when additional devices that require more urgent work, in other words, for example, you turn on the headlights in a car and the odacha controller increases in circle the current power to power these lights, in addition, the flow of power through the controller becomes constant and does not jump higher than lower as the headlights They work in the same mode and do not work; the light shines stronger and weaker.
The note! To change or test the voltage regulator, you will need: two different screwdrivers, as well as two 12-inch wrenches, and you will need a DC voltmeter to help you clearly determine the voltage you have on board and whether it is jumping or electrical appliances, you still need a megohmmeter to check the regulator capacitor for maintenance in which the current remains unchanged when supplied to the on-board network!
Where is the voltage regulator located? It is located on the generator itself, as was indicated a little earlier, plus the cable and wire block are also suitable for it so that the regulator does not become dirty, for this it is also attached together with a plastic cover, you can take a closer look at the output coming out of the controller, in the photo Below, in this photo you can see the plastic cap covering the regulator, and in the other photo (Small) you can see that the cap has already been removed and only one coming out of the regulator is sticking out (if I had a second opinion, it is indicated by a red arrow in both pictures).
READ Installing Heated Seat Ford Mondeo 3
When should I change the voltage regulator? It needs to be changed when it starts delivering AC power to the embedded network (AC is a current that rises or falls provided the circuit leaves its direction unnamed), simply saying whether the current fluctuates (and it shouldn't) , then the controller should be replaced when the current fluctuates, for example, the headlights may shine more alarmingly and stronger (depending on the engine speed, the headlights will shine more strongly at huge rpms), and the controller needs to be replaced if it starts emitting or less current. than this is too much (you will have a battery in this case), or more (with higher current you can burn out most of the wiring in a car that can't handle much load, or if you have fuses, at best they will open the circuit and posting nothing terrible will not work).
How to replace the voltage regulator and check its functionality on a VAZ 1117-VAZ 1119?
Checking the voltage regulator for maintenance:
1) First, you need to find out where the alternator itself is, and once you have found it, pull the rubber cap, indicated by the red arrow, to the side, this cap covers the "B" terminal with more common words, this is a positive conclusion, and it goes from the generator, to this terminal (also marked with a blue arrow) for you, you will need to connect the positive wire to the voltmeter and, having connected it, throw the other wire (minus wire) all this goes from the same voltmeter to ground (that's where you need to connect the wire marked green in Art ilkoyu), after the DC voltmeter operation, you will connect the mains voltage in the car.
Main Generator Components
In general, a generator is a converter that creates electrical energy from mechanical energy. On all cars, the design and operating principle of these devices are similar. The design consists of the following components:
- The stator winding, a thick copper wire is used for it, since it is with its help that voltage is generated.
- The rotor winding is excitation. Without it, it is impossible for current to appear in the stator winding. In order for any potential difference to appear in the frame, the presence of two components is necessary - rotation and a magnetic field. Thanks to the generator belt on the Kalina, the rotor rotates. It is its winding that fulfills these two conditions - a magnetic field is created around it, and it rotates around its axis.
- The rotor is equipped with slip rings, to which voltage is supplied using a brush assembly.
- A pulley mounted on the rotor allows rotation to be transmitted from the crankshaft via the generator belt on the Kalina.
- A mechanical or electronic voltage regulator changes the voltage on the rotor winding. Due to this, the generator produces a stable voltage.
- The block of semiconductors (valves) mentioned earlier is necessary to convert three-phase alternating voltage into unipolar direct voltage.
- Covers with bearings are designed for rotor alignment and normal operation of the unit.
- The capacitor allows you to get rid of residual alternating current after rectification.
Replacing the charging relay
If the charging relay is faulty, the voltage in the car's network can be too high or too low, and the voltage can also “jump”.
To eliminate the malfunction, it is necessary to change the relay regulator. On the Lada Kalina, this part is easy to replace with your own hands; the replacement can be made without removing the generator itself:
- turn off the engine, open the hood and remove the negative terminal from the battery;
- on the back side of the generator, pull off the top chip with the wire, unscrew the nut securing the supply wires and disconnect the wires themselves;
- remove the plastic casing, the cover can be removed easily - you need to unclip three hooks. If the casing is difficult to remove, it can be removed by hooking it with a screwdriver between the generator body and the plastic cover;
- unscrew the two bolts securing the relay regulator (key 8), disconnect the chip with the wire and dismantle the part;
- install the new charging relay in place and assemble everything in the reverse order.
Determining wear and replacing brushes on the generator
There can be many reasons for poor battery charging, one of which is worn out alternator brushes. To check their condition, you need to remove them and inspect them. All this can be done on Kalina with a generator installed, but for clarity, I will show it with a removed one. So, in order to remove them we need:
- 8 key, or socket with small ratchet
- Open-end wrench 13
- Flat head screwdriver
Checking the voltage regulator for serviceability:
1) First of all, you will need to find where the generator itself is located and after you find it, move your hand aside the rubber cover, which is indicated by a reddish arrow, this cover covers terminal “B” in more ordinary words this is the positive terminal and it goes from the generator, to this terminal (by the way, it is also indicated by a blue arrow) you will need to connect the positive wire of the voltmeter and after connecting it, throw another wire (minus wire) going all the way from the same voltmeter to ground (the places where you need to connect wire, indicated by a green arrow), after the operation has been completed, a constant current voltmeter will show you the voltage in the vehicle’s on-board network.
How to check a generator on a viburnum 8 valve
On Kalina cars, the generator is three-phase and produces alternating current. There is no need to go into too much theory; an ordinary motorist only needs to know how to independently diagnose and repair the installation. This means installing the generator and voltage regulator directly. The fact is that at the output of the power windings the voltage jumps in the range of 10-30 V, and to power the entire on-board network you need 12 V. The first step is to rectify the voltage and then stabilize it.