4.1/5 — (69 votes)
We will talk about the voltage regulator. In every car, even in the VAZ 2106, the most complex design is the power supply system. The operation of all electrical receivers in the car depends on how well it functions. The power supply system consists of two power sources - an alternator and a battery.
A rectifier unit is installed inside the generator; it consists of conductor diodes that convert three-phase alternating voltage to direct voltage. To stabilize the voltage at the output of the device, a relay regulator is used. It will be discussed in this article.
Remote controller
ATTENTION! A completely simple way to reduce fuel consumption has been found! Don't believe me? An auto mechanic with 15 years of experience also didn’t believe it until he tried it. And now he saves 35,000 rubles a year on gasoline! Read more"
This often happens to drivers. The brushes of the generating device burn out. The regulator is built in along with the brushes. We have to change everything together. And here’s some advice from experts: it’s better to install an external regulator than a built-in one. The models released recently have not been praised very much.
Okay, do you think I’ll install an external one, but how do I connect it? It turns out that there is a convenient scheme that makes it easy to carry out all this modernization.
Some important points:
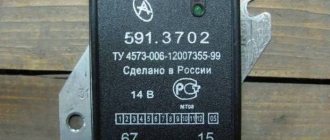
- do not confuse the chips on the regulator numbered 67 and 15 (the first should be connected to the generating device, and the second should go to the fuses);
This is what the connection diagram looks like
In the lower photo we see a diagram that shows the connection of the already built-in regulator relay.
It is suitable for connecting to “fives”, “sevens”, VAZ 2104, if the PG is installed from a VAZ “kopek”. As you can see, the remote-type regulator relay is connected via two terminals. Pin 15 goes to the fuse.
The second pin 67 is connected to the generator. The wire is connected to the brush chip.
Also, the remote-type relay must be connected to ground - any part of the body.
A relay is nothing more than a switch that serves to close and disconnect individual zones of an electrical circuit that occur at specific electrical values. A machine relay is otherwise called a load voltage switch, and this is 100 percent true. When the power supply unit, fan or starter consumes more current than necessary, the relay trips.
The relay consists of an electric type magnet, an armature and a switch. In this case, the electromagnet is a cable twisted around an inductor with a magnetic rod, and the armature is a special plate that controls the contacts.
As soon as electrical voltage passes through the magnet winding, an electric field is created. A special pusher presses the armature against the core and, thereby, the contacts switch.
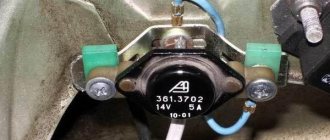
Attention. There are two types of relays used on VAZ cars. This is a non-contact relay-regulator and MER (electric). It is the diagram of the last relay that is shown in the picture below.
The non-contact relay or NERR is a fairly new unit that does not require any additional adjustments or regulation. As for the MED, this is an old-style device, the production of which has currently been suspended.
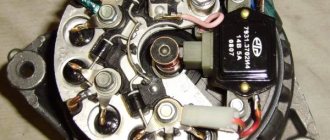
So, the BRN or built-in regulator is a device consisting of a microcircuit, a transistor and a housing with brushes. If the built-in regulator fails, it is replaced with a new one, or an external one is installed.
The external regulator is easy to install if you strictly follow the instructions.
Modernization involves dismantling and disassembling the generating device.
Voltage regulator relay VAZ 2106 - types of device
The task of this element of the car is to provide automatic continuous modification of the excitation current strength so that the voltage at the generator is always within standard limits when its load and rotation speed change.
On “sixes” there can be two types of regulators:
- electromagnetic;
- electronic contactless.
The first device is outdated; it has not been produced as spare parts for the VAZ 2106 for a long time. You can only find such a relay on old cars, and even then it’s extremely rare. But a contactless electronic regulator can be purchased at any auto store. This device is very popular among motorists, as it does not require any special complex adjustments or critical settings.
If the old electromagnetic relay-regulator fails, it is simply replaced with a new electronic one - both types of devices are completely interchangeable, so the electronic circuit does not need to be changed or modified.
But before you decide to replace the described relay, professionals strongly recommend checking the old device to ensure its performance. Often the problem lies not in it, but in other mechanisms and components of the vehicle.
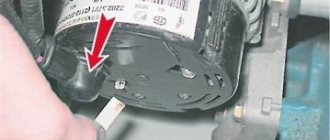
Diagnosing charging relay faults
- Worn generator brushes. If the length of the generator brushes of the VAZ-2106 car becomes insufficient, the charge may be lost. When diagnosing a malfunction, you should first carefully check the condition of the brushes in the generator. Their length should not be less than 12 millimeters. If it does not meet the minimum requirements, then they need to be replaced.
- The diode bridge of the generator does not work. Failure of one or more elements of the rectifier unit may cause a charging malfunction. You should use a tester to check the serviceability of all diodes.
- Circuit breakers. If there is no charging current in the VAZ-2106 car, it is worth checking the fuses. If a burnt one is found, it should be replaced.
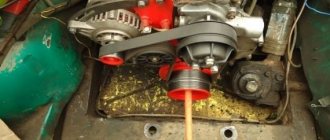
- Alternator belt and its tension. The generator belt is made in the shape of a wedge, so it is bursting between the cheeks in the pulley. When the pulley wears out, the generator belt may slip in the cheeks. Because of this, charging problems sometimes occur. In this case, it is necessary to immediately replace the generator pulley and belt.
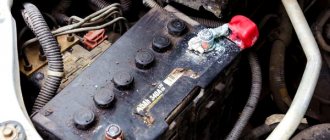
- Battery terminals. If there is oxidation on the battery terminals, it may prevent the battery from charging. In this case, you should clean the terminals with soda dissolved in water. This product can remove plaque. After completely cleaning the terminals from oxidation, wipe them well with a dry cloth and then lubricate them with thick lubricant.
How is the VAZ 2106 voltage regulator checked?
To carry out such an important operation, you need to take a voltmeter with an accuracy level of 1.0 or higher, which has a scale of up to 15–30 volts. It is important to remember that the test is performed only with a fully charged battery.
The procedure is as follows:
- turn on the ignition;
- let the engine run with the headlights on at medium speed until the crankshaft rotation rate is reached at 2.5–3 thousand revolutions per minute (this takes about 15 minutes);
- using a voltmeter, measure the voltage at the terminals of the car battery, it should be 14.1–14.3 V.
If during testing the voltage does not fall within the stated limits, you can safely install a new relay. Let us add that during the described test, it is strictly forbidden to short-circuit the plugs due to the high probability that the rectifier unit may become deformed. There is also no need to connect any sources of energy consumption to the generator winding. And during the procedure, it is important to ensure that the generator belt has sufficient tension.
Even a novice can determine the malfunction of the relay regulator, since surges in the voltage supplied to the battery will be observed. As a result of relay failure, the following troubles arise:
- Battery is undercharged. The battery does not receive enough voltage, regardless of whether the battery is new or already tired. This will be especially noticeable in winter, when the charge is not enough to start a frozen engine.
- Recharging the battery. Another problem is the battery boiling due to too high voltage. Operating a car with such a malfunction will lead to battery failure, because due to overcharging, the plates in the banks will begin to crumble.
GU or generator
The generator in any automotive electrical circuit performs the dominant functions.
The normal functioning and operation of the machine depends on it. Reliable PG is installed in all foreign cars and models of the domestic automobile industry. For example, a GU is placed on the “six”, the charge of which satisfies the need for electricity of any standard component. If you do not overload the generating device of the “six”, then the car is capable of driving many, many more kilometers
However, it is important to carry out preventive procedures in a timely manner - monitor the belt tension and the condition of the brushes
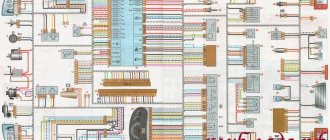
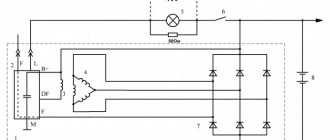
The GU is connected according to the classical scheme. Using the VAZ 2106 generator as an example, let’s consider its functioning. This GU is marked as G-221. It is an AC synchronous electric machine with ELMG excitation. A VB (rectifier) with 6 diodes is built inside the GU.
| 1 | generator rotor winding |
| 2 | generator |
| 3 | generator stator winding |
| 4 | generator rectifier |
| 5 | accumulator battery |
| 6 | ignition switch |
| 7 | battery charge indicator lamp |
| 8 | battery warning light relay |
| 9 | fuse box VAZ -2106 |
| 10 | throttle |
| 11 | temperature compensation resistor |
| 12 | additional resistors |
| 13 | voltage regulator |
A simple and understandable scheme that does not require any subtleties or specific knowledge. On the “six” the PG is located on the engine on the right. It is attached to the tension bar with a nut and to the bracket with its claws.
As you can see, the diagram shows an external regulator. It is marked with the number 13. The generator is indicated with the number 2, the fuse box is indicated with the number 9.
Separately, I would like to consider the relay, which plays an important role in the “six” generator circuit. First of all, it serves to provide information to the driver about the charging status. As is known, it is created by a generating device.
The relay is made on the same principle as all devices that function according to the same properties. The connection is made to terminal 30 of the generator. A separate wire goes through the fuses to the 3Z (lock).
The action of the relay boils down to the following: as soon as the voltage of the BS decreases (falls below the 12-volt value), the relay contacts open, the indicator is activated, giving a sign to the driver.
To better understand the connection diagram, it is recommended that you also familiarize yourself with the principles of battery charging:
- as soon as the key is turned into the 3Z, an electric pulse is supplied to the relay regulator through the fuse (pin 15);
- in the regulator the voltage is transformed and goes further to the positive brush of the GU;
- then, through the brush, the voltage goes to the excitation winding of the GU;
- then - to the negative brush, through which it is brought to ground.
After the relay is activated or after the normal voltage value has been reached in the BS, the GU begins to generate current with the required value. The indicator lamp goes out, and the circuit starts working in factory mode. But when the total voltage drops, the current is not enough, and the contacts open, which leads to the discharge lamp burning.
The constant switching on of the charge indicator lamp indicates that the gene is not working properly. This happens for various reasons. First, you should check the fuses: if they are active, then both relays deserve attention: the regulator and the charger. If they are also in order, then faults must be looked for in the generating device itself.
Before proceeding with replacing the relay, it is recommended to carefully check the functioning of the regulator. The car starts, the speed is kept within the range of 2500-3000 rpm. After this, you need to turn off all current consumers, except the ignition. Then you need to measure the voltage at the battery terminals.
Charging may disappear in the following cases:
- If the generator brushes are worn out.
- In case of malfunction of the generating device.
- If the charging relay is faulty.
- If the rectifier unit (diode bridge) fails.
Thus, installing an external relay-regulator instead of a built-in one will bring a lot of benefits. The fact is that modern charging systems have much more power. Thus, modern memory systems are much more complex than old-style systems.
- Absolutely legal (Article 12.2);
- Hides from photo and video recording;
- Suitable for all cars;
- Works through the cigarette lighter connector;
- Does not cause interference to radios and cell phones.
The VAZ 2106 voltage regulator relay ensures the normal functioning of important vehicle mechanisms and devices. In particular, the adequate operation of the car’s ignition system and its generator, as well as the condition of the battery, depend on it.
How to replace the voltage regulator of a VAZ 2106 generator?
The device is replaced in the following manner:
- unscrew the two nuts from the relay and dismantle it;
- in order not to get tangled in the wires, we mark them with a marker (this operation is mandatory, since if they are connected incorrectly, high voltage will be noted at the generator output);
- disconnect the wires and install a new regulator.
After this, you need to reconnect the marked wires and nuts in the reverse order, and then make sure that the installed device is operating normally (with the battery connected, of course). At this point, the procedure is considered completely completed - the new voltage regulator relay is ready to perform its tasks.
As you can see, replacing a device cannot cause difficulties even for a completely inexperienced car enthusiast who is just learning how to repair his vehicle on his own.
On the “classic” you can find 2 types of voltage regulator relays: built into the generator and external. The difference lies in the model of the generator that is installed on the car.
On older Zhiguli models (VAZ 2101, 2102, 2103, 2106, 2121 with carburetor engines) a G-221 generator is installed, and the external voltage regulator is a small “box”, which is secured with two nuts on the left mudguard of the body. It is precisely the replacement of such a regulator that will be discussed in this article.
On later VAZ models (2104, 2105 and 2107) there is a G-222 generator, and the voltage regulator is already built into the generator housing and is a small black “tablet”.
How to check the pH on a VAZ-2110 without removing it
If you find at least one of the listed signs, do not be lazy to check the voltage regulator on your VAZ-2110. This procedure will not take more than 10 minutes. To do this, you will need a voltmeter or multimeter turned on in its mode, as well as an assistant. The verification procedure is as follows:
- We start the car engine and warm it up to operating temperature.
- Without turning off the engine, we connect one voltage probe of the generator, and the second to the “ground” of the device.
- We ask the assistant to turn on the low beam headlights and press the accelerator pedal, keeping the speed at 2000-2500 thousand rpm.
- We measure the voltage with the device.
For the VAZ-2110, the voltage regulator should produce 13.2-14.7 V. This is the norm. If the voltmeter readings differ from those shown, diagnostic measures should be continued.
Removing and installing the voltage regulator
Replacing the external voltage regulator VAZ 2101-2106
1) Using the “8” socket, unscrew the two nuts and remove the regulator.
2) Disconnect the two wires.
3) Attach the new regulator to the mudguard and connect the wires: orange to terminal “15”, and gray to terminal “67”.
Voltage regulator relay connection diagram
ATTENTION! Before starting the engine, make sure that the contact between the voltage regulator housing and the vehicle ground is reliable, and that the wires to terminals “15” and “67” are connected correctly.
Connection diagram and operating principle
The voltage regulator on most cars is connected to the on-board network according to the diagram below.
The operating principle of a voltage regulator (VR) is the same as that of a relay. In other words, it opens and closes an electrical circuit. That is why the device is also called a relay regulator. It is triggered when a predetermined voltage value coming from the generator changes.
The first regulators had an electromagnetic design. These were real relays. Modern devices are made on the basis of semiconductors. They are small in size, and in addition, they work much more accurately and efficiently. Some of them are even equipped with special alarms that allow the driver to monitor their performance.