Replacing the stove radiator
The heating system is quite reliable, but like everything reliable, it comes to its end. Most often it goes to the pipes and taps ; the heater radiator may be the last to leave the distance. Niva VAZ 2121 and its modifications 21213 and 21214 are no exception and problems with the radiator may await them too. Therefore, it is better to prevent a problem than to encounter it in a field on a frosty night.
A sudden cold snap in the Niva’s interior does not mean that something urgently needs to be changed or repaired. For diagnostics, it is not necessary to go to a service station; you can find out everything yourself with a simple set of tools and a head on your shoulders. Actually, the lack of warm air in the air ducts can be the result of several malfunctions:
- air lock in the heating system;
- clogged air ducts;
- inoperative or malfunctioning heater motor;
- clogged heater radiator.
A clogged air intake may come as a complete surprise to the driver. This is especially true for the Niva, which is off-road friendly. Dust, leaves, branches, and other gifts from the forests that are absolutely not needed there can get into the air intake. A faulty heater motor will make itself known immediately, but the radiator will warm up properly, and if it is clogged or leaking, then a replacement is in order.
Before replacing the radiator of the Niva stove, you should think a hundred times whether it needs to be replaced with a new one. It may be better to clean or solder the old one, since a conveyor product is always better than a part from the spare parts stock. Although, it depends on the year of manufacture of the car. In principle, there is no special choice of heater radiators by type - there are only copper and aluminum models. The debate about which one is better will never end, because copper and aluminum are completely different metals with completely different characteristics.
And if we talk about prices, then copper is, of course, more expensive. Its price can be within 2.5 thousand rubles, while an aluminum one will cost no more than 1800. An aluminum heat exchanger has another good ability - it heats up quickly. Perhaps these are all its advantages. The copper part heats up longer, but at the same time:
- retains heat longer; copper has a high thermal inertia;
- copper is quite elastic and does not crack at the seams as often as aluminum;
- a copper radiator can always be restored, repaired, cleaned, soldered, but an aluminum radiator cannot.
Replacing the heater core is quite simple, although it may take half a day. That is why we focused on the quality of spare parts, so as not to redo the work several times. All you have to do is stick to the technology, collect all the screwdrivers you have in the garage (preferably with a short blade), be patient and begin a step-by-step replacement:
- Drain the antifreeze from the main radiator and cylinder block, although if the system is sealed, it is enough to close the heater duct.
- It is better to protect the interior from antifreeze, since some of it will inevitably end up on the floor mats.
- Dismantling the center console, the shelf under the glove compartment and it would be nice to remove the gear shift lever will be in the way.
- You can remove the lower air duct with it, but it’s more convenient.
- Unscrew the screws securing the radiator bracket.
- Loosen or unscrew the screws securing the front panel on the right and left; there is no need to remove the entire panel.
- Remove the rods from the stove tap, dismantle the casing with the fan.
- Dismantle the heater radiator, first carefully removing the pipes and draining the antifreeze from them .
The new radiator is installed in the reverse order, after which you need to make sure that no air lock has formed in the system. This way you can save at least 2,500 rubles, which would have been charged for this work at the service. And for this money it is better to buy a high-quality radiator that will last another ten years.
The radiator is leaking: what to do, how to find the leak and how to fix it
The cooling radiator is the main element of the engine cooling system.
The operation of a cooling radiator is the active transfer of heat into the atmosphere from the heated coolant. This process is important for efficient engine operation, because The coolant, before giving off heat in the radiator, takes this heat from the heated components and parts of the engine. This was originally intended by the designers, but life makes its own adjustments to the operation of the car on the road. A situation when the arrow on the dashboard begins to treacherously creep up, and, unfortunately, this arrow is not an indicator of the fuel level, but an indicator of the coolant temperature, modestly indicating that the car is starting to overheat. Steam is pouring out from under the hood, and a liquid stain of coolant is slowly but surely spreading on the asphalt. The radiator is leaking, what should I do?
Causes of radiator leaks in the car cooling system
Before you do anything, you need to figure out what led to this result. This may be external damage as a result of stones, or the plastic elements of the radiator may crack as a result of an impact in a minor accident. Such minor damage, as a rule, cannot be immediately identified, and problems arise from them over time. In the meantime, the driver continues to operate the car, gradually, drop by drop, losing coolant from the system.
What is the danger of antifreeze leaking from a car cooling system?
As the coolant level drops, the risk of engine overheating increases, which in turn can lead to the following problems:
Deformation of the plane of the cylinder block or cylinder head
Cylinder head gasket deformation
· Changes in the configuration of the cooling system and associated failure of system components
All of the above cases will lead to expensive repairs.
What to do if the cooling radiator is leaking
The first rule in this case is to monitor the coolant level.
In fact, periodically checking the vehicle's technical fluids before a trip is a good rule; this will help to promptly notice an emerging problem and eliminate it. Even if the cooling radiator leak is small, do not underestimate the scale of the current situation. Over time, radiator leakage will increase, and this point can be overlooked. The driver will not like the result.
Therefore, if such a situation occurs, it is necessary to have a supply of coolant or distilled water. Yes, if the loss of coolant is small, then for the first time you can use distilled water, but you need to take into account that the more distilled water gets into the system, the more we increase the freezing point of the coolant. Therefore, if it’s winter outside, you shouldn’t get carried away with distilled water, but add coolant.
What to do in case of major damage and leakage of the cooling system
If there is serious damage to the engine cooling system, repairs are inevitable; operating the vehicle in this case is extremely undesirable. And in order not to end up with engine repairs, you should move the car to a technical center using a tow truck, or, in extreme cases, on a cable.
How to seal plastic parts of a cooling system with a leak
If the design of the radiator allows, then you can use a heat-resistant sealant-adhesive, better known as cold welding. In some cases, you will need to remove the radiator from the car.
Cold welding is a special two-component sealant that may contain metal shavings. Such sealants allow you to quickly restore plastic or metal parts.
The gluing process itself is not complicated:
· Before applying the sealant, the surface must be prepared, cleaned and degreased.
· Prepare the sealant for use by mixing the two components. The components must be thoroughly mixed to obtain a homogeneous mass.
· The sealant is applied to the part.
The composition will set in 3-5 minutes, but until complete hardening it will take from an hour to a day, depending on the composition.
Is it possible to solder aluminum radiators and how to do it correctly
If a radiator leak occurs on an aluminum part, then sealing is possible.
The process is complicated, and we would recommend entrusting it to professionals, because... If the attempt fails, you will have to redo everything again. · You will need a powerful soldering iron and it must be warmed up well before work.
· The walls of the radiator will also need to be thoroughly heated.
· Clean the surface thoroughly before soldering.
· To ensure good soldering quality, it is necessary to use solder with a high tin content.
This method will require removing the radiator from the car, which means that when installing the radiator back after repair, it is advisable to completely replace the coolant.
Repairing antifreeze leaks in the cooling system using a special sealant
There is another way to eliminate a radiator leak that does not require partial or complete disassembly of the system. This is a sealant that works inside the cooling system. For example, Liqui Moly - Kuhler-Dichter cooling system sealant. This product seals small leaks in the radiator, metal porosity in solder areas, and hairline cracks. Seals damage that is quite difficult to localize (determined only by a drop in the coolant level). You can use the product with all types of additives in the cooling system and any antifreeze. Suitable for all cooling and heating systems.
Contains water-soluble monomer and plastic chips suspended in a monoethylene glycol solution. When there is a pressure difference and when oxygen is available, the polymerization reaction is activated and the polymerization products seal the coolant leaks.
Application of the sealant is very simple:
· Shake the can before use.
· Add sealant to the cooling system at the rate of 250 ml. additives for 10 l. coolant.
· Let the engine idle or drive the vehicle for at least 10 minutes.
The sealant can remain in the cooling system for the entire service life of the coolant.
To avoid major repairs, you should regularly check the cooling system for the slightest malfunctions and leaks, change hoses and pipes in a timely manner, and monitor the temperature of the antifreeze during operation. Also, do not forget to change the coolant in a timely manner, as over time it loses its properties, which can lead to malfunctions in the operation of the entire system.
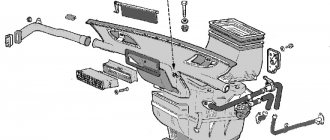
VAZ 2121 (Niva 4x4): replacing the heater radiator with your own hands
The operation of the stove on the classic Niva traditionally causes complaints from most owners of this car. A frankly weak but noisy fan and poor design of the air ducts do not warm the interior properly. In addition, the operation of the heater is affected by the operation of the VAZ 2121, 2131 in difficult road conditions. The stove radiator, air ducts become clogged, and the pipes are destroyed. Therefore, understanding the operating principles of the heater and the ability to repair it with your own hands become an important task for the Niva driver.
Radiator of the Niva stove
The heater radiator of VAZ 2121, 2131 is not a critical vehicle component. But in cold weather, driving a car with a faulty heater is unlikely to be a pleasure. In addition to the sheer coldness in the cabin, the windows may fog up, which leads to poor visibility, and this is a matter of safety for the driver, passengers and other road users.
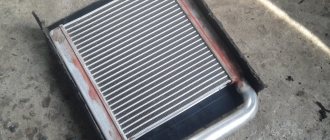
Structurally, the radiator is a heat exchanger, or more simply put, a battery, whose task is to heat the air passing through its grille. Externally, it looks the same as a similar unit on other cars.
The same type of heater radiator is used for “Niva” and “classic” VAZs
The Chevrolet Niva radiator is not suitable for the VAZ-2121, 2131 family. This should be taken into account when selecting spare parts in the store.
Radiator location
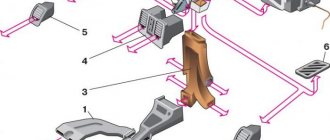
The heater radiator on the Niva is located under the dashboard behind the center console between the driver and right passenger seats. This is the standard location for the heater in most cars. Compared to many other car models, access to the radiator in the Niva is quite simple. This will take about 10–15 minutes for a semi-skilled specialist.
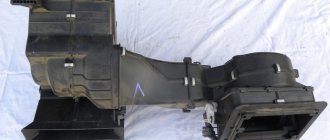
The radiator of the Niva stove is located in a plastic casing under the center console
Radiator design and functions
The stove radiator is a unit in which heat is transferred from the heated liquid to the surrounding air. It consists of two horizontal rows of tubes intersecting with vertical metal plates (ribs). On the sides, the structure is limited by panels that provide the functions of tanks. The incoming and outgoing pipes of the cooling circuit are connected to one of the tanks.
There are two unconnected cavities inside the tank. Antifreeze enters through the inlet pipe into the cavity connected to the upper row of tubes. On the other side of the radiator there is a return tank, through which antifreeze flows into the second row of tubes and moves in the opposite direction to the second cavity of the tank and the outgoing pipe. After leaving the radiator, the antifreeze enters the main cooling system of the car. Antifreeze circulating in the tubes ensures heating of the entire grille, thanks to which heat transfer from the radiator reaches maximum effect.
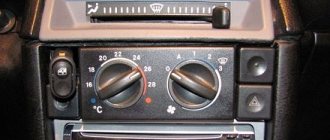
The radiator is installed in the instrument panel console in a plastic casing and sealed around the perimeter with foam tape. Air heating depends on the degree of opening of the valve that regulates the flow of liquid through the radiator. The valve is installed at the radiator inlet and is controlled by the upper lever on the center console.
Cold air comes from the external environment, passing through a hot radiator, heats up and enters the car interior
The main and only function of the heater radiator is to heat the air flow entering the cabin through the air ducts.
Radiators are made of aluminum or copper. The aluminum product does not hold temperature well. A copper radiator works more efficiently, but is more expensive. The advantages of a copper radiator include its maintainability: the ability to seal cracks in the tubes.
Typical radiator malfunctions
There are two main radiator malfunctions:
- Clogged grille and radiator tubes.
- Radiator leakage.
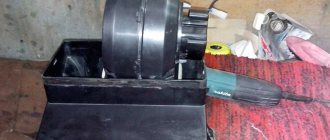
Since the Niva is often operated in difficult road conditions, the likelihood of contamination of the grille from dusty outside air is very high. Clogging of the cells reduces the heat transfer area of the radiator, and as a result leads to a decrease in the heat released from the air ducts into the passenger compartment. In such cases, the stove radiator is dismantled and washed under high pressure.
Clogged radiator tubes are also common. If the outlet pipe is barely warm or cold, then the radiator tubes are clogged. This happens for various reasons, including the entry of foreign objects into the cooling line during repair work. In such cases, the tubes themselves are also washed. To do this, it is not necessary to remove the heater radiator. It is enough to separate the radiator pipes from the cooling system and supply water under pressure into one of the radiator pipes.
A leak in the radiator tubes can be determined by a coolant leak, which usually forms on the right side of the center console in the passenger foot area. As a rule, a leak is accompanied by the smell of antifreeze (antifreeze) in the cabin. Don't rely on the smell of antifreeze alone. Coolant vapor is very volatile and can be misleading as to the source of the leak. The smell of antifreeze also indicates a leak in the engine compartment.
The leakage of the heater radiator occurs due to natural wear and tear of the metal from which it is made. Constant cycles of heating and cooling, exposure to various chemicals and consumable liquids eventually lead to the destruction of the metal and the formation of cracks. Cracks in a copper radiator can be soldered. The aluminum radiator will have to be replaced with a new one.
Typical malfunctions of the VAZ-2121 heater radiator can be eliminated in a garage environment
Possible heater malfunctions and ways to eliminate them
Cherry Niva Chevrolet
If the stove in a VAZ 21214 has stopped working, then, in principle, repairing it yourself is not a particularly difficult task.
The reasons for the malfunction why the Niva stove refuses to work are given below:
- Failure of the additional resistor. This element of the system is located behind the glove box and is designed to control the ventilating device for pumping warm air into the cabin. The problem is solved by replacement.
- Wear of pipes. Over time, the pipes begin to wear out, and temperature changes especially contribute to this. To detect worn hoses, each line must be carefully inspected. Wear may be indicated by cracks and other damage to the pipes through which antifreeze can escape.
- The heater valve is faulty. A breakdown of this component may be indicated by traces of a coolant leak in the vehicle interior. If the heater tap is being replaced, it is better to use a ceramic device; its service life is usually several times higher than that of traditional metal devices.
- Problems in the operation of the control unit. It is best to have this part repaired by a qualified electrician.
- The heater radiator has failed. On Niva 21213 you can easily replace it with your own hands, we will talk about this below (the author of the video is the OWNER G channel).
It is very easy to find a broken fan resistor - the fan only runs at maximum speed.
Removing the radiator of the VAZ-2121 stove
The procedure for removing the heater radiator on a VAZ Niva does not require any special skills or abilities. It is important to prepare the necessary materials and tools in advance. Most instructions for repairing car heaters contain a recommendation to drain the coolant before starting work. In practice, many car enthusiasts limit themselves to draining only that part of the antifreeze that is located in the radiator itself and the nearby pipes of the cooling system.
Preparing tools
To replace the radiator, you will need the following tools:
- pliers;
- slotted screwdriver;
- Phillips screwdriver;
- a set of markers for identifying wires;
- spanner set to “7”;
- socket wrench set to “10”;
- socket wrench set to “7”;
- socket wrench set to "10".
Procedure for dismantling the radiator
All operations must be performed in the following sequence:
- Unscrew the left self-tapping screw securing the storage shelf. The self-tapping screw is unscrewed with a Phillips screwdriver
- Unscrew the two self-tapping screws on the right shelf fastening. The right side of the shelf is attached to the upholstery
- Unscrew the central fastener of the shelf from the front panel. The central part of the shelf is unscrewed from the front panel
- Carefully lower the right side of the shelf. The right edge of the shelf moves down freely
- Remove the left side of the shelf from the center console panel. There is a special spike on the left side of the shelf
- Unscrew the self-tapping screw securing the floor tunnel lining to the radio mounting panel. The lower part of the panel is also fixed with a self-tapping screw
- Unscrew the screws of the left and right fastenings of the central panel. The process is shown on the right side, the left side is similar
- Remove the radio panel. The panel is moved to the side
- Disconnect the wire connectors from the radio panel. The wire blocks are detached to remove the entire radio panel
- Completely dismantle the panel. After disconnecting the wires, the panel can be easily removed
- In the engine compartment, loosen the clamps securing the hoses to the radiator pipes. Loosening the clamp is shown using the example of the lower pipe; a similar operation is performed with the upper
- Unscrew the screws securing the seal from the front panel. The screws are unscrewed with a socket wrench with a “7” head
- Remove the seal. The removed seal allows you to remove the radiator pipes from the engine compartment
- In the cabin, loosen the nut securing the crane drive rod. The fastening nut is unscrewed with a “7” key
- Remove the heater valve drive rod. The rod is removed from the crane lever
- On the right side of the fan casing, remove the heater tap rod from under the bracket. The rod is disconnected from the fan casing
- Disconnect the spring brackets securing the casing. The staples are pryed off with a slotted screwdriver
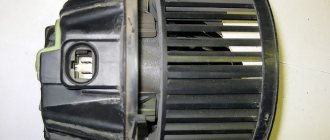
- Remove the casing and fan. The casing with the fan is moved to the side
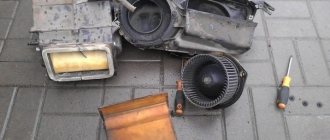
- Remove the radiator. After removing the fan, the radiator is carefully removed from its compartment
- Unscrew the faucet from the radiator. The tap and pipes are turned off with a key to “10”
- Remove the heater valve. The removed tap is checked for leaks
- Remove the lower nut securing the faucet to the radiator. The bottom nut often falls out and gets lost
Disconnect the outgoing pipe.
The two fastening nuts are unscrewed with a “10” wrench
After dismantling, you should carefully inspect the radiator for blockages in the grille and leaks from the tubes. Based on the results of the inspection, a decision is made on the possibility of repair or installation of a new radiator.
Video: installing a radiator
The process of replacing the heater radiator on a classic Niva has been studied far and wide by many car owners. In fact, the procedure is similar to the entire family of AvtoVAZ classics. However, caution and safety precautions should be observed when working. After completing the repair, before driving on public roads, you must make sure that all components and mechanisms of the vehicle are operating normally. Only then should you begin daily use of the machine.
Improvement No. 1. We take air from the cabin
The main disadvantage of the Niva heater is that all the air into the heater radiator comes from the street, and when the air intake flap is closed, air circulation and heating stop completely. To eliminate this drawback, I disassembled the heater (I had to drain some of the antifreeze and disconnect the heater radiator pipes), and in the side wall of the heater housing, opposite the wall where the radiator tubes exit, I made a hole in the shape of a rectangular trapezoid. I did it in such a way that there was 1.5-2 mm of the body wall left to the boundaries of the plane in which I made the hole, and 6-8 mm from the side of the stiffener for attaching the petal valve. I made the hole using a drill, marked it, drilled along the contour of the small diameter holes, then connected the holes using a knife, then filed the edges of the resulting hole, giving it its final shape. The area of the resulting hole was approximately 25 square centimeters. It is through this hole, when the heater air intake flap is closed, that air is drawn from the passenger compartment.
Replacing the heater radiator (heater)
We drain the liquid from the cooling system with the heater tap open (see here).
We remove the hoses from the heater pipes and the seal (see here).
We dismantle the heater fan (see here). In this case, the negative wire of the electric motor does not need to be disconnected.
We take out the radiator with the tap.
Using a 10mm wrench, unscrew the two bolts securing the faucet to the radiator.
We remove the fastening nuts from the grooves of the radiator tank (for radiator mod. 2105).
Using a 10" wrench, unscrew the two bolts (for the radiator mod. 2101 - two nuts) securing the outlet pipe...
...and remove the pipe with the gasket.
We assemble and install the heater radiator in the reverse order. We fill the engine cooling system with liquid and check the tightness of the connections.
Checking the serviceability of the heater radiator
It happens that the radiator gives off hot air only in the first few seconds after the heater fan is turned on, and then the air remains barely warm. The malfunction may be caused by the displacement of the rubber partition, which divides the tank into two parts. To check, drain the coolant from the cooling system. Place the radiator removed from the car vertically, with the pipes down. We connect a hose with water from the water supply to one of the pipes and slowly let the stream flow. On a faulty radiator, water will immediately run out of another pipe. A working radiator will fill up, become noticeably heavier, and only then will water flow from the other pipe.
How to replace the heater radiator on a Niva
The quality of heater radiators on VAZ SUVs is a fairly relevant topic and worries many car owners; the interior of these cars with a standard heating system is not always warm. In addition, the “native” heater radiator of Niva cars may leak over time, and then it has to be replaced.
- 1 Types of radiators for the Niva stove
- 2 (adsbygoogle = window.adsbygoogle || []).push(); Removing the radiator of the Niva stove
- 3 Replacing the Chevrolet Niva heater radiator
- 4 Heater radiator with air conditioning Niva Chevrolet (replacement)
In this article we will look at what types of heater radiators (HR) there are on VAZ 4x4 cars, how you can replace the RF on the VAZ 21213 and Chevrolet Niva models.
Improvement No. 2. Increasing fan performance
I also slightly increased the efficiency of the standard heater fan. The fact is that the gap between the fan blades and the diffuser is about 3 mm, and the width of the diffuser is no more than 15 mm, while the width of the fan blades is more than 30 mm. Therefore, some of the air leaks back between the blades and the diffuser, preventing a large pressure difference from being created between the suction area and the discharge area.
To eliminate these shortcomings, I reduced the gap between the diffuser blades and lengthened the diffuser. I solved these problems by cutting out a strip 30 mm wide and equal to the circumference of the diffuser from an old plastic fender liner 1 mm thick. I inserted the bent end-to-end ring from this strip tightly into the diffuser and “sewed” it to the diffuser with a thin wire through the drilled holes, so that the fan blades did not cling to the strip or wire. Against the blowing windows, the width of the strip is trimmed to 20-25 mm.
According to my estimates, the efficiency of the fan increases by 10-15%, so you don’t have to bother with this problem.
Types of radiators for the Niva stove
It doesn’t immediately become colder in the Niva’s cabin – the stove stops working normally for several reasons:
- the heating tap does not switch (stays sour in the closed or half-closed position);
- The motor rotates at low speed;
- the heater radiator is clogged;
- an air lock is created in the cooling system;
- parts turn out to be defective;
- the valve in the thermostat opens prematurely;
- poor circulation is created in the cooling system due to the water pump.
It may still be cold inside the car due to a blown cylinder head gasket in the engine. To make the interior warmer, car owners often install on Niva 21213 cars:
- three-row copper radiators of the stove, they have better heat transfer;
- The heater motor is 2108, they are more efficient than the standard ones on the Niva.
RP for the VAZ 21213 is produced by various companies, and the quality of stove radiators may vary. On the auto parts market you mainly find parts from manufacturers:
- "Orenburg radiator";
- luzar;
- DAAZ;
- SHAAZ;
- "Likhoslavl Radiator Plant";
- Iran;
Based on the material used, RPs can be made of copper or aluminum, each of them has its own advantages and disadvantages. Aluminum radiator:
- heats up quickly;
- cheaper than copper;
- has high rigidity and low weight.
But aluminum RP is not repairable, it is practically impossible to solder it. Other disadvantages of aluminum include:
- rapid cooling, this metal does not retain heat well;
- susceptibility to corrosion, which is why aluminum RPs fail more often than copper ones.
The main disadvantage of copper RP is that it takes a long time to heat up the interior, but even after stopping the engine, it retains heat for quite a long time. Copper heater radiators are approximately 30-50% more expensive than aluminum ones, but this is not so important - in general, the parts are still relatively inexpensive. The problem with copper RPs is different - the quality of the products is low, and it is not so easy to buy parts of acceptable quality.
Chevy Niva car owners often have problems with heating the interior; the car can be cold even in frosty temperatures of -15? C - the aluminum radiator of the stove does not heat very well. Another problem on VAZ 2123 cars is that stove radiators often leak.
Aluminum heater radiators on a Niva car are inexpensive:
- VAZ-2123 (Chevrolet Niva) - on average from 700 to 1000 rubles;
- VAZ-21213 (21214/2105) - from 650 to 1100 rubles.
Copper RPs are sold more expensive, their prices range from 1,500 to 2,500 rubles, the cost depends on the brand of the product, the region of sales and the sellers themselves.
We get rid of vibration and extraneous sounds of the Niva transfer case forever
The characteristic howl and hum of the transfer case on VAZ-21213 cars, alas, is familiar to many owners of such cars. Let’s figure out what is the reason for these problems, and most importantly, how to get rid of them without using “collective farm” methods, such as additional noise reduction.
Content
- Let's understand the terminology.
- We study problems and repair methods. Vibration and how to deal with it.
- We remove the howl and hum.
- We remove the possibility of oil leakage.
- Niva (LADA 4×4)
Understanding the terminology
Let's start by diving into the materiel. Transfer case (TC) is a separate unit of an all-wheel drive vehicle, which provides multi-mode power distribution from the engine to the front and rear axles.
Externally, this is a mechanism located under the bottom of the car, in the body of which a multiplier (divider) is placed in series to obtain an intermediate gear ratio in the transmission and a splitter of one power flow into two. It is with the help of this device and its controls (levers) that go into the vehicle interior that the LADA 4×4 driver selects the all-wheel drive operating mode.
The RK directly connects the front driveshaft and the intermediate shaft (shaft) with the vibration damper to the vehicle’s gearbox. As is probably already clear from the description, this element is connected to the rear axle of the car via a rear propeller shaft.
We study problems and repair methods.
Any car owner definitely doesn’t need to be told why howling and humming are bad. Vibration of the transfer case on a Niva at low speed is quite common. The driver, of course, gradually gets used to many extraneous sounds in the car, but the noise level is high enough to make it impossible to carry on a conversation with passengers while traveling. Due to excessive noise pollution, you will inevitably have to deal with the problem.
Vibration and how to deal with it.
The main reason for the occurrence of unnecessary sounds is multi-frequency vibrations of the components of the transmission. In general, the vibration of the transfer case on a Niva is one of the most common cornerstones that other car owners are forced to fight (or put up with) constantly.
- Check the cushions (supports) on which the power unit, gearbox and other parts are attached to the body, including the muffler. Any worn-out pad or rubber band can easily cause excessive shaking of the iron and accompanying rumble. It is better to replace worn silent blocks and pillows immediately.
- Be sure to pay attention to the intermediate shaft (inlet shaft). If you see signs of “fatigue” - change the elements that have become unusable, or the entire part!
Perhaps this is the most complete set of measures that experienced auto mechanics advise when the transfer case on a Niva hums and vibrates!
Removing the howl and hum
We will assume that we have dealt with the vibration, but an equally significant problem remains - how to remove the howling of the transfer case on the Niva. Vibrations of the mechanism are not always the only reason for the appearance of extraneous irritating sounds. And the characteristic noise of the transfer case, alas, is one of the “trademark” shortcomings of one of the best domestic SUVs.
- The first thing you should pay attention to is the levers. It is better to immediately replace them with silent ones - with anti-resonance bushings inside. They won’t eliminate all the noise, but they will definitely extinguish some of it.
- The result will be even better if you install a small-module transfer case - with front and rear covers equipped with double-row bearings. In 2010, AVTOVAZ introduced new double-row bearings for output shafts in order to get rid of backlash and runout, as well as extend the life of the seals and, in general, increase the reliability of the mechanism. Here logic is man’s friend: less shaking and hesitation means higher service life and reliability.
Removing the possibility of oil leakage
In an effort to resolve the question of how to get rid of the howling of the transfer case, even before the 2010 update, the manufacturer began assembling this mechanism using silicone sealant instead of cardboard gaskets. And he introduced an improved crankcase ventilation system with an open breather, which was located under the hood. Again, the reliability of the vehicle when passing fords has increased slightly, and most importantly, the load on the seals has also decreased.
We mention them again to point out that the fewer vibrations and shocks, the longer it will not take to detect an oil leak on the transfer case housing due to deteriorated seals. Moreover, the flange in the RC covers can cause noise - during operation, the bearing seats are simply broken.
We hope that the steps listed above will become complete step-by-step instructions on how to eliminate transfer case noise on a Niva.
A universal remedy that will definitely eliminate the noise of the transfer case?
For people who do not want to spend a lot of time modifying the components of their SUV, there is a proven solution. A fairly reliable universal option for how to remove the howling of a transfer case on a Niva, one might say, know-how from the SV-PARTs company, is the installation of a steel four-satellite differential.
Removing the radiator of the Niva stove
The heater radiator on the Niva 2121/21213/21214 is quite easy to change, but it is inconvenient to get to. We remove the RP as follows:
- drain the antifreeze from the radiator and cylinder block;
- we spread rags on the floor on the front passenger side, a little antifreeze will still spill;
- remove the shelf under the glove compartment;
- from under the hood, unscrew the clamps and remove the heater pipes;
- remove the draft from the stove faucet;
- dismantle the heating system fan;
- then we take out the RP itself.
VAZ 21213 models are standardly equipped with model 2105 heater radiators, but many owners of VAZ 4x4 cars install RP from Kopeika - 2101-8101060, with such a radiator heater the car becomes warmer. In order for the stove radiator to sit more tightly in the housing, it is covered with foam rubber around the perimeter to ensure a tight seal.
Replacing the Chevrolet Niva heater radiator
The main complaints that Chevy Niva car owners have about their stove heating system is a coolant leak from the stove radiator. Determining the malfunction is quite simple - the carpet on the floor in the front passenger area becomes wet, and the cabin smells of antifreeze. The cause of the leak could also be a stove faucet or a heating pipe, for example, a poorly tightened clamp, but the radiator itself also leaks quite often. Chevrolet Niva RPs are installed from the factory with aluminum, the parts are not distinguished by high quality.
We carry out the work of replacing the stove radiator as follows:
- drain the antifreeze from the cooling system (including from the cylinder block);
- unscrew the screws (3 pcs.), dismantle the right side of the glove compartment;
remove the glove compartment by disconnecting all the wires from it; it can be dismantled quite easily;
- You should place some rags or a plastic bag under the heater radiator, because antifreeze will leak in any case;
- unscrew the two clamps securing the stove pipes, unscrew the self-tapping screws securing the RP in the housing;
- we pull off the hoses and move them as far as possible to the side of the body - this way they will not interfere;
- then we take out the heater radiator itself;
we install a new RP in place, in some cases it is necessary to file or break the edge of the stove radiator body so that the part falls into place; - we install the pipes in place, tighten the clamps;
- put the glove compartment and the side right plastic panel in place;
- fill in antifreeze, start the engine, check for leaks through the RP or stove pipes;
- If everything is in order, the replacement of the Chevy Niva heater radiator can be considered complete.
As you can see, on a Chevrolet Niva car without an air conditioner, replacing the air conditioner is not particularly difficult, but it is not possible to do the work that needs to be done on a car with an air conditioning system.
Replacement frequency, how much and what kind of fluid is needed
According to the manufacturer's recommendation, it is necessary to replace antifreeze or antifreeze on VAZ-21214 cars every 3 years or after a mileage of 60 thousand kilometers.
If the car is used in more severe conditions, then it is advisable to replace it more often - every 30-40 thousand kilometers. In addition to the recommended coolant change intervals, there are other reasons why it is necessary to change the fluid in a car's cooling system:
- loss of coolant properties. You can check the quality of the antifreeze used using a test strip, which is sold in the same places where the liquid itself is sold. Place the strip in the expansion tank, then pull it out. The strip comes with a color scale, according to which you can understand how much longer the car can be used before replacing the coolant;
- change in color of the coolant to tan or red. This means that rust has appeared in it;
- the appearance of sediments, flakes and dense formations in the liquid.
The coolant for the VAZ 21214 Niva injector should have a freezing point no higher than -40 degrees. Typically, the manufacturer fills in TOSOL TS-40 (manufacturer in Dzerzhinsk). When replacing antifreeze, it can be replaced with antifreeze with G12 approval; it is safer for the entire cooling system. You can also use original Lada G12 antifreeze, which is suitable for all cars of this manufacturer.
Antifreeze volume table
| Model Niva | Engine capacity | Antifreeze volume | Original/recommended fluid |
| VAZ 21214 | 1.7 | 10.7 | Lada G12, TOSOL TS-40 |
| VAZ 21213 | 1.6-1.7 | 10.7 | |
| VAZ 2121 | 1.4-1.8 | 10.6 | |
| VAZ 2131 | 1.7 | 10.7 |