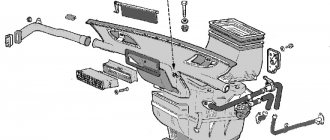
Winter is coming, and no matter how popular the saying is ready to sleigh in the summer, we begin to put the heater in order only closer to winter. This small cutout from the Murzilka will help us with this, which will tell us how the stove in the tenth VAZ family works. We present to your attention a diagram of the heater air ducts and control parts for the VAZ-2110 heater
1 – rear heating air ducts 2 – floor tunnel lining 3 – foot heating ducts 4 – central cabin ventilation nozzles 5 – side cabin ventilation nozzles 6 – front door window heating nozzles
7 – control lever for the interior heating system 8 – air distributor housing 9 – foot heating flap 10 – windshield heating flap 11 – heater
And here is a diagram of the parts of the VAZ-2110 stove, the design of dampers, valves, etc.:
1 – electro-pneumatic valve 2 – front heater air intake housing 3 – air intake water deflector flap 4 – recirculation damper control valve 5 – air intake recirculation damper 6 – rear heater air intake housing 7 – heater duct damper 8 – heater control damper 9 – radiator 10 – heater radiator casing
11 – steam exhaust hose fitting 12 – supply hose fitting 13 – exhaust hose fitting 14 – heater electric motor with fan 15 – electric motor housing 16 – support platform for the heater control damper drive lever 17 – heater control damper drive lever 18 – damper drive micromotor 19 – resistor 20 – heater casing cover
Note that the VAZ-2110 heater has an air recirculation system, that is, the air is not taken from the street, but simply circulates inside the cabin. The advantages of recycling are that dust, odors from the street, etc. do not enter the cabin. Cons: the windows fog up, the air in the cabin is not updated. When the recirculation system is turned on, the air flow during movement does not flow by gravity into the cabin, so the heater motor must be turned on. The electric motor in the tenth stove is essentially not repairable; it is recommended to change it in case of any malfunctions. The heater is controlled by an electronic control unit. There is no faucet that shuts off the flow of coolant into the heater radiator in the VAZ-2110 and is not provided for by the design. That is, the radiator is always on.
Today we will get acquainted with the stove and its structure on a VAZ 2110 car.
As you know, the heating system has a direct impact on the level of comfort. If in summer there is no special need for interior heating, then in autumn and winter it is problematic to imagine traveling without it. Theoretically, you can drive, but lower temperatures are unlikely to benefit your health.
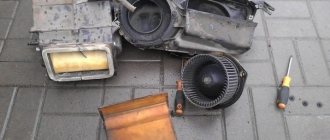
Dismantling the heater
VAZ 2110 heater blows cold, why?
Many owners of “ten” complain that at some point the stove constantly blows cold air and no amount of turning the handles of the automatic heater control system can save the situation. There can be a lot of problems and malfunctions. For example, the ACS controller itself is faulty, the ceiling sensor or micro-geared motor is faulty and simply does not open or close the damper. Another reason is the air (air lock) in the heater radiator, which is simply not capable of heating the air passing through it. Below is a schematic representation of the VAZ 2110 heater device.
Heater dampers VAZ 2110
Often the cause of poor performance of the “ten” heater is the damper of the VAZ 2110 stove. The damper may not close tightly or open poorly. The heater flap itself is made of plastic, which can become warped and perform poorly over time. Many car owners buy a metal damper and change it themselves. How to check the functionality and evaluate the condition of the heater damper? Everything is quite simple, remove the central air duct deflector and there you have it - a damper! Let's look at the photo.
Next, carefully inspect the damper, turn on the stove, turn the controls on the ACS unit and see if the damper works at all. How does it move, does it fit tightly. If she does not respond to commands, then the problem may not be her at all. For one thing, you can see if the lever for redirecting the air flow from the glass to the feet works.
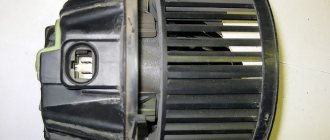
Heater fan VAZ 2110
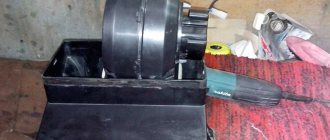
It is quite simple to determine the performance of a stove fan by looking at the noise. If the fan motor burns out, then it naturally will no longer work. However, before rushing to change the stove fan, you need to make sure that the fuse has not blown. As we already wrote above, the fan of the VAZ 2110 stove is located not in the cabin, but in the engine compartment. To get to it, you will need to remove a special apron that separates the engine compartment from the heater housing, vacuum brake booster and windshield wiper mechanism. The actual photo is below for clarity.
So we got to the stove fan, removing the apron and heater casing. By the way, next to you you will see the cabin filter, in the housing a little to the left. It needs to be pulled out and cleaned. If no one has changed the filter before you, over many years of operation it is seriously clogged with debris and interferes with the normal circulation of air, which is sucked into the cabin of the VAZ 2110.
Heater radiator VAZ 2110
The radiator of the “tens” heater is located in the same place as the fan, that is, under the hood (see photo above). To remove it, you must first remove the fan from the heater casing. If you notice a strange smell in the cabin, lift the floor mats; if there are puddles of antifreeze or antifreeze, then the radiator of the VAZ 2110 heater is leaking. Although the clamps may no longer hold... in any case, you will have to disassemble and find out the cause of the leak. Next, we offer a couple of videos demonstrating the process of disassembling, removing the apron, stove fan, cabin filter and heater radiator.
Accessories
With the help of numerous accessories, without using significant financial investments, you can make a good tuning of the VAZ-2110 with your own hands.
- Overlays, the cost of which are low, will help transform standard pedals.
- Carbon, wood, and metal imitation stickers will help significantly improve the appearance of the interior.
- Installing a new steering wheel will provide increased comfort and a more enjoyable driving experience. Upholstering the standard steering wheel with leather or leatherette will also help improve comfort. The only condition is to use a material that will not slip in your hands.
- LEDs can be used as interior lighting.
- The use of mats will improve the overall aesthetics and protect the interior floor from dirt.
- Even in such a budget car as a “ten”, it is quite possible to install high-quality electronics: a navigator, a video recorder, acoustics, a monitor.
If you are installing equipment that consumes a significant amount of electricity, then you will probably need to replace the standard wiring and battery.
So, we learned how to do tuning of the VAZ-2110 interior with our own hands. You can take the easy route and entrust the matter to professionals. True, it will cost much more.
Device
First of all, you should know the very structure of the heating system in order to clearly understand what and how to repair, because for the VAZ 2110, interruptions in the operation of the heater are a typical phenomenon, and from time to time requiring the intervention of reliable hands - be it a driver or a service station worker.
So, the heating system consists of: 1. The actual heater unit, which provides heating for the interior. It is represented (by importance of details):
- An electric motor on which a fan is also attached to pump hot air;
- A radiator, without which the entire system does not work. Moreover, unlike the old heater, the radiator of the VAZ 2110 stove of the new model does not have a tap that shuts off the flow of antifreeze (antifreeze) through the radiator. Thus, it is always (whether in winter or in summer) heated. This was done supposedly in order to eliminate leaks that were often observed through this tap, and also to heat the interior as quickly as possible when necessary. In the summer, the supply ventilation goes past the radiator, but still some VAZ 2110 owners, when repairing the stove, add this tap to the system;
- There are three dampers. One is responsible for air intake recirculation, the second opens/closes the heater duct, the third, the most important for the interior, controls the heater;
- A resistor that regulates the blowing speed.
Heater parts VAZ 2110
All parts are packaged in a block with additional valves, shields, and fittings. This entire device is housed in a housing and is located under the hood closer to the instrument panel.
2. The next block represents the air ducts of the VAZ 2110. They extend directly from the stove and provide:
- Interior ventilation through central nozzles;
- The air distributor works to supply heat (or regular air for ventilation);
- Two air ducts are directed to the rear of the cabin;
- There is a whole system of five nozzles for heating the feet;
- Two side air ducts provide heating for the side windows and part of the interior, providing better heating;
- Two nozzles for ventilation.
The principle of operation of the heater
This, in brief, is the principle of distributing hot or cold air inside the VAZ 2110.
3. The electronic control unit for the stove operates from the passenger compartment. It includes:
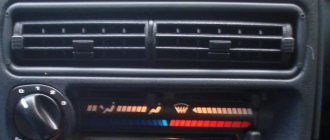
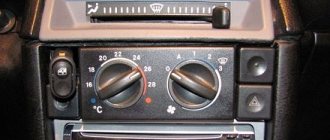
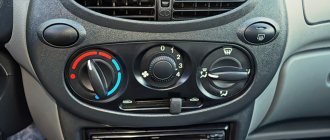
- Controller handle. This device allows you to set the temperature in the cabin that the stove unit should produce. It turns on by turning the knob and sets the temperature from the air, the temperature of which will correspond to that outside, up to 30°C. Most often, this part is called the ACS controller (automatic heater control system);
- The temperature sensor is responsible for turning on the heater when the temperature in the cabin drops by 2 degrees against the set one. The sensor has a microfan, and if the control knob is in position A, then the micromotor in the stove block turns on and the damper begins to operate, ensuring proper heating. Therefore, before starting repairs of the heating system, the operation of this sensor is usually checked. It is located next to the heating lamp on the ceiling of the VAZ 2110. Since it is not repairable, in the event of a breakdown this device should be replaced immediately.
Ceiling interior air temperature sensor
Priora heater control unit pinout
| Colored electrical diagrams VAZ 2170-71-72 LADA Priora |
Engine Control DiagramCar Front Wiring Harness ConnectionDashboard Harness ConnectionCar Rear Wiring Harness Connection
Colored electrical diagrams VAZ 2170 LADA Priora
Electronic engine control diagram Connection diagrams for the wiring harness of the front, rear of the car doors, trunk lid
| Instrument panel harness wiring diagram |
List of elements of the electrical connection diagram of the instrument panel harness of the LADA 2170 car
1, 2, 3 - instrument panel harness connectors to the front harness; 4 – instrument panel harness connector to the rear harness; 5 – contacts of the mounting block connector; 6 – brake light switch; 7 – instrument cluster; 8 – lighting control module; 9 – driver airbag module; 10 – horn switch; 11 – diagnostic block; 12 – on-board computer mode switch; 18 – ignition switch; 14, 15 – blocks to the electric power steering control unit; 16 – electrical package controller; 17 – light switch alarm;18 – windshield wiper switch;19 – air flow distribution gearmotor;20 – heater control unit;21 – heater electric motor switch;22 – rear window heating switch;23 – clock;24, 25 – instrument panel harness connectors to the radio;26 – hazard warning switch; 27 – glove compartment lighting switch; 28 – glove compartment lighting switch; 29 – instrument panel harness connector to the ignition system harness; 30 – airbag system control unit. Al, A2, AZ – instrument panel harness grounding points. B – mounting block block.
Instrument panel harness – 2170-3724030.
Ignition system harness wiring diagram
List of elements of the electrical connection diagram of the ignition system harness of the LADA 2170 car
1 – controller;2 – ignition system harness connector to the instrument panel harness;3 – main fuse box;4 * speed sensor;5 – rough road sensor;6 – oil pressure warning lamp sensor;7 – throttle position sensor;8 – sensor coolant temperature;9 – coolant temperature indicator sensor;10 – mass air flow sensor;11 – idle speed control;12 – electric fuel pump relay;13 – electric fuel pump power circuit fuse (15 A);14 – ignition relay;15 – relay fuse ignition (15 A); 16 – controller power supply fuse (7.5 A); 17 – crankshaft position sensor; 18 – oxygen sensor; 19 phase sensor; 20 – knock sensor; 21 – canister purge solenoid valve; 22 – sensor oxygen diagnostic;23 – ignition coil;24 – spark plugs;25 – injectors;26 – ignition coil wiring harness block to the ignition system harness;27 – ignition system harness block to the ignition coil wiring harness;28 – ignition system harness block to the injector harness ;29 – injector harness block to the ignition system harness. A – to the plus terminal of the battery; Bl, B2 – grounding points of the ignition system harness. C1 – grounding point of the ignition coil wiring harness. Ignition system wiring harness – 2170-37240*26 .Ignition coil wiring harness – 1118-3724148. Injector wiring harness – 11186-3724036.
List of elements of the electrical connection diagram of the front vehicle harness LADA 2170
1 – starter; 2 – battery; 3 – generator; 4 * battery and starter harness connectors and front harness; 5-7 front harness connectors to the instrument panel harness; 8 – engine compartment lamp switch; 9 – left headlight; 10 – right headlight ;11 - brake fluid level sensor;12 – air temperature sensor;13 – washer motor;14 – reverse light switch;15 – engine electric fan;16 – heater damper gearmotor;17 – additional resistor;18 – windshield wiper motor;19 – main fuse block; 20 – heater electric motor; 21, 22 – sound signal Al, A2, Bl, B2 – grounding points of the front harness. Front wiring harness – 2170-3724010. Battery wiring harness with housing – 2170-3724080. Battery connecting wiring harness and starter - 2170-3724070.
Differences in design
The VAZ 2110 was equipped with stoves of the so-called new or old model. Both systems, including those on the VAZ, which has an injector instead of a carburetor, are not particularly different in design.
So, the immediate differences:
- The main difference between the new stove and the old one is in the design of the heater radiator. Therefore, if you are repairing a heating system and decide to install a new model instead of an old radiator, then take into account some nuances;
- In addition, the SAUO controller is also not exactly like that. 4 or 5 position controllers manufactured before the fall of 2003 have already been discontinued and are not suitable for new heater models;
- The micro-gearboxes are also different, starting from release in September 2003. They differ in resistors (shaft position sensors), so you need to check whether the resistor in the MMR model that you purchased is interchangeable.
Old-style MMR
New sample MMR
Front seats
Consistency, accuracy and attentiveness are all you need to successfully install covers on the front seats.
- It is not necessary to remove the front seats to install the covers. All work can be done directly in the salon.
- Remove the head restraints from the seats.
- Pull the cover over the top of the back of your chair.
- Usually there are three elastic bands on the central seams of the covers. They must be passed between the back and the seat so that each element of the product is exactly in its place.
- Now we fix the position of the covers using hooks that are placed under the chair itself.
- Carry out a similar operation with the lower part of the chair.
- The locking hooks are also inserted from the bottom so as not to interfere with the driver and passenger.
- All that remains is to pull the material onto the headrest. How to install a turbine on a VAZ 2110
Repair
If you are planning a major overhaul of the stove, especially if you still have an outdated system, start by purchasing a new stove radiator (it is better to buy a copper one, it heats much better), and this will only improve the performance of the heater.
But the design of the VAZ injector stove is practically no different from carburetor cars.
The following is a breakdown of the following points:
- The engine block has a plug from which antifreeze is drained into some container;
- The frill is moved forward a little (a lengthy operation), the windshield wipers and everything that gets in the way are removed;
- The heater housing is removed. You should know that the body is divided into two parts. The front one is removed along with the fan;
- Next comes the cabin filter housing. It can be changed at the same time;
- The other part of the fan housing is removed;
- The clamps are loosened, the hoses are removed;
- Then, with some effort, the radiator is removed.
Assembly, as they say, is in reverse order. Just one more nuance: if you have an outdated stove, then pay attention to two points:
- When installing the plastic case, make sure that the pedal fits into the desired groove;
- Knowing the structure of all components, be sure to double-check their tightness.
Before adding antifreeze, do not forget to make sure that the engine block has a well-tightened plug. Be sure to make sure that the entire system is running smoothly and more efficiently than before.
The device of the stove on the VAZ 2110
Today we will get acquainted with the stove and its structure on a VAZ 2110 car.
As you know, the heating system has a direct impact on the level of comfort. If in summer there is no special need for interior heating, then in autumn and winter it is problematic to imagine traveling without it. Theoretically, you can drive, but lower temperatures are unlikely to benefit your health.
Dismantling the heater
see also
- How to choose an anemometer for ventilation
- Ventilation of an alcoholic beverages warehouse
- Ventilation restoration scheme
- DIY deflector for ventilation
- Installation of automatic ventilation
- BMW E90 crankcase ventilation valve
- Bathroom doors with ventilation
- Certification of the ventilation system
- Ventilation requirements for a gas wall-mounted boiler in a private house
- Ventilation for car painting in the garage
- Ventilation for laptop
Device
Periodic malfunctions in the operation of the heating system for the VAZ 2110 are an ordinary and common thing. Therefore, the owners of this model from the Russian automaker have to dig around in their own garage every now and then or send the car for repairs to specialists from service stations.
Heater circuit diagram
To understand exactly how to carry out repair and preventative measures, you first need to familiarize yourself with the diagram of the stove and its components.
| Element | Peculiarities |
| Electric motor | A fan is mounted on it. Both elements contribute to the injection of heated air into the cabin |
| Radiator | The entire operation of the heating system is based on this component. Remove the radiator and the heater will not work. Interestingly, the new model stove does not have a valve that shut off the flow of coolant through the radiator. Older devices have a faucet. The faucet was removed in order to avoid leaks, which were common on old stoves. Plus, they got rid of the tap for faster and more efficient heating of the interior. Although many owners of new tens do not agree with this decision, therefore, during repairs, they install a faucet on the stove |
| Dampers | In total, the stove has three of them. The first is responsible for air intake recirculation, the second is for opening and closing the heater duct, and the third is intended for control and is considered the most important |
| Resistor | This element is responsible for the speed of blowing hot air into the cabin. |
All elements, including additional valves, shields, fittings, are combined into a single unit. It, enclosed in a housing, is located in the engine compartment near the dashboard.
Air ducts
Air ducts are another block of the heating system. They come from the stove and perform several different functions at once:
- The interior is ventilated through central nozzles;
- Distribute the air through an appropriate distributor that supplies heat or air for ventilation;
- Another pair of air ducts serve to heat the rear row of seats;
- The system, which includes five nozzles at once, warms the feet;
- A pair of side air ducts take over the functions of heating the glass and partially heat the interior. This makes heating more efficient;
- A pair of nozzles are used for ventilation.
Electronic stove control
This electronic control unit operates directly from the passenger compartment. It consists of two main elements.
- Pen. Using the controller knob, the user sets the required temperature, which the stove then generates. Control is carried out by turning the knob in one direction or another, depending on what degree of heating you require at the moment.
- Temperature sensor. It is responsible for activating the stove when the temperature drops by more than 2 degrees compared to the value set on the controller. The sensor is equipped with a micro motor. When the handle is in position A, the micromotor in the stove block turns on, the damper is activated, thereby causing proper heating.
Control block
Before starting repairs of the entire stove, it is strongly recommended to check the condition of the sensor. You can find it near the heater lamp on the ceiling of the car. The device cannot be repaired. Replacement only.
Design Features
For the VAZ 2110, it is possible to install two types of stoves - new and old. Regardless of the engine used (injection or carburetor), there are no fundamental differences in the designs of the stoves.
But what is the difference between the new and old type stoves? Let's try to figure it out.
- Radiator design. This is the main difference between the devices. Therefore, when replacing a radiator from an old one to a new one, be sure to take into account the installation nuances;
- The controller knob on stoves is slightly different. Old-style heaters have a main problem - they have been discontinued. They cannot be an analogue for 4 and 5 position controllers, which began to be equipped with dozens of them in the fall of 2003;
- The micro-gear motors for the stoves are different, starting in September of the same 2003. The difference lies in the shaft position sensors (resistors). Therefore, when making repairs, make sure that the devices are truly interchangeable and that you bought old-style resistors for your old stove, not new ones. Otherwise the gearmotor will not work.
Manufacturing of covers
First of all, you will need new seat covers. You can either order them ready-made or sew them yourself. Practice shows that there are no particular difficulties in this work.
We remove the old covers and rip them into separate parts. We lay out the new fabric on the table, put the old parts of the cover on it and trace it along the contour. All that remains is to cut out the outlined details with sharp scissors. A finishing material called Alcantara is ideal for upholstering the seats of the VAZ 2114.
This suede-like fabric has many advantages:
wear resistance; durability; resistance to external influences; elasticity (which is especially important for upholstery of products of complex shapes); ease of care; resistance to deformation due to temperature changes; pleasant, soft structure, reminiscent of suede.
Each part of the old cover must be signed with a marker or felt-tip pen so as not to get confused when cutting new products.
In addition to fabric, for upholstering the seats you need foam rubber, 5-7 mm thick, on a fabric basis. We glue the cut parts of the covers to the foam rubber on the reverse fabric side.
Separately, it is worth mentioning the glue used for reupholstering the seats. Regular glue in a jar and a brush are not suitable for this purpose. You can only use spray glue; in this state it will not clog into the large pores of the foam rubber and will not spoil its structure. The German Mah3 upholstery adhesive, created specifically for use in the auto industry, has proven itself to be excellent.
Now we sew all the finished parts of the cover together using a sewing machine. Any triple feed lockstitch machine will do. Now all that remains is to glue the seam flaps in different directions and flatten the seams with a hammer.
Turn the cover right side out. Now you can put them on car seats.
Repair
As we have already noted, the design of stoves on dozens with carburetor and injection engines has practically no differences. Therefore, the repair instructions below are suitable for owners of a VAZ 2110 with both types of power units.
If you are planning to overhaul your old-style stove, we recommend starting with the purchase of a radiator. Use copper as it is more efficient and helps the heater work better.
To carry out repairs correctly, strictly follow the points presented in our instructions and rely on video materials.
- There is a plug on the engine block through which coolant is drained into any container. If you plan to use the same antifreeze or antifreeze again, choose clean containers.
- Next you need to move the frill forward. This process will take quite a long time, so be patient.
- Next, you need to remove the windshield wipers and get rid of as much as possible of everything that could interfere with the repair process.
- Remove the body of your stove. It is divided into two parts, which is important to know in advance. The front part of the stove body is removed directly along with the fan.
- After this comes the stage of dismantling the cabin filter. Check its current status. If the filter is dirty, this is an excellent reason to replace it.
- The next stage involves removing the second part of the housing.
- Loosen the clamps used on the hoses a little. This will allow you to easily remove the hoses.
- Having applied some effort, you can now finally remove the radiator from its seat.
Reassembly
In fact, reassembling the unit only involves following the opposite sequence of operations. By disassembling the stove, you have the opportunity to simultaneously inspect other elements of your car to make sure they are working.
Get used to the fact that during complex repairs you need to check components along the way that are not related to the current problem you are solving. Even if the part is suitable for use, but has already worn out enough, it is easier to change it now than to carry out heavy dismantling work again in a couple of months.
The only nuance that you should pay attention to when reassembling is the type of stove. If you have an old-style heater, then it is important to pay attention to a couple of issues.
- When the plastic housing is mounted in place, make sure that the pedal fits neatly into the groove intended for it.
- Check how tightly all the nodes fit into their seats. Otherwise, unpleasant consequences may arise that will force you to dismantle the entire assembly again. And this, as you already understand, is not an easy process.
That's it, now all that remains is to return the coolant back into the system and tighten the plug securely. Test your vehicle in a garage before driving it on public roads.
Preparatory work
Some are satisfied with dismantling without removing the remaining components of the interior, but this takes extra time and complicates the process as a whole. In order not to add more work to yourself, it is recommended to clear the interior for free movement. Strictly observing the sequence, you need to remove:
- armchairs;
- glove box;
- steering wheel;
- disassemble the floor tunnel. To do this, you need to unscrew the screws and move the part back a little.
We dismantle the lower part in the same way. The next step is to remove the glove compartment, after which you should remove the relay and mounting block. As you disassemble, you need to mark all the wires
Particular attention must be paid to the speedometer