Some VAZ-2111 owners believe that an insufficient flow of warm air passing along the sides, as well as its absence in the legs, indicate a malfunction of the stove. But in reality this is not the case - the fact is that the domestic manufacturer has not worked out the interior heating mechanism very carefully, so initially, even in a new vehicle, the stove works exactly as described above.
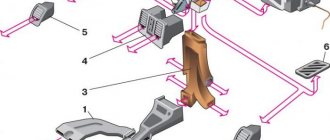
Another feature is that the windows of the VAZ-2111 fog up when it rains, and there is also no heat in the back seat. These shortcomings can be solved by modernizing the car's structure; for this it is important to understand the separation system of the car:
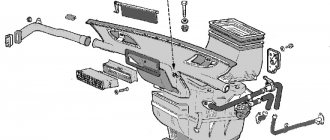
- The 1st element is represented by a heating unit that heats the outboard air flow that enters; this device is located under the hood. Its task is to control the air temperature and normalize the air flow rate to optimal values;
- The 2nd element acts as an air distributor; air enters the cabin passing through the air blowers. The distribution components are located on the dashboard of the vehicle.
Checking components
Naturally, disassembling the stove on a VAZ 2110 and checking its components is necessary if you are dissatisfied with its operation, and also if it cannot be adjusted.
So:
The first thing to do is check to see if the fuse has blown. And although, if this happens, the thought immediately arises - change the blown fuse, do not rush. This is unlikely to immediately solve the problem; most likely, it is not the cause, but a consequence of some kind of failure that needs to be found; First of all, you need to check whether the damper moves when the parameters of the heater sensor change
Carefully, so as not to break the wire going to the backlight, remove the deflectors. Now you can clearly see whether the damper is turning or not
If you need to replace the heater damper, then installing an aluminum one instead of a plastic one will be justified; Check the resistance of the temperature sensor. If the temperature in the cabin is 16°C, then its resistance should be 250 Ohms, at 22°C - about 200 Ohms. If this is not the case, then installing a new sensor should help; It is also advisable to check the controller: remove it from the socket, turn on the ignition and, using the handle to change the temperature parameters, measure the voltage on the long connector. If the voltage does not change, then it is faulty; To check the gear motor of the stove, you will have to do a little disassembly: remove the frill, get to the drive of the gear motor (brown and pink wires are connected to it). Apply current from the battery to the connector. If it spins, it means it’s working, if not, you may need to install a new one; If the heater only operates in one position, the additional resistance (resistor) through which the fan is connected may have burned out. Installation of a new one is possible only from the engine compartment; Check if the wires in the controller are burnt out. To do this, it needs to be disassembled; On the right under the hood you will find the relay box. It is very possible that a wire has come loose from the relay responsible for operating the heater. At the same time, check the relay that turns on the heated rear window. If you do not have such heating, when tuning the stove, you can include this relay in the system; If the air entering the VAZ 2110 interior does not warm up sufficiently, be sure to check the antifreeze level, as well as the absence of its leakage from the heater;
Possible problems
If the stove motor is not working well, do not rush to blame it. Of course, it tends to become clogged with extraneous small things - particles of dust, soot and other contaminants. It is enough to do preventative cleaning once or twice a season. Similar procedures must be carried out before the end and at the beginning of the operating season. The temperature sensor may fail. In this case, the movement of the damper is disrupted. In normal mode, it opens at the maximum when the red dot is reached and closes when the blue minimum point is reached. The indicators of normal resistance also differ. Typically the value is in the range of 20-25 ohms. If it goes beyond the limits, the fan may not heat or cool the air properly. A malfunction of the stove fan itself is indicated by unusual behavior. For example:
- Grinding noises during operation and extraneous noises;
- The fan does not start at all;
- Reduced efficiency and volume of air injection;
- I hear the fan is not working well.
The first place in the frequency of breakdowns is occupied by the electrical circuit from the battery to the stove motor. If the cable fails completely, a blown fuse is to blame. Malfunctions of the electric motor at different speeds hint at a blown resistor. And if there are no changes in the operating mode, the diagnosis is obvious - the control controller does not respond. The terminals of various connections may also fail. But if the electrical equipment is normal, then the device will have to be dismantled and thoroughly rebuilt.
Causes of poor-quality foot airflow
Almost all vehicle owners face the problem when the heater in the driver’s feet does not work on a VAZ-2110. The heating system on domestic cars has significant disadvantages - this is a weak air flow into the driver’s feet and towards the side windows. Often this situation occurs even during normal operation of the heater.
There may be several reasons for this, and all of them are related to the technical features of the heating system design.
The first and main reason why the stove does not heat with the required intensity is poor-quality sealing of the heating system air ducts. The heater ducts are made of plastic and have a large number of slots around the perimeter. As a result, a significant amount of warm air is lost through the holes in the air ducts and a weak flow reaches the final destination.
The second element of the heating system, which requires improvement for better heating of the interior, is the plastic air distribution unit. People also call the driver his Christmas tree. This unit also has slots, which significantly reduces the flow of warm air to the driver's feet, side windows and to the rear seats of the vehicle.
The next detail that causes poor heating of the interior is. Due to its design features, it does not fit tightly to the panel body. As a result, most of the hot air remains in the engine compartment and in the dashboard.
As you can see, the complex reason that the stove is blowing weakly is poor-quality sealing of the VAZ-2110 heater elements and the presence of a large number of cracks in the car’s heating system.
Before you begin to eliminate factory defects in the heater, you need to make sure that it is working properly
In case of problems with the functioning of the stove, it is important to first repair worn-out or damaged parts, and only then upgrade the heating system. Only in this case, modifications to the heating system of the vehicle will give a tangible positive result.
How to repair the heating system of a VAZ 2112
An indispensable device for any car in cold weather is the stove. Sometimes it is necessary to replace the radiator heater on a VAZ 2112 with all the elements. The interior of the VAZ 2112 has built-in supply and exhaust ventilation. Air enters the cabin through special holes made in the windshield linings. Air can be supplied spontaneously or forcefully. In the second case, the supply is provided by the heater fan. It can exit the passenger compartment through cracks between the panels located inside the doors and holes in their ends. Built-in valves allow air to pass out and prevent it from getting in, which improves thermal insulation in the cabin. If necessary, the heater radiator preheats the air before entering the cabin.
What are the features of the VAZ 2112 heater radiator?
- The heater radiator of a VAZ 2112 car is located in a plastic casing under the dashboard in a horizontal position.
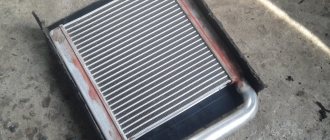
- The design consists of two rows of tubes made of aluminum with two plastic tanks pressed onto them. On the left there are two fittings: one for draining, the other for supplying coolant.
- The position of the dampers regulates the flow of part of the air that is taken in by the radiator. Its main flow passes by the radiator. If the damper is in its extreme positions, no air flows at all.
- A design feature is the absence of a tap, which should shut off the flow of coolant, which ensures constant heating of the heater radiator when the engine is running. In this case, the required temperature in the cabin is achieved faster, and the absence of a tap reduces the number of joints, places that can leak and create a lack of tightness in the entire system.
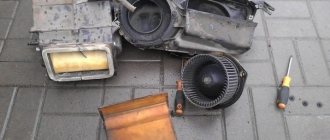
Dismantling the heater radiator of a VAZ 2112 car
If the heater radiator leaks, it must be replaced. Replacing the heater radiator in a VAZ 2112 begins with dismantling the entire dashboard and steering column. The work must be carried out carefully, which is due to the manufacture of most connectors from fragile plastic latches and clamps that can easily be broken. The radiator can be removed without dismantling the panel. Replacing the heater radiator on a VAZ 2112 is easier to do with the evaporator removed, but this requires preliminary depressurization of the main air conditioning system and removal of the refrigerant. The radiator removal instructions suggest:
Disconnect the battery.
- Disconnect the hoses installed on the heater bulkhead from the engine compartment side.
- Push the rubber seal on the partition into the interior of the cabin. To do this, you need to disconnect the edges of the seal from the edges of the hole in the partition.
- Remove the cover, the ashtray, the receiver, for the center pillar, and the front panels.
- Remove the heater and air conditioning control panel.
- Remove the electronic control unit without disconnecting it from the connector block.
Dismantling the control unit of a VAZ 2112 car
- Unscrew the bolts securing the left pillar to the base of the body and the bolts securing the ground wires; you do not need to completely remove the pillar.
- Unscrew the bolts that hold the right strut, then it is removed from the car.
- Use a Phillips screwdriver to unscrew the self-tapping screws that secure the stand to the front plastic panel from its reverse side.
- Remove the central air duct duct.
- Above the heater core, slightly shifted forward, there is a dividing damper, which must be removed along with the air duct section to increase the working space.
- Loosen the nuts on the studs that secure the left side of the evaporator housing.
- Unscrew the nut on the stud located near the upper pedal lever for controlling the throttle valve.
- Remove the bolts holding the lower right corner of the heater housing.
- Remove the heater lugs from the studs.
- Move part of the air conditioner evaporator housing to the side.
- Remove the heater from under the front panel; its general appearance is shown in the photo.
General view of the heater of the VAZ 2112 car
- Remove the clamps holding the heater pipes to the housing.
- Remove the radiator from the housing.
Advice from experienced car owners
Eugene:
“I never thought I would encounter such a problem, but it happened. After repairing the cylinder head, it became very difficult to warm up the interior. I spent a long time searching for why, and it turned out that the engine was throttling. I did everything as advised, the coolant stopped bubbling only after 4 hours, but now it’s always warm in the cabin.”
Sanya:
“I have a VAZ 2109i, it blew cold at idle. I added coolant to the expansion tank, everything was ok.”
Rustam:
“I drive a 6th Mazda. Last winter, the heater began to act like a fool: over 2 tons of revolutions, hot air came out of it, over 3 tons, despite how much the temperature was set, the heater practically boiled with boiling water, but as soon as you stopped, the air became cool. I went through all the possible options described in the article, the problem did not go away, after a long search, the service station technicians found the reason - the climate control system had failed.”
We recommend: What to do if the wipers on a VAZ-2110 do not work: possible reasons
Ruslan:
“On my Priora, the stove also blew cold at idle, so to fix this I had to constantly add antifreeze. Got tired of it, sealed the lower pipe, now everything works properly.”
Oleg:
“As a service station worker, I can say that the warmest stove among all domestic cars is in Kalina, but sometimes it also malfunctions
As a rule, the whole problem lies either in the gasket of the pump, or in the pump itself, so if you are the owner of the named car, in which case the first thing you should pay attention to is the pump and its components.”
Air lock and lack of coolant in the system
This is an easily fixable problem. The culprit may be a faulty expansion tank cap that is unable to maintain the required pressure in the system. Another reason for the formation of traffic jams is a lack of coolant. Poor circulation leads to the stove blowing cold air at idle. When the car starts moving, the air temperature rises, and after stopping it drops again.
To eliminate the problem, you need to check the antifreeze level and, if necessary, add coolant. Also check the system for leaks and repair any leaks if found. Often pipes leak at the joints, but the radiator itself may be the culprit. If the reservoir cap does not work, replace it with a known good item.
After this, you need to get rid of the air in the system by installing the machine on a hill or overpass so that its front part is higher than the rear. Start the engine and open the expansion tank cap. Excess air should be released from the system. If after some time the plug appears again, this may be a sign of a cylinder head gasket failure.
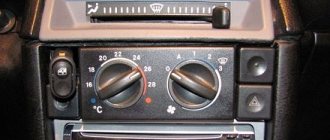
Operating modes
You can configure the heater operation manually or automatically. That is, you can set the temperature sensor according to your wishes, for example, at 22°C. If everything is in order, then the manufacturers promise that the deviations will be no more than 2°C, after which the relay will turn on the heating again, and after reaching the specified parameters, turn it off. But if failures occur, then after checking the functionality, it is quite possible that the sensor or relay will need to be replaced.
You can set the automatic mode. For this there is a special screw, the so-called tuning screw. It is advisable to make adjustments with the windows and doors closed. The fan handle should be in position “A”, and set the temperature at your discretion.
Take a test thermometer to the salon. If after 15 minutes the temperature does not correspond to the specified parameters, then you need to remove the controller from the socket and turn its adjustment screw. Clockwise to increase the temperature, counterclockwise to decrease it. If this does not help, then the sensor needs to be replaced.
SAUO block without panel
In addition, you may need to install a new control unit, or even tuning the entire heating system.
Switch, actuator and wiring
Checking that the fan switch is working is a little more difficult. To do this, you will need to remove the control unit and use a tester in ohmmeter mode to diagnose the variable resistance resistor.
To check the electric drive itself, you need to remove the decorative trims near the windshield from the outside and dismantle the electric motor. You can determine its serviceability by connecting the drive contacts directly to the battery terminals.
As for the wiring, its integrity is checked with the same tester in voltmeter mode at the contacts of the fan motor. If there is voltage on them (in the drive on mode), then the wiring is intact. Otherwise, it is better to contact an auto electrician.
Causes of poor foot airflow
Heater malfunction
Air through the cabin filter is taken from the street by the rotating blades of the electric heater motor. Through a damper system, air is distributed through air ducts and supplied into the cabin through deflectors and non-adjustable grilles.
Air, like any gaseous medium, tends to follow the path of least resistance. Therefore, it is logical that the air flows first come out of the central and side deflectors. The feet of the driver and passengers are blown last. Structurally, the air ducts to the central deflector and the upper side airflow points have a larger cross-section, and it is much easier for air to pass through them.
Initially, you need to make sure that nothing interferes with the intake of air from the atmosphere. After all, if the air is supplied in insufficient volume, then it will not be enough to supply all airflow points with the intensity that was calculated at the design stage of the car.
Check the condition of the cabin filter. To do this, remove the wipers and frill. The cabin filter is located on the right side of the vehicle under the windshield. It is covered with a plastic casing, which is secured with four self-tapping screws. Unscrew the screws and remove the cabin filter. We start the engine, warm it up to operating temperature and check the operation of the stove. If the situation has improved, change the cabin filter and close the issue.
The second common cause is a clogged heater core. In this case, the heating of the interior will be weak, because warm air does not come out of all the deflectors well, and not just into the legs. But the fact is that when driving for a long time, your feet begin to freeze first, so it seems that the problem is in this part of the airflow.
Video: Why the stove does not blow at the feet of VAZ 2111,2110
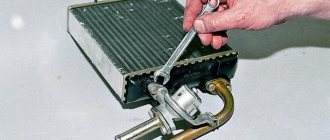
This malfunction is easily diagnosed. We find two pipes for supplying antifreeze to the heater radiator (rubber hoses on the left side in the direction of travel of the car). With the engine warm, carefully touch the two pipes one at a time with the heater running at full power. The difference in temperature between the pipes should be minimal. If one pipe is hot and the second is cold or barely warm, we wash or replace the heater radiator.
Checking the operation of the dampers
There are nine exit points for air flows from the heater on the VAZ-2110:
- central deflector;
- two side deflectors and two windshield air vents;
- heated feet of the driver and front passenger;
- two outputs for heating the feet of rear passengers.
In an ideally operating system, the pressure generated by the heater motor is sufficient to create an effective flow to warm the feet. However, over time, gaps form in the joints of the air ducts, and the dampers of the VAZ-2110 heater begin to fit loosely to the body. This leads to atomization of the air flow. As a result, a minimum amount of air reaches the distant exit points.
First, dismantle the panel with the central deflector. It is held in place by four plastic clips. To remove it, simply pry it off one of the sides with a suitable object, such as a flat-head screwdriver. Be careful: the clips are fragile.
Evaluate the damper's performance
In older cars with a manual damper drive, pay attention to the play in the linkage of the rods. A broken rod system will not allow the damper to fit tightly to the body in the extreme position, which will cause air to leak from the cold circuit
The problem is corrected by adjusting the damper. In a mechanical drive, it is possible to shorten the rod due to a movable lock on a gear rod or a threaded tip. During the adjustment process, check that the position of the switch on the panel corresponds to the actual position of the damper.
Another reason why the VAZ-2110 stove does not blow into your feet is a malfunction in the operation of the automatic heater control system (AHC) unit or the gear motor of the VAZ-2110 stove. In this case, there is usually insufficiently warm or even cold air from the stove operating in maximum heating mode. This is due to the incorrect position of the damper in which the gearmotor sets it.
Evaluate the operation of the gear motor of the VAZ-2110 stove. To do this, visually check how it closes the damper when switching modes. The easiest way to do this is to remove the panel with the central deflector. Move the temperature knob to the extreme position (for example, set the minimum temperature), then sharply switch to the opposite mode. The damper should completely block the channel visible from the driver's position. If this does not happen, the problem lies in the gear motor or the automatic control system unit. Check the serviceability of the gearmotor and unit.
Removal and replacement instructions
If you decide to change the stove radiator yourself, then strictly follow the steps described in the instructions below.
Replacing a VAZ 2110 heater radiator is described using the example of replacing an old-style device:
First, you will need to drain the coolant from the system before starting the process. In this case, you have several options - drain the antifreeze through the expansion tank, which will take more time, but you will drain about one liter. Or you can drain the consumables through the corresponding drain hole located on the power unit block; in this case, about four liters will drain. The antifreeze is poured into a prepared container; make sure it is clean. If the condition of the fluid is generally normal, there are no traces of deposits or wear products, then it can be reused. After draining the antifreeze, you need to remove the frill sealing element, and then remove the element itself. To do this, unscrew the corresponding bolt that secures the frill; it is located under the main brake cylinder. Next, the four upper fasteners on the right side are unscrewed, two clamps are disconnected that secure the pipes and wiring, in particular, the negative fan wire connected to the body. Then you will need to unscrew two more bolts that secure the left side of the frill, but do not unscrew them completely so that the side moves, but is not dismantled. The windshield trim must be completely removed; to do this, unscrew five screws and two nuts. After completing these steps, you will need to disconnect the coolant level controller terminal in the system. Having done this, you will need to disconnect the outlet line from the expansion tank. Next, disconnect the windshield washer pipe. To do this, you will need to unscrew the four bolts located in front of you, dismantle the wipers, trim, and also partially disconnect the body of the stove and the ventilation unit. After this, you need to unscrew the bolt that secures the cabin filter element, as well as the front part of the fan. Before unscrewing, we recommend that you remember the installation location of the four longest screws so that there are no problems during installation. The cabin filter housing itself can be removed; you will also need to dismantle the rear part of the ventilation unit. Having done this, turn off all supply and outlet lines, as well as the so-called antifreeze return hose. At the next stage, the radiator of the VAZ 2110 stove is replaced. You need to make some effort to dismantle the leaking radiator assembly. Install a new device in its place, then install all pipes, parts and components that were removed only in reverse order
Pay special attention to how correctly you installed the plastic housing of the ventilation device. His so-called pedal must fit exactly into the required groove
You must tighten all the bolts that were removed earlier, otherwise the tight fit of the main components of the heating system will be disrupted, and this may cause problems with the operation of the stove.
1. Place a container under the drain hole and drain the coolant.
2. Unscrew all screws and remove the protective trim under the windshield.
3. Unscrew the bolts that secure the cabin filter, as well as the front side of the fan.
4. Remove the filter element and dismantle the radiator, then install a new one. Now let's briefly look at the procedure for replacing a new device:
- Remove the bolt in the center of the lower part of the windshield, the nut in the left corner near the air filter, and the two nuts located above the intake manifold.
- Remove the air filter element.
- Next, if you look through the air supply line, you will be able to see a self-tapping screw and two small screws; they secure both parts of the radiator assembly; you need to unscrew them.
- Then the right side of the stove should be moved to the right, then slightly turned away from you and pulled upward. You will be able to bring out the right side first and then the rest.
- After completing these steps, you can turn off the steam outlet.
- Dismantle the steel brackets that secure the two parts of the radiator assembly. When you can gain access to the damper, it will also need to be replaced with a new one. The installation procedure is performed in reverse order.
Priora heater control unit pinout
| Colored electrical diagrams VAZ 2170-71-72 LADA Priora |
Engine Control DiagramCar Front Wiring Harness ConnectionDashboard Harness ConnectionCar Rear Wiring Harness Connection
Colored electrical diagrams VAZ 2170 LADA Priora
Electronic engine control diagram Connection diagrams for the wiring harness of the front, rear of the car doors, trunk lid
| Instrument panel harness wiring diagram |
List of elements of the electrical connection diagram of the instrument panel harness of the LADA 2170 car
1, 2, 3 - instrument panel harness connectors to the front harness; 4 – instrument panel harness connector to the rear harness; 5 – contacts of the mounting block connector; 6 – brake light switch; 7 – instrument cluster; 8 – lighting control module; 9 – driver airbag module; 10 – horn switch; 11 – diagnostic block; 12 – on-board computer mode switch; 18 – ignition switch; 14, 15 – blocks to the electric power steering control unit; 16 – electrical package controller; 17 – light switch alarm;18 – windshield wiper switch;19 – air flow distribution gearmotor;20 – heater control unit;21 – heater electric motor switch;22 – rear window heating switch;23 – clock;24, 25 – instrument panel harness connectors to the radio;26 – hazard warning switch; 27 – glove compartment lighting switch; 28 – glove compartment lighting switch; 29 – instrument panel harness connector to the ignition system harness; 30 – airbag system control unit. Al, A2, AZ – instrument panel harness grounding points. B – mounting block block.
Instrument panel harness – 2170-3724030.
Ignition system harness wiring diagram
List of elements of the electrical connection diagram of the ignition system harness of the LADA 2170 car
1 – controller;2 – ignition system harness connector to the instrument panel harness;3 – main fuse box;4 * speed sensor;5 – rough road sensor;6 – oil pressure warning lamp sensor;7 – throttle position sensor;8 – sensor coolant temperature;9 – coolant temperature indicator sensor;10 – mass air flow sensor;11 – idle speed control;12 – electric fuel pump relay;13 – electric fuel pump power circuit fuse (15 A);14 – ignition relay;15 – relay fuse ignition (15 A); 16 – controller power supply fuse (7.5 A); 17 – crankshaft position sensor; 18 – oxygen sensor; 19 phase sensor; 20 – knock sensor; 21 – canister purge solenoid valve; 22 – sensor oxygen diagnostic;23 – ignition coil;24 – spark plugs;25 – injectors;26 – ignition coil wiring harness block to the ignition system harness;27 – ignition system harness block to the ignition coil wiring harness;28 – ignition system harness block to the injector harness ;29 – injector harness block to the ignition system harness. A – to the plus terminal of the battery; Bl, B2 – grounding points of the ignition system harness. C1 – grounding point of the ignition coil wiring harness. Ignition system wiring harness – 2170-37240*26 .Ignition coil wiring harness – 1118-3724148. Injector wiring harness – 11186-3724036.
List of elements of the electrical connection diagram of the front vehicle harness LADA 2170
1 – starter; 2 – battery; 3 – generator; 4 * battery and starter harness connectors and front harness; 5-7 front harness connectors to the instrument panel harness; 8 – engine compartment lamp switch; 9 – left headlight; 10 – right headlight ;11 - brake fluid level sensor;12 – air temperature sensor;13 – washer motor;14 – reverse light switch;15 – engine electric fan;16 – heater damper gearmotor;17 – additional resistor;18 – windshield wiper motor;19 – main fuse block; 20 – heater electric motor; 21, 22 – sound signal Al, A2, Bl, B2 – grounding points of the front harness. Front wiring harness – 2170-3724010. Battery wiring harness with housing – 2170-3724080. Battery connecting wiring harness and starter - 2170-3724070.
Airbag malfunctions
You can tell that the airbags have become unusable by the amount of engine vibration. If it operates in normal mode, and the body begins to rattle, transmitting vibration to the steering rack, pedal block, and instrument panel, you can be sure that the reason for this is the wear of the pillows.
The greatest vibration is usually observed when the engine starts, as well as when it is turned off. When the rubber cushions are completely worn out, a knocking noise may appear caused by the contact of the engine elements and its supports.
To be more convincing, start the engine, open the hood and visually inspect the engine mounts and the cushions themselves. Place your palm on the motor and feel how much it vibrates.
The causes of failure of engine mounts can be:
- deformation due to spent life, mechanical or temperature effects;
- loss of elasticity due to “aging” of rubber and temperature changes;
- delamination or cracking caused by exposure to chemically active liquids.
Guide to upgrading the VAZ 2110 stove
- Correcting deficiencies in airflow of side deflectors
This deficiency can be corrected by one of two methods. The simplest method is to simply seal all the holes into which the air flow is dispersed, this will greatly increase the efficiency of glass blowing. The second method is to lay corrugations instead of air ducts, but this method is more effective in improving the airflow for the feet of front and rear passengers; for the side deflectors the improvements will be insignificant.
That is why it is better to do sealing. To do this, you need to use modelin (anti-creaking). Using this material, it is necessary to seal everything, including bolt holes.
Which radiator should I choose, aluminum or copper?
The VAZ 2110 after 2008 was equipped with aluminum radiators, which have a number of pros and cons. However, some car owners complain about cold interiors and foggy windows. Advantages of an aluminum radiator:
- They have a higher density compared to copper
- The width of the radiator channels is larger, which means more heat transfer
Minuses
- If a leak occurs, it is not repairable
- Heats up quite quickly, but also cools down quickly
Initially, domestic cars were equipped with copper radiators. However, later, as we wrote above, they were replaced with aluminum ones.
Now it is quite difficult to find a high-quality copper radiator, since some manufacturers use impurities instead of pure copper.
Advantages of copper radiators VAZ 2110
- Among the obvious advantages is its heat dissipation of 389.6 W/(m. deg), it is significantly higher than that of aluminum
- A copper radiator takes a long time to heat up, but also takes a long time to cool down.
- If it leaks, it can be repaired.
- The copper radiator can be soldered.
Minuses
This type of radiator has fewer fins and thin channels that can become clogged.
The design and principle of operation of the cooling system of the “tens” engine.
Any cooling system is designed not only to cool parts, but also to perform some other functions, namely:
- ventilation and air conditioning, heating the air in the heating system;
- cooling air in the turbocharger;
- cooling the working fluid in the automatic transmission;
- cooling the lubricant, or rather the oil in this system.
Design of the cooling system of the VAZ 2110 injection engine.
- Heater radiator
- Heater radiator steam hose
- Outlet hose
- Supply hose
- Coolant temperature sensor (in the cylinder head)
- Pump inlet hose
- Thermostat
- Charging hose
- Expansion tank plug
- Coolant level indicator sensor
- Expansion tank
- Outlet pipe
- Carburetor starter fluid chamber
- Radiator outlet hose
- Radiator inlet hose
- Radiator steam hose
- Left radiator tank
- Electric fan switch sensor
- Fan motor
- Electric fan impeller
- Right radiator tank
- Drain plug
- Electric fan shroud
- Timing belt
- Coolant pump impeller
- Coolant pump inlet pipe
- Coolant supply hose to throttle body
- Coolant drain hose from throttle pipe
- Exhaust coolant temperature sensor
- Radiator tubes
- Radiator core
The principle of operation of the cooling system of an injection engine.
If we talk directly about the cooling system of the VAZ 2110, then it is liquid, its circulation occurs forcibly, and is filled into the expansion tank.
The basis for creating the liquid used in this system is water combined with ethylene glycol. Such a liquid can freeze only at the lowest possible temperatures, and also create an elevated boiling point. By adding various additives to it, you can increase the service life of the oil seal, as well as slow down the process of corrosion of the system itself. Full filling of liquid requires the latter in a volume of 7.8 liters.
The movement of liquid throughout the cooling system of the VAZ 2110 injector is ensured by a centrifugal pump, which is fixed in the cylinder block and is activated by the timing belt.
As you know, the liquid gradually heats up from the friction of the working surfaces of the parts. And depending on the reached temperature of the liquid, the cooling system initially circulates in a small circle, and after heating it begins to move in a large circle. That is, when a certain heating point is reached, the thermostat is triggered, after which it opens and changes the direction of movement of the liquid. This process is already regulated by a pair of valves located in this thermostat. In it, the bypass valve regulates the movement of coolant in a small circle, and the main valve in a large circle. Thus, when one of these valves opens, the other closes, and vice versa.
Until the engine warms up well, the bypass valve is in the open position, and the coolant flows in a small circle through the cylinder block, throttle valve and heater radiator. This heating radiator is built directly into the engine cooling system, therefore, when liquid passes through it, the car interior is heated.
At the moment when the coolant is heated to 85°C, the main thermostat valve begins to open when the bypass valve closes. At this moment, the coolant flows simultaneously through both the small and large circles. And already at 102°C, the liquid enters the radiator, flowing only in a large circle. There, thanks to the flow of air from the outside, it is cooled.
It turns out that the injection system of the VAZ 2110 engine is designed in such a way that if the air flow does not cool the liquid well, then the fan is automatically turned on using a signal from the electronic control unit. And in the case of strong heating of the liquid, its volume begins to increase, and then its excess returns back to the expansion tank. This tank contains a valve that maintains the required pressure in the system.
It is necessary to monitor and check the coolant level only when the car’s power unit is cold. If you notice a regular decrease in it, be sure to check the entire system for leaks. Well, a complete replacement of the coolant in the VAZ 2110 injector must be done every 75,000 kilometers.
Stove design
This unit includes several devices. The radiator is the main element of the stove - it heats the air entering the cabin. It is located under the hood. The next component is the air distributor, equipped with special pipes that run through the cabin of the 2110.
Removing a faulty radiator, you can get to it through the hood
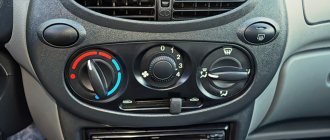
To control the operation of the heater, an SUAO unit is installed in the VAZ 2110 car, which is called a controller in the technical operating manual. The unit works in conjunction with a temperature sensor in the cabin; it is also called a ceiling sensor. The sensor reports the temperature to the unit, then this indicator is compared with the set temperature on the handle. If the indicators differ by more than 2°, warm or cooled air is supplied to the VAZ 2110 interior.
It’s worth taking a closer look at the handle, or more precisely at its extreme positions – MAX and MIN. If the heater knob is set to one of these indicators, heat is supplied without the operation of the temperature sensor in the cabin. The scheme includes all of the above elements.
The device of the “tens” heater includes another unit - a gearmotor, which is responsible for opening and closing the damper. The miniature electric motor performs an important task in the operation of the heating system, as evidenced by the diagram. If the gearmotor is faulty, the system will only produce cold or hot air. If the gearmotor fails when the damper is closed, the system will stop functioning. We have described the main components of the VAZ 2110 heater; the diagram contains a more detailed list.
- Radiator.
- Air distributor.
- SUAO block.
- Ceiling sensor.
- Lever.
- Damper.
- Gearmotor.
Radiator
In the heating system, a radiator is installed for heating, which enters the VAZ 2110. It is also called a heat exchanger. Heating is carried out by the heat of the antifreeze. This component is connected to the engine cooling system by pipes and hoses. Antifreeze constantly circulates through the heat exchanger of the stove. The damper, based on the commands of the unit, directs the incoming air to the radiator or directly into the passenger compartment. If the heater damper is in an intermediate position, then one part passes through the heat exchanger, and the second bypasses the radiator. If we compare this part of the stove with previous generations of the VAZ, it has a number of useful improvements, as the diagram demonstrates.
SUAO and ceiling sensor
The process of removing the interior temperature sensor These components of the VAZ 2110 heater are connected and work according to the following principle:
- The sensor determines the temperature inside the car;
- This data is sent to the SUAO block;
- The block compares the temperature with the position set on the handle of the VAZ 2110 stove;
- After comparison, the position of the damper changes or remains the same - it depends on the indicator;
- This way the temperature in the cabin is controlled;
- If the heater handle is set to MAX or MIN, then the data from the ceiling sensor is not taken into account.
All these actions are demonstrated by the diagram. The block is a set of microcircuits; the normal operation of the stove depends on its serviceability. Both the sensor and the control system can be replaced.
Damper and gearmotor
The heater gear motor changes the position of the damper, due to which air is supplied to the cabin. This component is controlled by the control system block. If the device is faulty, the damper will not move. The unit is a miniature electric motor. When it breaks, it is usually replaced, since repairing it will be problematic. This also applies to the damper. The diagram shows the connections between the gearbox and the block.
Diagnosis of recirculation system malfunctions
If outside air continues to flow when the button is pressed, there is a problem with the system. You can determine the cause of the breakdown by diagnosing the cooling system, which involves performing the following actions:
- turning on the ignition, starting the power unit;
- setting the maximum fan speed mode;
- pressing the recirculation key.
This triggers the valve and closes the damper. If the car is moving at a constant speed and the damper is completely closed for several seconds, the system is working properly. If there are suspicious sounds (clicks, pops) and the damper moves jerkily, we can talk about problems.
Internal damage to the heater radiator
In addition to a clogged radiator, some VAZ car owners have discovered another factor why the heater blows cold air at idle. In the heater radiator there is a partition between the coolant supply and outlet pipes. It may crack or crumble, preventing proper fluid circulation inside the radiator.
We recommend: Why antifreeze boils in the expansion tank: a review of common breakdowns
The problem can only be detected after disassembling the radiator, so it is better to have a working part on hand to check. If installing a working radiator solved the problem, you can simply throw away the old one. It is unlikely to be repaired.
Finally, I would like to advise you to monitor the correct operation of the engine cooling system of your car, use only high-quality coolant (read our article about whether it is possible to mix antifreezes of different colors - https://avtopub.com/antifrizyi-raznyih-tsvetov/) and adhere to the recommendations manufacturer!
Differences in design
The VAZ 2110 was equipped with stoves of the so-called new or old model. Both systems, including those on the VAZ, which has an injector instead of a carburetor, are not particularly different in design.
So, the immediate differences:
- The main difference between the new stove and the old one is in the design of the heater radiator. Therefore, if you are repairing a heating system and decide to install a new model instead of an old radiator, then take into account some nuances;
- In addition, the SAUO controller is also not exactly like that. 4 or 5 position controllers manufactured before the fall of 2003 have already been discontinued and are not suitable for new heater models;
- The micro-gearboxes are also different, starting from release in September 2003. They differ in resistors (shaft position sensors), so you need to check whether the resistor in the MMR model that you purchased is interchangeable.
MMR of the old type MMR of the new type
If you are planning a major overhaul of the stove, especially if you still have an outdated system, start by purchasing a new stove radiator (it is better to buy a copper one, it heats much better), and this will only improve the performance of the heater.
But the design of the VAZ injector stove is practically no different from carburetor cars.
The following is a breakdown of the following points:
- The engine block has a plug from which antifreeze is drained into some container;
- The frill is moved forward a little (a lengthy operation), the windshield wipers and everything that gets in the way are removed;
- The heater housing is removed. You should know that the body is divided into two parts. The front one is removed along with the fan;
- Next comes the cabin filter housing. It can be changed at the same time;
- The other part of the fan housing is removed;
- The clamps are loosened, the hoses are removed;
- Then, with some effort, the radiator is removed.
Assembly, as they say, is in reverse order
Just one more nuance: if you have an outdated stove, then pay attention to two points:
- When installing the plastic case, make sure that the pedal fits into the desired groove;
- Knowing the structure of all components, be sure to double-check their tightness.
Before adding antifreeze, do not forget to make sure that the engine block has a well-tightened plug. Be sure to make sure that the entire system is running smoothly and more efficiently than before.
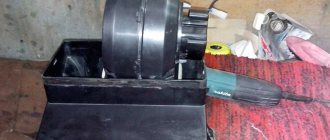
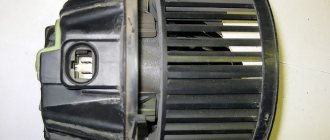
The procedure for repairing a stove fan
- Disassemble the heater motor. First remove the impeller, then the spring clips.
- Deprive him of support.
- Remove the brush assembly by unscrewing the screws first.
- Carefully knock out the rotor.
- Remove dust and dirt from all elements of the heater motor.
- Release the bearing by bending the edges of the plate on the inside of the stator.
- Remove the old bearing #609 and install the new one.
- Fold back the edges of the plate.
- Assess the condition of the plate after this procedure and sand the edges if necessary.
- Remove the old brushes along with the wires. In their place, solder the wires from the new brushes.
- Bend the brush spring stops to easily return the brush assembly to its place. Set it aside.
- Replace the heater motor rotor.
- Reinstall the brush assembly, making sure that the brushes are in their rightful places.
- Fill the gaps with springs and return the stops to their original position.
- Reinstall the impeller.
- Reconnect the electric motor to the stove network.
Disadvantages of the heater in the VAZ-2110
The main disadvantages, as a result of which car owners are forced to improve and modernize the heating unit:
- Weak air flow to the side mirrors and driver's feet. This problem often occurs during normal operation of the heating unit.
- Often consumers encounter a leak on a radiator device. The unit is equipped with a special tap, which wears out over time and begins to leak coolant. The faucet requires repair, but often the problem can only be solved by replacing the radiator assembly.
- The central air duct of the system includes two parts that are not sealed together. From the radiator device, this blower must supply a heat flow to the feet of the passengers sitting in the rear. If we take into account all the bends, then this is at least 2.5 meters. Of course, the heat flow does not reach the rear passengers.
Symptoms of a heater malfunction
The main signs by which you can identify problems with the heating unit:
- The temperature mode of the heater is not regulated. The problem usually lies in the control unit or in the operation of the heater dampers.
- The sensor located on the ceiling does not function. It is designed to determine the temperature inside the car.
- The heating unit does not function; only cold air flow is supplied to the vehicle interior.
- The side windows of the car or the feet of the driver and passengers are blown with hot air ineffectively.
- The volume of refrigerant in the cooling system decreases. The problem can manifest itself covertly or overtly. In the latter case, a leak can be noticed from the lines of the heating system or radiator device.
- The heating unit functions, but is very noisy.
The channel In Sandro's garage spoke in detail about replacing the electric motor of the heating unit on the "ten".
How the stove works on a VAZ 2113
Wanting to understand the question of why the stove on the 2113 VAZ model does not heat well, you need to study the design of the interior heating system itself.
Structurally, several main elements can be distinguished. The stove consists of:
- housings;
- radiator;
- radiator pipes;
- ceiling tap;
- air ducts;
- dampers;
- fan;
- control unit.
It is malfunctions on the part of these elements that may be the reason why the stove does not heat well.
Heating of the air entering the cabin is carried out due to the fact that hot air flows pass through a heat exchanger (radiator), inside of which coolant (antifreeze or antifreeze) heated from a running engine circulates.
On VAZ 2113 heaters, it was possible to shut off the supply of cooling liquid to the stove radiator. This allows you to turn off the interior heater when it is not needed. This mainly applies to car operation in the summer.
The supply of antifreeze is shut off with a special tap, which is cut into the coolant supply pipe to the stove radiator.
The radiator itself is located inside the heater housing. In addition to the fact that the housing contains the main elements of the stove, it also does not allow heat to dissipate in different directions and controls its movement throughout the car.
The housing is securely connected to the air ducts. It is through the air ducts that hot air flows can flow to the side windows, onto the windshield, into the passenger compartment, as well as to the feet of the driver and front passenger. To control the flow of air, deflectors are used at the ends of the air ducts.
To distribute air flows to different zones, dampers are used inside the stove body. Structurally, the stove on the VAZ 2113 has 3 types of dampers:
- Control. The first damper is responsible for controlling the stove itself. It is used to redirect the air flow through the heat exchanger (stove radiator), or bypass. In the first case, hot air will flow into the cabin, and in the second, the ventilation of the car interior is simply activated.
- Supply to the windshield area. The second flap helps redirect air towards the windshield. This is a useful feature. Especially in winter. Helps remove ice from glass, as well as get rid of fogging caused by the temperature difference between inside and outside.
- Redirection to the feet, side windows and interior. The third damper, which allows you to choose exactly where the hot air will blow.
Using the stove valve and dampers, the driver controls the interior heater, directs air flows and determines the zones where they will be directed.
There is also an important element in the form of a stove fan, which is part of the heater. With its help, air flows are created. The power supply circuit of the fan motor is equipped with rheostats. This allows you to select one of 3 operating modes. That is, by choosing one mode or another, the fan rotation speed changes
It is important to take into account that rheostats affect precisely the reduction in the speed of rotation of the blades. This is useful to know when identifying stove malfunctions.
The system used on the Samara and Samara-2 families, which includes the VAZ 2113 model, differs from the classic VAZ. Previously, the fan sucked in air. Now the process of pumping air into the stove body takes place. This significantly increased the efficiency of air supply.
Plus, access to the fan has been simplified. Now you can reach it through the engine compartment, near the engine shield.
Spare parts and tools
Before you replace a leaking or possibly clogged radiator, you need to choose a new one. Here you have space, it is quite possible that you will want a copper, DAAZ or Priorovsky one. But try to decide for yourself, look at reviews of different models on the forums, and only then buy.
Pay attention to the condition of the pipes; it is quite possible that they also need replacement. You will need more clamps, try not to limit yourself to the three recommended, a supply, as you know, will not hurt
You will need a Phillips screwdriver, preferably a short one. And also - tweezers, without them it is not easy to install the latches.