06 April 2016 Lada.Online 68 838 5
Cruise control is an indispensable option, especially when traveling long distances. Unfortunately, not all Lada models are equipped with such a useful function from the factory; for example, it is not available on the Lada Kalina and Granta with an automatic transmission, as well as on some trim levels of the Lada Priora. However, if you wish, you can install a universal cruise control kit yourself.
Most often, car enthusiasts are faced with two types of universal kits for cars with E-gas, the price of which is approximately the same (8000-1000 rubles):
- Jet Cruise (control via key fob; holds the throttle in a given position, so the speed decreases/increases due to the road terrain; there is a gas pedal jetter);
- Drivenge (control via an additional steering column switch; the throttle position is adjusted automatically and the speed does not change depending on the terrain; there is a gas pedal jetter).
If you decide to choose the first option, then installation instructions - To download the files, you need to log in to the website and connect the cruise control on the manufacturer’s website. Further instructions for those who have chosen Drivenge.
What benefits does having cruise control in a car give to a driver?
Modern cars are equipped with a cruise control system (“autospeed” or “autodrive”) - this is a device designed to maintain a constant certain speed, increasing or decreasing it depending on road conditions and terrain, with or without driver participation. It makes long journeys much easier. The driver does not need to constantly press the gas pedal.
All actions are reflected on the dashboard. The intensity of traffic on the roads is increasing, so adapted devices have appeared that can control the distance to the vehicle ahead, keeping it at an acceptable distance. In addition, they will prevent the car from rolling uncontrollably on a hill, and also have a number of additional functions.
04.04.2017
The simplest homemade cruise control
The simplest cruise control that can be easily installed even on an old carburetor car.
This homemade product is from the old, old times, when universal cruise control kits were not yet sold, and electronic throttles, where the cruise function is easily implemented in software, were not in use. Therefore, this design seriously smells of mothballs. Which, however, does not deprive it of its functionality. What if someone finds it useful?
If you need to increase the speed, for example, to overtake, then you accelerate, pressing the gas pedal as usual, and when the maneuver is completed, your foot is removed from the pedal and the car itself smoothly returns to the speed recorded using SPFS. If you need to slow down, you can start actively braking with the brake pedal or simply touch it to start gentle engine braking - depending on the circumstances. In any case, a short or long touch on the brake pedal causes a positive signal to be sent from the “frog” of the brake lights to the SPFS control unit, and even the shortest positive impulse deactivates the system - the cable fixation disappears, and the return spring of the throttle assembly returns the damper to the idle position , leading to the start of engine braking.
However, unlike real and full-fledged cruise control, the driving speed with the SPFS system turned on is the only one, selected during setup taking into account the driver’s preferences. It will not be possible to adjust it while driving. There is also no provision for automatic adaptation to the road terrain; the set speed will only be that way on a flat road, and ascents and descents will, alas, affect the movement accordingly. These are the disadvantages. The advantages, as promised, are the simplicity and low cost of the design.
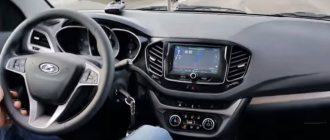
How to turn on a cruise on a Priora
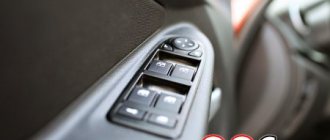
You can turn on cruise control on Priora 2 using the buttons on the right steering column switch, located in the form of a joystick:
- The left key allows you to enable or disable Cruise control.
- The right button controls the speed limiting system.
- The top key – “Set+” – activates the selected function and allows you to increase the set speed value.
- The lower key – “Set-” – activates the option and decreases the speed value.
- The central button – “OK” – resumes/pauses the system.
- The “Menu” button installed separately on the left turns on the Cruise control mode.
This way the system controls are at your fingertips.
To turn on the Priora's cruise control you need to:
With the ignition on, hold down the “Menu” button to enter the Cruise control mode. An indicator representing a speedometer will appear on the liquid crystal display of the instrument cluster.
- Press the left “CC” key; the yellow indicator lamp on the right side of the tachometer display will light up.
- Start moving, pick up speed, press “Set+” or “Set-”. If the car is moving no slower than 30, no faster than 150 km/h, the engine speed is 1200–4500 rpm, the selected gear is 3, 4, 5 (for a car with a manual transmission), the cruise will turn on. The current speed will be maintained automatically and its value will be displayed on the LCD. The indicator on the tachometer will turn green.
If the conditions for activating the function are not met, the instrument panel indicator will flash for 5 seconds and then turn yellow.
While driving, the selected speed is adjusted by pressing the “Set+”, “Set-” keys. When you hold them for a long time, the values increase/decrease automatically until the hand releases the button, but no more than 30 km/h. You can also accelerate by pressing the gas pedal. When the accelerator is released, the system will continue to operate in the specified mode.
The speed control and maintenance function pauses operation when:
- Pressing the brake pedal.
- Holding the clutch pedal for more than 5 seconds (for cars with manual transmission).
- Pressing the “OK” button on the steering column switch.
Inability to automatically maintain speed (for example, on ascents and descents in cars with “mechanics”). Deactivation of the system will be indicated by the turning on of the yellow indicator; the specified parameters will be saved. You can activate the function with the same settings by pressing “OK”, or using “Set+”, “Set-” as when you turned it on for the first time.
Features of operation on manual transmission and automatic transmission
On vehicles with manual transmission and automatic transmission, the operating principle of cruise control is the same, with the exception of some points. These points lie in the number of functions performed by the devices. However, let’s look at the initial components of the device and its operating principle.
The design of the simplest cruise control consists of a servo drive, which is connected to the throttle control mechanism. It is the servo drive that is responsible for supplying a certain amount of the fuel mixture. A servo drive is a negative feedback product used when driving a vehicle with a manual transmission.
Cruise control servo drive responsible for fuel supply
The operating principle of the device is as follows:
- When the car is moving at a constant speed limit, the gas pedal is in one position.
- When cruise control is activated, the throttle position is memorized by the microprocessor module.
- If the car moves up, the speed will decrease if the position of the throttle remains unchanged.
- To balance the speed of the car to the set value, the microprocessor sends the appropriate command to the servo drive, after which the latter adjusts the position of the damper. At the same time, not only the speed will increase, but also the fuel consumption will increase.
- If the car is moving downhill, the speed will increase, so to level it out, the microprocessor will send a signal to the servo drive to reduce the fuel supply. To balance the vehicle speed, the system uses engine braking, and consumption is significantly reduced.
- To cancel the set speed, simply press the brake pedal.
To emergency disable the cruise control function, simply press the brake pedal.
The cruise control module analyzes the information received and also compares it with those specified by the driver. Based on information processing, a specific car control algorithm is created. Now let’s figure out what are the differences in the functioning of the cruise control system for cars with manual transmission and automatic transmission.
How does the mechanical system work?
When using the cruise control system on a car with a manual transmission, the sector stops at the limiter. To do this, the driver should change from high to low gear. In addition, with a manual transmission, the driver needs to independently press the brake pedal if the need arises.
On a car with a manual transmission, when driving uphill and with the cruise control option activated, the driver will need to switch to a lower speed. If you don’t switch to it when going up a steep climb, you simply won’t be able to overcome the obstacle. The same applies to the situation when a car goes down a hill. If you do not shift to a lower gear for engine braking, the engine will develop a high speed.
Video: cruise control on a Suzuki Grand Vitara with manual transmission
On “automatic”, with the cruise control option turned on, there is no need to switch, since the device is responsible for all actions. As soon as the car reaches the desired speed, the servo will fix the position of the damper. If an adaptive type system is installed on a vehicle with an automatic transmission, then the car braking occurs automatically.
Do-it-yourself cruise control for POOR car drivers
video content
Rating: 4.0; Votes: 1 Do-it-yourself cruise control for POOR drivers on a car Alexey Friesen: I now have 2 Izhek 412 14.5 years of operation. I've been riding them all my life. So this is how I did my cruise control while going on shift to Surgut from Omsk. The carburetor switched to soft cable control, i.e., opening the throttle valve. Parallel to it is another cable, but with a fixed position, and a more powerful spring for closing the throttle valve. My legs were simply blissful, because they could take any comfortable position. If the situation on the road changed, I simply pressed the parallel cable fungus and drove as usual. But your idea with the electromagnet inspired me again, because I love carburetor technology for its prostate.
Date: 2019-06-26
← A selection of useful things for cars and drivers
Don’t even think about putting these mats in your CAR →
Related videos
ROCKED for 6,000,000! And FUCK YOU! Car troubles - DIAGRAM #6 Part 2
• Maxim Shelkov - automatic selection
TOP SCAM IN CAR SHOWROOMS. What is happening in the car market now. Fox rules
• Fox Rules
What's the catch with these cars? Reading advertisements correctly
• Auto RU
Auto enamel in Karcher - will it paint the car?
• Garage 54
Garbage trucks, what are you doing? Garbage unloaded at a pig gas station
• Heavy duty 40rus
The handbrake doesn't work. Repair and inspection of the rear caliper. Replacement of piston and cuffs. Video lecture #2
• Renault repair
Comments and feedback:
The evil YARIK Denis, too, was confused by the cruise for his tag. I had to dance with a tambourine over the mechanical part: the magnet did not fit on the standard wheel of the remote control drive, I had to fence the bracket and sharpen the pulley for the cable from a thick washer. Question: you have NORMALLY CLOSED limit switches on the brake and gas pedals, but is it possible to put NORMALLY OPEN ones in your electrical circuit (is it easier to use them on the pedals? If so, how to connect them? Thank you. Your subscriber.
Sergey Kuznetsov Of course, I still have 99 on the carburetor, I have an eternal car more alive than anyone else alive. Excellent Denis, it’s better than a cruise, it’s smooth gas, because of this I have a standard cruise and rarely use it, it only maintains speed, because of this the consumption increases, but so the consumption there was even less need to implement exactly smooth gas like yours, how to do it on a car with an electronic pedal?
Sergei Raim Yes, it’s a cool idea, but there is no connection with the speed of the car, which means that up the hill it will lag and you will need to add gas, but on the contrary, if you are in a hurry, you will need to reset it, so this is just a parody of cruise control, but it’s still better than nothing, there is Plus, at least you won’t fall asleep on the track, you’ll be pushing the button all the way before each climb, like in the TV series Lost)
Sergei Ivanov What does it mean for the poor? Are you an alegarch? And secondly, cruise control maintains not only the gas, but also the speed by adjusting the throttle as the load on the engine increases, when the car goes uphill and the speed drops, and when it goes downhill, the speed increases, but what do you advise people? suicide alegarch
naBeJI_OJIeroBu4 PCFCP_XMAO Denis, please read, I hope this idea will touch you, I was once told that KamAZ has a turbocharger to take hot exhaust gases back to the throttle valve so that it does not suck cold and so that there are no losses in fuel combustion
Oleg The system is interesting and has a right to life. But it is unlikely to be suitable for a carburetor, because carburetor cars are more sensitive to movement uphill and downhill, and in them it is necessary to adjust the opening and closing of the throttle valve over a larger range.
Semyon Semyonich Complete crap. Cruise control must add a portion of the fuel-air mixture when the engine is under load, and when the load is removed, close the throttle valve almost completely. What's going on here? Constantly open throttle and that's it. With such a miracle, it’s not far from the morgue.
Nikolay Orlov I saw quick tests on some channels for reasons of oil consumption. Allegedly, if, when pressed sharply, the engine smokes and stops, it’s the valve seals; if it smokes continuously, it’s the end of the rings. How plausible are such tests? Make a video Denis?
Samodelkin Video should have been called undercruise control. Uncle probably doesn’t know how a cruise really works. His task is to maintain the same speed all the way, be it a hill or an incline. This cannot be done without the use of MK.
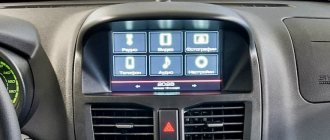
The process of diagnosing a Lada Priora car using an on-board computer
First of all, you need to know how to reset the parameters using the button to reset all daily mileage indicators. It is located on the instrument panel. You must press this button and, while continuing to hold it, you must simultaneously turn on the ignition using the key. Using these steps, you will be able to see all the error codes that have occurred and are available. Before displaying a list of error codes, the vehicle's autonomous self-diagnosis is enabled.
At this time, at the beginning of the diagnostic process, all arrows on sensors and instruments should show a jump from the minimum to the maximum indicator, at the same time at this moment all the necessary indicators and errors for checking the car should be shown on the liquid crystal display.
If at this moment any arrow does not show the correct movement or any position on the display does not appear, then you need to check the sensors and systems of the car for errors. Also, do not forget to check the display itself for faults, because A situation is possible when the car is working correctly, but errors are shown on the display solely due to the separation of any contacts.
Now, in the same mode of self-checking the car, you need to double-click any button that is responsible for switching the operating mode of the on-board computer. After these steps, certain numbers should appear on the on-board computer’s LCD screen. These are the Lada Priora error codes.
Error code
Decoding
Features of operation
Those who have driven cars equipped with standard cruisers will most likely not be attracted to such products - they are not very convenient to use and look unrespectable. But if such toys are new to someone, they may well come in handy.
Isn’t it dangerous to drive with these devices if they suddenly fail? After all, we interfered with the standard electrical equipment, breaking some of the car’s control circuits... We checked that when the power from both systems is turned off, the ability to control the car remains. Therefore, the manufacturers of both devices did not violate the old principle of “do no harm.”
Drivenge.
I constantly want to press the new steering column “lever”, which also “breathes” along with the steering column casing.
Jet-cruise KH.
The remote control is not backlit - on a dark country road you will have to manipulate it by touch. The indication only works at the moment of operation.
| After installing the Drivenge system, you will have a steering column “lever”, which in fact is not a lever at all, but simply a fixed element with three buttons. After installing the Drivenge system, you will have a steering column “lever”, which in fact is not a lever at all, but simply a fixed element with three buttons. | The Jet-cruise KH system is controlled from a wireless remote control, which can be glued anywhere. The Jet-cruise KH system is controlled from a wireless remote control, which can be glued anywhere. |
Changing the oil
This procedure is not particularly difficult; you do not need to use any professional tools or equipment, and it can take one hour to complete. Just remember the need to use high-quality consumable parts and lubricating fluids, which will eliminate any difficulties in the future with the operation of the car.
Tools used
To perform this work you will need a filter, engine oil, a clean rag, a container with a volume of at least 4 liters, a wrench for removing the oil filter, a 17 wrench.
If you are unable to unscrew the filter manually, you can pierce its housing with a screwdriver and use it as a lever, thus removing the filter element. If you use a screwdriver to remove the filter, then you need to pierce its housing at the very bottom. This will prevent damage to the fitting.
Step-by-step instruction
Changing the engine oil must be done on a hot engine. To do this, you should either drive the car first, or start the engine and let the engine run for about 10 minutes. Warm oil will flow out easily through the lower hole, and you can almost completely drain it from the crankcase of the power unit. To perform such service work, the vehicle must be driven onto a lift or inspection pit. Open the hood and unscrew the oil filler plug. You can easily unscrew this plug by hand. Next, we go down under the car and remove the existing engine protection. We place a plastic container with a volume of at least 4 liters under the engine crankcase. We find the drain plug located on the engine crankcase, and then carefully loosen the tightening with a 17 key. When unscrewing the plug, act as carefully as possible, as you can get burned by hot oil. We unscrew it completely and wait for the oil to completely drain out. This usually takes about half an hour. If the car has a good mileage and the oil has not been changed for a long time, you can perform an engine flush. Why is a special washing composition used? It is poured into the engine after twisting the drain plug. We start the engine and let it run for about 15 minutes. After this, drain the washing liquid and change the filter. Replacing the oil filter is not particularly difficult. It is mounted on a thread and you only need to unscrew it, carefully draining the old oil
Fill the new filter element halfway with fresh auto lubricant and carefully screw it onto the mounting thread. Please note the presence of a rubberized gasket, which is responsible for sealing such a connection. The filter must be tightened by hand three quarters of a turn from the point of contact between the cylinder block flange and the ring. Next, pour approximately 3 liters of auto lubricant into the engine and check the level using a dipstick. The level should be in the middle between the minimum and maximum risk. Then close the oil filler neck, start the engine, and let it idle for several minutes. After this, we turn off the engine and wait for it to cool, check the oil level with a dipstick and, if necessary, add about 500 milliliters more
This completes all service work.
The level should be in the middle between the minimum and maximum risk. Then close the oil filler neck, start the engine, and let it idle for several minutes. After this, we turn off the engine and wait for it to cool, check the oil level with a dipstick and, if necessary, add about 500 milliliters more. This completes all service work.
Lada Priora Sedan Panther › Logbook › Standard cruise control. It's simple
The morning started as usual, I came to work, made tea, opened Drive2.ru
I haven’t thought about any cruise control yet... Or rather, I did, but on the Internet, in various groups on social networks, they were selling the device for about 4500-5500 and more + 1300 for a cruise switch. The price is biting... + I thought the block would need to be reflashed.
In general, after the last update of the application, notifications about new products for my cars from the flea market began to pour in on my phone... I turned off the notifications, but decided to see what was interesting there...
I found the device and switch at Krau, wrote it off, it turned out that the unit was M74 or M74.5
keeps the cruise without any ECU flashing, initializations and other troubles.
In general, after a couple of hours I sent him a 100% prepayment (although he offered courier or cash on delivery with payment upon receipt, but I think that drive2.ru is not the place to cheat or cheat. And the price is a little more expensive) Krau I almost immediately went to the post office and sent the parcel... 6 days later I picked it up from the post office:
The process of disassembly, removal and installation is simple and has already been described a thousand times, let’s skip it
We put everything back together, we try to start the car, but the immo won’t let us. The starter turns, but the car does not start... I retrained the key, started it up and went to the track for testing:
The cruise and limiter work, everything is cool! By the way, the tidy from the standard+ differs from the luxury tidy only in the presence of cruise! All other parameters displayed on the display are the same and there are a total of 9 of them! I counted and checked)
Let’s summarize once again what is needed to start a cruise without problems: We don’t even take the presence of a CAN bus for granted1. Instrument panel 2172–3801010-20; software version 19 or software 22 (they say it does not work with software version 25)2. Washer switch: 11190-3709340-20 (turn switch: 11180-3709330-00 optional)3. It is advisable to have an M74 or M74.5 ECU (so as not to search for the firmware with which the cruise will start)4. Training key to re-register the keys in the dashboard
Smooth roads everyone, and as they say: even closer to SE
source
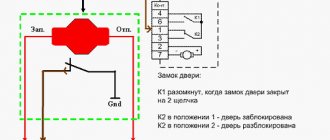
Which wire goes where?
First, let's look at the back of the instrument panel. At the top there are:
- fuel level indicator;
- dashboard lighting lamps;
- control of right and left turns (separately);
- tachometer;
- block with many plugs;
- coolant temperature gauge.
As you can see, there is really nothing particularly complicated here. At the bottom of the instrument panel on the back side there are controllers:
- high beam;
- "emergency lights";
- CHECK ENGINE;
- battery charge;
- parking brake;
- oil pressure;
- air damper (for models with a carburetor);
- outdoor lighting work.
In addition, there is also a speedometer and a brake fluid level indicator lamp.
Now let's take a closer look at the pads. There are two of them - white and red. In the first, the connectors and wires look like this (in order):
- Ground wire black.
- Red-brown – low-voltage supply from the ECU to the tachometer.
- Yellow – high-voltage supply to the tachometer from the coil.
- Red-blue - comes from the battery through the 6th fuse Const with a voltage of 12 volts.
- Green-white - leads to the coolant temperature sensor.
- Green-yellow – fuse F1, responsible for the side lights.
- This connector has no color, it goes to the throttle valve.
- Red and white – leading to the CHECK ENGINE indicator light.
- 2 orange wires leading to two F19 + 12 volt power fuses.
- Same as the previous connector.
- 2 blue-brown wires leading to the “VK” terminal of the handbrake.
- The output to terminal D of the generator is a brown-white wire.
- Gray and blue - wire going to the oil pressure sensor.
In the red block, the connector number according to the account, the color of the wires and the devices to which they lead are as follows:
- Red-blue – leads to the external temperature sensor.
- Orange – goes to power fuse F19 + 12 volts.
- 2 black ground wires.
- White – leads to the instrument lighting switch.
- Blue – to the right turn indicator.
- Blue-black - to the left turn indicator.
- Blue-pink - to the brake fluid level sensor.
- Brown – leads to the on-board computer.
- Gray - to the speedometer.
- Pink – to the fuel level indicator.
- 2 green-black wires leading to fuse F3, which is responsible for the high beam.
- Blue-white - to the hazard warning switch.
- The white wire leads to terminal 50 - the ignition switch.
It is worth especially noting here that the most typical and common pinout diagram is shown above. However, different manufacturers may have differences in color markings. For example, in the instrument panel manufactured by the Kursk "Schetmash" there will be minor differences from the above diagram, in particular in the red block (connector number and wire color):
- black;
- red-brown;
- yellow;
- red and white;
- green-white;
- 2 brown wires;
- empty;
- red and white;
- blue;
- orange;
- blue-brown;
- white-brown;
- blue-gray.
As you can see, there are still certain differences, even if they are small.
However, these little things are very important. Therefore, it is best, before starting work, to find out which panel your car has (by year of manufacture and manufacturer), and then find the correct pinout diagram. However, there is another option - the self-adhesive pieces of paper already mentioned above.
When disconnecting the wires, be sure to label them - this will greatly facilitate the assembly process.
However, there is another option - the self-adhesive pieces of paper already mentioned above. When disconnecting the wires, be sure to label them - this will greatly facilitate the assembly process.
Cruise control DRIVENGE Lada Priora
Cruise control DRIVENGE Lada Priora Mechanica
Cruise control is equipped with a full-fledged steering column switch!!! The Drivenge cruise control of the Lada Priora MT has a 3-year warranty.
All DRIVENGE cruise control models are Certified.
Place an order on the website and receive FREE DELIVERY within the Russian Federation + GIFT!
Cruise control significantly increases the level of comfort in the car; every driver can remember more than one situation when, from constantly pressing the pedal, the leg became numb, and from constantly changing the position, the back and neck began to hurt.
One factor in installing cruise control is efficiency. By controlling the gas pedal yourself, the car is much more likely to be in the acceleration-rolling mode, which can increase fuel consumption by up to 10-15%.
Another advantage of this cruise control is the presence of a pedal booster function. This software function allows you to set one of three preset modes.
Economy mode - weak response to the gas pedal, maximum fuel economy.
Drive mode is identical to the factory mode, perhaps a little more economical.
“Sport” mode - the fastest possible response to the gas pedal, with slightly increased fuel consumption, the car becomes much faster.
Control of the device is similar to standard cruises. Switching on is done using one button, switching off with the brake pedal or by pressing the button again.
Cruise control model Drivenge Lada Priora MT was created specifically for the UAZ Patriot manual transmission model.
It doesn’t matter what kind of ECU your car has - Bosch, Itelma, January. For each unit, the device is equipped in such a way that intervention in the electronics and software of the vehicle control units is not required
Detailed instructions are included with the device.
You can install the device yourself without having serious knowledge of electronics.
Video review of the DRIVENGE cruise control installation.
Cruise control functionality:
- Activates cruise control at the current or last set speed.
- Automatically maintains the set speed in cruise control mode.
- Change the set speed using the buttons in 1 km/h increments or using the gas pedal.
- Restores the last set speed.
- Automatically deactivates cruise control when the brake or clutch pedal is pressed.
- Enabling or disabling pedal boost mode.
- Select one of three modes of operation of the booster pedal.
- Maintaining increased (set) idle speed.
- Connect to a computer to update internal firmware.
- Saving all parameters of the last used values (speed, modes, etc.) in non-volatile memory.
- Resumes, after turning on the power, the operating mode in which the power was turned off.
Cruise control equipment:
- Cruise control main control unit
- Under the steering wheel controller for cruise and booster control
- Wiring harness for connecting to vehicle wiring
- LED in holder with wire + connector housing
- Clips for connecting to car wiring without breaking the wires
- Plastic clamps for fastening wires
- Fabric insulating tape for wrapping harnesses and wires
- Operating manual with warranty card
Buying cruise control is easy, fill out the order form or place an order by phone,
Installation
To work you will need the following tools:
- Screwdriver Set;
- scissors;
- thin punch or awl;
- sectional knife;
- wrench and set of sockets for it;
- self-tapping screws
First of all, you need to choose a suitable place on the panel. If a standard device is installed, then it is simply replaced. Otherwise, you will have to get out of the situation by cutting additional holes. It is most convenient to place the device itself (executive module) next to the fuel filter.
The throttle cable is adjusted, but not before the bracket for the accelerator status sensor is installed.
The electrical part of the cruise control is installed after detecting the tachometer signals. For this you need an oscilloscope. Having identified the desired wire, connect it to the green one from the control unit of the device. Red goes to the brake light switch.
The start button is connected to the gray wires. It is important to connect the ground (it is black).
The handle is mounted in place (the steering wheel will need to be disassembled). You will also need to disable the airbag, if equipped.
That's all. All that remains is to check the functionality of the device and, if necessary, replace the ECU firmware.
Cruise control installation video:
Deciphering faults in the fuel and air systems
- P0030 - the oxygen sensor heater wire to the exhaust gas converter has broken;
- P0031 - the same electrical wire has shorted to ground;
- P0032 - the same wire has shorted to the on-board network (BS);
- P0036 - the wiring of the oxygen sensor heater is broken, after the converter;
- P0037 - the same wiring has shorted to ground;
- P0038 - it has shorted to BS;
- P0102 - weak signal in the mass air flow sensor network;
- P0103 - very strong signal in the network of this device;
- P0112 - weak signal in the air temperature sensor network;
- P0113 - very strong signal in the network of the same device;
- P0116 - antifreeze temperature sensor signal is out of operating range;
- P0117 - poor signal from the antifreeze temperature sensor network;
- P0118 - very strong signal from the antifreeze temperature sensor;
P0122 - poor signal in the throttle position sensor circuit;
- P0123 - very strong signal in the same circuit;
- P0130 - the oxygen sensor before the converter does not work;
- P0131 - weak outgoing signal on the network of this device;
- P0132 - signal too strong on the same network;
- P0133 - slow response to changes in mixture quality in the network of the same device;
- P0134 - oxygen sensor circuit inactive;
- P0136 - the oxygen sensor after the converter is broken;
- P0137 - poor signal in the circuit of this device;
- P0138 - signal too strong in the same circuit;
- P0140 - the same sensor circuit is inactive;
- P0141 - the oxygen sensor heater after the converter is broken;
- P0171 - there is a lot of air in the fuel mixture;
- P0172 - there is a lot of gasoline in the fuel mixture;
- P0201 - injector wire No. 1 is broken;
- P0202 - injector wire No. 2 is broken;
- P0203 - injector wire No. 3 is broken;
- P0204 - injector wire No. 4 is broken;
- P0217 - engine overheated;
- P0230 - failure in the electric fuel pump relay network;
Here we are looking for an electrical problem that has arisen.
P0261 - the injector circuit of cylinder No. 1 has shorted to ground;
P0263 - injector driver No. 1 does not work; P0264 - the injector circuit of cylinder No. 2 has shorted to ground; P0266 - injector driver No. 2 does not work; P0267 - injector circuit No. 3 has shorted to ground; P0269 - injector driver No. 3 does not work; P0270 - injector circuit No. 4 has shorted to ground; P0262 - the injector circuit of cylinder No. 1 is shorted to the BS; P0265 - injector circuit No. 2 is shorted to BS; P0268 - injector circuit No. 3 is shorted to BS; P0271 - injector circuit No. 4 is shorted to BS; P0272 - injector driver No. 4 does not work.
Lada Priora Hatchback Cherry › Logbook › Correct standard cruise control
Everyone!) This topic is no longer new, a lot has been written about. I wanted this option for a long time, so that everything would be as it was from the factory. I read a lot of information here and on other resources. I asked a lot of people about the connection and possible pitfalls. Then, as financially possible, I stocked up on equipment. So, we will need: 1. 2172-3801010-20
— Instrument cluster with software version 19 or 22. 2. 21126-1411020-4x
- The engine control unit.
3. 11180-3709330-00
— Turn switch.
You can leave the original one with rounded edges, but for symmetry with the other one, still replace it with this one... 4. 11190-3709340-20
— Washer switch
Lada Priora Sedan Panther › Logbook › Standard cruise control. It's simple
The morning started as usual, I came to work, made tea, opened Drive2.ru
I haven’t thought about any cruise control yet... Or rather, I did, but on the Internet, in various groups on social networks, they were selling the device for about 4500-5500 and more + 1300 for a cruise switch. The price is biting... + I thought the block would need to be reflashed.
In general, after the last update of the application, notifications about new products for my cars from the flea market began to pour in on my phone... I turned off the notifications, but decided to see what was interesting there...
I found the device and switch at Krau, wrote it off, it turned out that the unit was M74 or M74.5
keeps the cruise without any ECU flashing, initializations and other troubles.
In general, after a couple of hours I sent him a 100% prepayment (although he offered courier or cash on delivery with payment upon receipt, but I think that drive2.ru is not the place to cheat or cheat. And the price is a little more expensive) Krau I almost immediately went to the post office and sent the parcel... 6 days later I picked it up from the post office:
The process of disassembly, removal and installation is simple and has already been described a thousand times, let’s skip it
We put everything back together, we try to start the car, but the immo won’t let us. The starter turns, but the car does not start... I retrained the key, started it up and went to the track for testing:
Video “Jet Cruise Review”
This video provides an overview of the Jet Cruise device for automatically maintaining speed (the author of the video is Electro Stavr).
You can’t figure it out on your own - this is not a foreign car - 5 buttons without signatures and they all do something))
- How to activate cruise control on a Mitsubishi Outlander xl
So - thanks for the help!
So why not share the result? So why not share the result? Let there be another source of information on the Internet “how to turn on cruise control on a Priora”, someone will quickly find the answer to their question.
> it turns out you can charge your phone while the car is turned off, but no matter how much you searched for BMW, you couldn’t find such a feature. (I don’t even remember which cars have this - almost all foreign cars don’t)
In many foreign cars, the cigarette lighter does not turn off immediately, but 20 minutes (or 1 hour) after turning off the ignition. Perhaps in some it is even customizable.
Lada Priora Sedan Panther › Logbook › Standard cruise control. It's simple
The morning started as usual, I came to work, made tea, opened Drive2.ru
I haven’t thought about any cruise control yet... Or rather, I did, but on the Internet, in various groups on social networks, they were selling the device for about 4500-5500 and more + 1300 for a cruise switch. The price is biting... + I thought the block would need to be reflashed.
In general, after the last update of the application, notifications about new products for my cars from the flea market began to pour in on my phone... I turned off the notifications, but decided to see what was interesting there...
I found the device and switch at Krau, wrote it off, it turned out that the unit was M74 or M74.5
keeps the cruise without any ECU flashing, initializations and other troubles.
In general, after a couple of hours I sent him a 100% prepayment (although he offered courier or cash on delivery with payment upon receipt, but I think that drive2.ru is not the place to cheat or cheat. And the price is a little more expensive) Krau I almost immediately went to the post office and sent the parcel... 6 days later I picked it up from the post office:
The process of disassembly, removal and installation is simple and has already been described a thousand times, let’s skip it
We put everything back together, we try to start the car, but the immo won’t let us. The starter turns, but the car does not start... I retrained the key, started it up and went to the track for testing:
Adjustment
The adjustment process may vary on different car models, since different manufacturers use mechanisms of different designs. But the same principle can be applied for configuration. As for a specific model, it is better to find information on it in advance.
To begin the adjustment, the first step is to remove the pedal from the holding bracket. Next, loosen the screws securing the cover. One screw holds the cover in a certain position - it must be completely unscrewed. The cover is turned to the side clockwise until the end, then the screws are tightened again.
This adjustment will reduce pedal response time. Some car owners note that after such adjustments, the response speed can even be compared with a mechanical pedal. Adjustment allows you to improve engine performance and improve the start of movement from a standstill.
In cases where a pedal with low sensitivity is needed, it is necessary to rotate the cover in the opposite direction - counterclockwise. The machine begins to respond to presses not so quickly.
Sometimes you can come across harmful adjustment tips - drivers advise placing shims under the lever. This is the wrong approach. Sometimes the pads get caught under the contact pads in the potentiometer, and the machine may lose control as a result.
Cruise control DRIVENGE Lada Priora
Cruise control DRIVENGE Lada Priora Mechanica
Cruise control is equipped with a full-fledged steering column switch. The Drivenge cruise control of the Lada Priora MT has a 3-year warranty.
All DRIVENGE cruise control models are Certified.
Place an order on the website and receive FREE DELIVERY within the Russian Federation + GIFT!
Cruise control significantly increases the level of comfort in the car; every driver can remember more than one situation when, from constantly pressing the pedal, the leg became numb, and from constantly changing the position, the back and neck began to hurt.
One factor in installing cruise control is efficiency. By controlling the gas pedal yourself, the car is much more likely to be in the acceleration-rolling mode, which can increase fuel consumption by up to 10-15%.
Another advantage of this cruise control is the presence of a pedal booster function. This software function allows you to set one of three preset modes.
Economy mode - weak response to the gas pedal, maximum fuel economy.
Drive mode is identical to the factory mode, perhaps a little more economical.
“Sport” mode - the fastest possible response to the gas pedal, with slightly increased fuel consumption, the car becomes much faster.
Control of the device is similar to standard cruises. Switching on is done using one button, switching off with the brake pedal or by pressing the button again.
Cruise control model Drivenge Lada Priora MT was created specifically for the UAZ Patriot manual transmission model.
It doesn’t matter what kind of ECU your car has - Bosch, Itelma, January. For each unit, the device is equipped in such a way that intervention in the electronics and software of the vehicle control units is not required
Detailed instructions are included with the device.
You can install the device yourself without having serious knowledge of electronics.
Installed - looked
If you do not have the proper skills to communicate with the electrical equipment of modern cars, it is better not to undertake the installation of such devices yourself. First of all, this applies to the Drivenge system: we spent more than two hours fiddling around. Jet-cruise KH was able to install in half the time.
Drivenge.
Quite a lot of fuss. Drivenge is an extensive system with many connectors that need to be connected in the depths under the front panel. You will have to drill the steering column housing to install the steering column stalk. This control looks somewhat clumsy: you can’t press it - it’s just a place for buttons! And the design is frail: the attachment to plastic cannot be any other way. And the wires in the connectors are rolled loosely - unreliably.
Cruise control on a VAZ - Lada 2106, 1.9 l., 1993 on DRIVE2
Since the car is used exclusively for long trips, I couldn’t resist and installed Waeco MagicSpeed MS400 cruise control, with a WAECO MS-BE4 control panel.
A purely German, universal product that can be installed on almost any car. The instructions are in many languages, but apparently out of revenge for 1945, there is no Russian there. So I had to tinker a lot with the translation, because... Everything is clear with installation and connection, but you can’t figure it out in a bunch of settings without instructions. For the pedal position sensor, I screwed up a bracket and attached it to the pedal:Under the hood there were two throttle cables, and despite the non-dismountable design, the cable was still disassembled and its length was adjusted to the required size.
The executive mechanism is located under the hood behind the fuel filter (marked with an arrow) and is connected to the vacuum brake booster discharge hose.
In the cabin, it stands in conjunction with other steering column switches.
Connection diagram:
Settings table:
The capabilities of cruise can be understood from this part of the instructions: (“ON/OFF button: Turn on/off Cruise. The LED light lights up as confirmation. SET button: 1. Hold the existing speed if the SET button is pressed briefly. The selected speed is maintained until: a) press brake or clutch pedals. b) turning off the cruise with the ON/OFF button. c) vehicle speed drops below 40 km/h. d) speed drop by more than 25% 2. If the SET button is pressed and held, the machine will accelerate. When the button is released, the control will retain the achieved speed and maintain it. RES BUTTON: If the RES button is pressed and immediately released, the machine will return to the last stored speed, provided that: a) the device is turned on with the ON/OFF button; b) the speed of your car is not lower than the minimum speed; c) the brake or clutch pedal is not pressed; d) the ignition has not been turned off since the moment of memorization; e) current speed - not less than 50% of the saved value.
www.drive2.ru