Central and automatic locking/unlocking of door locks from the interior and outside of the car
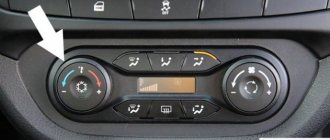
Central door locking/unlocking. To lock the locks of all doors from the passenger compartment, press the button on the instrument panel, the indicator on button 1 (Fig. 3) will light up for a while, then go off. If the hood, trunk or one of the doors was open when the button was pressed, the doors will unlock again. Close the doors, hood, trunk, press the lock button, all doors will be locked. The side door locks are unlocked when any front door is opened from the passenger compartment. To forcefully lock the doors, and arm them if any door is open, you need to press and hold the button for a while.
- Door lock switch.
- ESC (Electronic Stability Control) switch.
Note. Before forcefully locking, make sure that all passengers have exited the vehicle and that the ignition keys do not remain in the vehicle.
DRIVER RESPONSIBILITY
If you decide to drive with the doors locked, remember that this may make it difficult for rescuers to gain access to the vehicle in an emergency. Enabling the automatic locking of the side doors when driving. With the engine running, press the central locking button on the instrument panel and hold it for five seconds. Immediately after pressing the button, the LED will light up and the doors will be locked. Turn off the engine. The function is activated.
Start the engine, after starting to move at a speed of about 10 km/h, the doors will automatically lock if they have not been locked.
The doors will unlock when you press the central locking button or when you open any door from the passenger compartment while the car is stationary.
Disabling the automatic locking of the side doors when driving. With the engine running, press the central locking button on the instrument panel and hold it for five seconds. The function is disabled.
Automatic unlocking of side doors in the event of an accident. In the event of an accident, if the airbags are deployed, the locks of all side doors are automatically unlocked.
Note. Central locking has protection for door locks against overheating. If the doors are locked and unlocked repeatedly within a short period of time, the system stops responding to pressing a button on the instrument panel, as well as to pressing buttons on the remote control. If this happens, do not press the button on the instrument panel or the buttons on the remote control for a while, after which the system will be fully restored.
Connecting the heating element to the power source
The load on the snail cable will be about 2A, this is not much, but it requires a high-quality connection in the contact connectors. The best option would be to use direct soldering of the heating wires into the steering wheel connector. As an option, end switches taken from the computer's power supply connector block are sealed at the ends of the two wires and inserted into the contact chip of the snail. The negative part of the wiring is screwed onto the steering wheel mount.
Alternative connection option
To connect the steering wheel heating element with your own hands, it is not necessary to modify the steering wheel structure so much. If your car does not have an airbag, you can install a heated steering wheel and make wiring easier. For example, as an option, additional homemade ring tracks are used, through which power is directly supplied to the steering wheel heating element.
To do this, two copper rings, 65 and 85 mm in diameter, are glued onto a thin (1 mm) textolite base. Rings can be made by etching on foil fiberglass. Through an insulating gasket, a homemade contact pad is mounted on the cochlea. Two sliding contacts are installed on the steering wheel, each on its own ring. The connecting wires for the heated steering wheel are connected to the installed contacts in the usual manner.
With your own hands, solder the contacts of a two-core cable to the plus and minus rings of the installed pad, which can easily be connected to the battery or ignition switch via a relay. A simpler connection to the heating system would be to plug the circuit into the cigarette lighter socket.
Advantages of such a steering wheel heating system:
- high reliability and simplicity of design;
- no risk of damaging the steering volute cable;
- the ability to supply any current to the steering wheel.
The disadvantages include the higher complexity of manufacturing the heating and the need to install additional wiring to connect the system.
Final operations
Often, in order to hide the steering wheel heating system, they try to sew a cover with their own hands that completely covers the spokes and rim. Not everyone has the ability to stitch leather or dermantine products, so a more aesthetic solution would be to purchase and install a ready-made cover on the steering wheel. The cover must be selected according to size in advance, taking into account the increase in the size of the steering wheel by the thickness of the heater element and insulation. Sometimes leather products are pre-steamed or treated with alcohol to soften the material, which simplifies installation and allows the leather to stretch and “shrink” to size.
If you don’t want to assemble the circuit yourself, you can easily order a heated steering wheel installation kit on the Internet.
How to make a heated steering wheel with your own hands is shown in the video:
LADA XRAY
Instructions for modifying the Lada XRAY car were shared by walla03.
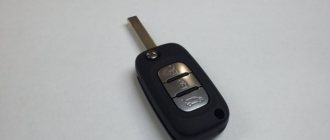
To activate the ECO mode on the Lada XRAY (with a Renault-Nissan engine), you will need to install a button (part number 251B49802R), or short-circuit the P1-7 contact of the TsBKE (where the unit is located) to ground.
We connect the button according to the diagram:
- black - mass.
- blue - +12 V from dimensions.
- green - into connector P1-7 of the TsBKES block.
Now, when you press the ECO button, the black and green wires short-circuit, and the corresponding indicator on the instrument panel lights up.
On the 2022 Lada XRAY Cross with a CVT, it was noted that to activate the ECO mode, installing a button or shorting to ground is not sufficient. For the mode to work, it must be activated programmatically using an ELM327 adapter.
Required
:
- adapter ELM327 V1.5, price about 200 rubles.
- archive with database and software
Installing software on an Android smartphone
:
- Install the ECU Tweaker application (available in the archive)
- From the archive (link above) download ecu.zip. We copy it to the root of the internal or external memory without unpacking it (the program itself will find the archive after launch).
- If you previously used ECU Tweaker with a different ecu.zip database, then you need to delete the old ecu.zip file, clear the application cache and then add a new ecu.zip file.
- If your dashboard goes out, disconnect the ELM327 adapter, turn off and turn on the ignition again and everything will work.
Installing software on a PC/laptop
:
Download ddt4all software from the archive (link above) and install.
Changing settings
:
1. Change the settings from False to True for the values shown in the photo.
2. Click Send next to each setting.
As a result, when you press the ECO button in the instrument cluster, the corresponding indicator will light up. During the operation of the car, it was noted that the ECO mode really works:
Results of the Lada Vesta SW Cross review
This car is cheaper to maintain than foreign cars. In addition, insurance for it is more affordable and car thieves are not yet showing much interest in it. On the other hand, it is now one of the most expensive Ladas to maintain. It now has 17-inch wheels, which means seasonal re-shoes will no longer be budget-friendly. By the way, what the handling of this car will be like on winter tires is still a question. Because according to the results of our tests and review, the Lada Vesta SW Cross is very picky when choosing winter tires. The wrong tires can greatly ruin its handling.
Via ECU Tweaker
Required
: ECU Tweaker
Procedure
- The car is on level ground.
- The wheel alignment was done correctly.
- Turn on the ignition and the Ecu Tweaker program.
- Start the car.
- In the VM lada
, click
ABS-VDC
, then autodetection, then
ABSESC - X105298 Version 2.6
, then
2 - Diagnosnic
, then
21 - Parameters value - When you rotate the steering wheel, watch the readings change in the steering wheel angle
and
offset
. - With the car running, turn the steering wheel all the way to the left, wait 10 seconds, then return the steering wheel to the straight ahead position for 10 seconds, then turn the steering wheel all the way to the right and wait 10 seconds. Return the steering wheel to the straight ahead position, wait 10 seconds and turn off the engine.
- Turn on the ignition, do not start the engine (the steering wheel and front wheels should be set as accurately as possible to the straight ahead position).
- In the VM lada
, click
ABS-VDC
, then
ABSESC - X105298 Version 2.6
, then
1- Configuration
, then
12 - Sensors calibration
, and click to calibrate the window - “
CALIBRATE STEERING ANGLE TO 0° (PT2 - SERIES)
”. (This is the second window, do not confuse or click the window that says “CALIBRATE STEERING ANGLE TO 0° (VC-LOT & RT-1). - As a result of a positive adjustment, an inscription will appear at the top of the Ecu Tweaker program with a response to the request, where the code will be indicated.
- Click the key icon at the top of the program and reset the DTC
. - Turn off the program, turn off the ignition and remove the key, wait for about 4 minutes for the car electronics to turn off.
Installation of the sensor and control button
Stability of maintaining the required temperature can be ensured only by installing a temperature sensor with a shutdown temperature of 40-45 o C. Alternatively, you can use the KSD 301 relay model, having previously adjusted the shape of the device to a more convenient one for installation in the steering wheel body.
We similarly make a seat for the heated steering wheel control button. In summer, there will be no need to use a heated steering wheel, and you can easily turn off the circuit with your own hands, without disassembling the steering wheel.
Installation
In order to cover the steering wheel of an X Ray or Vesta with leather braiding, no special knowledge or experience is required. The main thing is diligence and patience, since, despite the fact that the braid is pre-stitched and you only need to cover the steering wheel with it, you will have to set aside several hours for this.
Naturally, it is much more convenient to work when the steering wheel is removed, although some prefer to stretch the braid over the Vesta steering wheel right in the car. However, both experts and owners still recommend dismantling the steering wheel.
Removal
Removing the steering wheel of a Lada Vesta or X-Ray is not too difficult, especially considering that everything is done according to the same algorithm. First you need to remove the terminal from the battery. In addition, you should wait a little (at least a couple of minutes) for the activator capacitor to discharge.
List of required tools:
— 2 thin rods or screwdrivers;
- ratchet;
— Torx 50 bit;
- extension cord;
— 2-lever puller.
First you need to remove the airbag to gain access to the steering wheel mount itself. To do this, you need to arm yourself with a pair of thin rods or nails, about 5 mm in diameter.
There are recesses on the sides of the steering wheel, where you need to insert both rods, and then press on them at the same time. This will tighten the spring clips, and the pillow itself will rise slightly. Here you will need help, since the airbag module will need to be removed and the plugs disconnected.
Arrows mark spring clamps
When the module is removed, you will have access to the bolt (marked 3) that secures the steering wheel. To unscrew it, you will need a ratchet, an extension and a Torx 50 bit. The car wheels must be placed straight, and then unscrew the bolt in the center of the hub. Next, you need to pull the steering wheel towards you and remove it, while simultaneously pushing the connectors for the airbag and horn wires into the hole in the center. In addition, if your car is equipped with a multi-steering wheel, you will need to disconnect the corresponding block.
Next, all that remains is to remove the fuse (transportation) from the steering pocket, marked with the number 5, and then insert it into the rotating mechanism.
Installing the transport fuse
This completes the procedure for removing the Lada Vesta steering wheel. All that remains is to first remove the plastic insert from it. This is not easy to do, since it is held on by 8 clips that are inserted into the rubber base.
Steering wheel removed
The removal process is clearly shown in the video.
Padding
Self-upholstery of the steering wheel of a Lada Vesta and X-Ray into leather is quite possible. Everything is described in detail in the re-upholstery instructions. However, many note that it is better to turn to a professional. The most difficult thing about reupholstering a Lada X-Ray steering wheel yourself with leather is the stitches and the formation of grooves “to match the factory ones.”
However, you can choose different stitch options whichever you like best. The main thing is to do everything measuredly and exactly according to the instructions. Then the result will definitely please you.
The process is clearly demonstrated in the video. In it, the master, using the example of a Toyota, shows the entire process of re-upholstering the steering wheel, including dismantling, making patterns, preparing the braid and steering wheel, as well as installation
Since the steering wheel braid for the Lada Vesta and X-Ray is already ready, you need to pay special attention to the re-upholstery process, which begins at 14:45
Installation
Installing the Vesta steering wheel is carried out in the reverse order, but there are several nuances.
The steering wheel fastening bolt removed during dismantling cannot be used. You need to buy a new bolt, and its tightening torque must be in the range of 38-50 Nm, which is equivalent to 3.8-5.0 kg/s.
In the case where there is no transport safety lock, it is necessary to inspect the position in which the contact disk of the (rotating) steering column switch unit is located. If it is not level, it needs to be placed in the middle position
It is important to combine the splines on the shaft and the hub of the steering wheel, and also to combine the ebbs on the steering wheel with the grooves
Source of photos and experience - https://www.drive2.ru/c/3009956/
Recommendations for choosing cases
Lada xray upper trunk mat for raised floor
It is best to cover the wiring system with a leather cover. It can be purchased ready-made, but in this case you need to carefully select the size. In this case, it is necessary to take into account that, under the influence of the thickness of the insulation and the heating element, the steering wheel will be enlarged. It is recommended to steam a leather product in advance or soften the material by treating it in alcohol. Thanks to such measures, the leather will stretch and fit perfectly on the wheel. You can also sew such a cover with your own hands, but to do this you need to have at least minimal sewing skills.
We recommend: Removing chips from the car body yourself: what and how to do?
Steering wheel heating is a thing that is useful not only for a car, but also for a motorcycle. Especially if a person needs to travel in the cold season. You can put a hat and helmet on your head, and insulate your body with a jacket, but warming your hands is more difficult - turning the steering wheel or driving a motorcycle in mittens is inconvenient, and without them, your hands will freeze.
A heated steering wheel is a good device that increases the comfort of driving a vehicle. However, it has several shortcomings that can be corrected. If you simply wrap heated handles with electrical tape, they will not look very attractive. This can be easily disguised with a nice cover. Another disadvantage is more significant: heating is very expensive in terms of energy consumption. You can install a night light lamp with a lower power.
Lada Vesta steering wheel reupholstery
Many owners of basic cars do the reupholstery of the Lada Vesta steering wheel with their own hands. The leather version looks solid.
To install a braid made of high-quality, expensive material, you will first need to remove the steering wheel.
See the sequence of actions above.
- If control keys are present, remove them.
- The braid is applied so that the seams match each other exactly.
- Along with the braid, the set contains clamps. They fix the position of the braid. Mark the position of the recesses.
- Using the knife included in the kit, easily make indentations on the surface. The recess size is 3-4 mm. Same depth. Several such slits are required to remove all the edges of the braid.
- Check the alignment of the joints again.
- Apply the adhesive composition to the back surface of the steering spokes, and in the same area on the inner surface of the leather braid.
- After 5-10 minutes we glue the surfaces. Using the same method, we connect all parts of the leather braid.
- Take a piece of thread from the kit no longer than 80 cm. Wind the thread into the groove of the seam. Thread will be needed to fasten the lower steering parts.
- Then a piece of thread 1-1.3 m long is required. It is needed to sew together the most voluminous section - the upper part from one iron rod to another.
- Use a needle to thread the thread through the holes, removing it to the front surface.
- Burn the ends of the thread with fire.
- Hold the ends of the braid with your hands and adjust the tension with a thread.
- Use a small screwdriver or knitting needle to secure the thread in each stitch of the selected stitch.
- Having stitched to the edge of the second metal rod, secure the thread in the same way.
- When the entire braid is stitched, tuck the edges of the material into the prepared holes.
Do-it-yourself reupholstery is not a complicated, but labor-intensive process that cannot be rushed and requires care.
Disassembly and removal of the steering wheel
To install a heated steering wheel yourself, the steering wheel must be disassembled and removed. We will consider installing a heated steering wheel on cars whose steering wheel has an airbag. In such cars, electrical devices on the steering wheel (airbag, horn, control buttons) are connected to the car's electrics through a special spiral or U-shaped cable (clock spring/steering column cable/"snail"), which allows the steering wheel to rotate and do not disrupt the electrical connection with it. We will look at the topic of connecting heating elements in more detail in this article below.
So, to disassemble and remove the steering wheel, you need to turn off the ignition and disconnect the negative terminal of the battery. Next, you need to wait 5 minutes after removing the terminal so that the charge completely disappears from the SRS system.
Place the wheels straight. Disassemble the steering wheel. Make marks on the shaft splines and on the steering wheel so that you can later install the steering wheel back in the same position. To remove, unscrew the steering wheel fastening nut not completely and sharply pull the steering wheel towards you. This will free the steering wheel and rest against the nut, after which it can be easily removed by unscrewing the nut all the way.
Installing heating elements involves removing the steering wheel cover and reinstalling it, or replacing the cover with a new one. If there is no braid on the steering wheel, then it will also be necessary to install a new braid. Before installing the heating elements, you need to take into account the location of the butt seams of the braid segments and pre-cut recesses for them in the steering wheel. You can read a detailed article about re-upholstering the steering wheel with your own hands.
You can try to unravel the thread of the old braid to reuse it, or you need to buy a new thread of a similar size.
The steering wheel angle sensor may be located on the steering column housing (“snail”). It is better to secure it with tape or tape so that it does not accidentally get knocked down. Or you will need to set it according to the marks before turning on the voltage, otherwise an error will occur in the system.
Site navigation
To permanently turn on the high beam headlights, you need to turn the handle to position 3 and pull the steering column switch towards you until it locks in this position. At the same time, a blue light on the dashboard should light up, it signals that the high beam is on. To turn on the low beam, you need to pull the electric switch towards you again until the handle is locked again.
In order to turn on the fog lights, you need to set the outermost handle to position 2, then the next one to position 4.
At the same time, the corresponding light in the instrument panel lights up. The rear fog light is turned on by turning the handle in position 5.
The left switch is additionally equipped with a horn button. To remove it, you need to press out one of the two grooves and carefully pull the button out of the left part. After this, you need to remove the lighting slider using a clamp or be careful with your hands, since this element is quite fragile.
In the body of the left part itself there is a so-called contact pin with wires, which also needs to be removed after all manipulations.
There was no need to disassemble the devices.
Repair of the steering column switch RENAULT DASTER
But this was the simplest thing, because it wasn’t me who did it...: Then, having seen enough photos and videos and armed with screwdrivers with an extension cord, I went to the covered parking lot to reinstall the switches. I didn’t take the navigator with me, since he does not have the flexibility of his figure necessary for the operation!
The worst thing is to break the plastic casing around the steering wheel, and the most difficult thing is to unscrew the 2 recessed screws under it.
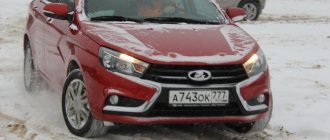
The design is really interesting
- At the bottom of the bumper there is supposedly an aluminum insert, but in fact it is plastic.
- Unpainted elements that allow you to not be afraid to drive onto gravel, drive over branches, and so on.
- Wheels 17 inches. Special design of rims. This is the first time this has been used on Auto VAZ. The part is made of polished aluminum, and the inside is pleasant to the eye graphite. Looks really cool.
- The icing on the cake is the floating roof. This element can be seen on many foreign-made and quite expensive cars. And now it has appeared on the domestic Lada.. Steve Mattin said that in fact he did not make a “floating roof”, as we used to call it. He was inspired by shark fin. Anyway, it looks really good.
- LED taillights. Here you can find fault that there are already such in Rio and Solaris, despite the fact that this Lada costs under 900,000 rubles.
- The headlights look quite modern. Nothing has changed here - halogen.
- The rear bumper has a pseudo-aluminum trim.
- Double muffler bell. This is also a new product on domestic cars.
- Another shark fin as an antenna.
- The ground clearance has been increased. It's now larger than most crossovers.
- Unfortunately, all-wheel drive and automatic transmission will not appear in this car.
- Another fetish is the gas tank flap. It is now sleek and centrally locked.
Which versions of Vesta have a heated steering wheel?
Factory installation of a heated steering wheel on Vesta is provided in expensive configuration options: Luxe and Exclusive.
Given the increased interest in this part, a heated steering wheel also began to be installed from the factory in the most popular version of the Lada Vesta (more than half of all model sales) - Comfort. Here it, along with heated front seats and 16-inch alloy wheels, is included in the Comfort Winter package. It appeared in catalogs in January 2022 as part of an interim model update.
Photo source: https://www.lada.ru/cars/vesta/
The increase in the price of a car with a “winter package” compared to regular sedans and station wagons in the comfort version amounted to 36 thousand rubles. For Cross versions, alloy wheels are already included in the package, so the extra charge for winter options is lower - 21 thousand rubles.
You can also find the Comfort Multimedia equipment type at official dealers. It is distinguished by the installation of a multimedia system with a touch panel, which also includes navigation, instead of a simple radio.
This version also has steering wheels with built-in heating, but not because of the focus on driving in cold weather, but because such a steering wheel is equipped with a set of special buttons for controlling “advanced” audio options. The steering wheel with these buttons is otherwise called “multi-steering wheel” for its multimedia features.
Advantages of a multifunction steering wheel over a conventional steering wheel:
- increasing the comfort of the driver’s workplace;
- increasing safety on the road due to the fact that you do not need to lose concentration, being distracted by searching for service functions;
- presence of cruise control keys at hand, helping to maintain a uniform speed along the way;
- basic options for controlling on-board multimedia: selecting and switching files, smooth and instant switching on/off sound volume.
The same as on the Lada Vesta, a heated multi-function steering wheel is installed by the factory on the XRAY Cross model.
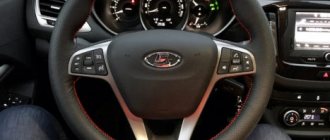
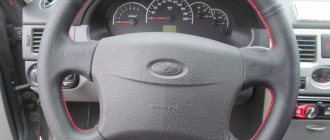
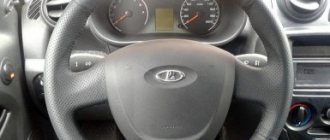
So, let's try to figure out what buttons are on the steering wheel and what they do
For example, on the left there is a zone that is responsible for the cruise control mode. The right zone is responsible for controlling the multimedia system.
In turn, the cruise control function has several functions
- switch “ ” – turn on/off cruise control (position 3);
- switch “ ” – turning on/off the speed limiter (position 6);
- “SET+ / SET–” switch – setting and increasing speed (positions 1 and 4);
- “CAN” switch – temporary disabling of cruise control/speed limiter (item 2);
- “RES” switch – recalling the previously stored speed value (position 5).
Instructions for luxury equipment, which has gray wires
Sequencing:
- There are holes on both sides of the Lada Vesta steering wheel. Insert the rods into them and press.
- The base of the airbag rises. You need to carefully remove it.
- Carefully separate the wires.
- Unscrew the central locking screw and pull the control wheel towards you without any effort. The wires should exit through the hub opening.
- If it is necessary to install the steering wheel, carry out all the steps in reverse order.
The steering wheel in the car is locked tightly. Therefore, when removing it, do not make any effort, gently swing it.
Test the correct connection. All keys must function as intended. If the backlighting of the cruise control keys does not function, then a flashing is required. After checking, the airbag is installed.
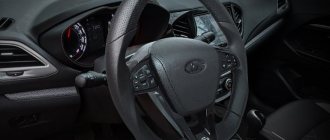
How does the standard heated steering wheel work?
The standard steering wheel heating in the Lada Vesta is turned on by a button on the right spoke of the multimedia module. The button itself has an orange indicator light, which is very convenient.
The electric heating threads built into the steering wheel are located along the entire circumference. But those parts of the steering wheel that the driver usually holds on to the left and right of the center warm up faster and to a higher temperature.
The heating is controlled by an automatic unit and, after reaching the desired heat, it turns off itself. But you can turn it off earlier by pressing the key again. Feedback from drivers confirms that the heating option in Vesta is implemented efficiently; you can drive the car even in winter cold without gloves.
Luggage cases
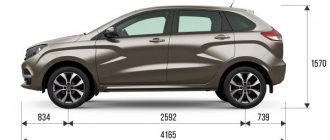
The trunk is the station wagon's calling card, and Lada displays it with pride. The standard volume is 480 liters, in the floor there are two organizers with lids, and under them there is also a spacious underground, in a niche with a spare wheel. Little things can be shoved around so that you won’t find them right away! Larger items can be stored in niches on the sides - on the right there is a box that closes with a lid, on the left there is a mesh and Velcro for fixation. The doorway width is 97 cm, the maximum trunk width is the same.
The trunk of the Hyundai Creta is smaller in capacity, but the doorway is wider and the width of the trunk itself is larger
For carrying luggage, the Hyundai Creta offers less usable volume - 403 liters. But its trunk itself is more convenient for transporting large items, so the width of the opening and the trunk itself is noticeably larger - 110 cm versus 97 for the Lada. Otherwise, everything is similar: there is a niche in the underground near the spare wheel, and there are side pockets with Velcro.
We work with the following car brands
| Audi | Skoda | Volkswagen | BMW | Seat | Volvo |
| Kia | Hyundai | Ford | Honda | Infiniti | Porcshe |
| Land-rover | Jeep | Mercedes-Benz | Mini | Toyota | Lexus |
| Opel | Citroen | Chevrolet | LaDa | Renault | Nissan |
Still have questions? Ask us or sign up for installation!
Buy a kit or do it yourself?
The desire to retrofit your car with a heated steering wheel can be realized in 4 ways.
- Buy a kit ready for installation, which will include a thermal switch, heating element, button, relay, wires with a fuse holder. In some systems, a voltage converter with 12V ≥ 30V is included in the circuit to improve efficiency.
- Assemble the installation kit yourself. If you do not take into account the voltage converter, which is not available in all models, the kit consists of elements that are easily available for purchase.
- Install a standard heated steering wheel. You will need to buy a steering wheel, a button and possibly replace the steering column cable. But this is only provided that your car model of later years of production or in expensive trim levels had a heated steering wheel installed as standard.
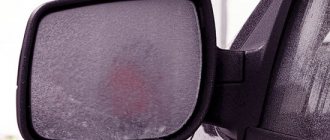
- Make your own heating using MGTF wire as a heating element. Previously, along with nichrome wire, we considered making a heating element from MGTF wire for heating rear-view mirrors. The same element is often used in the design of heated seats.
To choose your own path, you just need to estimate the cost of the finished kit, the elements separately, and the time costs for installing a heated steering wheel using each method.
Braid
Advantages of installing heated braid:
- heating is powered from the cigarette lighter, so there is no need to interfere with the design of the vehicle’s on-board network;
- Removal and installation takes no more than 2-3 minutes.
For the apparent convenience you will have to pay with serious disadvantages:
It is impossible to turn on the heated steering wheel while driving. The power cord going to the cigarette lighter will restrict the movements of the steering wheel, which makes it difficult to control the car and is fraught with an accident;
- minor effect. When turned on for a short time, the steering wheel will heat up very little and quickly release heat after removing the braid. We do not recommend driving constantly with this kind of accessory on the steering wheel. Due to its versatility and manufacturing features, the heated braid is poorly fixed to the steering wheel, which may prevent emergency steering in case of a skid;
- the braid, wire and adapter for powering the heated steering wheel will have to be constantly stored in the car.
Tools and materials
To install the heated steering wheel kit you will need:
- soldering iron, flux and some solder;
- tool for removing the steering column trim, steering wheel. You can find detailed removal instructions in the repair and operating manual for your vehicle;
- a feather drill for a hole in the steering wheel spoke for a thermal switch;
- universal glue "Moment". The glue will not allow the conductive fabric to wrinkle or peel off from the rim when connecting and re-stitching.
Is it possible to do the heating yourself?
Test drive lada xray
Heating on your own is a very realistic task if you approach it competently. You can implement it in one of the following ways:
- purchase a ready-made kit consisting of a thermal switch, heating element, button, wires with a fuse holder and a relay, which will turn on the heating automatically when the required temperature is reached. Some systems also include a voltage converter with 12 ≥ 30 V;
- assemble a kit yourself from easily accessible parts;
- install a standard steering wheel that is already heated. To do this, you need to buy a steering wheel, a button, and in some cases you will also have to replace the steering column cable. This option is only possible if the manufacturer provides for the production of such a steering wheel for your car model;
- make an option using MGTF wire.
The choice of method should be based on calculating the cost of each of them, as well as the time spent on installation and connection.
Before learning how to make a heated steering wheel using a purchased seat kit, you should prepare in advance:
- the kit itself. It will be used as a donor, from it you need to take heating elements, a thermal relay, which will allow automatic shutdown when a certain temperature is reached;
- glue "Moment";
- soldering iron;
- sealant;
- small knife;
- electrical tape, double-sided tape;
- marker.
Once the tools are collected, you can move on to the installation process itself. To make a heated steering wheel yourself, follow the instructions:
- Let's start removing the steering wheel. To do this, you need to turn off the power to the on-board network, disconnecting the negative terminal of the battery, then turn the steering wheel 180 degrees and pull it out as far as possible, then lower it down. Having made such movements, the holes on the steering rear side become accessible; an object that fits in diameter should be installed all the way and at an angle. It could be a knitting needle. There are elements inside the holes; you need to pull them with the object you are using, while also using your hand to pry the body where the airbag is installed, which will snap off as a result of the action. The pillow is pulled towards itself and the connector is disconnected. Next, the wheels are aligned and the steering wheel is set to the central position. Use a socket wrench to unscrew the mounting bolt.
- Marking of grooves is done - about 2-3 cm. step. The blue wire is pulled out of the kit (if using a ready-made seat kit).
- Furrows are cut, you can use a knife or drill.
- Place the heating element on the glue. Bends and turning points can be fixed using electrical tape; after the glue has dried, remove it.
- The wire is laid and everything is covered with sealant; this should be done so that no grooves are felt under the cover. Excess sealant can be easily removed with a knife.
- The cover is placed on the heated steering wheel. Experts advise using a leather case, which must be steamed or softened in alcohol in advance. This will allow the material to stretch well and sit perfectly on the steering wheel without any problems.
Connection
In this case, it is necessary to ensure that the floor lighting on the Lada Vesta and X-Ray works in the same way as the rest of the car, that is, it fades out when the doors are closed. Otherwise, the constantly burning backlight will begin to irritate and tire you, especially on a long night journey.
In this case, there are 2 connection options:
- To CBKE;
- To the ERA-GLONASS lamp.
To CBKE
The connection goes to plug P1, contact C4 (the red wire goes into it) - 12V, provided the car is disarmed. Plug P1, contact C6 (a white wire goes into it) – when the door is opened, a “ground” gradually appears.
The location of the electronics box varies depending on the model.
Lada Vesta
In a sedan it is located behind the glove box, and therefore, in order to get to it, the glove compartment must be removed. To do this, you need to open the glove box lid, then release the latches that hold its upper edge. When this is done, the lid pulls towards itself, overcoming the resistance of the 3 fasteners, and snaps off.
Vesta glove box mount
Next you need to remove the glove box light. It is located in the upper left corner and is held in place by a spring-type lock. You need to pry up the lampshade with a knife or screwdriver and snap it off, then disconnect the wiring.
When the ceiling light is removed, you only need to unscrew the 5 mounting screws that secure the glove compartment to the dashboard. This is done using a T20 Torx bit.
Lada X Ray
In this case, everything is simpler, since the electronics unit is located on the left side of the dashboard, at the driver’s feet.
To the ERA-GLONASS lamp
First you need to remove the lampshade itself. Before work, you must reset the negative terminal from the battery.
Next, you need to insert a screwdriver or knife between the roof upholstery and the lampshade, with the help of which you can disengage the latches.
Then unscrew the 2 screws that secure the lampshade to the body, and pry off the spring retainer (also with a knife or screwdriver). In the end, all that remains is to disconnect the plug.
For greater convenience of connecting the floor lighting (and other devices) to the Lada Vesta and X-Ray through the lampshade, the plug is numbered. It is recommended to navigate by the number, since the color of cars of different years of assembly and configuration may differ.
Diagram of the ERA-GLONASS lighting unit
Connection:
- Contacts 11 and 14 (usually white-pink color) - after turning on the main relay (opening the doors, turning the key in the ignition switch), +12 V appears. A few minutes after the key is removed from the ignition switch, the power stops.
- Contact 15 (usually blue-black or black) – ground;
- Contact 17 (usually white) – mass of door limit switches. It occurs only when the doors are open.
The implementation of floor lighting on the Lada Vesta is demonstrated in the video.
Technical characteristics of Lada Vesta SW Cross
Judging by the name, in fact the car is not unitary, not multifunctional, but actually sports. The letters SW stand for Sport Wagon. But if you treat it as a sport, then you will be disappointed, because there is no smell of sport here.
To be honest, we thought nothing good would come of this car. Imagine: we took Vesta, which handles well, has good comfort, and raised it above the road (ground clearance = 203mm). As a result, the center of gravity has risen and the suspension now works differently. In reality, when we tested the technical characteristics of the Lada Vesta SW Cross, it turned out that the car is very comfortable. And the suspension and sound insulation and in general everything is good here.
Unlike an automatic, a manual car accelerates well with any engine. She's dynamic. There is no feeling of lack of traction, no feeling of delayed gear shifting. Although, of course, there is a drawback - there are only five gears. A six-speed gearbox was never installed here.
If you look at the acceleration figures to 100 km/h, and especially if the car is called a Sport Wagon, then there is complete dissonance. With a 1.6 engine with AMT, the car accelerates to hundreds in 14 seconds. This sounds scary in 2022. Even if you take the 1.8 liter engine, the acceleration dynamics are still not impressive. At best it's 11 seconds. The rated fuel consumption of the Lada Vesta SW Cross 1.8 MT is 7.9 liters per 100 km.
But, if you just drive around the city and don’t race at traffic lights, then you won’t have a lack of mechanical traction.
The suspension works great. If we compare the technical characteristics of the Lada Vesta SW Cross with the Koreans, then it is much more interesting to drive. Therefore, the main achievement that the engineers at Auto VAZ were able to organize was excellent handling. The car behaves great on the road. The suspension really doesn’t notice those bumps, potholes and everything else.
The limiter works very hard in first gear. When you want to accelerate quickly, you will definitely run into it, because it does not reach the red zone. It's strange why they did this, because in second gear it already works fine.
Brakes
Admit it, you dreamed about this - a Lada with rear disc brakes. The funny thing is that Vesta technically has enough drums. There are no problems with deceleration or braking distance. However, in Russia, not a single car with drums will be on par with foreign cars. That's why engineers developed a disc brake. They had to make a new brake disc, it's VAZ's own. The diameter is even slightly larger than the front disc, but without ventilation.
Rules for connecting the mechanism
After the heating elements have been installed on the steering wheel, you can connect the device to power. There are several connection options:
- through the cigarette lighter;
- through wiring specially dedicated for this purpose;
- using unused wires.
The most practical and safe option for arranging power is to connect via a dedicated line from the battery. The algorithm of actions is as follows:
- you need to take two copper rings, which are about 1.5 mm thick, and prepare a power button;
- the rings must be connected to the plus and minus of the electrical wiring of the machine;
- the device switch off button should be placed in the steering column casing located at the bottom - this will be more aesthetically pleasing and convenient;
- on the left overlay you need to make a cutout to install the button using a special stencil;
- then the wires must be soldered to the rings, and then connected to the battery through the fuse and relay;
- copper rings should be attached to the wire with double-sided tape, and then filled with epoxy glue;
- one wire must be positive, the negative can be used from the steering shaft;
- the contact for switching off should be located opposite the rings in the steering wheel; for this you need to make a special hole;
- everything must be carefully isolated to avoid unwanted contacts;
- At the bottom, you should install a thin plate as a spring so that the shutdown button is constantly pressed against the rings: one end of the spring will rest against the steering wheel, the other will press on the contact.
This is interesting: How to prepare documents and dispose of a car? 4 stages of recycling, rules and features
The heating process with this connection will occur quite quickly and evenly. The steering wheel will be noticeably warm after just a few minutes.
Stages of work
Removing the steering wheel
Review of tuning body kits for Lada Xray (photos, prices)
First of all, you need to remove the steering wheel itself. Depending on the design of a particular car model, this process occurs in different ways, however, in the vast majority of cases, the process of removing the steering wheel can cause certain difficulties. So that after the final installation of the steering wheel the wheel falls into place without displacement relative to the axis, it is recommended to mark the position of the steering wheel relative to the shaft (you can simply mark it with a marker).
Marking
warm steering wheel yourself Having dismantled the steering wheel, you need to use a marker or felt-tip pen to apply markings to its rim, in accordance with which the heating element will be laid. The markings can be made at your discretion - as a rule, these are turns along the rim of the steering wheel in increments of 2-3 cm. If you cut the turns at a higher pitch frequency, the heating wire of one set of heated seats may not be enough. After the markings have been applied, using a paper knife to follow the markings, you need to cut the outer surface of the steering wheel so that a wire can be placed in the cut, serving as a heating element for installing the heated steering wheel of the car with your own hands. It is best to cut grooves for the wire at an angle. Firstly, thanks to this method, the wire will hold better when laying it, and secondly, making cuts will be much easier.
Laying a heating element for heating the steering wheel
The heating cord, previously removed from the car heating pad, must be tightly placed in the slot on the steering wheel. At the same time, a high-quality heating system will only be achieved if the heating cord fits tightly to the steering wheel, remaining fixed with glue in several places. In places where there are creases or kinks, the power cord should be secured with an electrical tape, which can be easily removed after the glue has completely dried. After wrapping the heating element around the steering wheel and carefully fixing it, you should cover the laid wire with sealant so that the groove cut on the steering wheel and the wire laid in it cannot be felt. After the sealant has dried, its excess must be removed by carefully cutting it off with a knife. Then the entire structure is sheathed on top with leather or other material at the discretion of the car owner.
Final stage
Another technically difficult stage in making a steering wheel heating system yourself is the stage of installing the steering wheel in place and connecting the heating to the on-board power supply system. To power the newly installed steering wheel heating system, three free contacts are used, provided in almost every car. The fourth contact must be connected to the horn, as before dismantling the steering wheel. In order to simplify the entire process, turning on the heated steering wheel can be combined with the button for turning on the rear window defroster by connecting the contact to the corresponding electrical circuit of the car.
With proper manufacturing and installation of the steering wheel heating system, heating to a warm state occurs within 2-3 minutes after pressing the power button.
Customer Reviews
Michael
I recently installed a heated steering wheel and covered it with leather at this service. I want to say that there are few places where you will find real professionals in their field. The craftsmen did everything efficiently and carefully. Excellent service, I will definitely come again.
Artyom
On the advice of my friend, I decided to install a heated steering wheel in this service. The craftsmen did everything carefully. The managers are friendly and know their stuff. I liked everything, the service and service. No wonder a friend recommended this technical center.
See all