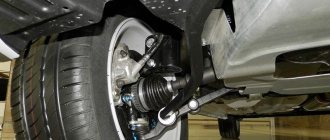
The front suspension of the Lada Priora remains generally the same as on the predecessor VAZ 2110. There are minor differences in the springs and shock absorbers. Diseases migrated along with the suspension (for example, short service life of wheel bearings, ball joints). The table shows problems in the front suspension of the Lada Priora, as well as ways to eliminate them.
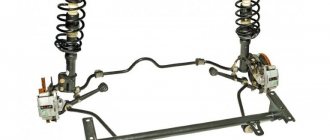
Lada Priora front suspension diagram
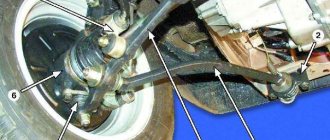
1 — steering knuckle; 2 - eccentric bolt; 3 — shock absorber strut; 4 — lever; 5 — stabilizer bar; 6 — mounting bracket for the stabilizer bar cushion; 7 — stabilizer bar strut; 8 — cross member of the front suspension; 9 — ball joint; 10 - stretching
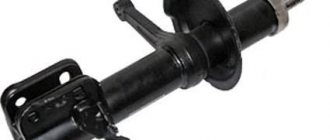
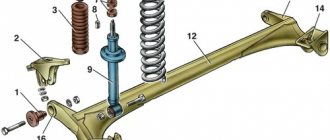
1 — telescopic stand; 2 - spring; 3 — rod nut; 4 — rebound limiter of the upper support; 5 — upper support; 6 — bearing; 7 — upper spring cup; 8 — spring gasket; 9 — compression stroke limiter of the upper support; 10 — compression progress buffer; 11 - protective cover
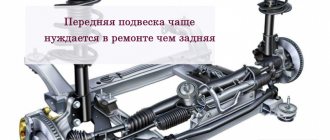
1 — ball joint; 2 - hub; 3 — hub bearing nut; 4 — protective cap; 5 — hub bearing; 6 — steering knuckle; 7 - nut; 8 — front wheel brake disc; 9 — brake mechanism shield; 10 — eccentric (adjusting) bolt; 11 — rotary lever; 12 — front suspension spring; 13 — shock absorber rod; 14 — upper spring cup; 15 — upper support of the shock absorber strut; 16 — shock absorber rod nut; 17 — bearing of the upper support of the shock absorber strut; 18 — spring gasket; 19 — front suspension compression buffer; 20 — protective casing; 21 — rack body; 22 — bracket for mounting the anti-roll bar cushion; 23 — front suspension stretch; 24 — front wheel drive shaft; 25 — anti-roll bar; 26 — stabilizer bar; 27 — front suspension arm
Features of dismantling work
Dismantling the rear and front suspension elements on the Lada Priora is mainly needed to lubricate the moving parts. It will also be needed in situations where repairs or replacement of worn components are required.
Rear suspension removal
Structurally, the chassis here is simpler, which means it is easier to disassemble (repair) it. The process consists of several standard procedures.
- The car is installed on a platform with an inspection hole. It’s even better if you can lift it on a lift.
- Now you need to open the luggage compartment and remove the facing material from the seat belt reels. Behind them is the mounting of the suspension shock absorber struts. They only need to be loosened; there is no need to unscrew them completely.
- Next you need to remove the wheels. If the car is on a lift, then the wheel bolts should be loosened while still on the ground, and only then the car should be lifted.
- The handbrake cables must also be removed to facilitate dismantling. Unscrew the fastening brackets that secure the cables to the body brackets and levers. Next, the brake drums are removed. The cable ends must be removed through the parking brake lever. At the same time, you will need to unscrew the brake flanges at the rear.
- Now you can remove the hard brake tubes. The drive lever, designed to operate the regulator to distribute pressure, is dismantled. To dismantle it, simply remove the washer, then disconnect the bracket and remove the drive.
- After the work has been done, you can begin to remove the suspension struts. You need to remove the supports, unscrew the fasteners and remove the washer from the body bracket. You need to put suitable stops under the front wheel axle and hang the rear part, after which you can remove the shock absorber strut assembly.
- To dismantle the rear beam, you need to unscrew the fastening elements of the bracket, with which it is fixed to the body from below.
Thus, the rear suspension is dismantled. Then you can disassemble the shock absorbers to replace individual elements or repair them.
Special tensioning devices may be required to remove the springs.
You can buy them at any auto store. Without such devices, removing springs can result in various injuries, and removing them in any other way is problematic. Since the spring is compressed quite strongly, if you act carelessly it will fly out, causing damage.
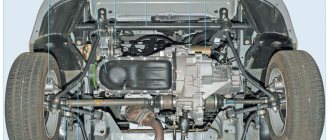
Removing the front suspension
It is somewhat more complicated than the back one from a technical point of view. Structurally, the spring suspension consists of 41 parts. Its main part is a shock absorber strut, which is attached to the steering knuckle with 2 bolted connections. The fastening bolts are equipped with an eccentric washer.
When the steering mechanism operates, the strut bolt on top also turns, resulting in the ability to turn. However, the stand is a weak point. It takes on the main burden of mitigating vibrations.
Noise or knocking in the front suspension of Lada Priora
The struts are faulty. Replace. The bolts securing the stabilizer bar to the body are loose. Either the cushions or rod are worn out Tighten the fastening bolts, replace the cushions The fastening of the upper support of the suspension strut to the body is loose Tighten the fastening nuts of the upper support of the suspension strut Wear of the rubber element of the strut support Replace the rubber element Wear of the silent blocks of the suspension arms, braces or struts of the stabilizer bar Replace the silent blocks Wear of the ball joint of the suspension arm Replace the ball joint Wear or breakage suspension springs Replace the spring Destruction of the compression stroke buffer Replace the buffer Increased wheel imbalance Rebalance the wheelsWhich stands are better?
This question is difficult to answer. Despite the fact that manufacturers have quality certificates, very often spare parts for the frame cannot provide the declared comfort of movement and the specified service life. Reviews also do not allow us to understand which is better. It all depends on the preferences of the car owner. Today Prioru is equipped with air suspension.
You can make this system yourself or go to a gas station. This solution shows itself very well in terms of comfort and reliability.
The car pulls to the side
Different air pressures in the tires Set normal tire pressures Violation of wheel alignment angles Perform a wheel alignment Destruction of the rubber element of one of the front suspension strut supports Replace the rubber element of the front suspension strut support Uneven elasticity of the suspension springs Replace the front suspension spring that has lost its elasticity Significant differences in tire wear Replace worn tires Increased imbalance of the front wheels Balance the wheelsRequired Tools
In order to successfully replace the front shock absorber strut on a Prioress, you must first prepare the tools from the table below.
Table - Tools required to replace the front strut
| Name | Note |
| Pliers | |
| Jack | For hanging the front of the car |
| Socket wrench | "At 13", "at 17", "at 19" |
| Support | To protect and prevent the vehicle from falling off the jack |
| Extractor | To remove the tie rod end |
| Call button | "At 17", "At 19", "At 22" |
| Balloon key | Remove and install the wheel |
| Hexagon | |
| Penetrating lubricant | It is recommended to lubricate all fasteners a couple of hours before replacing the shock absorber |
| Hammer | Medium size |
| Stops | To keep the car from moving |
| Spring extractor | To compress a spring |
Uneven tire wear
Increased speed when cornering Practice a more relaxed ride Excessive wear on the ball joints of the suspension arms and silent blocks Repair the front suspension Imbalance of the wheels Rebalance the wheelsLet us remind you that another car disease can be called steering rack knock.
Key words: front suspension of Lada Priora
0 0 0 0 0 1
Share on social networks:
Fluid leak from shock absorbers
Owners of Priora cars often encounter this problem. The front suspension is leaking. This happens due to a worn or failed rod seal. Also, scuffs may form on the element during operation and the chrome layer may be damaged. A leak occurs due to damage or shrinkage of the sealing rings on the housing. The solution to these problems is to replace the element in the assembly.
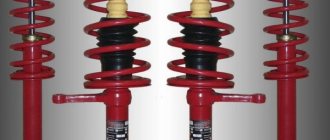
Chassis SS20
These spare parts for domestic and foreign cars are produced under the “System Technologies” brand. These racks have become so popular due to their high quality. For Priora, the manufacturer offers 4 product options that differ in hardness. Which stands are better? They need to be selected according to your driving style. The softest ones are the “Standard” series racks. Rear shock absorbers from the same series are also offered.
A reinforced version is offered to increase the load capacity. Next are the “Comfort” racks. According to reviews from many car owners, this is the best option. They are stiffer than the Standard, but the suspension works equally well on bad and good roads.
The “Highway” kit is suitable for those who like stiff suspension and high speed. With these racks you can drive on bad roads, but it will be uncomfortable. “Sport” is the toughest option from this manufacturer for Priora cars. A front suspension of this type is not very suitable for the city, but for sports competitions it is just right.
Engines and official fuel consumption rates for Lada Priora
Popular among domestic car enthusiasts, the Lada Priora is equipped with a line of gasoline engines developed by the VAZ concern. They have proven themselves to be reliable and maintainable units. The following motors are installed on the car:
- 1.6 at 90 forces:
- 1.6 at 98 forces;
- 1.6 at 106 forces;
- 1.8 at 123 or 130 forces.
New Lada: LADA Priora for Spin Tires
An important feature is that the fuel consumption of the Lada Priora does not exceed that of the leaders of its class
Given the relative cheapness of the car, this attracts additional attention from potential buyers. Priora has mechanical and, from 2022, automatic transmissions
Basic faults
A beam can fail for two reasons:
- displacement from place;
- mechanical damage (most often a crack).
When a crack occurs in the lever, the torsional rigidity of the body decreases. This parameter determines the degree of safety, as well as the position of the parts. The fact is that with normal body rigidity, which is laid down during design and obtained after the final stage of car assembly, absolutely all components and assemblies (down to the bolts) are in place, they have a maximum permissible vibration amplitude. For example, the suspension “swallows” potholes - the parts actively move, and people in the cabin may not even notice the rolling.
In addition to the fact that you will most likely have to get used to unpleasant sounds, there will be increased wear and tear on small parts. When a lever cracks, everything that is attached to it begins to move with greater amplitude. The problem is temporarily solved by welding, but this only postpones the solution to the problem for some time. Craftsmen recommend changing the beam.
How to properly replace silent blocks?
If a malfunction of one or a group of silent blocks is detected, you cannot hesitate. The vibration created by the car when moving will not be damped by the rubber suspension elements and will be transferred to other parts that will begin to deteriorate.
Ignoring the cheap operation of replacing a silent block can result in significant material costs. The greatest difficulty associated with replacing these elements is pressing. The operation requires the use of special equipment.
Of course, if the goal is to save money at any cost, you can turn to garage craftsmen who perform pressing of silent blocks using homemade equipment. It must be remembered that the quality of work in this case is very low. A guarantee for work performed is almost never given. All actions are performed at your own peril and risk.
The cost of replacing the product consists of the price of the rubber element itself and its pressing. As a rule, the entire operation of replacing silent blocks does not take much time.
Thank you for your attention, good luck on your journey. Read, comment and ask questions
Subscribe to fresh and interesting articles on the site.
1200 rub. for the photo report
We pay for photo reports on car repairs. Earnings from 10,000 rubles/month.
Write:
Any motorist, having heard any incomprehensible sound made by a car, for example, a click or knock in the area of the front suspension, experiences unpleasant associations. When you hear a knock in the front suspension, this is a clear sign that there is a problem with the car's chassis. If the car's suspension rattles, it means that you need to immediately diagnose the car's chassis.
The main reason for the failure of a car's suspension is, of course, a broken road; the suspension most often breaks due to very unpleasant “surprises” such as holes and ditches. The suspension begins to knock after the car flies into a hole or onto a bump; the suspension also breaks due to inexperience, when some drivers notice a pothole at the last moment and immediately press the brake pedal to the floor and do not release the pedal when the wheel hits into a pothole - during braking, the load on the strut increases several times and, accordingly, the suspension also suffers several times more. The angle of rotation of the wheel when hitting a pothole has a significant influence on the operation of the suspension, but the reason is still the same, increased load.
Bearing replacement
No matter what kind of car the support bearing wears out, but if it uses a MacPherson strut, then the technology for disassembling the unit for replacement is identical, with the exception of some nuances regarding the suspension design.
Therefore, we will consider how replacement is carried out on a VAZ-2110 car, and then we will indicate the features of the operation on other models.
So, it has been revealed that the support bearing requires replacement. All work can be done in a garage, but some specialized tools will be required.
In general, you will need:
- Standard set of keys, hexagons, heads with collars and rods;
- Jack;
- Steering wheel end remover;
- Spring ties;
- Rags.
A new support will also be required, since on this car the bearing is included in its design.
Of course, you can disassemble the support itself to replace only the bearing, but most car owners prefer to replace the entire assembly.
Additionally, you can purchase a spring vibration damper that is installed between the upper cup and the spring.
Below we will consider the sequence of actions, and we will indicate small tricks that will make the work easier.
Disassembly and replacement is done as follows:
- We place the car on a level surface and immobilize it using the hand brake and wheel chocks;
- Take a 30mm socket and loosen the nut securing the drive to the hub. It is better to do this while the car is standing on all wheels (unscrewing this nut with the wheel removed is more difficult, since it will be more difficult to block the hub from turning). It is also worth noting that this nut is pinned, so it is difficult to tear it out of place and you cannot do without extending the wrench;
- We open the hood and, using a spanner wrench and a hexagon, tear off the shock absorber rod nut (the hexagon holds the rod itself, and the wrench loosens the nut. In this case, you only need to loosen it a little; it is strictly forbidden to twist the nut completely, otherwise the unheld spring will “shoot”). It is better to do this operation before removing the rack (it is much more difficult to remove the nut on a removed unit);
- After removing these two nuts from their place, you can continue disassembly. Jack up the required wheel and remove it;
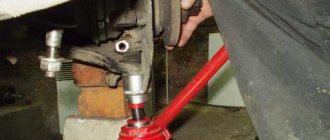
- Unscrew the fastening of the ball joint of the lever to the rack;
- Using a puller, press out the tie rod end;
- Completely unscrew the nut securing the drive to the hub;
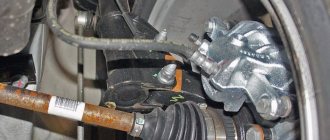
- Loosen the brake caliper mount (there is no need to disconnect the tubes from it), remove it from the disc and move it to the side;
- We take hold of the brake disc and pull it towards ourselves, pulling the hub from the splines of the drive shaft end switch;
- We go into the engine compartment and unscrew the three nuts securing the support to the car body. At the same time, we ask an assistant to hold the support so that it does not fall to the ground. After this, remove the assembly;
- We install the couplers and tighten the spring until its upper coil moves away from the thrust cup;
- We completely unscrew the nut securing the shock absorber rod and remove the support (after this you can check the performance of the shock absorber, check the condition of the boot and bump stop).
- Before installing a new support, we check the condition of the support cup, clean it of rust and dirt, install vibration dampers under it (if purchased);
- Before installing a new support, we install the spring correctly (the ends of the coils at the top and bottom should fit into special recesses in the cups);
- We install a new support and screw the rod securing nut until it stops;
- We remove the ties, constantly monitoring the position of the ends of the spring;
- We install the assembled rack on the car. After assembly work, it is necessary to additionally tighten the rod fastening nut.
Now about the features of the replacement with Priora, Kalina, X-Trail. Removing and disassembling the strut for these cars is the same as described above.
But it is not necessary to change the support itself on these cars (if the condition is satisfactory); after dismantling, it is enough to remove the bearing from it (installed on the side of the support cup), and put a new one in its place. And then everything comes back together.
Below is a table of the designation of support bearings according to GOST, designations (full, main, foreign analogues), their size and weight.
When carrying out replacement, special attention should be paid to safety precautions. You should not try to disassemble the rack without ties, since a “firing” spring can cause serious injury
Checking VAZ support bearings.
What is required for replacement
In order to independently replace the support bearing of the Priora strut, you need to have a minimum set of tools on hand. You will have to completely dismantle the shock absorber strut, and this is not an easy task. But try to outline the position of all elements relative to each other - this will allow you to avoid adjusting the camber angles in the future. You need the following tool:
- Set of wrenches and socket heads.
- Screwdriver.
- Marker.
- Puller for tie rod ends.
- Puller for springs.
Having all these tools, you can start repairing. It is also advisable to have strong steel wire on hand. If you follow all the recommendations, you will complete the repair in an hour, or two at most. This is relatively little.
The price of a support bearing for a Priora is no more than 700 rubles (if you purchase domestic products). Repair at a service station will cost the same as spare parts, sometimes more. There are no difficulties in the work, then there is simply no point in overpaying.
Preparation for repair
Before you begin any repairs, you need to do some preparation. To do this, perform a few simple manipulations:
Park the car (Priora or Ten, it doesn’t matter at all, the operating algorithm is the same for them) on a level surface. Fix the position of the car - place shoes under the rear wheels, squeeze the handbrake and engage first or reverse gear. Remove all the front wheel bolts from the threads (it is advisable to replace the bearings on both struts). Lift up the side on which you plan to replace the support bearing first. Remove the entire wheel.
At this point the preparation stage can be considered complete; it is time to disassemble the suspension and replace worn elements
Pay attention to the condition of all boots - if they are damaged, be sure to replace them
Brake calipers - an exclusive problem
Only in some car models with disc brakes in the rear, the brake calipers become loose or simply play. This is problem number one for all budget cars with rear disc brakes. It is the budget nature of fasteners that often causes parts to fail. It is very interesting that calipers can be an invisible cause of knocking, that is, very difficult to diagnose. You will have to perform the following procedures:
first, you can try to pull the caliper with your hands while the wheel is installed; perhaps the parts of the mechanism are hitting the disc, everything should be tightly screwed; Next, you should remove the wheel and carry out manual diagnostics of all possible fastenings of this unit; you should tug the mechanism with your hands to understand the absence of play; the next step should be to disassemble the caliper to determine the loose parts, but doing this without experience is not recommended, as many problems can be found; when disassembling, you should pay special attention to the quality of tightening of each module and each bolt, this is what can tell you where the knocking problem lies; when reassembling, pay attention to the pads; it is quite possible that they are worn out or deformed, and simply knock in the places where they are installed during operation.