The VAZ-2110 is considered the predecessor of the Lada Priora; their front suspensions are almost identical, the only differences are in the spring parts and shock-absorbing components. The problems that drivers noted with the VAZ-2110 with front suspension migrated to the Priora - the wheel bearings leave much to be desired, the ball joints wear out quickly and must be regularly replaced.
Tuning the front suspension in Lada Priora
Tuning a part first of all implies the comfort of the car, and only then does it come to the external component. To install a cool suspension that will not let the driver down on the road, you need to purchase the following materials and tools:
- Front stabilizer ŠS.
- Spacer.
- Component that reinforces the shield at the front.
- Cross member of the suspension located at the front.
- Levers brand IQ Racing Technology.
- Cross piece to match the front suspension.
What each detail is responsible for:
The stabilizer has a mount like in foreign cars, which is something you can only dream of with a stock stabilizer. Drivers who have already installed and are using an improved version of the stabilizer note the good handling of the Priora. The component is fixed to the rack through a rod using an eyelet. The lower strut successfully pulls together the arms that fit the front suspension
When mounting the device, make sure that the installation site is inclined, so that the reinforcing arc passes below the jamming device and avoids contact with it. The component that reinforces the shield in the front part perfectly fixes the steering rack to the body. To make the tuning look perfect, paint the element in the desired color. The cross member of the suspension located at the front amazes Priora drivers with its large weight; the part is fixed directly under the bumper
Performs the functions of “crabs” and spacers. Car enthusiasts promise amazing profits. Levers of a well-known brand in original quality replace all levers combined, including sabers. Castor can be replaced at the top and bottom.
Such tuning of the Lada Priora will cost approximately 14,000 rubles.
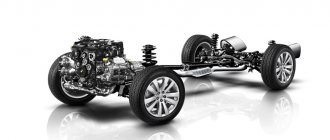
The chassis is an important parameter for comfort - not everyone will agree to a gear crusher machine. The front and rear suspension of a Priora car is, in fact, its foundation, which consists of several systems, each of which is responsible for a specific task. Some provide “swallowing” of bumps, some provide confident braking, and other systems ensure that the wheels move evenly, with the correct trajectory. The rear suspension on the Priora car is a beam. These are found on all budget cars. Lada Priora is still a budget car, if you dig deeper. Especially the interior, the handles, the paint.
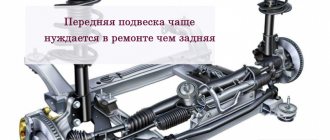
The front suspension of the VAZ 2170 Priora is an independent MacPherson system, in many ways it is a modified copy of the models of the tenth “family”. Its design is simple and even, in my opinion, needs some improvement, for example in the levers. I still like the Priora chassis for its relative softness - few cars in this class are able to show a cushion that could withstand Russian off-road conditions. If you put a front suspension arm on both sides, coupled with braces, it will be a different car both in handling and in swallowing potholes.
Some spare parts are replaced almost immediately after purchase with analog ones - more expensive, but reliable. The strut rod, of course, holds all the components and mechanisms around it, but in serious off-road conditions it cannot cope with this. The rack breaks and it leaks. The chassis mechanism at the front of a vehicle is more often repaired than the rear, but on subsequent AvtoVAZ models it was made a little stronger.
Tuning Lada Priora hatchback: stylish, beautiful, powerful!
Whatever you name the ship, that’s how it will sail. Fast and smooth Lada "Priora"
named correctly!
The car immediately became the brand’s priority model – and the demand for it has not decreased since 2007. It is also important that the car has reached the age when modifying it no longer seems like mere fun. Today, tuning the Lada Priora
is the call of the times!
Some time ago we published an article about tuning
Lada Priora
, and it has not lost its relevance. On the page https://www.autodela.ru/main/top/diy/tuning-lada-priora you can find a lot of interesting materials regarding the improvement of this glorious car.
However, the demand for tuning activities has since become larger and deeper. Our readers ask what are the features of tuning
a Lada Priora
with a hatchback body.
The beginning of the transformation: chip tuning of the Lada “Priora” hatchback
Today even the most incurious car owners are aware of the possibilities of chip tuning. This operation is recognized as safe and even desirable - if firmware approved by leading industry experts is used. However, readers of our site often ask: doesn’t an increase in power output from the engine lead to increased wear of the piston group of parts?
We answer: it is theoretically possible to set such control modes for the operation of the motor that will lead to the rapid destruction of its parts and assemblies. Similar experiments are often and extensively practiced during high-speed races over short distances. In everyday practice, adjustments to the operation of the engine ECU are carried out strictly within the framework of not even permissible, but purely NORMAL loads on the engine.
Another thing is that many customers chip tuning Lada "Priora" hatchback
after introducing additional horsepower under the hood, they feel a surge of driver energy and change their calm driving style to an aggressive one. A sharp, jerky, jerky pace of vehicle movement reduces the engine's service life many times faster than the calculated one.
However, it is worth mentioning chipping, which is aimed at all-round fuel economy. This reconfiguration option allows you to reduce the fuel consumption of the Priora by 15% (maximum) - but this is precisely where the pitfalls lie.
A car on a starvation diet drives slower, and in order to actively maneuver in city traffic, the driver has to engage a lower gear (thereby increasing engine speed) more often and drive it longer than if the ECU settings remained normal. As a result, the wear and tear of the vehicle accelerates.
The optimal option for chip tuning
Lada Priora hatchback
today is to install a module that makes it possible to select the operating mode of the car. Proven models of removable systems allow you to drive in “economy”, “standard”, “sport” modes.
Technical tuning: engine, transmission, suspension
We described how to achieve high dynamic characteristics by equipping the Priora engine with turbocharging in an article on the page https://www.autodela.ru/main/top/diy/tuning-lada-priora. We also touched on some aspects of tuning the piston group, valve mechanism, intake and exhaust tracts. However, not a word was said about the method of visually improving the engine. Namely, about the introduction of carbon film into the engine compartment.
According to film tuning practitioners, a personal feeling of the car’s power allows us to estimate the increase in capabilities as a 10-15% increase. It should be noted that overseas, in America, chrome and nickel plating are used for the same purposes.
Replacement of silent blocks of front levers of VAZ 2110
Front suspension of the Lada Kalina
Some car owners are afraid to independently replace the silent blocks of the front beam on a VAZ 2110. But in vain. Contacting a service station entails serious financial costs. Plus, it’s far from a fact that the service station will do your job better than you would have done yourself.
Zapisovka
The only thing is that you may need the help of a car service friend. All service stations have a special puller in their tool arsenal. There is no point in purchasing it, since it is expensive and is rarely needed by a car owner. Some craftsmen even make their own puller using a homemade method. There are many drawings and diagrams according to which it is made. So you can try it if you have free time.
There are two silent blocks in the front beam - in the front upper and front lower arm. The procedure for replacing them is somewhat different from each other, so we will consider the processes separately.
Front upper control arm silent block
Broken
Let us immediately note that it is easier to work with it than with the second element. The entire procedure involves performing several sequential operations.
- Raise the car on a jack and secure it in a stationary position. Turn on the handbrake, put stoppers under the wheels.
- Remove the front wheel.
- Unscrew and remove the support. To do this, you will need to turn the wheel out and hit the bipod with a hammer. It is better to do this through some kind of insert.
- By knocking out the support, you can remove the upper front control arm without serious problems.
- There is a bolt on the side, it is quite long. Unscrew it. Inspect the end play. Most likely, it is quite serious and is easily felt when checking. Therefore, you absolutely correctly decided to change the silent blocks.
- You can remove the silent block with a hammer and chisel. Just don't hit it too hard, or you'll damage other suspension components.
- In some cases, the silent block sits very firmly, so you can’t do without a drill and drilling it. After making the holes, you can safely remove the element.
- Now use the smaller bushing to press the new silent block into place. The part must fit firmly and securely into the socket.
Installing rear independent suspension on a car
The rear independent suspension is installed on the VAZ 2170 instead of the standard system installed by the manufacturer. The rear independent suspension, made on the basis of triangular levers, is ideally suited for installation on the Lada Priora. The rear independent suspension provides increased comfort when operating the car.
When operating a vehicle on which a standard rear suspension is installed, the vehicle beam shifts towards the arch when cornering by approximately 1 cm. If the vehicle is equipped with a rear independent suspension, then such a beam displacement is not observed under similar operating conditions. The rear independent suspension is attached rigidly to the body, without using silent blocks in mounting the rear suspension on the Priora, which avoids lateral displacement of the beam.
In the design of both the front and rear suspension of the Priora, rubber-metal structural elements such as silent blocks are used. These structural elements consist of a rubber body and a bushing made of metal, which is vulcanized with the base material of the silent block. In this case, the connection between the sleeve and the base is inseparable.
Silent blocks, which are part of the design of the rear and front suspensions, perform the function of damping all torques and bending moments that may occur during movement, thereby ensuring a stable position of the vehicle on uneven road surfaces and when turning.
It is the rubber-metal design of silent blocks that is capable of providing the maximum possible damping of emerging vibrations and absorption of emerging deformations. Silent blocks are structural elements that do not require additional maintenance and lubrication during operation. These structural elements cannot be repaired; after a certain period of operation, silent blocks are replaced.
Silent blocks are mounted on a car as an element of the chassis and suspension, since this structural element is one of the most reliable and economical ways to prevent the influence of various types of deformations and loads that can occur during the operation of the car on the car body. Installation and replacement of silent blocks on Priora is provided for in some vehicle suspension components:
- front and lower arms, by installing silent blocks the arm is attached to the car body; in addition, by installing silent blocks, the rod was attached to the lever;
- on the stabilizer, using silent blocks, it is attached to the lever through the strut;
- on the front linkage mount, called the crab;
- on the rear beam, on fastenings to the car body;
- on the rear pillars, in the upper and lower mounting points.
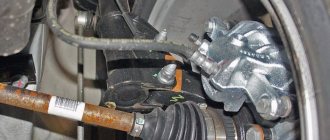
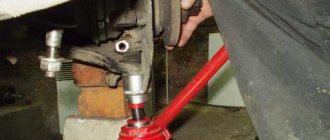
How to replace the front support bearing on a Priora
Front suspension
Before starting the replacement, familiarize yourself with the structure of the front suspension strut, and it is also recommended to watch the video (at the bottom of the article).
Preparation for repair
Place the car on a flat surface and provide lighting, engage first gear, it is advisable to also place wheel chocks at the rear, and provide insurance when working with a jack. Prepare the required tool:
- new spare parts for replacement.
- a set of keys and a ratchet;
- steering wheel end puller (preferably);
- hammer;
- clamps or spring ties (required);
- jack and vice.
- penetrating lubricant WD-40.
- Torque wrench (optional).
Disassembling the front pillar assembly
- Open the hood and locate the front support cup.
- First, remove the rubber cover.
- To unscrew the fastening you will need a special elongated double head for 22, sold for 150 rubles.
- We install the head inside, grab it with a balloon or carob.
- We grab the smaller inner head with a spanner.
- First, loosen the nut (do not unscrew).
- Moving on to the bottom of the rack, the wheel has already been removed. We treat the fasteners of the secondary knuckle with penetrating lubricant (WD-40), as well as the steering tip bolt. Let's wait for a while.
- We tear off the rack mounting bolts. The process looks like this:
- You can’t unscrew them right away; you’ll have to knock them out at the end. First, unscrew the tip of the ball joint.
- We loosen it with a spanner, then work with a “ratchet”.
- Next, you will need a special puller, or carefully knock it out with a hammer through a wooden spacer.
- Let's go back to the lower strut bolts. We knock them out carefully with a hammer and a wooden wedge. The fastener on top regulates the wheel alignment - do not confuse it with the bottom one when assembling.
After removing the fasteners, carefully pull the assembly towards you. Don't forget to disconnect the brake hose.
- We return upstairs and unscrew the three support fasteners.
- Now the structure does not hold anything, all that remains is to remove it, we do it from below, pulling the module towards ourselves.
Installing a new part
- We clamp the assembly in a vice, as shown in the photo.
We compress the springs with clamps until the outer part of the support weakens. ATTENTION: do not overtighten the spring.
Now unscrew the locknut on the rod.
- Here is a way to unscrew the lock nut so that the rod does not turn; this is done using a hexagon.
- After this, all that remains is to lift the outer cover and we will gain access to the support bearing for replacement.
- Now, depending on what your goal is, we change the entire support or just the bearing. Mandatory condition: replacement of rubber gaskets - vibration isolators.
- We assemble the entire assembly in reverse order. Do the final tightening of the fasteners when the jack is removed.
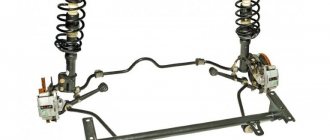
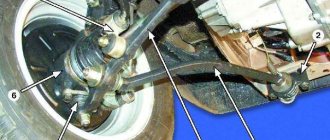
Front suspension of the Lada Priora car
Do-it-yourself Lada Granta liftback tuning: engine, suspension, interior, exterior
The front suspension is independent, MacPherson type with telescopic hydraulic shock absorbers, helical barrel springs, wishbones with braces and a stabilizer bar.
The basis of the suspension is a telescopic shock absorber strut, which allows the front wheels to move up and down when driving over uneven surfaces and at the same time dampen body vibrations.
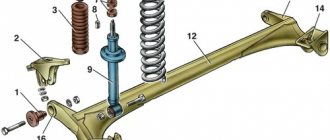
- 1 — steering knuckle;
- 2 - eccentric bolt;
- 3 — shock absorber strut;
- 5 — stabilizer bar;
- 6 — mounting bracket for the stabilizer bar cushion;
- 7 — stabilizer bar strut;
- 8 — cross member of the front suspension;
- 9 — ball joint;
The top bolt that goes through the hole in the strut bracket has an eccentric collar and an eccentric washer. By turning this bolt, the camber angle of the front wheel is adjusted.
The telescopic strut is equipped with a helical barrel spring, a polyurethane foam compression stroke buffer, and an upper strut support assembly with a bearing.
- Shock absorber parts:
- 1 — telescopic stand;
- 4 — rebound limiter of the upper support;
- 5 — upper support;
- 7 — upper spring cup;
- 8 — spring gasket;
- 9 — compression stroke limiter of the upper support;
- 10 — compression progress buffer;
- 11 — protective cover.
- Front suspension elements:
- 1 — ball joint;
- 3 — hub bearing nut;
- 4 — protective cap;
- 5 — hub bearing;
- 6 — steering knuckle;
- 8 — front wheel brake disc;
- 9 — brake mechanism shield;
- 10 — eccentric (adjusting) bolt;
- 11 — rotary lever;
- 12 — front suspension spring;
- 13 — shock absorber rod;
- 14 — upper spring cup;
- 15 — upper support of the shock absorber strut;
- 16 — shock absorber rod nut;
- 17 — bearing of the upper support of the shock absorber strut;
- 18 — spring gasket;
- 19 — front suspension compression buffer;
- 20 — protective casing;
- 21 — rack body;
- 22 — bracket for mounting the anti-roll bar cushion;
- 23 — front suspension stretch;
- 24 — front wheel drive shaft;
- 25 — anti-roll bar;
- 26 — stabilizer bar;
- 27 — front suspension arm
Under the weight of the front of the car, the bearing is in a compressed position, which eliminated all gaps and knocks. The contact area of the balls with the raceways has increased significantly, and consequently, the durability of the bearing has increased.
When the wheels turn, the strut housing rotates along with the spring, but in the new design the shock absorber rod remains stationary and the connection between the rod and the shock absorber guide bushing wears out less.
A telescopic hydraulic shock absorber is installed in the strut housing.
The lower part of the steering knuckle is connected to the suspension arm through a ball joint. The support is attached to the steering knuckle with two bolts (the holes in the steering knuckle are not through).
The support is covered with a rubber-metal cover.
Braking and traction forces when the car is moving are perceived by longitudinal braces connected through silent blocks to levers and brackets welded to the cross member of the front suspension. At the connection points (at both ends of the brace) washers are installed to adjust the longitudinal inclination of the wheel turning axis. The front suspension cross member is attached to the body with six bolts.
The steering knuckle is equipped with a double-row angular contact ball bearing of a closed type, which is secured in the knuckle with two retaining rings. The wheel hub is installed in the inner rings of the bearing with interference fit.
The inner rings of the bearing are tightened (through the hub) by a nut on the shank of the outer wheel drive joint housing. In operation, the bearing is not adjustable and does not require replenishment of lubricant.
The wheel hub nuts are the same, with right-hand threads.
The anti-roll bar is a spring steel bar. In its middle part there is a bend above the pipe of the additional muffler of the exhaust gas system.
Both ends of the stabilizer bar are connected to the lower suspension arms through struts with rubber and rubber-metal hinges.
The rod in its middle part is attached to the body with brackets through rubber pads.
- Checking and adjusting wheel alignment angles should be carried out in accordance with the maintenance regulations, as well as after repairing the body or suspension.
- When the vehicle is in running order, the wheel alignment angles must be within the following limits:
- – angle of longitudinal inclination of the axis of rotation 0°42'±30';
What does the Priora front suspension diagram look like?
The structure of the part is shown in detail in the figure, where the following components are indicated in the kit:
- rounded fist;
- eccentric type bolt;
- strut responsible for shock absorption;
- lever arm;
- a rod suitable for the stabilizer;
- a bracket fixing a cushion related to the stabilizer bar;
- a stand that fits the stabilizer bar;
- transverse suspension component;
- ball type support;
- stretching;
- spring device;
- rod nut;
- a detail limiting the rebound stroke of the support located in the upper part;
- support placed at the top;
- bearing;
- silent blocks;
- a gasket created specifically for a spring device;
- spring cup at the top;
- an element limiting the compression movements of the upper support;
- compression motion buffer;
- case for protection.
How to benefit from increased ground clearance?
Obviously, neither the double nor triple ground clearance of the Priora can be compared with the ground clearance of any jeep. But we should not forget that, in tandem with the improvement of certain other features of the car, the Priora’s ground clearance can give good results. Let's be clear for now.
The distance from the ground to the bottom is 165 mm. But knowing this fact alone is not enough to draw any conclusions. The motorist must certainly take into account the properties indicated below, such as:
- Full length of the machine.
- Distance from front overhang to rear.
- Wheel base.
- Vehicle track width.
- The presence of some parts protruding from the bottom of the car.
- The way the ground clearance changes when the car is 100% loaded.
Only working on the joint improvement of all these features can lead to benefit from the increase in ground clearance of the Priora.
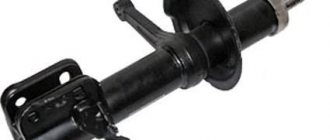
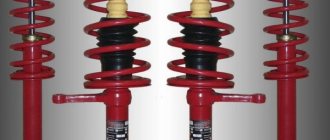
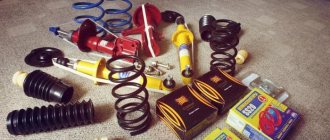
Chassis SS20
These spare parts for domestic and foreign cars are produced under the “System Technologies” brand. These racks have become so popular due to their high quality. For Priora, the manufacturer offers 4 product options that differ in hardness. Which stands are better? They need to be selected according to your driving style. The softest ones are the “Standard” series racks. Rear shock absorbers from the same series are also offered.
A reinforced version is offered to increase the load capacity. Next are the “Comfort” racks. According to reviews from many car owners, this is the best option. They are stiffer than the Standard, but the suspension works equally well on bad and good roads.
The “Highway” kit is suitable for those who like stiff suspension and high speed. With these racks you can drive on bad roads, but it will be uncomfortable. “Sport” is the toughest option from this manufacturer for Priora cars. A front suspension of this type is not very suitable for the city, but for sports competitions it is just right.
Assembling a new shock absorber
1. Set the rack rod to the upper position.
2. Place the boot and compression buffer on the new front strut.
3. Install the spring, spring cup and damper
Pay attention to the lower shank, it should fall into place
4. Install the small washer from the new Acomi kit, the large washer and the support with the bearing installed.
5. Install the rod mounting nut.
6. The nut is tightened using a hexagon to “6”, hold the rod with it. It is better to do the final tightening after installing the front struts in place.
7. Remove the spring clamps.
8. Turn the support so that the indicator on it looks forward and slightly inside the car body.
9. After this, install the rack assembly in its place of further service.
10. Tighten the support bolts from above, then put the stand on the steering knuckle, install the eccentric bolt with a washer in the upper hole, and a simple bolt down and tighten.
11. Install the steering tip pin into the rod on the rack and tighten the nut.
12. After this, pin the finger, spreading the antennae.
13. Thread the brake hoses into the holder bracket on the rack.
Done, now we can say that the front strut has been replaced. Install the wheel and lower the jack. When the car is on wheels, go through all the fastenings and tighten them. It would be a good idea to rock the body on the side where the strut was changed for additional pumping.
Now all that remains is to repeat the same thing on the left side. The second time things will be “more fun”, since you will already know what’s what and why.
After replacing the front struts, be sure to do a wheel alignment; don’t rush on the way to the service station - the wheels are not adjusted and the car will “drive” a little on the road, so be vigilant and careful.
The result of the work done:
After several weeks of using the new racks, I can note the following:
- The knocking has disappeared;
- The suspension has become more elastic;
- The laxity and swaying have disappeared;
- The car began to take turns better, the roll decreased;
- It has become more comfortable to drive off-road;
- The steering wheel began to return noticeably faster after a turn - the result of increased castor;
- Improved handling at high speeds;
- Speed bumps are less painful to overcome.
In short, I am very pleased, the impressions are only positive, if I had known that such a result would be achieved, I would have changed the front struts even before they failed, immediately after the purchase.