When using any car, its suspension wears out over time. Domestic car enthusiasts know that repairs to the VAZ 2114 chassis are required quite often due to poor roads in our country. How to repair the front or rear suspension of a VAZ 2114 with your own hands, we will look in detail in this material.
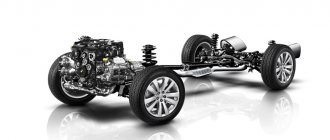
The VAZ chassis consists of front and rear suspensions. When operating a vehicle, they bear the greatest load. Their condition affects the quality and comfort of driving a car, as well as the safety of the driver and his passengers. The main function of car suspensions is to soften the ride and eliminate vibrations. The chassis also reduces roll when cornering and ensures a smooth ride, and also provides high information content to the driver in the city and on highways.
In the CIS countries, the roads are generally not very good, so the VAZ 2114 suspension experiences very high loads. This leads to the need to regularly contact a car service. At the same time, you can save your money by repairing the chassis of a domestic passenger car yourself in a garage. To be able to determine which element has failed, you need to know how the suspension works.
Rear suspension design
In the picture, the numbers indicate the main elements of the rear suspension of the VAZ 2114, which usually fail on bad roads.
Rear suspension diagram
- Number 1 in the picture shows a rubber-metal hinge - the main attachment to the car body.
- Bracket for attaching the rear suspension arm to the body.
- Shock absorber protective cover.
- A buffer that takes the load during compression.
- Casing cover.
- Main support washer.
- Cushion for shock absorption.
- Spacer sleeve.
- Shock absorber, also called strut.
- Insulation gasket.
- Spring.
- Connecting beam for levers.
- Beam lever.
- The bracket that secures the rack structure.
- Flange.
- Lever type bushing.
The beam design includes a connector and a pair of trailing arms. They are indicated in the diagram by numbers 12 and 13. The parts are connected by welding. In the rear part, flanges numbered 15 are attached to the levers, as well as brackets for fixing the shock absorbers.
The rear wheel axles with brake blocks are screwed to the flanges. There are bushings on the rear suspension arms at the front. They are held on rubber-metal hinges. One end of the spring rests on the support through a rubber gasket, and the other on the shock-absorbing cup.
How does the node work?
The spring works at the same time with the shock absorber strut. These same elements provide support for the wheel and the entire car as a whole. The entire assembly is supported by suspension arms and braces. The entire system does not move in the longitudinal direction. This provides a set of levers that prevent longitudinal movement of the suspension. The steering wheels are used to set the drive wheels in motion.
There are eyes on the racks; tie rod ends are installed in them. With the help of a support bearing, which is mounted in the upper part, as well as a ball joint located in the lower arm, the rack moves around its axis. At the same time, the wheels turn and the car moves in the desired direction. The suspension has a stabilizer that links the two parts and allows them to work as synchronously as possible.
How is the rear suspension disassembled?
To repair the rear suspension of a VAZ 2114, you need to know how to disassemble it correctly. We will tell you how to do this correctly below.
To begin with, the car must be placed above the inspection hole or raised using a lift. In the trunk, you need to disconnect the rear and side trim, as well as the seat belt retractor. Also here you need to find the fastenings of the struts to the car body and loosen them, but do not unscrew them completely.
Then you need to loosen the rear wheel mounts by removing the hubcaps and completely unscrewing the wheels. The machine must stand on reliable jacks - one on each side.
Front pillar
Remove the brake system cables. They should be removed as an assembly by disconnecting the cable fastenings to the chassis arms and body. After this, you need to remove the brake drums. Remove the ends from the manual drive levers and disconnect the flanges from the brake flaps. Before removing brake hoses and pipes, be careful not to leak. Next, remove the elastic drive lever, which is necessary for the operation of the brake pressure regulator. To remove the lever, disconnect it from the bracket by removing the lock washer, and then remove the shackle from the wheel axle.
Disconnect the shock absorbers by removing the rubber cushions, body mounting nuts and washer. Next, support the front wheelbase and lift the rear. Having done this, you can remove the compression stroke buffers, shock absorber covers and springs.
Once the body mount brackets are detached, you can remove the entire beam. In front of you will be a rear suspension with risers. If necessary, disassemble the shock absorber - this will not cause any special problems.
To remove the shock-absorbing spring, you will need special ties. Without them, you could be seriously injured because the spring is held in place under high pressure.
Approximate prices
A new original rear beam can be purchased in specialized stores for 4500-5000 rubles . The assembled part is sold for 5800-6000 rubles . A non-original new spare part can be purchased for 4000-7000 rubles .
A used rear beam manufactured by AvtoVAZ is sold through private advertisements for 1000-1500 rubles . The assembled part can be purchased for 2000-2490 rubles .
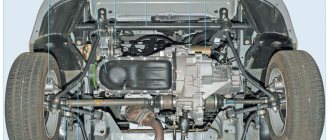
How the front suspension works
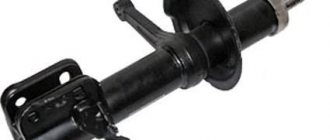
The key element of the front suspension of the VAZ 2114 is the shock absorber strut, which is indicated by number 9 in the figure below. It is secured with two bolts to the steering knuckle. Compared to the rear system, the front suspension has a more complex design - this can be seen in the number of parts. Number 11 indicates the bolt that goes through the holes in the rack bracket. It has an eccentric washer and a special belt. When the steering gear is turned, the top bolt turns. As a result, the car turns. Shock absorber struts, which carry the main load, usually fail.
VAZ 2114 front suspension diagram
Types of spare parts
By manufacturer you can get a spare part for a VAZ 2114:
- Original (AvtoVAZ plant).
- Non-original (from another manufacturer).
Depending on the condition, the spare part may be:
- Used.
- New.
The part can be purchased:
- According to an advertisement from a private individual, the owner of a VAZ 2114.
- At the car dismantling point.
- In the online store.
- At the car market.
- In a specialty store.
According to the configuration, the beam can be:
- Naked.
- Assembled (complete with torsion bars, levers, hubs and drums).
By payment method you can buy a spare part:
- On credit.
- In installments.
- For personal savings.
You can take a car part from the following manufacturer for the VAZ 2114:
- JP GROUP.
- AvtoVAZ.
We disassemble the front suspension with our own hands
Install the VAZ 2114 over the inspection hole or lift it on jacks or a lift. Be sure to set the parking brake when not using a lift. Remove the wheel caps and bolts, and then remove the wheels.
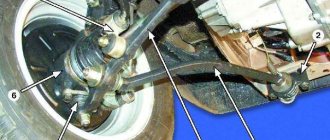
Next, remove the ball joint pin located in the strut swing arm. In the next step, remove the front stabilizer link number 24 from the suspension arm number 22. Then remove the braces from the body 30 and completely disconnect the ball joint that is attached to the steering knuckle.
Special ties
Remove the front suspension arm by disconnecting it from the body bracket number 28. After this, the arm can be removed with the bracket and extension. You should also remove the bolts that hold the pads to the steering knuckle.
In front of you you will see the assembled caliper. To avoid unnecessary work, do not remove it completely, but hang it on a wire so that the hose is not bent and does not experience stress. Then press the spline shank out of the wheel hub.
From the engine compartment, remove the protective cam number 41 by unscrewing the telescopic rack nuts, and then remove the solid suspension strut. It must be assembled with the wheel hub. In the same way, you need to remove the other front suspension strut, and then remove the struts from the rod.
When removing the bolts holding the ball joint to the steering knuckle, use a suitable socket wrench. Otherwise, you may damage the hinge protection case, which will result in unnecessary costs.
Do-it-yourself assembly of the front suspension of the VAZ 2114 is carried out in the reverse order. When installing the bracket, make sure that the threads of the bushings are not damaged. To do this, carry out all work carefully and do not allow longitudinal displacement of the cushions on the bar. This can happen when installing a stabilizer bar.
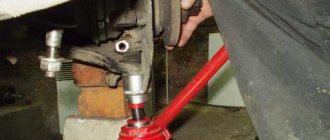
How does the ball joint change?
To do this, you need to remove the front wheel mounting bolts and hang part of the car on a jack. Next, the nut securing the ball element is unscrewed. The support pin is pressed out of the lever. Similar to the previous case, this is done using a puller. If there is none, do not unscrew the nut completely.
Also interesting: How to remove 140 horsepower from a Priora engine. "Niva-Chevrolet" with an engine from "Priora": description, features, advantages and reviews
After this, the lever is moved to the side (with a pry bar), and the support is successfully pulled out. A working finger should not move with more than 0.8 millimeters of play in the support. Otherwise, it needs to be replaced, since there is a large output here. Before installing the dirt boot, it is recommended to coat the surface of the support with sealant.
Read news about the new Niva
- The modernized Lada Niva Legend (4x4) 2021 was shown on the Internet
- Lada 4×4 Bronto - sales stopped, new details » Lada.Online - all the most interesting and useful about LADA cars
- Description of the instrument panel Lada 4×4 (VAZ 2121, 2131) » Lada.Online - all the most interesting and useful about LADA cars
- Chevrolet Niva gasoline consumption per 100 km
- Buy LADA (VAZ) 2131 (4×4) 2022 in Rostov-on-Don, low price for Lada 2131 (4×4) 2022 on the Avto.ru website
- Fuses Niva 21214 injector «
- The new large Lada 4×4 Niva “Bigster” 2021-2022 based on the Dacia Bigster was shown for the first time. The SUV has changed beyond recognition
- New Niva Chevrolet Lux 2022 - review of GLC equipment
How to replace rear silent blocks on a VAZ 2114
Preparatory stage. Initially, the repair site and vehicle are prepared. It is necessary to drive the car onto an overpass or use an inspection hole. It's good to fix it in place and let the car cool down. It is recommended to move away all cables, pipes, and wires passing nearby so as not to damage them during routine repairs of the machine.
It is also important to thoroughly rinse the area where the hinge is located, clean everything from dirt and open access to the fastening system so that nothing interferes and it is possible to replace the rear silent blocks of the VAZ 2114. Fixing stage. The car is installed well, raised on a jack, a place is prepared for repairing the vehicle, wooden blocks are also used to fix some parts of the car
If you are afraid of damaging parts of the brake system and engine, you can dismantle them for a while. Direct replacement of rear silent blocks on a VAZ 2114. Gradually unscrew all the nuts. If necessary, the fasteners that have frozen forever are cut off with a grinder. The metal parts of the hinge are lowered to allow access to the rubber or polyurethane layer. Then, using a chisel and a hammer, the damaged part of the hinge is removed from the niche. A new part is installed in the freed space, which can be clamped in a vice at the time of installation. This is how the replacement of the rear silent blocks of the VAZ 2114 is completed.
It is recommended to carry out a wheel alignment diagnosis at the end of the repair work; this will be more reliable. We observe the behavior of the machine for several days; if the alarming signs disappear, it means that you have discovered the correct location of the problem and fixed it in time. The “stuffing” of a car is complex and consists of small parts, but never discount them. Clearly understand: if it is vital to replace the rear silent blocks on a VAZ 2114, then act, look for opportunities to put the vehicle in order. Transform the powerful “steel horse” into a source of supreme pride! Don't lose sight of a single detail, not a single little thing!
Wheel alignment
Determining the malfunction of the rear shock absorbers of the VAZ-2115
The role of shock absorbers in ensuring the safe operation of a car is often not taken into account by many, especially novice car enthusiasts. And this can lead to unpleasant and even tragic events. If the shock absorber fails, or even partially fails, the car wheel loses contact with the road.
And, as a result of this, the braking distance increases in case of emergency braking. When cornering, the stability of the car deteriorates, the chassis and tires are subject to greater load, which leads to their wear, and so on.
Final disassembly of the unit
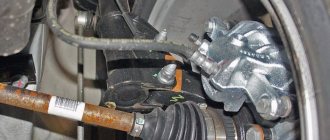
To completely disassemble the suspension, you will need to unscrew the bolts securing the caliper to the steering knuckle. This is done with the key “17”. The caliper must be suspended in such a way as not to accidentally damage it or the rubber tube. After this, remove the tie rod end pin, treat the threads with penetrating lubricant and unscrew the nut. Using a puller, the tip is removed from the rack lever.
Then unscrew the three nuts that secure the support bearing to the glass on the car body. Using keys “19” and “17”, unscrew the two lower bolts securing the strut to the steering knuckle. Only then can you remove the entire rack assembly. By compressing the spring, you can completely disassemble the assembly and repair it. But you need to think about whether it is worth repairing the shock absorber. The cost of a repair kit is quite high; not everyone can do the work themselves. And installing a new rack is a matter of just a few minutes.
How to determine if a shock absorber is faulty
The first thing to do is conduct a visual inspection. Oil stains on the shock absorber itself, boot or rebound buffer warn that it needs to be replaced. Also, uneven tire wear may be an indication of problems with the rear suspension strut.
When driving at a speed of more than 80 kilometers, the car's handling noticeably deteriorates, the steering reacts late to road irregularities, and the car's swaying does not subside.
But the most reliable way is to inspect it at a specialized service station stand.
The benefits of replacing silent blocks in your garage
Here are the benefits you can get:
- Firstly, such a procedure will cost much less than at a car dealership.
- Secondly, it is not known how well the master will complete everything. After all, it’s no secret that very often they do everything badly, so that they will soon be turned to for help again. Of course, there are also conscientious car mechanics, but this is rare.
- In any case, you will need to purchase a silent block yourself and give it to the master. At the car dealership he will only install it. That is, payment will only be made for work that you can do yourself.
- And finally, no one knows whether the master will install a new silent block or will make do with some old one that still functions.
Note: there is one BUT. Good car repair shops provide a guarantee for repairs, so if the car breaks down, the second repair will be carried out free of charge. Therefore, the main thing is to find such a car dealership, and everything will be fine.
Shock absorber: its role in suspension operation
An automobile shock absorber is a mechanism in the suspension of a car that serves to partially dampen the swaying (damping) that occurs during movement or completely absorb it.
Giving the car a smooth ride, shock absorbers act as protection for the car's chassis from overloads when driving on uneven roads and rough terrain. In the suspension, the shock absorber acts as an element to increase its elasticity along with the spring and torsion bar.
Shock absorbers are divided according to their types:
- gas single-pipe;
- gas two-pipe;
- oil two-pipe.
On the VAZ-2115 model, standard oil shock absorbers are installed at the factory. Later, when using the car, owners often replace them with gas ones, depending on their driving style.
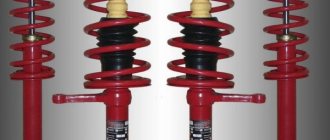
There are 3 types of racks with different characteristics. You need to choose them based on the roads on which traffic occurs. Oil (hydraulic) – quite elastic. Designed for drivers who prefer a calm, measured ride or frequent trips on unpaved roads.
Gas shock absorbers are characterized by higher rigidity, and, as a rule, they are preferred by motorists who practice an aggressive, highway driving style. Such shock absorbers (gas) prevent swaying that occurs at high speeds and turns. Gas-oil shock absorbers combine the advantages and disadvantages of both types.