How to change the front pads on a Niva?
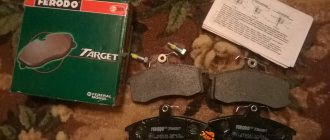
Brake pads for Lada Largus
Not only the quality of the ride, but also the safety of driving the car depends on the condition and serviceability of the parts. A special role among the large detailed components in the car is played by the braking system. Malfunctions in it, its complete failure make movement by car not only dangerous, but in some cases impossible.
When thinking about repairing the brake system, many decide to do the work themselves, especially if all external signs indicate not very serious problems, for example, wear of the front pads. The practice of self-repair is popular among owners of domestic cars or imported models that are similar in design to Russian ones. Niva owners are no exception. Therefore, it is quite logical for them to ask the question “How to change the pads in the field.”
Replacing front pads in the field: features of the process
Replacing a part such as pads is often done independently, without the help of car service specialists, for several reasons:
- It takes no more than 2 hours to complete the work;
- The caliper has a simple design;
- Removing and installing the pads does not require special skills: both men and women can handle this work;
- Replacement is carried out using a jack and standard tools from the driver’s kit (hammer, screwdrivers, etc.).
An important rule to remember: diagnosing wear and malfunction of one of the pads makes it necessary to replace both parts (front pads). That’s why the manufacturer offers them as a set
This state of affairs ensures high quality operation of the car’s braking system, whereas after replacing one (damaged) pad this fact is not observed.
Removing parts
Replacing front brake pads in the field: removing the part
Niva owners can rest assured: the procedure for removing the front pads is the same on all cars, regardless of their brand. There are specific features, but in general the algorithm is identical:
- Setting the car to the manual parking brake;
- Installation of supports/ supports/ rollbacks for all wheels;
- Removing the bolts from the wheel;
- Installing a jack under the front part of the Niva;
- Unscrewing nuts;
- Wheel removal;
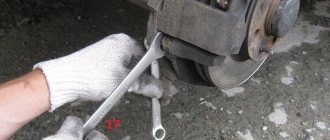
- Unscrewing the caliper.
Working with the caliper requires special attention, because unscrewing this part has some features:
- Removing the cotter pin, which acts as a position lock for the clamping brackets;
- Removing staples by knocking them out (a hammer and a punch will help with this).
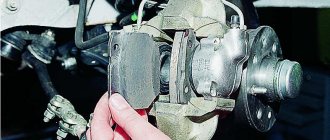
After removing the caliper, the pads are removed. They are visually inspected
Particular attention is paid to their thickness. Detection of reaching the minimum thickness of the front pads indicates their immediate replacement
Part installation
How to change front pads in the field: installing a new part
The return of repaired and installation of new front pads on the Niva is carried out in the following way:
Piston squeeze. A piston is one of the elements of a car’s braking system. To press it out, use a screwdriver. The long version is best; Installation of pads
At this stage, it is important to install the pads in exactly the position in which the old ones were removed; Installing the caliper. The algorithm is identical to its analysis (discussed above), but is performed in reverse order
At the stage of installing the clamping brackets, use a lubricant, which will make the secondary knockout of the clamps easier; Installation of spring clamps fixing the position (simultaneously checking the degree of their elasticity); Wheel installation; Repeat the steps to replace the second pad; Bleeding the brakes. This is done to pump air out of the braking system.
Preventative work
Front brake pads on the field: prevention
The brake system, like any other part in the car, must always remain in good working order. This will ensure a high-quality and safe ride at any time of the year. The condition of the front and rear brakes must be monitored. If characteristic signs of their malfunction occur, immediate intervention is required to eliminate it.
https://www.youtube.com/watch?v=pTi_AXhGtpA
Prevention is the best measure to prevent parts from breaking. If the car is used in the average frequency range (from 3 to 4 times a week), the condition of the pads, including the front ones, is checked and monitored on Niva once every 2 years. If the machine is used daily - once a year.
At the same time, when visually inspecting the pads, special attention is paid to their thickness: during braking, it tends to wear out. Loading…
Loading…
How to independently replace front and rear discs on a Niva Chevrolet
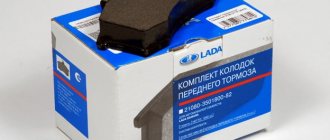
Brake pads for Lada Kalina
At the initial stage, we carry out diagnostics, determine the source of the breakdown, and calculate the number of spare parts, time, effort, and money.
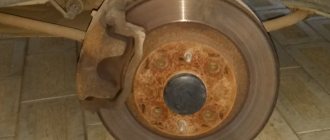
We carry out the inspection on our own, since the procedure is not at all complicated. We jack up each side of the car one by one and remove the wheel. We use a caliper to measure the actual thickness of the disc; in this case, it is not at all necessary to disassemble the caliper. We compare the obtained data with the parameters in the operating instructions. If the thickness is less than 9.5 mm. — the disk must be replaced with a new one; subsequent use of the machine is unsafe.
Also interesting: The best ball joints for a car
Before changing elements of the brake system, you need to treat the cotter pin and caliper with a special anti-corrosion lubricant, for example, WD40, since problems may arise during removal due to rust. If upon inspection it is clear that there is uneven wear, this may indicate that there are problems with the caliper.
- Using pliers, pull out the cotter pin from the bottom finger.
- Take a thinner screwdriver and push out the cotter pin itself
- We remove the clamping lever with two springs
- Take a screwdriver and hook the caliper, lifting it up
- We remove the worn pads and inspect them; if there is wear, replace them with new ones.
- We recess the pistons onto the caliper as deeply as possible so that the new ones will fit in without problems since they are thicker and simply won’t fit.
- When you have installed the new pads, we begin to assemble everything in the reverse order.
After changing, press the brake pedal a couple of times so that the pistons take their working position. You should also check what level the brake fluid is, since after replacement the level of brake fluid may increase. Replacing these elements on a Niva Chevrolet SUV takes no more than four hours and can be done independently.
Replacing Chevrolet Niva front brake pads
How to change the front and rear brake pads on a Skoda Octavia A5 yourself
Tools:
- Sliding pliers
- Pliers
- Medium flat screwdriver
- Small hammer
- Wheel chock
- Rolling jack
- Rubber bulb
- Brake fluid container
- Punch
- Wire brush
- Mounting blade
Parts and consumables:
- Front brake pads
- Graphite grease
- Aerosol lubricant type WD-40
- Brake fluid
Note:
The minimum permissible thickness of the friction linings of brake pads is 1.5 mm. Replace the pads in the following cases:
– the thickness of the linings is less than 1.5 mm;
– the surface of the linings is oily;
– the linings are not firmly connected to the base;
– the linings have deep grooves and chips.
If for some reason you have removed the front wheel, check the condition of the pads through the hole in the brake caliper housing. If the thickness of the friction linings is about 2 mm, replace the pads. If the car pulls to the side when braking or you hear strange noises, remove the brake pads and check their condition.
Attention:
Loosen and tighten wheel nuts only with the vehicle on the ground. Do not use gasoline, diesel fuel or any other mineral solvents to clean brakes. The brake pads on both front wheels must be replaced at the same time. It is not permissible to replace the inner and outer pads between each other, as well as between the left and right wheels. This may result in uneven braking.
1. Brake the vehicle with the parking brake and install wheel chocks under the rear wheels.
2. We hang and remove the front wheel.
3. Clean the brake mechanism from dirt. To facilitate disassembly, apply WD-40 type liquid to the joints of the pins with the caliper and clamping arms.
4. Pump out some of the fluid from the reservoir if, before replacing the pads, the brake fluid level in the reservoir is at or close to about zero.
5. Using pliers, remove the cotter pin of the lower clamping arm axis.
6. Using a drift, we touch the axis of the clamping lever.
7. Holding the lever, use pliers to remove the axle.
8. Remove the clamping lever.
9. We remove the two clamping lever springs from the pad guide so as not to lose them.
10. Using a screwdriver, lift the brake caliper.
11. Place the caliper with the cylinder block on the steering knuckle.
12. Remove the brake pads from the guide.
13. Before installing new brake pads, it is necessary to move the pistons as far inside the cylinders as possible. Using sliding pliers (or a pipe wrench), press the pistons into the cylinders.
You can recess the pistons into the cylinders in another way. To do this, insert the outer block into the guide and install the caliper in place. Use a spatula to press the pistons into the cylinders.
14. We carry out further assembly of the unit in the reverse order. To make it easier to install the axis of the clamping lever, use a file or emery to grind the end of the axis like this.
To make a cone.
15. Before installation, lubricate the axis of the clamping lever with graphite grease.
16. Pressing the lever, insert the axle.
17. After installing the brake pads, you must press the brake pedal several times so that the cylinder pistons move the pads to the brake disc.
18. Check the brake fluid level in the reservoir and, if necessary, top up to normal.
Attention:
After replacing worn brake pads with new ones, do not rush to immediately drive onto busy highways. It is possible that at the very first intensive braking you will be unpleasantly surprised by the low efficiency of the brakes, although you have installed branded pads. The brake discs also wear out, and the new pads only touch them at the edges, practically without braking. Choose a quiet street or passage without cars and brake smoothly several times so that the pads get used and begin to fit the entire surface. At the same time, evaluate the effectiveness of the brakes. And try not to brake sharply for at least the first 100 km. When unused pads become very hot, the top layer of their linings burns, and the brakes will not be as effective for a long time.
The article is missing:
- Photo of the instrument
- Photos of parts and consumables
- High-quality photos of repairs
carpedia.club
Original auto parts
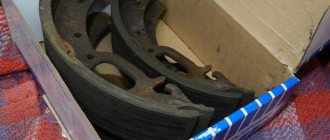
The part itself consists of a metal base and a ceramic or synthetic lining. Due to increased friction, components must be fire resistant and wear resistant. There are both disc and drum variations of the systems. The pads in both cases differ in shape and method of fastening. As a rule, the drum version is rarely used, and only on the rear wheels.
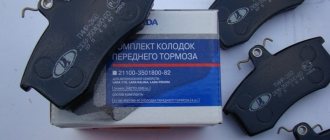
The LADA Sport kit will cost you about 650 rubles. It already has all four parts, you don’t have to buy anything else. They have a width of 8 millimeters and a length of 11 cm. A quiet and high-quality replacement option. Don't forget to check that the article numbers match one of the ones below:
- 2108-3501080;
- 21080350180083;
- 2108-3501800-83.
AvtoVAZ itself offers a similar solution. VAZ-2108 brake pads are suitable for most VAZ car models and cost about 480 rubles. In particular, they can be installed on VAZ 211213, VAZ 2121. The set consists of two front and two rear pads.
It is supplied under article number 21080350180082. The length of the last is 15 cm, width is 8 mm.
Check that the items and dimensions on the box are correct. If the barcodes are poorly printed, the box does not match the image in the catalog - most likely, this is a fake.
Replacing the front brake pads of a VAZ 2121 Niva 2131
The removal and subsequent replacement of the front brake pads on a VAZ 2121 and Niva 2131 is carried out in case of wear, when the thickness of the friction linings has become less than the maximum permissible, when mechanical defects have appeared on the surface - chips, cracks, etc.
It is recommended to replace the pads on both sides at once, regardless of the condition of the other pair, in order to maintain the quality of operation of both wheels and not violate the basic characteristics. We hang the side to be repaired with a jack and remove the wheel.
After removing the wheel, we clean the brake mechanism from dirt using a wire brush or blow it with compressed air.
Now we need to pull out the cotter pin of the lower axis of the clamping arm. To do this, using pliers, you first need to remove the locking plate that secures it from spontaneous removal, then remove it from its place using a hammer and a stop of suitable diameter.
We grab the cotter pin with pliers and at the same time, holding the lever from falling, remove the cotter pin and remove the lever from its seat.
Remove the two lever pressure springs from the pad guide.
Then we pry up and lift the brake caliper.
Place the caliper on the steering knuckle with the pads facing up. Then we remove them from their seats.
Now that the pads have been removed, we replace them, and then proceed to installation. But first you need to recess the brake pistons into the cylinders; for this you can use sliding pliers, or install the caliper with one outer old pad back in its place and insert a small mounting blade between the disc and the pad and recess the piston.
- Also, before installation, it is recommended to grind down the end of the clamping lever axle to make it easier to install into place and lubricate it with graphite lubricant.
- We carry out all subsequent assembly in reverse order.
- At this point, the repair work to replace the front brake pads on the VAZ 2121 Niva 2131 has been completed.
Tips for caring and maintaining the brake system
- Strictly adhere to the technical inspection schedule. The manufacturer recommends an interval of 15,000 km;
- Buy and install only original spare parts and consumables;
- Maintain a moderate driving style. For systematic off-road use and mountain serpentines, install brake discs of the class with notches and a perforated surface.
If you still don’t know how to replace brake system components yourself, read the instructions and watch the video. If you do not have enough time to service your Niva Chevrolet, contact the service center to order a paid service.
Characteristic differences between different types of brake discs
- Ventilated and non-ventilated: since their technical characteristics practically do not differ from each other, we combine them into one class. The indicator of moisture-heat-gas removal is at an average level. Wheels of this modification are an ideal solution for daily trips, moderate driving style, and minimal off-road use;
- With notches, with through holes: a design with multiple holes in the disk and grooves allows excess heat and moisture to be removed as quickly as possible. noise, gases. Brake discs of this design are installed off-road, at high speeds, and when operating equipment in special climatic conditions.
Obviously, the cost of the first modifications is 10 - 15% cheaper than analogues. Despite the budget price, the service life hardly exceeds 50 - 55 thousand km. Which type of disc is best is up to the car owner to decide.
How to Identify Brake Problems
No one will argue that a working brake system is a guarantee of safety. With serviceable brakes, you can compensate for the breakdown of any component in motion. Therefore, regular monitoring of these nodes is a mandatory procedure. Replacing brake pads on Niva 21214 occurs in the following cases:
- increasing the braking distance when you press the pedal;
- car drifting away from a straight line when braking;
- extraneous sounds when the brakes are applied;
- overheating, defects in the brake system elements;
- long travel of the handbrake lever and/or pedal;
- change in force when pressing the pedal;
- independent operation of the brakes;
- the hand brake does not apply on slopes;
- wear of brake pads less than 1.5 mm.
Replacing components is not a problem even for beginners in repairing their own car. The main thing is to strictly follow the instructions and check the new system after assembly to eliminate possible problems while driving.
Design of the working hydraulic system
In order to increase the reliability and safety of control, the hydraulic brake system of the Chevrolet Niva is built according to a dual-circuit diagonal design. The first hydraulic drive circuit drives the front right and rear left wheels, and the second drive drives the front left and rear right wheels. Thus, controllability is maintained in the event of failure of one of the hydraulic drive circuits. The hydraulic braking system includes:
- brake pedal located in the cabin under the driver’s right foot;
- vacuum pedal pressure booster;
- master cylinder with reservoir for filling brake fluid;
- dual-circuit hydraulic drive pipeline;
- working brake cylinders of the rear and front wheels;
- pressure regulator with actuating lever.
The pressure of the driver's foot on the brake pedal is increased by a vacuum booster and transmitted to the piston of the master cylinder, which, moving, compresses the brake fluid. The fluid pressure increases and is transmitted through pipelines to the working cylinders of the front wheels and the brake pressure regulator of the rear wheels.
How to Remove a Brake Drum on a Chevrolet Niva
Societies ›Chevrolet Niva› Blog ›How to remove rear brake drums?
Hello everyone, I now wanted to change the rear pad brake. It's sad, but I couldn't take off
drum. How competent are they to take off? Thanks for the advice on hanging and warming up the drum. I would like to add that there is a little play in the heels, so the cool wheel moves back and forth a little later. Thanks again, I listened for half a day today. Along the perimeter through the tree, the bowl is still a little loose
It’s better to summarize: 1. VD-40, 15 minutes, VD-40, 15 minutes. 2. Try the trick with suspension and acceleration, braking. It is not so tight (if everything is oiled, then the heel moves somewhere around 0.5 mm.) 3. Knocking on wood, but it is more convenient for two, because there are not enough hands. Piece of wood on drum
, put the installation on top and hit it - it turns out more evenly than with a piece of wood.
Everything worked with this technique :)).
Eventually you will install the back end of the head and hammer the setup. At the station I was hit by peeling drums
Remove acidification of brake drum VAZ 2123 / Russian crazy car service
In this video I will show you how to take off
half rotten drum
. Special pullers couldn't handle it.
learned from “bitter” experience on the previous 10, they kicked the stitch out of the salon with the first thing that he removed the drums. covered the seat with graphite. Such questions no longer arise! ! ! and also, in turn, unscrew all the brake pipe nuts, including the ABS unit. It is permissible to lubricate the contact brake nut/tube.
How to remove a brake drum on a Chevrolet Field.
To remove the drums, try collecting vinegar essence in a syringe and carefully soaking the needle between the drum and the axle shaft through the needle. concentrated essence will absorb corrosion
see here www.autoprospect.ru/chevr…anizmy-zadnikh-koles.html
Trying to knock down the clamping drum with a sledgehammer and a metal spacer will deform the aluminum edge and even break. On the old woman 2121, this method gnawed my drums
Gray as advised and gently tapping the wooden block in a circle. First of all, in the area stuck up to half the axis of the symptoms, and then along the edge along the wheel protection from under the car
You put it in place, and then put it on the mating drum - axle shafts, graphite lubricant. It will be easier again.
Position the metal space correctly so that the edges remain intact.
I beat the drums on wood. First tap the wheel, then circle and go down. There are also pullers with 3 legs and a rest center - their price is 350-500 rubles, the size is just
Choosing pads
The front wheels of the Niva Chevrolet use disc brakes, and the rear wheels use drum brakes. Accordingly, the pads on them are different. Pads are the main working part of the brakes, which carry the most load and wear out the fastest. If the car is used intensively, the condition of the pads should be checked at least once every six months. Today there are many different domestic and foreign manufacturers of pads for Niva-Chevrolet cars.
- low heating temperature during braking;
- do not require heating in winter;
- they do not creak or squeal even during sudden braking;
- have a longer service life compared to other models.
Also interesting: Where is the Niva Chevrolet ignition relay located?
The only disadvantage of these pads is the high cost, but the price corresponds to the quality.
If you need information about replacing front pads, this is the place for you.
The choice will depend on what your preferences are and what your budget is, since there are at least six different types from different manufacturers.
All the options given above are suitable for both a regular Niva and a Chevrolet Niva, since they have identical calipers.
Purpose and operation of the pressure regulator
The pressure regulator (“sorcerer”) is designed to prevent the car from skidding during sudden braking. This is achieved due to the fact that the rear wheels begin to brake after the front ones. The time delay is provided by the regulator lever, which, when the car brakes sharply (the nose drops and the rear rises), pulls the piston in the regulator cylinder and closes the fluid supply channel to the working cylinders of the rear wheels.
In this case, the rear brakes do not work and the wheels spin until the rear of the car drops back. Thus, the “sorcerer” automatically regulates the fluid pressure in the rear cylinder path in inverse proportion to the load on the rear axle. In addition, it increases the braking efficiency of an empty vehicle when the load on the front axle is higher than on the rear.
This work must be carried out at every maintenance and after repair of the rear suspension.
Replacing pads on the rear axle
To replace the rear pads, you will need to carry out the same preparatory work, after which the first thing you need to do is loosen the handbrake. Subsequence:
We remove the spring near the lever from which two cables go.
Using two “13” keys, you need to unscrew the bracket nuts, after which the cables weaken and do not affect the pads.
You can start directly replacing the pads
You need to remove the drum from the axle shaft using a “12” key by unscrewing two bolts. The drum often sticks, so you need to tap it with a hammer around the entire perimeter.
The working cylinder must be pushed inward on both sides using a flat screwdriver.
- You need to pry the tension springs by pulling them out.
- The block must be moved to the side opposite to the other block by the lower part, after which the two blocks are removed from the shield.
After removing the pads, the brake flap and drum must be cleaned and degreased and checked for the presence or absence of cracks.
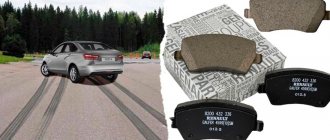
Analogs
| Brand name | vendor code | Price, rub.) |
| LYNXauto | BD4602 | 860 |
| Ferodo | FDB195 | 1140 |
| Delphi | LP189 | 870 |
| HI-Q | SP1168 | 460 |
| TRW | GDB265M | 570 |
There is a large selection of similar parts, so choosing the ones you need won’t be difficult.
The main thing is to pay attention to the article number. This will prevent you from purchasing a low quality fake.
Also, fake parts do not have markings, or they are poorly printed on the products themselves.
Also interesting: What to check when buying a Niva
| Brand name | vendor code | Price, rub.) |
| Bosch | 1987475191 | 312 |
| Rosdot | 000006237 | 480 |
| Pilenga | BS-T001 | 560 |
| Fenox | BP50001C3 | 670 |
| "Start" | 361278J,MSK026 | 520 |
The minimum thickness of the brake pad linings should be 1.5 millimeters. To assess the condition of parts without removing them, you can use the inspection window. It is located in the brake shield.
Substitutes
| vendor code | Cost in rub. | vendor code | Cost in rub. |
| Chevrolet Niva BOSCH 0986478746 | from 1500 | PATRON PBD1725 | —/— |
| TRI-DF 254 | —/— | FERODO DDF092 | —/— |
| TRW DF1725 | —/— | ROTINGER RT 2798 | —/— |
| TEXTAR 92024487 | —/— | HELLA 8DD355100381 | —/— |
| BOSCH RA1372785 | from 1700 | GLOBER RA16003411 | —/— |
| LPR RA626584 | —/— | BREMBO RA1782407 | —/— |
| TRW RA2416674 | —/— | TRW RA2416835 | —/— |
| vendor code | Cost in rub. | vendor code | Cost in rub. |
| BOSCH 0986478746 | from 2200 per set | TRW DF1725 | —/— |
| HELLA 8DD 355 100-381 | —/— | PAGID 51702 | —/— |
| BOSCH 0 986 479 904 | —/— | TEXTAR 92096332 | —/— |
| GIRLING 6017253 | —/— | BRAKE ENGINEERING DI839391 | —/— |
| COMLINE ADC2103 | —/— | BORG{amp}amp; BECK BBD4692 | —/— |
| NIBK RN3598 | —/— | TRI-DF 365 | —/— |
| GIRLING 6017487 | —/— | GIRLING 6017615 | —/— |
The pads rattle in the Niva Chevrolet caliper
One of the common problems encountered by Chevrolet Niva car owners. Brakes make unpleasant sounds; they rattle, make noise, rattle, clank, and squeak. The noise is so loud that it's scary to even drive. Let's look specifically at one such case, why this happens, how to fix it, the owner made a video about this, where he describes this situation and how he dealt with it.
Video with a solution to the problem of noisy and rattling brakes on a Niva Chevrolet:
Here's how you can cut out rubber gaskets from an old camera to solve the problem of a rattling caliper:
A short video about this:
No matter how good the sound insulation is, the rumble from the calipers will be clearly noticeable. Many motorists face this problem. What is noteworthy is that the knocking occurs only on small bumps. On smooth asphalt and at high speed there are no extraneous sounds. If you hear a characteristic ringing sound in the front suspension, check the condition of the brake elements. Perhaps the cause is the rattling calipers. What to do in such a situation? See the answer to this question further in our article.
Installing ventilated discs
But what needs to be done when replacing brake discs on a Chevrolet Niva? Installing ventilated discs instead of standard ones is quite difficult; you will have to perform several costly manipulations:
- Replace wheel rims. Instead of size R15 you will need to put R16.
- Of course, you need to buy the discs themselves.
- You will also need a new set of pads.
- You still need to install new calipers and fasteners.
After installing all the elements, you can start operating the car. And do not forget to promptly check the condition of the brake mechanisms. If necessary, you need to replace the brake discs on the Chevrolet Niva. If the standard ones do not suit you, you need to install ventilated ones - they can not only eliminate overheating, but also significantly improve braking efficiency.
Step-by-step instructions for replacing pads
To replace the pads you will need:
- “balloon”;
- small and large flat screwdriver;
- pliers;
- pipe wrench.
Install the jack and hang the wheel, having first removed the wheel mounting bolts. After removing the wheel, you need to place it under the car as insurance.
Remove the lower caliper pin by pulling the cotter pin using pliers.
Using a thin screwdriver, the finger is pulled out.
Then the pressure bar and two springs are removed.
Using a screwdriver, the caliper is pryed up and pulled up, freeing up space for replacing the pads.
The old pads are removed, after which the caliper cylinders need to be recessed inward. To do this, use a pipe wrench to carefully recess the cylinders without touching the cuffs.
Installing new pads is done in reverse order.
A few words about the problem of the front calipers
All Chevrolet Niva owners note that the front brakes rattle and rattle. This problem can be solved in several ways:
- installation of new caliper guides;
- installation of high-quality pads;
- treat the caliper mechanism and “guide” with copper grease;
- Apply three drops of sealant where the caliper cylinders touch the pad, which ultimately helps in the entire service life of the pads.
If the above methods did not help, and the brakes still ring and knock, then the last resort is to install calipers from GAZ Sobol.