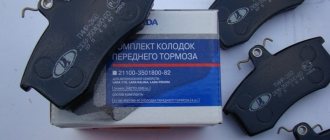
When do you need to replace rear pads?
According to the technical documentation and recommendations of the manufacturer, the rear brake pads of the Lada Kalina should be changed every 25,000 km.
The mileage of these pads is more than regulated
An important factor is driving style . Frequent and sharp pressing of the brake pedal greatly wears out the pads, and replacement may be required after 7,000-10,000 km.
Experts recommend changing the rear brake pads on the Lada Kalina in the following cases:
- Once a year, after the winter riding season.
- When the pads are worn out, when the thickness of the friction pad has reached 1.5.
- When the brakes apply unevenly when braking.
- When a squeaking sound appears in the rear of the wheels when braking.
- When a car is purchased on the secondary market.
All these factors contribute to the fact that it’s time to replace the rear pads on Kalina with new ones. Under no circumstances should you install supported pads, since uneven braking and material depletion can lead to an accident with unpredictable consequences.
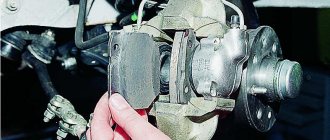
How to clean a brake caliper
If the brake caliper is in good condition, but squeaks or jams, you can try to deal with the problems yourself. The algorithm of actions is as follows:
- First you need to unscrew the rear brake caliper, for which the car is placed on a jack and the wheel is removed. It should be remembered that in some models the rear caliper can be unscrewed counterclockwise.
- After removing the rear caliper, use a wrench to unscrew the piston, then pull it out of the cylinder.
- The removed parts are carefully inspected for chips, rust, corrosion and other damage. If there is rust, it needs to be cleaned well. If the rear calipers are heavily worn, it can be difficult to clean the rust with improvised means; then it is better to sand the part.
- Having rid the rear caliper of rust, you need to drain the liquid from it, remove the O-ring and clean everything thoroughly, paying special attention to the place where the ring is attached.
- Then you need to dry all the parts, add fluid and reassemble the rear caliper.
Important:
When reassembling the caliper, you should handle the boot carefully so as not to accidentally damage it. If cracks are found on the boot, it must be replaced.
These manipulations to completely clean the rear caliper are quite complex and can take a lot of time. To carry out such procedures as rarely as possible, every 6 months it is necessary to apply a special lubricant or WD-40 to the surface of the rear caliper to prevent corrosion.
You should also inspect the rear caliper every year to see if there is any corrosion, damage, dirt on it, or if the boot is damaged.
We recommend
“Adjusting the parking brake drive: why you need to do it and what you need” Read more
Tuning and improving the brake system on Lada Kalina
Some car enthusiasts remodel the brake system in order to improve the quality of braking and facilitate replacement, or, in short, they carry out tuning. There are two ways to make your brakes better and more reliable.
Option 1. Replacing the rear drum brakes with disc brakes from the Lada Kalina SPORT version.
Standard brakes on Lada Kalina in SPORT configuration
To do this, you will have to spend 9,500 rubles and buy parts, namely: rear wheel hubs, brake discs and pads. At the same time, braking during movement will improve, the brakes will respond faster and better. The holding of the vehicle on the parking brake will increase.
Option 2. Installing rear sports drums from or TRW. In this case, you will have to replace the brake pads from the same companies. This will improve braking performance and increase safety.
2 more reasons why rear brakes stick
Rear brakes jam like this: the pads stick to the brake discs or drums, as a result the wheels do not rotate and the vehicle does not move.
Why do the rear brakes stick? There may be two reasons:
- The car “rested” on the handbrake for more than a month.
- The brake pads got wet when the vehicle got into a puddle, and the driver drove the car into a garage or parking lot without drying them.
You will have to be quite nervous in such circumstances. The rear brakes are jammed, there is no way to even get to the service station. You'll have to do the repairs yourself. Below are tips on how to deal with this situation.
We recommend
“11 reasons why the front brakes stick” Read more
Replacing brake drums Lada Kalina
You will need : remove the rear wheel and prepare a high hex head “7”, a hammer, a wooden block, mounting blades.
To remove the Kalina brake drum :
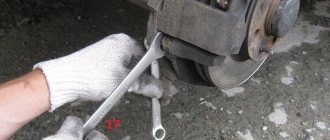
- Unscrew the two wheel guide pins using a 7mm hex socket.
- Try to remove the drum with your own hands.
- If that doesn't work, try knocking it off with a hammer through a wooden spacer.
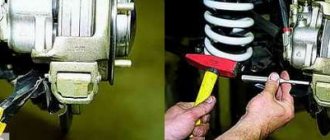
After removing the drum, do not press the brake pedal, otherwise the pistons may come out of the cylinder completely.
To install the brake drums, you must first recess the pistons into the working cylinder. To do this, we press on the pads with two mounting blades, leaning against the shoulder of the brake shield.
For Kalina's brakes to start functioning, with the car standing, press the brake pedal 2-3 times to bring the pads to the drum.
THE BETTER DISC BRAKES VS. DRUM MODIFICATIONS
The effectiveness of disc brakes versus drum brakes has been proven many times when installed on sports car models. They are installed on “foreign cars” not only because of effective braking. They are able to ensure simultaneous activation of the brake mechanisms on all wheels, and this allows improving the vehicle's handling in any road conditions.
The advantages of rear disc brakes include the following:
- Reducing the braking distance of the car several times;
- Reducing the time for brake mechanisms to operate;
- The time required to replace brake pads is reduced. the ease of their replacement is noted;
- Increases the safety of driving a vehicle;
- Uniformity is observed when the brake mechanisms of all wheels are activated;
- Reduced unsprung masses of the rear axle;
- Good removal of excess heat under extreme driving conditions;
- There is no need to periodically tighten the handbrake cable;
- The problems of pads freezing to discs in the cold season disappear.
Disc or drum brakes?
The list shows an impressive list of advantages, but there are also specific disadvantages to installing them. When manufacturing the car, the Volzhsky plant does not install the ZDT on the Priora; it’s hard to say why this is, probably to reduce production costs. By installing rear disc brakes on the Priora, technical changes are made to the design of the vehicle. This may cause problems during technical inspection.
Any design receives a comprehensive assessment during test trips at the test site. The vehicle is equipped with well-balanced and properly adjusted brake systems.
If suddenly a car gets into an accident, even if the accident was completely innocent, the owner will have problems due to unauthorized changes in the design features of the car.
Installing rear disc brakes on a Priora with your own hands is quite possible. But after its installation is completed, careful fine-tuning and configuration of the system is necessary. Doing it yourself is difficult, but possible.
How to replace rear brake pads on a VAZ 1117-VAZ 1119?
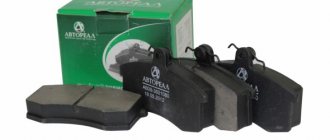
Note! Before you start replacing, we recommend that you read the article in which all the details on the pads are indicated, and this article is called: “What are brake pads and how not to run into a fake?”!
Removal: 1) At the beginning of the operation you will need to protect yourself from the car, how do you ask? Let's explain! Firstly, to replace the pads you will need to lift the car into the air, before lifting it, be sure to look for some kind of stops (for example, bricks) and place them under all free wheels, and then engage first gear and be sure to lower the handbrake down, and otherwise replacing the pads will be problematic.
Note! When all the operations are done, you need to remove the wheel from the car, and you can see how to remove the wheel in the article entitled: “Replacing a wheel on modern VAZ cars”!
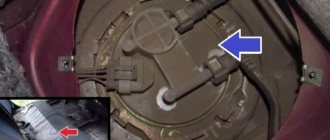
2) Now, when you remove the wheel, use a rag, namely, use it to wipe the brake mechanism from dirt, then put the rag aside, go to the car interior and pull the lever to open the hood of the car, then look for the brake reservoir in the engine compartment (It also indicated in the photo by an arrow), this reservoir contains brake fluid, check how much it is (there are two marks MIN and MAX on the reservoir), so if you have fluid right up to the MAX mark, then use a medical syringe or a rubber bulb to pump it out just a little brake fluid so that it is just below the highest mark.
3) Next, you will need to completely remove the brake drum from the vehicle. (For information on how to remove it, see the article: “Replacing the brake drum on a viburnum”)
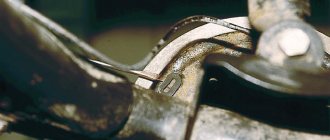
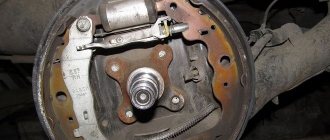
4) Now you need to remove two tension springs (the places where they are attached are indicated by arrows) of the rear wheel mechanism, these springs can be removed quite easily using a screwdriver, and you can also remove them by pulling them by hand or simply using pliers.
Note! Immediately after both compression springs are removed, without removing the pliers from your hands, remove another spring that secures the block as shown in the photo below, and after this spring is removed, remove the front block itself and the expansion bar shown in the photo blue arrow and also shows how to remove it in a small picture!
5) With the next one (Rear pad), do the same, namely, it is secured in the center by one small spring, you remove this spring using pliers and thereby remove the rear pad itself, but only when you remove the pad lever (Indicated by the red arrow ) disengage with the end of the handbrake cable (Indicated by the blue arrow) and only then completely remove the rear block.
Note! If you need to disassemble the rear shoe to replace the shoe lever, then first use pliers to remove the cotter pin that secures this lever (This cotter pin can also be clearly seen in the photo above), and after removing the cotter pin, remove the lock washer from the pin as shown in the figure below, after that, press your hand on the finger itself (see small photo) and thereby remove both the finger and the lever itself from the block!
Installation: Install new pads in the reverse order of removal, and when you install them, make sure that the upper parts of both pads fit into the grooves of the piston (The groove of the piston and the upper part of one of the pads is indicated by a red arrow in the photo below), and then take it into hands two mounting blades or two pry bars (Whatever you find) and then, as shown in the small picture, at the same time, with both mounting blades (Indicated by blue arrows), bring the brake pads towards each other (Towards you), so that they simply do not extend beyond the edges of the shield and so that the brake drum can be installed properly.
Note! When everything is in place, get into the car and press the brake pedal fully three times so that the pads come into working position!
Important! 1. Some people, when they buy new pads, are indignant and don’t understand why there are usually four pads in the box and not two, he only needs to replace the pads on the right side and they still live on the left, he thinks, let’s explain this situation so that and you understood why the manufacturer basically puts four pads in one box.
Checking the parking brake
A common situation: the pads have been replaced, but the handbrake adjustment has also changed. So, all that remains is to configure:
- First we release the handbrake;
- Then, using a 10mm wrench, unscrew the four nuts (Fig. 1).
You also need to remove the cushion securing the brackets; Removing the screen - The part called “screen” needs to be moved forward (in the direction of travel);
- The adjustment mechanism consists of two nuts (Fig. 2).
The “wide nut” must be held in order to unscrew the lock nut. Two nuts, adjusting and locking
Note that a “13” wrench is suitable for each of the nuts. Don't forget to tighten the locknut in the last step!
Turning the nuts to the right corresponds to tightening the cable, and vice versa. The standard full travel of the handbrake should be 2-4 “clicks”.
Replacement algorithm
The process of replacing brake pads on cars with and without ABS has only one difference . In cars with ABS, you should disconnect the wires from the sensors before starting work to avoid damaging them.
The replacement process is carried out in several stages:
- We install wedges under the front wheels.
- We lower the handbrake as much as possible, which will reduce the tension of the cable.
- Additionally, we loosen the handbrake cable by turning the adjusting bolt, accessible from the bottom of the car.
Pins on the diagram.
Tap the end evenly with a rubber hammer (or a regular one through a piece of wood).
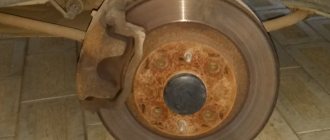
After removing the drum, inspect the brake mechanism. Make sure there are no leaks from the brake cylinder.
We press on the pads with spatulas.
Remove the end of the spring from the block.
Remove the spring by hand.
Remove the lower spring in the same way as the upper one.
To remove the pad, you need to move the pressure spring aside.
We remove the pads from the grooves on the cylinder pistons and remove the spacer bar.
Remove the rear shoe and remove the parking brake tip.
We perform the steps to assemble the unit in reverse order.
It is convenient to tighten the pressure spring using a hook or a piece of wire.
Differences between ABS pads
Differences between brake pads with and without ABS. For the version with ABS, a recess for the sensor is required.
WITHOUT ABS
- LADA 21080-3502090-55
- ADR 010821
- TRIALLI GF 231
- PILENGA ITALY BS-T 1002
- FORTECH FB-2102R
- FINWHALE VR318
- LUCAS/TRW GS8210
- BREMBO S 41 503
- VALEO 562067
- SANGSIN SA183
LADA 21080-3502090-55 - without ABS. Original pads.
With ABS
- LADA 21703502090
- ADR 010921
- PILENGA ITALY BS-P 1005 N
- BM-MOTORSPORT BS 1005
- Pilenga - BS-P 1005
- Finwhale - VR317
- DAFMI - DA770
- LYNXauto - BS4603
- Fenox - BP50003C3
- Allied Nippon - ABS1703
- Sangsin Brake - SA183