How the stove 2107 works
So, the heating system of the VAZ 2107 includes:
- heater;
- fan;
- heater control unit;
From the outside, air enters through the air intake into the casing of the air intake chamber. The camera is located in the engine compartment (in the area under the windshield). The air is then redirected to the heater, where moisture condensation occurs.
An important element is the heater radiator on the VAZ 2107, which heats up due to the circulation of coolant (coolant) in the engine cooling system. In this case, the air temperature changes due to the opening and closing of a special tap (VAZ heater tap), which reduces or increases the flow of heated coolant entering the heater radiator.
You can control the crane thanks to the presence of a regulator in the cabin, which is connected to the crane using a flexible rod. The air flow into the cabin is supplied by the heater fan, and the intensity of the supply will depend on the rotation speed. The VAZ 2107 heater motor is responsible for the operation of the fan. The fan rotation speed changes due to the use of a resistor.
By the way, if the car is moving at high speed, the heating system can supply air to the cabin even when the VAZ 2107 heater fan is turned off. The fact is that the air flow from outside is capable of creating pressure in the air supply box, due to which heated air penetrates into the cabin.
The heating system itself is simple. Air ducts can direct heated air to the feet, the driver, the windshield and side windows, etc. You can control the stove, change the temperature, and select the blowing direction using the knobs on the dashboard.
The handle at the top is responsible for adjusting the position of the heater tap. By moving the handle as far as possible to the left, the tap closes completely, and to the right will mean full opening.
The middle handle changes the position of the air supply cover, which allows you to adjust the intensity of the hot air supply. The handle on the bottom allows you to control the dampers of the heated glass air ducts. If you move the handle to the right, the air flow goes to the side windows, while the left position allows you to blow the windshield.
Let's sum it up
Timely diagnostics, preventive cleaning and inspection of elements of the vehicle’s heating system is a guarantee of high-quality operation of the stove. Experts recommend checking the heating system on the VAZ-2107 at least twice a year - in autumn and spring. Any driver can handle preventive cleaning and adjustments of the stove on his own; to do this, you just need to understand the structure of the heating and ventilation system of the cabin and the principle of its operation. The easiest way to do this is to always have a visual instruction manual for your car nearby.
Don’t put off any further work to improve the functioning of your car’s heating system. Proper care will ensure uninterrupted operation of the heater and a comfortable temperature in the interior at any time of the year.
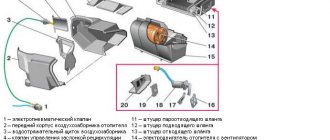
Additionally, to repair or tune a VAZ, you will need to know the serial numbers of the plugs in the blocks. The electrical diagram of the VAZ 21074 gives the following designations:
- Headlights, windshield and headlight wipers, power supply valve control unit, windshield wiper relay.
- Mounting block and three-lever switch.
- Signal and turn signals.
- Rear block lights.
- Alarm switch.
VAZ 2107 heater fan does not work
Hello. This time I will write about possible reasons why the heater motor on a VAZ 2107 may not work. These reasons can also be attributed to other classic models such as VAZ 2105, 2106, 2101, 2103, 2104.
To check all possible malfunctions, you need to have at least a test lamp, or better yet, a multimeter.
If you find out that it is the heater motor that has broken down, then read the article.
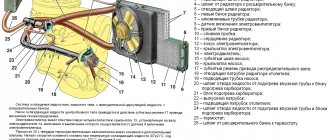
To understand what can break and why the VAZ 2107 heater fan may not spin, you need to consider the electrical circuit for powering this motor.
Connection diagram for heater fan VAZ 2107
The diagram shows how the stove fan (4) is powered. Power from the battery, through the mounting block (1), goes to the ignition switch (5) and again goes to the mounting block (1). In the mounting block (1) it passes through fuse F1 (10 amperes) and goes to the stove speed switch button (2). Next, power from the button goes either through the resistance (3) to the motor (4), or directly to the stove motor (4).
The VAZ stove fan will not work if any of its circuit components is faulty. You can determine the reason why the VAZ 2107 heater fan does not work:
- There is a fault in the mounting block.
- The contacts of the heater fan speed switch are burnt out.
- The speed control resistance has burned out.
- There is a malfunction in the heater motor itself.
Let's take a closer look at each of the faults.
Site about electronics, technology and UNIX OS
12/24/2017 by admin | 0 comments
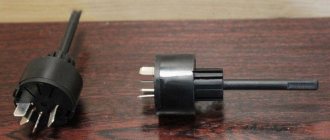
Along with the instrument panel, I did one more thing that had been planned for a long time, but I put it off just before replacing the instrument panel. This is a replacement for the interior heater switch button. I bought this button at the end of September, I really looked for it for a long time, but I still found it. It looks exactly the same as the original one, only the new one has 5 pins on the reverse side, instead of the three of the original one:
If someone decides to buy one for themselves, then its marking is “ 72.3709-02A ”. Also, in order not to deal with wires and terminals for connecting the backlight, I bought a block with eight wires connected for this button. I left only three wires in this block and removed the remaining terminals. On the remaining wires, I crimped the knife terminals on the reverse side so that they could be connected to the wires going to the heater motor. My heater wires are quite short, and it is very inconvenient to remove and put them on when removing the frame with the instrument panel. And most importantly, when installing the frame back, I had to figure out these three wires - which goes where, so that the button works correctly. Now, when you connect the block, everything will immediately be correct; you won’t be able to put it on the button incorrectly.
I decided to connect the backlight for the heater button to the glove box lighting. I crimped one wire with a special female/male terminal, and the second wire with a screw terminal. Thus, I secured the mass to the pin that secures the torpedo to the body, and connected the second wire to the light bulb in the glove box. I covered the often protruding knife terminals that go to the heater motor wires with heat shrink so that after assembly they would not shorten anything for me under the dashboard. Well, connecting the button itself after installing the frame with the tidy was quick and convenient:
Now all that remains is to tuck the button with the block inside into the frame of the instrument panel. After connecting and installing in place, all that remains is to check how the button will look and work.
Everything turned out just as I had planned. Now I have a desire to find and try to install an engine from a front-wheel drive VAZ in the stove, but again, I don’t want to buy a new engine, I will look for a used one in working condition and then experiment with it.
in short, one is clearly +, the other two are two speeds, one goes to the fan immediately, this is understandable, and the second is somewhere like in a relay that reduces the speed, now tell me which terminal I should put + in, and which 2 others
The idea is this, I don’t need a lower speed, so I use it for PTF (needless to say)
with one press, the PTF will work, and with the second press, the stove itself will work)
Malfunction in the VAZ 2107 mounting block
If the stove stops blowing air, then first of all look to see if fuse F1 in the mounting block is intact. Usually, if this fuse blows, then the heated rear window and reverse lights stop working along with the heater. This fuse must be rated 10 amps. No more and no less. If you install a fuse of less than the nominal value, it will constantly burn out, and if you install a fuse of a higher nominal value, it is possible to burn the mounting block. If you have a fuse of a higher rating (as in the photo below), then the likelihood increases that the mounting block has failed and the plus is not supplied to the speed shift button. How to find out, read the next paragraph.
Comments
2 coolers
if you install two 40*40 coolers, it will be even better, you don’t even need to cut anything
- Login to leave comments
Main Cooler (fan)
The main thing is to put the cooler (fan) in the correct blowing position, otherwise it will force air back into the stove)
- Login to leave comments
I've been wanting to make it like this for a long time
I've been wanting to refine it using this method for a long time, but never got around to it. finally got it together. I advise you to install coolers on both side deflectors. and in summer the extra movement of air along the side will not hurt, and they work absolutely silently!
- Login to leave comments
Subjec
To say the least.
- Login to leave comments
A comment
- Login to leave comments
Vacuum cleaner
Well, I don’t know, I don’t know, on computers they don’t hesitate for a long time and, like vacuum cleaners, they collect all the dust.
- Login to leave comments
modification of the stove
Fans of this type are complete garbage, because: 1. They are not designed to blow hot air through themselves - very quickly the electronics inside will die from overheating. 2. There is no lubrication there, as well as the bearing (or rather the lack of it), in a month it will all come out and the cooler will begin to hum when starting “cold”, then it usually jams and the electronics burn out. 3. Dust collects perfectly on its blades, and accordingly, when the car is damp, hello fungi
vote
Article rating
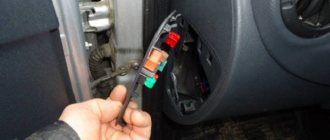
Contacts of the heater fan speed switch are burnt out
You checked the fuse and saw that it was intact. Let's dig further. Now we take and remove the gear shift button from the panel and disconnect the wires from it. Afterwards, we reliably connect one end of the indicator light to ground, and alternately insert the other end into the removed terminals of the wires disconnected from the button. The ignition must be on!
If the light does not light up, then power is not supplied to the speed switch and the mounting block is most likely faulty.
If the light comes on when testing one of the contacts, it means either the button or something else is faulty. How to find out? Very simple! To do this, we make a jumper from a regular wire, from the contact, during the test of which the indicator light came on, to one of the other two contacts. The stove motor will work if the button is faulty. If the motor does not work, then it is the motor that is faulty.
Malfunction in the heater motor itself
Before disassembling the panel and stirring up the interior, check whether the mass going from the heater motor to the body sits well. It often happens that this wire simply rots.
If you have a multimeter, you can ring it. To do this, take out the speed switch button and disconnect the contacts from it. Now, in the continuity mode, connect one probe of the multimeter to ground, and check the wires with the others one by one. If the motor and ballast resistance are working properly, the multimeter will beep when checking two of the three wires. If the ballast resistance is faulty, then the multimeter will beep when checking one of the three wires, and if the heater motor does not work or does not have contact with ground, then the multimeter will be silent.
Frequent malfunctions of the VAZ 2107 stove
mashinaa.ru
The most typical malfunctions of the VAZ 2107 stove include:
- Air entering the cooling system. This usually happens after the system has been filled with antifreeze. Removing the airlock normalizes the heating process of the interior.
- When the heater tap is open, coolant does not flow into the radiator. This most often occurs when water is used as antifreeze. Scale forms in the system, clogging the faucet and impeding the passage of coolant. The problem is eliminated by dismantling the tap and then cleaning or replacing it.
- Poorly functioning or failed water pump. If the pump does not pump coolant, this can lead not only to a lack of heating of the interior, but also to more serious problems, such as engine overheating. The water pump does not work, as a rule, when the generator belt breaks, as well as when it jams as a result of wear on the bearings.
- Clogged stove radiator honeycomb. In this case, the supply pipe will be warm and the outgoing pipe will be cold. The radiator often becomes clogged when water is used as a coolant, as well as when oil or additive particles enter the system to eliminate leaks. Cleaning or replacing the radiator will help restore normal operation of the stove.
- Displacement of the partition according to the website mashinaa.ru in the radiator. If both radiator hoses are hot, but warm air does not enter the cabin, then most likely the partition in the radiator has shifted. The only solution to the problem is to replace the radiator with a new one.
If an oily residue appears on the floor or glass, you should look for an antifreeze leak, which may be:
- on tap;
- on pipes;
- on the radiator.
If a faucet or pipe is leaking, it should be replaced. A leaking radiator can be temporarily sealed, but it will still need to be replaced soon.
The list of possible stove malfunctions is not limited to this.
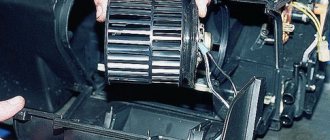
It can be quite difficult to get to some elements of the VAZ 2107 heating system
Control mechanism
The control of the VAZ 2107 stove is mechanical. It consists of a fan switch and a block of sliders. The control mechanism is installed on the center console at the top, which provides easy access to the elements.
There are three sliders of the control mechanism, and each of them controls its own element:
- The top one is responsible for supplying antifreeze to the radiator and is connected by a cable to a tap installed on the inlet pipe. The extreme left position of the slider means the tap is closed (the stove does not heat), the right position means the tap is open (antifreeze enters the radiator).
- Middle – air supply damper control. When you move it to the left, the damper shuts off the air supply from the street (closed air circulation in the cabin), while the right position means the air flow is open (air from the street enters the cabin).
- The lower one controls the damper for distributing the flow through the air ducts. Left position - the flow is supplied through the side and central deflectors, right - to the windshield area. Each of these sliders can be adjusted to any position to achieve optimal stove operation.
The stove doesn't work in summer
Sometimes during the warm season it is impossible to turn off the stove by setting the upper handle of the control unit to the extreme left position. If you cannot turn off the tap, the tap itself or its drive cable is faulty. The tap can be found under the instrument panel on the passenger side. If you also cannot close it manually, you should not apply much effort. The faucet may break and antifreeze may leak into the cabin.
You can replace the faucet after purchasing a new one at any car service center. However, you can try to do this yourself. It should be noted that changing the faucet with your own hands is quite inconvenient due to its location. First, open the hood and disconnect the pipe going to the tap. Since coolant will flow from the pipe, it is necessary to place a previously prepared container under it. After this, you need to remove the storage shelf and, using a 10mm wrench, unscrew the two nuts securing the faucet to the heater body from the passenger seat. Then the tap is removed from the studs, removed and replaced with a new tap in the reverse order.
The reason for the inability to turn off the heater is usually a faulty heater valve.
What is hidden under the panel in the car interior?
The “refrigerator effect” becomes most noticeable if you still continue to use old VAZ models with front-wheel drive: 2108, 2109, 21099. Let's try to figure out whether there is any possibility of replacing the heating system yourself. Despite the visual identity of the car models, there is still some difference in these VAZ units of the 8th and 9th models.
This difference is not fundamental. It’s just that in the process of evolution, unnecessary air ducts were removed from the design, the shape of the damper and the location of the radiator were changed. But this does not change the principle of operation. The interior is heated by air, a radiator connected to the engine cooling system is responsible for heating it, and the heater itself is located under the instrument panel in the car, which is higher in the VAZ 21099 due to some design features of the stove. With the help of connected air ducts, heat flows into the interior.
To force heated air into the cabin, a fan is located at the top of the heater, which rotates using an electric motor. The easiest way to access it is from the engine compartment. , which was mentioned above, is located in the VAZ 2109, 2108 and 21099 models near the heater itself. It has a seal in the form of a polyurethane foam gasket and consists of two plastic tanks, cooling plates and tubes arranged in two rows.
Since heating is connected to the car’s cooling system, fluid circulation through the radiator occurs using the pump of this system. You can regulate its flow using the heater tap and various levers that affect the position of valves and dampers. Warm air enters the cabin through two central and two side nozzles, inside of which there are dampers that regulate the intensity of heating. The direction of flow is also changed by blades-blinds using levers in the cabin.
After the air in the cabin is heated, it is necessary to circulate it and maintain the set temperature. It is necessary to release the waste stream outside. In this regard, on VAZ 2108 models, hot air flows out through holes located in the central body pillars. On 9-model cars, these holes are located in the corners of the rear side windows and have rubber valves that prevent atmospheric air from entering the air ducts.