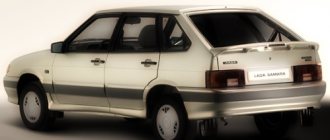
The domestic auto industry is one of the most controversial topics raised by car enthusiasts. Yes, sales of the brainchild of Tolyatti engineers annually occupy leading positions in sales rankings, both on the new car market and on the secondary market. But everyone understands perfectly well that such indicators were achieved not thanks to the quality of the cars themselves, but because of the non-standard policy of the state itself in this regard, because of which foreign dealers, one by one, refuse to supply their new models to the Russian market.
As for quality, this has never been a strong point. Of course, its cars are in the lowest price segment, which means they belong to the lowest class of cars, designed exclusively for moving from one place to another on good road surfaces. VAZ completely excludes any kind of comfort - all the technologies used date back to the 70-80s of the last century.
However, this also has its advantages. For example, the structure of such cars has long been studied and is familiar not only to technicians at service stations, but also to many ordinary car enthusiasts. Another positive point is the simplicity of the design. Unlike foreign cars, especially those produced in Germany, all their spare parts can be easily found on free sale and separately, and not assembled and at a much higher price. This way, users do not have to rack their brains over the location of parts in the car, and, accordingly, over their installation during repairs or scheduled maintenance.
VAZ 2115 fuses
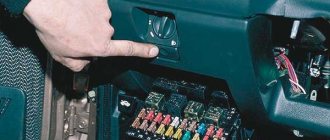
The location of the mounting fuse block in the Lada Samara family car is different from previous modifications.
Where is it located: the main board is installed in the engine compartment, the additional module is in the central channel on the right.
The process of replacing fuses (hereinafter referred to as modules) is not at all complicated, similar to the VAZ 2110, 2112, but it requires attentiveness on the part of the technician. Violation of the installation technology, incorrect selection of the module leads to its overheating and short circuit.
If you encounter difficulties with replacement, contact a specialist service station.
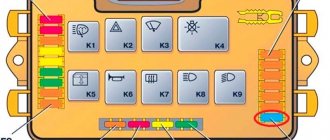
Relay-breaker layout diagram
| Name | What is it responsible for/what does it provide? |
| K 1 | Headlight wiper relay |
| K2 | Turn signals, hazard warning lights |
| K 3 | Windscreen wipers |
| K 4 | Controlling the operation of dashboard lamps |
| K5 | Window lifters |
| K 6 | Sound signal |
| K 7 | Heated rear window |
| K 8 | Long range lighting |
| K9 | Low lighting |
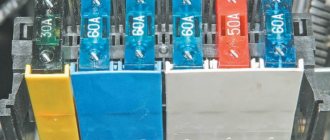
Fuse installation diagram for VAZ 2115 (injector, 8 valves)
| Marking/amperage | What is he responsible for? |
| F (F-1) / 10 | Rear fog lights, headlight washer motor, fluid pump |
| F (F-2) / 10 | Turn signals. emergency gang |
| F (F-3) / 7.5 | Interior lighting, trunk lighting, on-board computer, clock |
| F (F-4) / 20 | Car socket, heated rear window |
| F (F-5) / 20 | Signal, cooling fan |
| F (F-6) / 30 | Window lifters |
| F (F-7) / 30 | Oven heater, cigarette lighter, heated rear window, glove compartment lighting |
| F (F-8) / 7.5 | Left side fog light |
| F (F-9) / 7.5 | Fog lamp on the right side |
| F (F-10) / 7.5 | Left-hand side lights, license plate lights, engine compartment lights |
| F (F-11) / 7.5 | Right-hand dimensions |
| F (F-12) / 7.5 | Low illumination on the right side |
| F (F-13) / 7.5 | Low beam on the left side |
| F (F-14) / 7.5 | Left-hand high beam |
| F (F-15) / 7.5 | High beam on the right side |
| F (F-16) / 15 | Hazard alarm, heater, brake light |
| F (F-17) / 7.5 | To the fuel pump, to the wipers, to reverse |
| F (F-18) / 25 | central locking |
| F (F-19) / 10 | Reservation |
| F (F-20) / 7.5 | Reservation |
The price of a complete power supply starts from 2300 rubles, melting elements from 100 rubles, a set from 400 - 550 rubles.
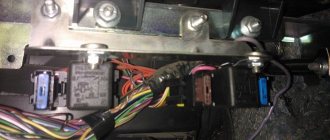
Additional power relay modules are installed in the central channel, under the dashboard. To get to the parts, first remove the plastic cover.
- Gasoline pump;
- Radiator fan.
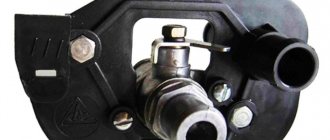
Pressure system
Where is the Gazelle Fuel Pump Fuse? The fuel pump creates pressure in the fuel rail for the normal functionality of the gasoline supply. Let's measure the pressure and we'll understand a lot right away.
Normal parameters of atmospheres in the system are as follows:
- Idle – 2.5
- Ignition – from 3
- Without pressure regulator tube – 3.3
- With pinched drain – 7
- We press on the gas - from 3 to 2.5.
We will measure in these five states with a pressure gauge with a small range of atmospheres (up to 7, to reduce the error to a minimum). Under the hood we found a pressure fitting (just unscrew the cap in advance), attached a pressure gauge (hose) to the fitting and off we went. The ignition is turned on, the pressure gauge is zero: the fuel pressure regulator is broken. We press on the gas, the pressure gauge goes to zero: the fuel pump itself is broken (now you can do some shopping at a spare parts store). There may still be a situation. When the pressure gauge needle lazily rises, look at the condition of the fuel filter.
By the way, if you don’t have a pressure gauge, it’s sad and sad, because it’s an expensive pleasure. Similar diagnostics in the service will cost half as much.
Common causes of fuse failures
- Natural factor - due to long-term operation of the technical device;
- Mechanical damage, accident, impact, collision;
- Short circuit in the circuit;
- Damage to insulation, oxidation of terminals, loosening of contacts;
- Water entering the mounting block, condensation formation, deformation due to high operating temperature.
Replacing fuses on a VAZ 2115
Preparatory stage:
- Driver, head at “10”;
- Flat head screwdriver;
- A set of new modules;
- Plastic pliers for removing the relay block;
- Rags, additional lighting as needed.
Sequencing:
- We turn off the engine, open the hood, remove the terminals from the battery;
- On the left side, closer to the windshield, there is a mounting block. Unscrew the two bolts around the perimeter;
- We disconnect two blocks with wires, remove the power supply assembly;
- We carry out troubleshooting and check the serviceability of all modules.
You can do this in two ways:
- Visually: checking each module for the integrity of the melting element;
- Using a multimeter: measuring the resistance at the end switches of the module without dismantling it.
Each method is applicable and effective.
After replacing the faulty fuses, we assemble the structure in the reverse order.
Some motorists practice the second method: without dismantling the mounting block. We remove the fuses one by one, check them for integrity, and replace them with new ones as necessary.
If you notice that a unit in your car has suddenly stopped working, do not rush to dismantle it and replace it with a new one. First of all, inspect the mounting block, check the modules for integrity. Most likely some kind of fuse has blown.
Only after replacing the module does not help eliminate the problem, proceed to diagnosing the equipment and checking the integrity of the electrical supply circuit.
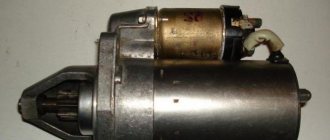
Fuel pump does not work
If the starter of your car turns normally, but the car does not start, the first thing you need to do is check that the fuel pump is turned on. On domestic cars, its operation can be heard from the passenger compartment; when the ignition is turned on, a characteristic buzzing sound comes from under the rear seat or trunk. If the fuel pump does not work, you need to check the integrity of the fuses and the activation of the main relay of the engine management system and the fuel pump relay. On the VAZ-2107, VAZ-2108, VAZ-2109 and their modifications, relays and fuses are located on the shelf under the glove compartment or under it. On VAZ-2110 and similar ones, you should look in the heater console on the passenger side by unscrewing the fastening screws and removing the side cover. On GAZ cars they are located under the hood on the front wall of the cabin, closer to the passenger side.
Fuel pump relay does not turn on
If the fuel pump does not work, then first of all you need to check the attraction of the main relay and the fuel pump relay. If the main relay does not click, then it is necessary to check its switching circuit and its serviceability. How to do this is described in the article the main relay does not turn on,
In the case when the main relay turns on, but the fuel pump relay does not, it is necessary to check the power at terminals 85 and 86. When using a test lamp, its current consumption should not exceed 0.25A.
, otherwise the controller may be damaged. If the control lamp does not light up on any terminal, then the relay is not receiving power.
This may be caused by a blown fuse or a broken power cord.
In the case when the lamp burns brightly on one terminal, and at half-glow on the second, and the relay may be activated, you should remove the relay from the socket and connect terminals 85 and 86 with a test lamp.
When the ignition is turned on, the control lamp should light up and go out after approximately 20 - 30 seconds. If the lamp lights up and there is poor contact in the connection between the block and the fuel pump relay.
If the lamp does not light up, there may be a break in the wire connecting the relay to the controller or the controller itself may be faulty.
Checking relay power
In the case when the fuel pump relay turns on when the ignition is turned on, but the pump itself does not work, you need to check the power at terminal 87 of the fuel pump relay. To do this, touch terminal 87 of the relay socket with the output of the control lamp connected to the vehicle ground, and the lamp should light up. If the lamp does not light, it means the fuse has blown or there is a break in the wire.
If there is power at terminal 87, remove the relay from the socket and instead place a jumper between pins 87 and 30.
If the pump does not start working, then, without removing the jumper, you need to touch the power wire on the fuel pump with a test lamp connected to the vehicle ground.
Checking the fuel pump power circuit
If a submersible pump is installed on the car as part of the fuel module, you need to remove the connecting connector and touch one of the thick wires. When you touch one of them, the indicator lamp should light up.
If the lamp does not light up on any of the wires, then it is necessary to eliminate the break in the wire from the fuel pump relay to the module connector or the pump itself, if the pump is of a remote type.
One of the reasons for the break may be the anti-theft blocking of an installed non-standard alarm system.
In the case when the test lamp lights up on one of the thick wires of the connector or one of the terminals of the remote pump, you need to connect these terminals with a test lamp to each other. In this case, the control lamp should light up. If the lamp does not light, it is necessary to eliminate a break or poor contact in the wire connecting the pump to the vehicle ground.
If, when checking the wires and relay for turning on the fuel pump, no malfunction is detected, the electric motor of the fuel pump or its connection to the module connector is faulty. It is not difficult to find the cause by removing the fuel pump module from the tank.
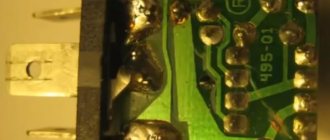
If there is poor contact with the connector, melting of the plugs will be visible. If melting is not noticed, then to check the pump itself, you can connect it to the battery. It should be taken into account that operating a submersible pump without liquid will damage the pump.
A faulty pump should be replaced.
admin 02/15/2012 “If you notice an error in the text, please highlight this place with the mouse and press CTRL+ENTER” “If the article was useful to you, share the link to it on social networks”
Recommendations for care and maintenance
- Buy original fuses. Domestic or foreign, it doesn’t matter;
- Install strictly in accordance with amperage ratings. Unacceptable with lower or higher current strength. In the first case, this will lead to damage to the module, in the second - to breakdown of the unit, which is attached to the fuse;
- Carefully check the quality of fixation of terminals and limit switches on the board. If loose, tighten and press with pliers. A spark can cause a fire and melting occurs;
- If moisture gets in or condensation forms inside the mounting block, remove the cover, dry it, and if necessary, blow it with a stream of compressed air.
Carry out preventive and diagnostic work in the fuse box with the battery terminals removed in order to prevent a short circuit in the circuit.
The average service life of fuses is 40 – 60 thousand km. The service life of foreign analogues is 10–15% longer. Before replacing, read the instructions and get advice from service station specialists.
Sources
- zapchasti.expert/predoxraniteli/predoxraniteli-vaz-2115.html
- drive2.ru/l/5419303/
Symptoms of a problem
A malfunction of the fuel pump of VAZ 2114/2115 cars can be diagnosed by the following symptoms:
- when the ignition is turned on, there is no sound of the pump running;
- the engine does not start or starts with difficulty;
- the power unit is unstable at idle, the speed “floats”;
- “dips” appeared during acceleration;
- the motor has lost power.
The same signs also appear when other elements of the fuel system malfunction.
Before you begin diagnosing or replacing the fuel pump, you should make sure that:
- the fine fuel filter is not clogged (it is changed every 7 thousand kilometers);
- the injectors and fuel pressure regulator are operating normally;
- The sensors for mass air flow, throttle position, and oxygen quantity are working properly.
If the detected malfunction is accompanied by the lighting of the “CHECK” lamp on the dashboard, you should set the error code and decipher it.