Electrical circuits of automobiles are protected by fusible links that prevent overheating and ignition of the wiring. Knowledge of the Priora's fuse diagram will allow the owner to detect a failed element. In addition, using a burnt element, you can establish an electrical unit operating in emergency mode.
Relay and fuse blocks on a LADA Priora car
The VAZ Priora passenger car, regardless of the type of engine installed, is equipped with several junction boxes. They are located under the hood and inside the car. The use of several boxes made it possible to separate circuits with high and low currents. In addition, separate small-sized mounting blocks were installed, introduced as the configuration expanded.
Main power fuse block
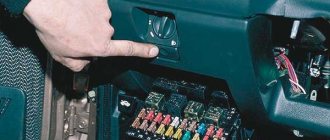
The vehicle's power circuits are protected by inserts installed on the positive terminal of the battery. The block is designed to protect circuits with maximum currents. To gain access to the fuses, you need to remove the plastic cover; this can be done without the help of tools.
Block diagram and its location in the car
The removal of the most powerful circuits on the Lada Priora into a separate unit located close to the battery ensured maximum protection of the car's electrical system from overloads.
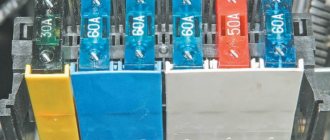
The location and designation of the inserts is indicated in the photo. Depending on the year of manufacture and installed equipment, it is possible to install fuses of different ratings.
Priora power insert block
Explanation of fuse designations
Purpose and rating of the main block inserts.
| Number in photo | Denomination, A | Purpose of the element |
| F1 | 30 | Protection of power supply circuits to the ECM system (propulsion control) |
| F2 | 40 (there is a 60 A option) | Power supply for the cooling fan electric motor, additional ignition system controller, glass heating filaments, electrical package control unit |
| F3 | 30 (there is a 60 A option) | Control of the operation of the cooling fan electric motor, horn, standard alarm siren, ignition control switch, instrument cluster circuits, interior lighting, power supply for brake lights and cigarette lighter |
| F4 | 60 | First generator circuit |
| F5 | 50 | Power supply and control of the electromechanical power steering motor |
| F6 | 60 | Second generator circuit |
The given fuse diagram for the Lada Priora is relevant for cars without an anti-lock brake system. The introduction of a hydroelectronic unit on the Priora-2 series car led to a change in the purpose of the inserts.
Purpose of fuses on the battery for Priora cars with ABS (starting from the one closest to the terminal):
- F1 - ECM protection (30 A);
- F2 - power steering (50 A);
- F3 - generator circuits (60 A);
- F4 - similar to F3;
- F5 - power supply to the ABS unit (40 A);
- F6 - similar to F5, but rated at 30 A.
Mounting block: relays and fuses in the passenger compartment
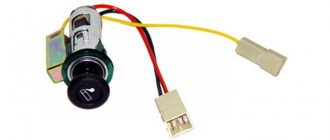
The unit includes fuses, several relays, and tweezers designed to simplify the procedure for replacing burnt out inserts. The content of the device depends on the vehicle configuration.
Block diagram and its location in the car
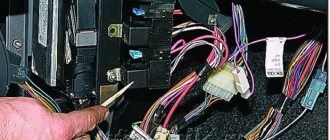
The unit is located in the plastic frame of the dashboard at the bottom of the driver's side. The outside of the box is closed with a removable cover installed around the steering column and secured with three locks located along the lower edge. To remove the cover, you need to turn the latches 90 degrees and remove the element from the latches by pulling it towards you.
The oval marks the location of the block installation
On cars, fuse ratings may differ depending on the year of manufacture of the car and the configuration. To determine the value of the fuse link, you should use the operating instructions for the Lada Priora.
When repairing fuses, it is necessary to take into account that the instructions for the Lada Priora car change several times a year. It is not recommended to use a manual from another car.
The “norm” option with the additional installation of an air conditioner has differences in the Priora’s fuse circuit. Elements that protect the device are placed in a separate engine compartment, discussed below. The mounting housing itself has not undergone any changes.
Block version “norm” with air conditioning
The purpose of fuse links in the “luxury” version of the car does not differ from the “standard + air conditioning” version. On cars, you can find both the block model 1118-3722010-00 and the Delphi version 15493150. The cases differ slightly in appearance, as well as in the location of spare inserts and the presence of tweezers on Delphi.
Deluxe mounting block option from Delphi
With the start of production of the modernized Priora-2, the contents of the body changed somewhat. In the interior units of cars, only one space for a relay and two cells for fuses are empty.
Block on Priora-2
Explanation of fuses and relays
Explanation of fuses in the “norm” version.
| Number on the diagram | Denomination, A | Purpose |
| P-1 | 25 | Radiator fan power supply |
| P-2 | 25 | Electrically heated glass on the rear |
| P-3 | 10 | High beam lamp strings on starboard side |
| P-4 | 10 | Likewise on the left |
| P-5 | 10 | Klaxon |
| P-6 | 7,5 | Low beam left |
| P-7 | 7,5 | Likewise on the starboard side |
| P-8 | 10 | Alarm siren |
| P-9 | 25 | Electric heater motor |
| P-10 | 7,5 | Power supply for the instrument cluster (terminal 30), brake light bulbs and interior lighting |
| P-11 | 20 | Windshield cleaning system. Rear window heating control |
| P-12 | 10 | Second power connection for instrument cluster (terminal 15) |
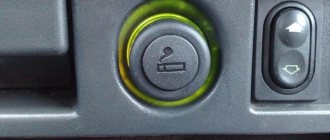
| P-13 | 15 | Cigarette lighter |
| P-14 | 5 | Left side marker signals |
| P-15 | 5 | Same as on the right |
| P-16 | 10 | ABS unit power connection (terminal 15) |
| P-17 | 10 | Left side fog lamp |
| P-18 | 10 | Likewise on the right side |
| P-19 | 15 | Heating threads for driver and front passenger seats |
| P-20 | 5 | Standard immobilizer operating system |
| P-21 | 7,5 | Rear fog lamp |
| P-22-30 | Any | Reserve |
| P-31 | 30 | Electrical package power supply circuits |
| P-32 | Any | Reserve |
Relay of the “norm” configuration unit:
- 1 — cooling system fan;
- 2 — turning on the glass heating;
- 3 - starter;
- 4 - additional ignition circuits;
- 5 - reserve;
- 6 — system for cleaning and supplying water to the windshield;
- 7 — high beam;
- 8 — horn;
- 9 — standard alarm siren;
- 10 - reserve;
- 11 - reserve;
- 12 - reserve.
Assignment of fuses in the “norm” version with air conditioning.
| Number on the diagram | Denomination, A | Purpose |
| P-1 | any | Reserve place |
| P-2 | 25 | Controllers for heating glass and electrical accessories. Glass heating power circuits |
| P-3 | 10 | Starboard high beam, instrument cluster and high beam indicator |
| P-4 | 10 | High beam left |
| P-5 | 10 | Horn control and horn power circuits |
| P-6 | 7,5 | Low beam left headlight |
| P-7 | 7,5 | Analog for starboard side |
| P-8 | 10 | Control and power supply of standard alarm siren |
| P-9 | Any | Reserve place |
| P-10 | 10 | Power supply for instrument cluster (terminal 20), brake signal circuits (including additional), interior lighting system |
| P-11 | 20 | Wiper and washer circuits (windshield and rear), heated rear window, safety controls (airbags) |
| P-12 | 10 | Pin 21 on the instrument cluster, power accessories unit, power steering control, parking sensors (if equipped), reverse gear indicator |
| P-13 | 15 | Cigarette lighter |
| P-14 | 5 | Circuits for the left side dimensions, license plate illumination, part of the circuits for the electrical package control unit |
| P-15 | 5 | Right side side light circuits and glove box lighting system |
| P-16 | 10 | ABS unit |
| P-17 | 10 | Front fog lamp left |
| P-18 | 10 | Same as on the right |
| P-19 | 15 | Seat heating system and control keys |
| P-20 | 10 | Starting the headlight relay, heater, rain sensor and climate control (automatic) and lighting |
| P-21 | 5 | Diagnostic connector, clock and climate control controller |
| P-22-30 | Any | Reserve place |
| P-31 | 30 | Electrical package unit, control of the button module on the driver's door, illumination of the left door opening |
| P-32 | Any | Reserve place |
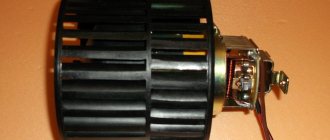
Stove fan device
If the VAZ-2115 has stopped heating the interior, first let’s figure out how the stove’s operating system works. The structure is simple: the temperature of the air supplied to the cabin is regulated by the heater tap, when opened, coolant (antifreeze) enters the heater radiator, warming up to 95 degrees. By adjusting the fan operating modes from minimum to maximum, you change the speed of the stove, determining the required amount of incoming heat. All that remains is to direct the air flow in the desired direction using the dampers located along the perimeter of the panel of your car.
What are the relays responsible for in the Lada Priora mounting block?
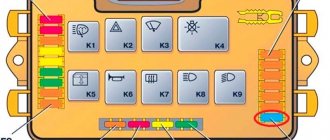
And so now let me tell you what is responsible for what in the mounting block. We look at the figure above K1 - K12 is a relay. F1 – F32 fuses.
- 1,2 – tweezers.
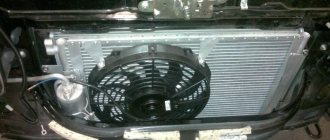
- K1 – relay for turning on the electric radiator fan of the engine cooling system.
- K2 – relay for turning on the heated rear window.
- K3 – starter activation relay.
- K4 – additional relay (ignition relay).
- K5 is a place for a backup relay.
- K6 – relay for turning on the windshield washer and wiper.
- K7 – Headlight high beam relay.
- K8 – Relay for turning on the sound signal.
- K9 – Alarm signal activation relay.
- K10 – K12 Place for backup relay.
HEATING SYSTEM DEVICE
Such a system in these cars consists of several components. This is a fan that blows air over the heater radiator. The device also has air ducts and dampers. This is a separate damper for blowing the windshield, as well as a distribution one - it directs the air flow to the central and side deflectors, as well as to the floor. That's not all. There is also a control valve.
You can also highlight the stove faucet and the resistor that controls the power of the motor. There is also a switch that allows you to change the fan power.
If the heating system is working properly, then the coolant heated from the engine is supplied to the heater radiator through the tap. The temperature of the air, which is pumped into the cabin by a fan, can be controlled - this is what the faucet is designed for. Heat is generated when a fan blows on the heater radiator, which is heated by coolant. When the car engine is heated to operating temperature, the temperature of the antifreeze or antifreeze can reach 95 degrees or more.
The stove on this car can operate in one of three modes. Modes allow you to change the fan speed. Depending on the position of the tap, you can supply both warm and cold air into the cabin.
What are the fuses in the Lada Priora mounting block responsible for?
So let's now go over the fuses:
- Fuse F1 is responsible for the electric radiator fan of the engine cooling system
- Fuse F2 is responsible for the heated rear window
- Fuse F3 is responsible for the high beam (starboard side)
- Fuse F4 is responsible for the high beam (left side)
- Fuse F5 is responsible for the sound signal
- Fuse F6 is responsible for the low beam (left side)
- Fuse F7 is responsible for the low beam (starboard side)
- Fuse F8 is responsible for the alarm signal
- Fuse F9 is responsible for the heater fan
- Fuse F10 is responsible for the instrument cluster, interior lighting, brake light
- Fuse F11 is responsible for the windshield wiper, heated rear window (control)
- Fuse F12 is responsible for output “15” devices
- Fuse F13 is responsible for the cigarette lighter
- Fuse F14 is responsible for the side light (left side)
- Fuse F15 is responsible for the side light (right side)
- Fuse F16 is responsible for terminal “15” of the ABS
- Fuse F17 is responsible for the left fog lamp
- Fuse F18 is responsible for the right fog lamp
- Fuse F19 is responsible for seat heating
- Fuse F20 is responsible for the immobilizer control unit
- Fuse F21 is responsible for the rear fog light
- Fuse F22 – F30 – reserve location for fuse
- Fuse F31 is responsible for the electrical package control unit
- Fuse F32 – reserve location for fuse
How to replace relays and fuses on a Lada Priora
And so, now let’s move on to the question of how to replace relays and blown fuses on a Lada Priora car
- And the first thing we need to do is disconnect the “─” terminal of the battery.
- Turn the three locks on the fuse and relay box cover 90°.
- Overcoming the resistance of the latches, remove the cover.
- Install a fuse of the same rating as the one removed into the contact connector.
- Small relays in the mounting block can also be removed using fuse tweezers. The remaining relays will have to be removed by hand, since the design of the relay tweezers located in the mounting block provides for the presence of ribs on the side surfaces of the relay, but there are no such relays in this mounting block.
- Install a relay of the same type as the one removed. Fuses of different ratings are painted in different colors. In addition, the fuse is marked with a numerical value of the current strength for which it is designed (rated value).
How to remove and replace the relay and fuse mounting block on a Lada Priora
But there are often cases when it is simply not possible to replace one relay and fuse. In this case, you have to replace the entire mounting block. For this:
- Disconnect the minus terminal from the battery
- Removing the cover of the mounting block
- We unscrew the screw securing the mounting block to the instrument panel
- We remove the mounting block from the instrument panel, disengaging it from the mounting hooks.
- Remove all relays and fuses from the mounting block
- We press out the clamps of the electrical wiring terminals
- We remove the terminals with wires from the mounting block and remove the mounting block from the car
Answers to common questions related to replacing relays and fuses on the Lada Priora
And so, now I would like to answer common questions that are related to replacing fuses on the Lada Priora:
What fuse goes to the cigarette lighter of the Lada Priora?
On a Lada Priora car, fuse F13 is responsible for the functionality and operation of the cigarette lighter. I marked it in the screenshot.
Which fuse goes to the windshield wipers in a Lada Priora?
In the mounting block, fuse F11 is responsible for the operation of the windshield wipers (windshield wipers), in addition, in the event of a malfunction, I recommend that you check relay K6; it is responsible for the windshield washer and wiper (windshield wipers)
Which fuse on the Priora goes to the low beam?
If you need to replace the fuse going to the low beam, then to do this, open the mounting block and pay attention to fuses F6 and F7; they are responsible for the operation of the low beam headlights on the left and right sides, respectively.
Which fuse is responsible for the heater on the Lada Priora
Fuse F9 is responsible for the operation of the heater on a Lada Priora car; turning on the heater fan or heater
Causes of failure
The heating system can break down in the summer, but the owner of a VAZ-2109 can detect a breakdown only in winter, because no one turns on the heating in the warm season. There are situations when the driver does not have the opportunity to go to the nearest service station to repair the car. Any car owner should be able to start and repair his car on his own. If you are the owner of the well-known VAZ-2109 car, read the reasons why the stove does not work:
- the stove fan is broken;
- The radiator does not heat;
- Air ducts are clogged.
There are very few reasons why the stove does not work in a VAZ-2109 car. As a rule, at the second speed the stove should heat well. It is not always possible for a car owner to contact an auto electrician or auto mechanic. Moreover, finding a good specialist in our time is not at all easy. Skillful hands and a smart head are used.