The parking (or hand) brake is designed to keep the car from moving on an uneven surface. When the handbrake lever is fixed in the upward position, the cable is tensioned, going to the equalizer, which in turn distributes force to the two rear wheels through two cables. At the moment when the cable is tensioned, the spacers in the drums of the rear wheels move the blocks in different directions, which fixes the wheels, and accordingly the car, in a stationary state.
Like any part of a car, the parking brake tends to fail. If such a situation occurs with your car, then it is necessary to carry out repairs as quickly as possible. Replacing a VAZ 2110 hand brake with your own hands is not a difficult procedure if you have the tools and appropriate skills. Let's look at each element separately.
Replacing the handbrake cable on a VAZ-2110: photos and videos
To brake urgently in an emergency situation or to park the car securely on a slope for more than 6 minutes with the engine turned off, you will need a handbrake. This system is activated using a lever located in the cabin between the front seats.
Features of the hand brake on the VAZ-2110
Handbrake device on a VAZ-2110 car.
Sometimes replacing the cable can be done on your own if there is no service station nearby. It is recommended that this work be performed with minimal experience. When this is not the case, the replacement should be carried out by service specialists. This will ensure better quality work and provide a guarantee.
The traffic rules state that the handbrake must hold the vehicle on a slope of 25%. In this case, the driver pulls the lever 6-7 clicks.
Cable inspection
When the car is operated for a long time without maintenance, the brake cable must be inspected once a year.
To do this, you need to park the car on a flat horizontal platform and pull the cable drive lever in the cabin. You should hear 6-8 clicks.
After this, you need to leave the cabin and try to move the car using force. There should definitely be no more than eight clicks. When the car rolls with the cable tightened, it needs to be adjusted.
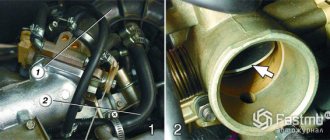
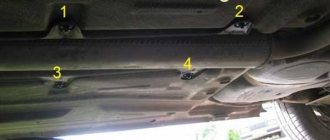
Hand brake adjustment unit: 1 - lock nut, 2 - adjusting nut, 3 - lever rod, 4 - cable equalizer.
Checking the cable
To do this, you should perform the following steps:
- Place the car on the inspection hole.
- Place shoes under the wheels to prevent the car from moving.
- Raise the rear of the car with a jack.
- Lower the lever all the way down.
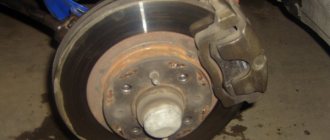
- Check the drums on the wheels. The wear of the linings should not be more than a quarter of the total volume.
- The cable must not have any abrasions or breaks. Given such factors, it will not work well in the casing.
The system can wear out in any vehicle during its operation.
Damage to the cable sheath.
Broken cable strand.
Replacing the cable
Replacement should be carried out in the following cases:
- Two or more cable strands are broken.
- There is wear on the tips.
- The cable is difficult to move in the casing.
Tool
The following tools will be required:
- The key is "10".
- Powerful screwdriver.
- The key is "13".
- Mount.
Hand brake cable - 2 pcs.
It is more convenient to turn the nuts 13mm using a spanner with a ratchet.
Work algorithm
Replacement work is carried out as follows:
- Release the lever all the way down.
- Remove the muffler.
- Unscrew the equalizer nuts on the adjusting unit.
Unscrew the nuts and remove the distributor.
- Remove the casing from the equalizer by unscrewing the two nuts by 10.
- Remove the cable fastenings.
- After dismantling the cable, all attachment points to the body and threaded connections will need to be lubricated and cleaned of rust. It is also important to clean the passages of the casing in the mounts on the body. You can use vinegar for this, which eats away rust. All work must be carried out wearing protective equipment to avoid injury.
- After this, you need to purchase a new set of spacers in the brake drums from the store. If necessary, the pads should also be replaced. Installing the cable is carried out in the reverse order.
Remove the cable from the fastenings.
Remove the pads on the rear wheels and disconnect the cable from them.
We remove the drums, unhook the cable from the lever and remove it from the brake shield.
To make it easier to carry out such work, it is recommended to do it together. One will pull back and the other will unscrew the nuts.
It is better to lubricate the new cable with machine oil before installation.
The lever rod is thoroughly cleaned and lubricated with Litol.
Adjusting the travel of the handbrake cable on a VAZ-2110
The lever should tighten the cable tightly with 2-4 clicks.
- The pads are put in place and the wheels are put on. They should initially rotate freely when the lever is released.
- Then you should drive 1-2 kilometers by car. In this case, you need to brake several times.
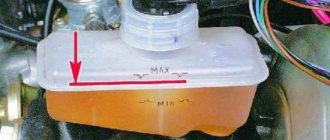
- Then you should try the drum by hand. It shouldn't be hot. When it gets hotter, the cable needs to be released a little.
- Repeat the entire procedure until the drum stops heating.
It is much more convenient to twist the handbrake nut with a socket with an extension.
Slope check
You can also check the operation of the handbrake on a slope. To do this, you need to turn off the engine and put the car on the handbrake, turning on the neutral gear. It should not move on its own on a 25% slope. When it starts to roll, the cable should be tightened.
Recommendations
You should buy a replacement cable only from the official manufacturer. You can also use its analogues. It is better to clarify these points with managers at the point of sale.
To avoid an emergency on the road and to be confident in your safety, you need to carry out routine inspections of the handbrake once a year when the car is in constant use.
Video on how to adjust the handbrake on a front-wheel drive VAZ car
Checking status
Normal PT adjustment ensures that the vehicle is held on a slope. This corresponds to 3-8 clicks of the handle on newer nines or 5-7 clicks on a VAZ 2109 produced before 1995.
To carry out the test, follow a few simple steps:
- Find a slope that has about 25 degrees;
- Turn the handbrake to the required position;
- If the car starts to roll, the handbrake does not hold, adjustment is required;
- If there is no such slope nearby, the check is carried out in a garage;
- Place the car on a flat surface, raise the handbrake handle all the way;
- Approach from behind and try to push the car with maximum force;
- If the car begins to move, the RT requires adjustment;
- Check the operation of the handbrake at 2 clicks on newer versions of the VAZ 2109 and not reaching 5 clicks on versions before 1995. If the handbrake is working at full strength, the cable will be tightened. It will also need to be adjusted.
Operating a car with a tightened PT cable is also dangerous, as this leads to overheating and wear of the rear brake pads.
Bottom view
Adjustment
To adjust the PT cable you will need a pit, overpass or lift. Next we proceed according to the following algorithm.
- Raise the handbrake handle 2-3 clicks from the passenger compartment.
- Get under the car and loosen the locking nut of the parking brake cable equalizer. Before doing this, it is better to treat the nut with a wire brush to remove all dirt.
- Then act according to the circumstances. If the cable is overtightened, it must be loosened by appropriate manipulation of the nut. If the cable holds too weakly, the nut must be tightened more tightly.
- If tensioning the cable does not produce any result, then the element is already at the limit of its capabilities. Therefore, the only solution to this situation is replacement.
- When adjusting the degree of tension, be sure to evaluate the adjustment of the cable along the PT lever. As you remember, normally it is 3-8 clicks for more recent versions of the VAZ 2109, or 5-7 clicks for nines that were produced before 1995.
- Check the freedom of rotation of the rear wheels. If you overtighten the cable, the wheels will spin with difficulty and not as freely as they should.
- After making the adjustment, tighten the locking nut back and check the operation of the handbrake again by driving up a slope or pushing the machine with the PT on.
Adjustment process
Replacement
In some cases, heavy movement of the cable in the sheath is due to lack of lubrication. To eliminate this defect, fill the shell with transmission or engine oil. Pour until grease flows out of the opposite end of the cable casing. Remember to move the cable while adding lubricant.
Cable replacement procedure
But lubrication is more of a temporary measure. If signs of cable wear are detected, it is better to replace it with a new one. This is done as follows.
- Loosen the tension on the PT cable locking nut.
- Unscrew the equalizer adjusting nut, which will loosen the handbrake drive cables.
- Raise the rear of your VAZ 2109 using a jack, then remove the brake drum and brake pad.
- Unscrew the drive cable end from the drive arm.
- Disconnect the fastening nut, and then remove the PT cable holder on the rear suspension beam of the vehicle.
- Remove the shell bushing from the hole in the brake shield.
- Pass the end of the PT cable through the hole in the brake shield.
- Remove the PT cable from all holders on the body of your car.
- Disconnect the end of the PT cable from the equalizer.
- Push the cable end out of the bracket to remove the cable.
- Install a new, tested cable, proceeding in the reverse order.
- Do not forget to adjust the cable tension and the performance of the restored RT at the final stage of assembling the unit.
How to adjust the handbrake of VAZ 2110 and 2112
1. Place the car on a pit or a lift. The article shows how to remove the right hand brake cable
2. Lower the handbrake all the way down. 3. Remove the handbrake lever from the cable end (Replacing rear brake pads).
4. Using a 10mm wrench, unscrew the nut that secures the cable to the rear beam
5. Remove bracket6. Remove the cable from the holder.7. Using a screwdriver, bend the three brackets that secure the cable to the body
8. Remove the cable from the brake shield.
9. Using a wrench and a long socket “13”, unscrew the lock nut and the adjustment nut 10. Remove the cable end from the equalizer.
11. Remove the cable end from the bracket.
12. Remove the left handbrake cable in the same way. It is more inconvenient to remove it than the right cable, because... the exhaust system interferes with this.13. Remove the cable and equalizer.
15. Remove the cover and body of the floor tunnel (Removing the instrument panel and heater air ducts).16. Using a 10mm socket, unscrew the four bolts securing the lever to the floor.
17. Using a Phillips screwdriver, unscrew the two self-tapping screws of the handbrake warning lamp switch bracket......and remove the bracket and switch
18. Push the lever forward to remove it19. Remove the cotter pin of the adjusting rod shaft.
20. Remove the axle and disconnect the adjusting rod and lever.
Reassemble the handbrake mechanism in reverse order
Adjusting the hand brake
- loosen the locknut of the tensioner; - rotate the adjustment nut, tighten the cable; - the full stroke of the lever should be 3-5 clicks - when the lever is released, the wheels should rotate freely - tighten the locknut.
Similar articles
How to remove and adjust the VAZ-2110 parking brake components
We install the car on an inspection ditch or a lift. Removing the parking brake cable is shown using the example of the right cable.
Lower the parking brake lever to its lowest position.
We remove the manual brake pad drive lever from the cable end (see Replacing rear brake pads).
1. Using a 10mm wrench, unscrew the nut of the bracket securing the cable sheath to the rear suspension beam.
2. Remove the cable fastening bracket.
3. Remove the cable sheath from the holder.
4. Use a screwdriver to bend the three brackets securing the cable sheath to the body.
We remove the cable from the brake mechanism shield.
5. Using a wrench and a high 13mm socket, unscrew the locknut and the rod adjusting nut.
6. Remove the cable tip from the equalizer slot.
7. Remove the end of the cable sheath from the bracket.
Similarly, remove the left parking brake cable. Its dismantling (unlike the right cable) is hindered by the exhaust system.
Handbrake device VAZ 2110
Modification of the VAZ 2110 handbrake
Manual control of the stove (heater) damper
If you are tired of understanding the problems of the VAZ 2110 heater, which are associated with algorithms for determining the position of the heater damper, then you can adjust the damper manually. Now it will be possible to install the heater damper in the desired position yourself without an SAUO controller.
How to tighten the handbrake
VAZ 2110: adjusting the handbrake yourself
Parking brake VAZ 2110
The principle of operation of such an element of the VAZ 2110 car as the hand (also known as parking) brake is quite simple. A special cable is used as a mechanical drive for the device. By pulling the handbrake handle, the driver simultaneously provides tension on the cable, which occurs evenly on the brake pads of each wheel. If the parking brake is faulty, you should carry out work such as VAZ 2110 adjusting the handbrake, or repair it by replacing the cable. It is noteworthy that it is easy and simple on the VAZ 2110 to both tighten the handbrake and replace it. If the handbrake malfunctions, the driver runs the risk that the car will move on its own or, conversely, will not be able to continue driving after stopping on an uphill slope. That is why you will have to adjust the handbrake in any case - and this can be done without necessarily going to a car service center. An experienced car enthusiast is able to adjust the parking handbrake of a domestic car on his own.
"Lenekhod"
Just by the name of this transport, it becomes clear that its author and designer was a master named Leonid. Indeed, a resident of the city of Nyagan, who built such a miracle of technology, capable of accelerating up to 50 km/h and overcoming any water barriers, bears this very name.
If we talk about the technical characteristics of the snowmobile, then it was built on the body of the same Oka, placed on an all-welded profile frame, receiving a motor from a VAZ-1111 as a power plant.
The result is a real hodgepodge of meat, and even on studded SHAIN tires, but the car copes with its duties with a bang, helping the owner transport firewood and other cargo.
What is needed to adjust the handbrake
To adjust the parking brake, you will need one of the following tools:
In the absence of all these conditions, which any ordinary driver is unlikely to be able to provide, you can get by with support “goats”, which are installed under the rear of the body after it has been raised with a jack. It is also worth considering the presence of two “13” keys and pliers in the set.
Where to start adjusting
VAZ 2110 handbrake does not work
The parking brake adjustment process is as follows:
- the car is placed on an overpass (or a ditch, or generally raised with a jack);
- the position of the brake lever is checked - it should be the lowest;
- Using the first key, the lock nut is loosened, while at the same time holding the adjusting nut with the second key.
- The adjusting nut is tightened until the handbrake cable is tensioned.
Note. When tightening the adjusting nut, the rod must be held with pliers.
VAZ 2110 tighten the handbrake
- Now you should make sure that the full stroke of the lever is from 2 to 4 clicks;
- After the stroke has been checked, the equalizer locknut should be tightened while holding the adjusting nut with a wrench.
- The handbrake lever goes down, after which the rear wheels are turned by hand. Their rotation should occur evenly and without jamming.
Note. If the handbrake drive cable cannot be tensioned during the adjustment process, this part should be replaced.
VAZ 2110 handbrake adjustment
After the system has been adjusted, it is necessary to check the quality of its operation again. To do this, after all the work performed by the driver, you should find a section of the road with a slope of at least 23%, then stop the car on it and put it on the handbrake. If the brakes reliably hold the car on the rise, then everything was done correctly.
What to do if the adjustment did not help
VAZ 2110 handbrake does not hold
In some cases, adjustment is indeed not enough. This happens in cases where the handbrake cable breaks - a rather rare phenomenon, but still happens, especially on older cars. It happens that the cable breaks on newer models that are subjected to too intense use, which the brake system of an average car is not designed for.
VAZ 2110 manual brake adjustment
The cable should also be replaced in the following situations:
- when its tips are loose;
- the cable threads began to stretch (this could soon lead to a break);
- the cable moves quite hard in its sheath even after it has been lubricated.
Like adjusting the handbrake, an operation such as replacing the parking brake cable does not necessarily require a visit to a car service center. And, although it will most likely take much more time to complete, such repairs do not require special professional skills, equipment or any specialized tools.
Note. Still, some conditions must be met when replacing the cable. For this work, the driver will need an assistant who will strongly pull the cable in order to correctly install the equalizer.
Where to start replacing
Replacing the handbrake of a VAZ 2110
First of all, replacing the cable begins with the following operations:
- lowering the handbrake lever all the way down;
- removing the brake disc of the wheel on which the replacement is being made;
- removing the muffler from the suspension cushions, and the resonator from the rear suspension;
- lowering the exhaust system;
- unscrewing the locknut and adjusting nut;
- removing the equalizer from the rod.
- remove the end of the cable being replaced from the equalizer;
- remove the tip of its shell from the bracket located on the car body;
- bend the cable fastening brackets;
- remove the rear brake pad and disconnect the cable end from the lever;
- loosen the nut that secures the cable holder to the rear axle;
- remove the cable first from the holder, then from the bracket, and finally from the brake cleat.
The work ends with the new cable being installed in place in the reverse order to its removal. In this case, it is worth paying attention to the location of the cables in the bracket - it should be crosswise. After installing the part, be sure to adjust the handbrake. Now, knowing how to adjust the handbrake of his car and replace its cable with his own hands, the car enthusiast can avoid contacting a service station, and thus save his money, since the cost of repairs is not low. If instructions for performing all this work are not enough, it is quite easy to find on the Internet both photos and videos showing these processes in great detail.
Important points
- It is best to use two people to disconnect the tip from the brake pads. One person should carefully press the brake rocker with a large screwdriver (or a thin pry bar), the second at this moment will be able to freely loosen the lock nut, after which the cable can be pulled out of the holder without risking injury to your hands.
- As soon as the cable is removed, its attachment points should be thoroughly cleaned of rust and dirt. The best way to do this is with a wire brush. Those places in the brake shield where the cable passes must be wiped with solvent.
- If too much rust has accumulated in the through passages of the cable, you should use concentrated acetic acid, as it corrodes rust well. You only need to work with it wearing gloves to avoid chemical burns.
- Before installing the brake drum, be sure to check the condition of the pads. If the spacers on the pads are very worn (and most likely this will be the case), they need to be replaced with new ones. A set of such strips can be purchased at any auto store.
Fines for crossing the stop line and speeding will no longer bother you!
Parking brake screw-nut
Such parking brake mechanisms are used in a number of foreign cars. Below is the design and operating principle of the parking brake used on Volvo cars.
When the parking (hand) brake lever is lifted, the cable moves relative to the braid resting on the bracket 9 and, using the lever 8, turns the shaft 7 around the axis, at the other end of which there is a plate 6 with three conical sockets of variable depth. Each socket contains a ball 11. Together with the ring 10, these parts form a mechanism that, when rotated, causes the shaft 7 to move in the axial direction. The conical sockets are designed in such a way that the initially large axial movement relative to the rotational movement becomes small, thereby increasing the transmitted force. The axial movement of the shaft 7 is transmitted to the head of the screw 5, which, compressing the spring 12, through the nut 4 transmits force to the piston 3 mounted in the floating bracket 13, and together with the bracket, acting through the brake pads 2, clamps the brake disc 1.
The effect of self-regulation of the parking brake occurs due to the fact that as the “brake pads - brake disc” pair wears out, an increased gap appears and, without encountering resistance, shaft 7 turns screw 5 relative to nut 4, which leads to a decrease in the gap between the brake pads and the disc. The screw-nut pair (items 5 and 4) has play in the threaded connection, which allows the brake mechanism to release the brake disc when the parking brake is not applied.
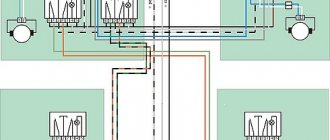
Handbrake diagram for VAZ-2112
For clarity, here is a diagram of a hand brake
1 - button that fixes the handbrake lever; 2 — hand brake lever; 3 — protective cover; 4 — handbrake rod; 5 — cable equalizer; 6 — adjusting nut; 7 - lock nut; 8 - cable; 9 — protective sheath of the cable.
In this scheme we need element number 6. It is he, and only him!
What is required for adjustment?
In order to adjust the handbrake you need a platform or lift. If there are no such devices, then you can simply hang the rear wheels on the “goats”. They can be installed under the car using a jack. It’s also worth taking two “13” keys and pliers.
- The car is installed on an overpass or “goats”.
The lever position is set to the lowest possible position.
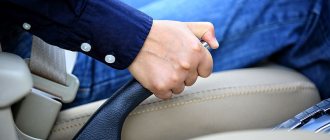
We put the handbrake at the very bottom. Do not pay attention to the scuffs of the console; we conducted an experiment with non-standard armrests. The iron fastenings of the armrest are visible. The photo shows the editorial car
Use a wrench to loosen the locknut.
Tighten the adjusting nut
Everything is rusty, we changed the adjustment mechanism
If you cannot tighten the cable, then it should be replaced with a new one.
Adjusting the handbrake after tensioning
After adjusting the brakes, you need to check them again. To do this, the car should be placed on a road with a slope of at least 23%. The car should be in neutral gear in this area and with the handbrake pulled up. If the handbrake brakes hold the car in this area, then the handbrake is adjusted correctly.
What to do when adjustment does not work
There are also cases when the above actions are not enough to adjust the handbrake. This can happen, for example, when the handbrake cable is broken. This happens on the VAZ-2112, although rarely. In such situations, the cable must be replaced. The cable also needs to be replaced when:
- The tips are loose.
- The cable itself begins to stretch, which will lead to its breakage during operation.
HAIKU! The old cable is very worn out! For comparison, old and new handbrake cables
Physical wear (scuffs and cracks) of the handbrake cables.
Heavy wear on the handbrake cable
This replacement procedure does not require contacting a service station. Although this will require some time and skills from the driver, such work can be done independently.
It should also be remembered that when replacing the cable, certain conditions must be observed. To do this, the driver will need an assistant who will pull the cable.
Why do you tighten the handbrake?
The cable acts here as a drive. If the driver pulls the handbrake lever, then at the same time he uses the cable, which spreads the pads in the rear wheel.
If the handbrake is faulty, you just need to tighten the cable or replace it with a new one. On a VAZ-2112 it’s quite easy to do this with your own hands.
Need for adjustment
You can determine that the parking brake needs adjustment when checking. It is recommended to do it every 30,000 kilometers. This procedure should be done even if the handbrake seems to be working well.
The device must also be checked in cases where it does not work. For example, a car moves when the brake lever is applied.
During the operation of the vehicle, due to wear of the rear brake pads and pulling of the drive cables, it periodically becomes necessary to adjust the travel of the parking brake lever (handbrake).
In this article we will talk about how you can tighten the handbrake on a VAZ-2110. This method can also be used when adjusting the handbrake on other front-wheel drive cars of domestic production.
Tension
So, having understood the diagram, you can begin the procedure of tightening the handbrake cables.
Stretch
The tensioning procedure is as follows.
- Place the car on an overpass or pit. If you don’t have a garage and you have the opportunity or desire to carry out the procedure at a service station, use a jack. The rear of the car is raised on a jack. The most extreme option is a curb onto which the car is driven and all you have to do is crawl under it.
- Engage the gearbox in first gear and put the car on the handbrake by pulling the lever up.
- The ideal number of handbrake clicks is from 2 to 5. If there are fewer or more clicks, it is easier to take appropriate measures to tension the cable.
- If there are less than 2 clicks, then the cable will need to be lengthened. If there are more than five clicks, then the cables are shortened.
- Lengthening the cable means relaxing it. To do this, unscrew the locknut. When tightening the cable, the locknut must be tightened in reverse.
- Before you start looking for the required nut on the bottom of the car, release the handbrake lever all the way.
- Take a 13mm wrench under the car and head down.
- Find the handbrake cable equalizer. This is the same element from which the main handbrake cable is divided into two cables.
- In some cases, it is simply not possible to gain access to the equalizer, since the muffler holders made of rubber are in the way. In such a situation, it is better to remove them. This is not difficult to do, but working with the handbrake will be much easier.
- Now there are two nuts in front of you. One is a simple nut and the other is a lock nut. Having two keys in your hands, fix the nut with the first one, and with the second one begin to unscrew or tighten the locking nut. Be careful that the nut does not start to turn.
- Taking into account the condition of the handbrake and the need to loosen or tighten the lever, turn the locknut in the appropriate direction. Remember what is the optimal number of clicks.
- Tighten or unscrew the locknut to obtain the required degree of tension.
Examination
But if you twisted the nuts there, this is not a guarantee that the handbrake now works perfectly. This needs to be clearly verified.
To do this, it is enough to go through a successive stage of verification activities.
| Stage | Explanation |
| Spin the wheels after tensioning is completed | The wheels are lifted one by one on a jack. When the handbrake lever is turned off, they should rotate freely without obstacles. By squeezing the brake, the wheels should lock. |
| Drive up a slight slope, stop and engage the handbrake | The fact that the wheels do not spin when suspended is good. But you need to make sure that the handbrake holds the car even when exposed to gravity. |
If the check shows that the handbrake still does not hold, even if the cable was tensioned exactly according to the instructions, the handbrake is probably simply worn out and the cable needs to be replaced.
Signs that replacement is needed
It is not uncommon for the VAZ 2114 handbrake cable to rust, as a result of which it breaks or weakens so much that no tightening can restore its previous functionality.
At the first sign of cable wear, you should consider replacing it. This problem may manifest itself as follows:
- The handbrake is not able to withstand the required traction;
- Drum brakes overheat;
- When you pull the parking brake lever, the cable does not respond to your actions;
- The cable sheath is seriously worn.
To check the operation of the handbrake, it is enough to perform one simple action. Place the car on a level surface, apply the handbrake, get out of the car and try to push it hard. If movement begins, the cable is dead and needs urgent replacement.
Causes of malfunction
Handbrake lever VAZ 2110 in a leather case
Let's consider the principle of operation of the parking brake (handbrake) on a VAZ 2110 car.
It's pretty simple. One of its main elements is a special cable. When the driver pulls the parking brake handle, this cable is tensioned, which evenly distributes its effect on the brake pads of each wheel of the car. During operation, the rear brake pad linings wear out, the cable stretches, and as a result, there is a need to adjust or repair the handbrake. Also, very often drivers, especially beginners, drive with the handbrake raised, which leads to premature wear of the handbrake cable. If the driver does not carry out preventive maintenance or repair of this mechanism in a timely manner, the car may independently start moving from a standstill or will slow down, even stopping, on an uphill slope.
External view of the parking brake cable on a VAZ 2110 car
You can adjust the handbrake not only in a car service center, but also with your own hands at home. But first you need to familiarize yourself with the manual parking brake diagram in order to know its main elements for setting up this system.
Handbrake diagram for VAZ 2110
In this diagram the following elements are indicated by numbers:
1 - button that fixes the handbrake lever; 2 — hand brake lever; 3 — protective cover; 4 — handbrake rod; 5 — cable equalizer; 6 — adjusting nut; 7 - lock nut; 8 - cable; 9 — protective sheath of the cable
Design
The handbrake (RT) system on VAZ 2109 cars is quite simple. It includes two main nodes:
- Braking devices for rear wheels;
- Mechanical drive.
The drive, in turn, consists of:
- Handbrake lever located in the cabin on the right hand of the driver;
- Front and rear drive cables.
The ends of the rear cable are connected to the levers of the manual brake shoes. In the section where the front cable is brought to the rear area we are dealing with the following elements:
- Equalizer;
- Adjusting nut;
- Tension spring and locknut. They connect the front cable to the car body bracket.
By releasing the lever, the spring releases the tension on the cables and the equalizer returns to its original position. This is where adjustment is required.
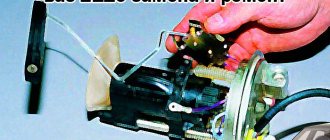
Dismantled RT handle
First adjustment steps
To begin adjusting the handbrake, you need to make sure that one of three elements is present and accessible: a lift, an inspection hole or an overpass.
An overpass is a type of engineering structure that is intended to lay a road or communications above the ground.
Homemade overpass for adjusting the handbrake on a VAZ 2110
At home, most often only the inspection hole is accessible. If you cannot take advantage of any of the above conditions, then you can make do with a kind of support trestles, which are a rigid structure installed under the rear part of the body after it has been lifted with a jack. In addition, you need to prepare two wrenches size “13”, as well as pliers.
- lower the parking brake lever to its lowest position;
One of the adjustment stages is to lower the handbrake lever
- using one key set to “13” you need to loosen the lock nut, while holding the adjusting nut with the second key;
Loosen the locknut and loosen the adjusting nut
That's not all, as there are a few steps left to complete the complete handbrake setup.
RK Corps
The transfer case housing consists of two parts. To prevent lubricant leakage at the joint, the parts are sealed with gaskets. Oil seals are installed on the shafts coming out of the sealed housing. They prevent lubricant from leaking out when the car is moving.
Drive mechanism
The RK mechanism consists of:
- Rear axle shaft. Rigidly connected to the rear driveshaft of the car. Mounted on ball bearings. They allow the shaft to rotate freely;
- Front axle shaft. Drives the front driveshaft. Fastened with a nut;
- Intermediate shaft. Necessary for engaging the front axle or downshifting;
- Shift forks. Used to move gears when turning the front axle on/off and to downshift. The movement of the forks is carried out along specialized rods. Each fork is equipped with a locking mechanism that prevents spontaneous movement of the product along the rod.
Control mechanism
The unit is made in the form of a metal cover. It is bolted to the transfer case housing. Two levers are installed in the cover. One serves to connect the front axle, the second to reduce the torque transmitted from the gearbox.
Final Setup Steps
- continue rotating the adjusting nut until we are sure that the brake lever has a full stroke of approximately 3 clicks (this operation is convenient to perform with two people - one person rotates the nut, and the second checks the handbrake);
- after checking the working stroke, you need to tighten the locknut while holding the adjusting nut with a wrench;
- now you need to check whether the handbrake cable is not too tight: the parking brake lever goes down, the rear wheels are jacked up and turned by hand - they should rotate evenly, without delays;
- if the lever travel is still large, then we continue to tighten the adjusting nut (or unscrew it if the cable is too tight) and regularly check the handbrake travel until it reaches 3 clicks and the brake pads do not interfere with the rotation of the wheels.
After adjusting the system, you should check its operation. To do this, the driver needs to place his car on a section of the road with a slope of 23% and raise the parking brake lever. If the car is securely fixed on the road and does not move, this means that the work was carried out correctly.
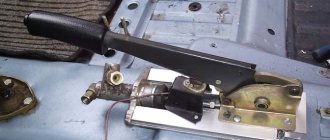
Modernization
Many modern owners modernize their cars and install so-called hydraulic handbrake here. As a lyrical digression, we note that in this case it is necessary to replace the rear brakes with disc brakes without fail.
Very serious design changes are required - such as installing a hydraulic system in the parking brake. No cables are used here - the parking brake lever is connected to the master cylinder.
After the driver lifts the lever, the brake fluid in the system presses on the cylinders. Most often, hydraulic systems can be found on sports cars - after all, such a brake holds much better.
The main advantages that the hydro system gives:
- Full confidence that the hydraulic handbrake will work;
- There is no need to tighten the cable.
There are some disadvantages:
Sources
- https://masteravaza.ru/tormoza/ruchnoj-tormoz/vaz-2110-zamena-trosa-ruchnika-597
- https://masteravaza.ru/tormoza/ruchnoj-tormoz/vaz-2110-regulirovka-ruchnika-600
- https://vazweb.ru/desyatka/tormoza/zamena-trosa-ruchnika.html