Hi all! Started tripping 2 days ago. In the morning on the way to school, I was driving along the highway and noticed that the car was accelerating quickly and everything was fine, then it was on you and immediately it became a “cow”. I switch to 4 and put the gas to the floor, but it slowly picks up speed and jerks, somehow reaching 100 km/h. Before this, in the city, it stalled several times (when starting off). At idle it did not work smoothly (the revolutions dropped from 1000 to 500), the “oil pressure” light blinked (I stopped, checked the engine oil level, topped it up according to the mark) and did not light up again. I recently changed the spark plugs in December. There was even some kind of glitch, I was driving in 2nd gear in the lane and was ahead of the GAZelle, the car jerked and did not move, and then as soon as it started slipping, I immediately took the pedal off the gas, but it still rushed. I switched to neutral and it started turning until the cutoff. I turned it off while driving, started it again and again until the cutoff. I turned it off again and stopped, stood there for a couple of minutes and started it, it stopped.
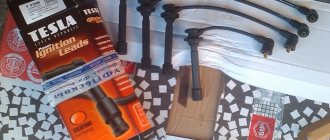
Today, I started looking for the cause of the problem. I wanted to check the spark plugs and high-voltage wires. When removing high-voltage wires, the tip of one wire fell off, then I immediately checked the spark plug from there and found that it did not ignite. I bought a set of high-voltage wires MILENA tcb cable and replaced it. I started everything GOOD.
Hello everyone! I once went in wet weather for a drive in a newly repaired Sena and didn’t recognize the car - it was stuck, the revs were floating, it adjusted at idle, it jerked while driving... I opened the hood and saw that over 8 years of service the high-voltage wires had become unusable, the charge was constantly draining from output of the 4 cylinder ignition coil to a nearby mounting bolt. Plus, the insulation on all the wires was damaged in the place where it fits into the clamps of the engine trim... The solution is clear - replacement with new ones. I climbed onto Existence and was literally blown away - a set of high-voltage wires costs from 3,000 rubles, with a two-week wait... A toad crawled out of the corner and began to whisper that original spare parts are of course good, but there is a crisis in the country, and in general there is little money after the holidays... Moreover, that the wires are made in Russia and it’s generally unclear why the hell this price is... I came to the store and bought wires for a VAZ 2110 injector 8 valves. I bought wires from the company HORS - all silicone, reinforced, blue for 380 rubles. I climbed under the hood, began to try it on, and it turned out that these wires are completely similar to the standard wires for the Sens, except for two small nuances: 1- The wire of the second cylinder is slightly shorter in length and because of this it cannot be completely removed into the standard channel of the engine trim. 2- The diameter of the internal connecting part of the protective moisture-proof cap on the ignition coil side is twice as large as required. Because of this, it is possible for water and other nasty things to get into the contact of the coil, which is accompanied by its failure. I thought and thought and decided that the tenfold difference in cost would pay for the existing shortcomings - which turned out to be very easy to eliminate.
Self-check of automotive high-voltage spark plug wires of the ignition system
It is necessary to begin diagnostics with an external inspection of high-voltage wires. During such an external examination, the presence of noticeable defects in the form of cracks, fractures, etc. is not allowed.
- The easiest way to check is to use a known good spare ignition wire. It is necessary to disconnect each armored wire one by one, replacing it with a spare one. Stabilization of engine operation after replacing one of the wires will indicate a faulty element.
- To identify a possible breakdown of the ignition armored wire, you must wait until it gets dark. When darkness falls, you will need to open the hood and start the engine. If there is a breakdown, then during engine operation an electric spark on the damaged high-voltage wire becomes clearly visible.
- Also, checking high-voltage automotive ignition wires can be done by using an additional insulated wire. To check, the ends of such a wire are stripped (exposed). Then one end is shorted to ground, and the other end should be passed along the highest voltage wire, connections, bends, caps, etc. If there is a breakdown in a certain place, then an electric spark will appear between the breakdown area and the end of the tester wire.
- Checking the resistance of high-voltage car wires is carried out using a multimeter. To check, the multimeter must be switched to operating mode as an ohmmeter. The next step is to remove the wire from the spark plug on the first cylinder, after which the specified wire is also disconnected from the ignition coil. Then the contacts of the multimeter are connected to the ends of the wire, after which the obtained data is evaluated.
In a similar way, you should check the remaining high-voltage ignition wires. It should be taken into account that the spread in readings between all wires should not be higher than 2 or maximum 4 kOhm. Exceeding this threshold will indicate the need to replace high-voltage automotive ignition wires.
It should be added that if a faulty wire is detected, replacing only one defective element is not recommended, since it is a temporary measure. It is optimal to replace high-voltage armored ignition wires in a car as a set. This approach allows for the most efficient operation of the ignition system and smooth engine operation in all modes. For the same reason, it is highly not recommended to repair high-voltage wires for further operation without replacement.
Do-it-yourself tuning and modernization of spark plugs to improve fuel efficiency and other characteristics of the internal combustion engine. How to modify the candles yourself.
Signs of faulty spark plugs. Assessing the condition of a spark plug during a visual inspection, methods for checking spark plugs. Plaque on the spark plug electrodes.
For what reasons may misfire of the fuel-air mixture occur in one or more cylinders? Fault diagnosis, recommendations.
What to do if the ignition spark is lost. Diagnostics of individual elements: spark plugs, coil, ignition module. How to check the spark on an injection engine.
The main reasons for engine oil getting into spark plug wells. What should a driver do if oil flows into the spark plug well, how to carry out repairs with his own hands.
What you need to know when selecting spark plugs according to your car model: size, heat rating, interchangeability. Choosing candles by design, useful tips.
A little theory
In this article I will not describe in great detail the structure and characteristics of armored pipes, unlike the article “How a non-working expansion tank cap leads to engine capital (a lot of theory)” in which I examined in great detail the structure and significance of the expansion tank cap. Therefore, let’s briefly go over the main points in our own words.
As is known, to burn the air-fuel mixture in the combustion chamber, spark plugs are used, which at the right moment produce a spark to ignite this very mixture.
And the voltage to form a spark is supplied to the spark plug through high-voltage wires. And the better these wires conduct voltage (i.e., the lower the resistance), the stronger the spark will be, and, accordingly, the fuel will burn better, thereby improving engine performance.
You can measure the resistance of the wires using an ohmmeter or multimeter.
Here is an excerpt from the book, which describes what kind of resistance is acceptable (so that there are no disputes).
I think that if every second of us approaches a car and wants to measure the resistance on the wires of his car, he will see not very pleasant numbers on at least one of them.
I’ll tell you even more - when you buy new high-voltage wires and immediately measure the resistance, it will most likely be above the permissible limits.
To do this, I decided to share with you a way to avoid such problems and make high-voltage wires of zero resistance yourself.
Typical ignition cable faults
There are 3 main problems associated with high-voltage wires:
- Internal break of current-carrying conductor.
- Breakdown of external silicone insulation.
- Unreliable contact at the junction of copper tips with the terminals of spark plugs and high voltage coils.
A break or fracture of the carbon core does not always lead to complete failure of the explosive wire. Since a high voltage pulse with a nominal value of more than 20 kilovolts is applied to the spark plug, the current still “breaks through” the break point and reaches the spark plug electrodes. But the power of the spark noticeably weakens, hence problems arise with the high-quality ignition of the air-fuel mixture in the combustion chamber. In the worst case, there is no spark at all and the cylinder fails completely.
A similar picture is observed with weak contact of copper conductors at the joints. Due to an oxidized or poorly fitting terminal, the power of the electrical impulse is lost to overcome this obstacle, and the discharge on the spark plug electrodes weakens.
We recommend: Motor oils and everything you need to know about motor oils for Lada Vesta
When two insulating layers break down, the voltage is lost differently. The principle is as follows: the current that detects a circuit of lower resistance tends to pass along that path. If the point of insulation breakdown is located close to the metal parts of the machine connected to the “minus” of the on-board network (ground), a spark discharge is formed between them. As a result, the spark plug receives only half the impulse, causing the ignition of the combustible mixture to occur sluggishly. By the way, it is impossible to check armored wires with a multimeter for insulation integrity; you will need special equipment.
Interruptions in the supply of spark discharges are monitored by the following signs:
- the engine is unstable due to misfires and insufficient spark power;
- one or more cylinders periodically fail, the engine vibrates at idle;
- while driving, acceleration dynamics deteriorate, a weak response to the accelerator pedal is felt;
- more fuel is consumed.
Similar symptoms appear on faulty spark plugs, but checking their performance is more difficult. Therefore, start diagnostics with high voltage wires.
Features of the ignition module
Now let's talk about a more complex issue - the ignition module and its design features.
The design includes several components, each of which has its own nuances.
Component
Peculiarities
There are always two coils on a VAZ 2109. This mechanism is responsible for generating current
Switch keys also work together. Through them, the current goes to the spark plugs, plus the controller regulates the time the current is turned on, which is calculated by receiving information from the crankshaft sensor
Electronic control unit
Responsible for distributing information in the form of electronic impulses
High-strength plastic is used for its manufacture, which largely ensures the durability and reliability of the device.
Ignition coil
Location
Any work related to repair, testing, and maintenance of the ignition module will be impossible to perform if you do not know basic things - the location of the device.
You can find the ignition module (ignition module) in the engine compartment. Find the high voltage wires that go to the spark plugs. One end is connected to them, and the other goes to the module. The MZ is small in size and enclosed in a plastic housing.
Device location
Principle of operation
Initially, on carburetor cars, the system worked due to the presence of an ignition coil. With injectors everything is somewhat different.
- Initially, the ignition coil is turned on, generating a high voltage current. The coil operates on the principle of magnetic induction;
- Then the electronic control unit MZ is connected to the work, performing the functions of control, transmitting commands, and ensuring the flow of current required by the characteristics to the spark plugs;
- Next, the spark plugs activate the spark, ignition occurs, and so on.
MH malfunctions
The ignition module often shows the most basic sign of failure - lack of spark. But this is not the only indicator of a malfunction. These also include:
- Lack of dynamics when accelerating the car. Trying to quickly pick up speed, you can clearly feel failures in engine operation;
- The engine does not produce the usual power; in some cases, the engine is not able to pull the car uphill;
- The idle speed fluctuates;
- One of the pairs of engine cylinders refuses to work. Here, most likely, there is no current that should come from the ignition coil.
Installation of high-voltage wires
Regardless of the make and model of the car, all high-voltage wires have a similar design. Currently, armored wires are widely developed in modern cars and have many engineering solutions to increase their conductivity and insulation resistance.
The wires consist of:
- Conductor;
- Insulation;
- Tips for connection;
- Protective caps for tips;
Conductor
The conductor has several design options, and this depends on the quality of the wire, its manufacturer, etc. Each manufacturer tries to add as many new solutions as possible to their wires that can increase the efficiency of wires.
- Copper, the simplest and most outdated, requires additional noise suppression resistors;
- Non-metallic with metal coating. The central part is made of fiberglass and impregnated with graphite. It is possible to cover it with ferroplasts, which prevent interference from spreading. And finally, everything is wrapped around a thin metal wire, creating the role of a screen. Just like copper, it requires the installation of additional noise suppression resistors.
- Non-metallic, has a high distribution voltage. No additional resistors are required.
Wire insulation
To ensure safety and protection against breakdown of wires, as well as to bring high voltage to the spark plug, the insulation of the wires must be at a high level and provide reliable protection against breakdown.
- Single layer (Fig. A). A conventional shell made of polymers does not have the best insulating qualities, which is why it is almost never used;
- Two-layer (Fig. B). Much better than a single layer, it consists of an inner coating and an outer one. High degree of protection against dust, various technical liquids and temperature changes;
- Multilayer (Fig. B). The most advanced option on the market. It consists of an inner layer of insulation that protects the core from breakdowns. The braiding of the inner layer, thanks to it, the core is protected from breakage, deformation and other damage. And an outer layer that provides complete protection from external factors.
Tips
In cars, two types of connecting tips are used (on the spark plug side):
- L-shaped;
- Straight;
As a rule, on a VAZ 2110 car, wires with straight tips and L-shaped ones are installed, on one side the tips have a direct contact, it is connected to the spark plug, and the wires are connected to the ignition module with an L-shaped contact.
Introduction
High-voltage wires of VAZ cars are one of the most important elements in the ignition system. It is the wires that transmit high electrical voltage from the module to the spark plug.
Failure of the wires affects not only the formation of a spark, but also the operation of the entire power plant. This article will talk about how to correctly select and independently replace high-voltage wires on a VAZ car.
Below we discuss the procedure for connecting wires to the ignition module, as well as examples of the highest quality and best wires that can be purchased in terms of price and quality.
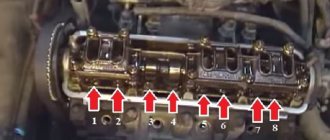
Firing order
The cylinders in a car do not work chaotically, because for stable operation of the engine and alternate execution of all four strokes, their strict synchronization is required.
So there is a special order of operation of the cylinders of the VAZ 2114, thanks to which each of them at one point in time performs any of 4 strokes, namely:
- Injection of a mixture of fuel and air that fills the entire volume of the cylinder.
- Compression of the working mixture due to the upward movement of the piston.
- The combustion of the working mixture and the expansion of the resulting gases pushes the piston in the opposite direction, thereby driving the connecting rod and crankshaft.
- The release of exhaust gases from the cylinder with their further discharge into the exhaust system.
Ignition order of the VAZ 2114
It is worth noting that on cars of different brands and even models, the engine may have a different operating circuit, but the operating order of the cylinders of the VAZ 2114 injector always looks like this: 1-3-4-2. According to this diagram, the high-voltage wires should be connected.
Armored wires and their connections
Having found out how the location of the VAZ 2114 cylinders affects their connection, it is worth talking about the high-voltage wires with which this is done.
These wires themselves are quite different from ordinary electrical wires - they have an increased layer of insulation, protective shielding, as well as metal connecting tips and protective caps made of heat-resistant plastic. The main purpose of these wires is to transmit a high-voltage pulse from the ignition unit to the cylinders (it is this pulse that allows the spark plugs to ignite the working mixture).
The connection of armored wires should be made taking into account the ignition order of the VAZ 2114 injector and the numbering of the cylinders (this was mentioned above). For greater convenience, you should be guided by the numbering present on the ignition module - just connect socket number 1 to the corresponding cylinder, socket number 2 to cylinder number 2, etc. It is extremely difficult to make any mistake here.
Types of damage and malfunctions
- Breakage of current-carrying conductors in high-voltage wires.
- Damage to the wire insulation. Sometimes, just one accidental scratch on the insulation is enough for a current leak to occur that can cause problems.
- The conductor is oxidized. This damage is a direct result of torn insulation, which allows moisture to enter the core.
- High wire resistance. Here the fault lies with the manufacturer (alternatively, the car owner himself may be to blame for installing wires from a car of a different brand).
- Bad contacts. They in the wire caps wear out over time and no longer fit tightly to the spark plugs (or to the contacts on the ignition coil).
All of the above damage can lead to sparks and “stray” electromagnetic pulses that will interfere with the normal operation of the car’s sensors. In addition, if the conductor is broken, voltage will not be supplied to the spark plug in a timely manner. This will lead to the fact that the fuel-air mixture in the combustion chamber will ignite late, and one of the engine cylinders will always be “late”, that is, the synchronization of the cylinders will be disrupted.
The main signs of a malfunction of the armored wires of the VAZ 2112
High-voltage wires of the VAZ 2112 are subject to some typical faults:
Lost connection. The electrical circuit is often interrupted at the junctions between the metal contacts of the wiring and the conductor (conductive). A break can also happen:
- when disconnecting the wire;
- in case of unreliable interaction of certain components of the ignition system;
- when the vein oxidizes.
Photo: Wear of armored wires of VAZ 2112
Current leaks. The cause of the leak may be:
- dirty wiring;
- dirt on spark plugs;
- distribution cover;
- ignition coil;
- the insulating layer is damaged.
- faulty wiring caps. The voltage drops due to clogging of the wiring, spark plugs, distribution cap, ignition coil, when the insulation and wiring caps are damaged.
Expert advice: A typical prerequisite for connection failure is heat/sparks. This is fraught with burnout of the core/metal contacts.
Preparatory activities and necessary tools
Installing the ignition of a VAZ 2109 carburetor begins with preparatory activities. In particular, you need:
- Warm up the car engine;
- Set the parking brake and install wheel chocks under the rear wheels.
Remember that you cannot ignore safety rules, because a car is a highly dangerous vehicle, and failure to comply with safety rules when driving, servicing and repairing it can cost you dearly.
An important point: before you start work, you should make sure that the carburetor is correctly configured on the car. It would be a good idea to carry out a visual inspection of all elements of the system.
If we are talking about a carburetor car, special attention should be paid to inspecting the condition of the distributor
If you have a car with an injection engine, it is worth checking the ignition module for serviceability. The thing is that, as practice shows, it is this module that fails most often and is the reason for the inoperability of the entire system.
To complete the work we need:
- strobe;
- a set of keys.
Do-it-yourself replacement of armored wires on a VAZ 2112
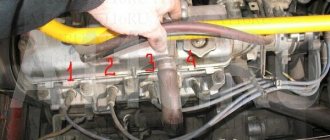
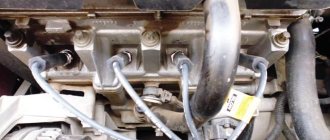
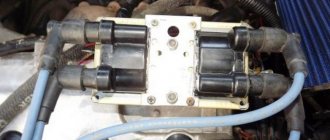
1 – tip of the wire of the first cylinder; 2 – tip of the wire of the second cylinder; 3 – tip of the wire of the third cylinder; 4 – plastic bracket securing the high-voltage wire of the third cylinder; 5 – ignition module; 6 – tip of the wire of the fourth cylinder; 7 – plastic bracket for fastening high-voltage wires of the first, second and fourth cylinders
In order to replace the armor wires of a VAZ 2112, you must perform the following procedure:
- We prepare the car for work (see “Preparing the car for maintenance and repair”) and turn off the ignition.
- Remove the engine decorative trim.
- Remove the wire tip from the spark plug well.
- Disconnect the other end of the high-voltage wire from the ignition module.
- Remove the wire from the first cylinder.
- Similarly, we remove the high-voltage wires of other engine cylinders.
High voltage wires are not interchangeable. The wires must be connected to the ignition module in accordance with the cylinder serial number
Checking high voltage wires
The high-voltage wires used in contact ignition are designed for a relatively low voltage of about 12 kV and have rigid insulation. This insulation breaks down, especially with temperature changes, resulting in voltage leakage to the housing. Determining this malfunction is quite simple. It is necessary to look under the hood with the engine running in the dark. The presence of sparking on the wires indicates a malfunction.
The insulation of silicone wires is practically not subject to damage during operation, unless it can be damaged mechanically during repairs. But these wires can often have a break in the conductive part. With a small break, due to the high voltage of the contactless ignition system, no sensitive changes in engine operation are noticeable. It’s another matter when this cliff burns out and grows over time. Depending on which wire is broken, unstable operation of the engine may occur, engine trouble, failures during acceleration, etc.
But a break in a high-voltage wire is scary not because of a deterioration in engine performance, which is of course unpleasant, but because of an increase in self-induction voltage. This leads to increased load on the switch or ECU of the injection engine. In case of large breaks, a breakdown of the control transistor (thyristor) of the switch or ECU occurs.
Checking the integrity of the wires is quite simple. It is necessary to measure the resistance of all wires and compare them with each other. Since the resistance of wires from different manufacturers may have different values. But the resistance of the wires of one set does not differ significantly and depends only on the length. If, when comparing the values, a large difference is revealed, then this wire must be replaced.
Purpose and requirements for such armored wires
It seems that, according to the logic of things, the lower the electrical resistance of the conductor, the less energy loss should be and, therefore, the ignition system should work better:
Arrangement of armored wires
The I/O wires of the VAZ 2112 contain a conductive core, the so-called insulation (protective layer), special metal contacts and insulating caps:
The conductor (laid inside the wire, number 4 in the photo) exists in several types:
Cores of this type are made from a variety of materials, for example, there are such options for its design:
- The core is made of cotton fibers impregnated with a soot solution. And sometimes it is reinforced on top with cotton or nylon braiding. It turns out that the resistance is 15-40 kiloOhms per meter
- The core is polymer, having a resistance of 12-15 kiloohms per meter. A reinforcing thread is usually passed inside it
- The core is made of fiberglass threads coated with graphite
Various armor wire cores
Insulation is a single-layer or multi-layer dielectric protective coating for a conductor; it is intended for:
- Prevent electric leakage
- Protects the core material from the harmful effects of moisture, harmful vapors, gasoline and oils, high temperatures that occur in the engine compartment, and also protects the core from mechanical damage
- It is made from various types of plastic (for example, polyvinyl chloride), silicone, and rubber mixed in various combinations. Sometimes the mechanical strength of the outer insulation is additionally increased by adding braided fabric, cotton fiber, nylon, fiberglass or polymers.
Various types of insulation
Tips are metal contacts that provide a reliable electrical connection between the conductor material and the contacts (high-voltage leads and sockets) on the spark plugs, ignition coil or distributor cap. Requirements for tips:
Diagram of the arrangement of caps on armored wires
Typical malfunctions of high-voltage armored wires
The main faults of armored wires are current leakage and electrical circuit breakage. And a break in the wire circuit can most often occur where the metal contact of the armored wire is connected to the conductive conductor, as well as at the points of connection with other components of the ignition system. This happens, for example:
- When roughly removing a wire from a spark plug or distributor cover
- In case of poor contact with the terminals of any system elements
- In case of oxidation of contacts or destruction of the core itself
In all places where contact is broken, heating and sparking occur, which only aggravates the situation and often leads to burnout of the core or metal contacts:
- Breakdown (leakage) of electricity can occur through contaminated armored wires (wires with damaged insulation), spark plugs, distributor cap, as well as the ignition coil; in addition, when the wire caps are destroyed (cracked), the dielectric properties also decrease
- Low temperatures affect high-voltage armor wires, making them more rigid, and increasing the likelihood of breaks and cracks in their insulation, caps, and core thread.
- In addition, the constant vibration that accompanies the operation of the motor causes loosening of the joints, which gradually leads to deterioration of contact, such as in the distributor cover
- At elevated temperatures, spark plug caps heat up more than other parts, because they are located close to the heated parts of the engine and even if removed carelessly, they often break; when removed by the wire, contact with the cap is broken (you spoil them with your own hands)
- During operation, over time, any elements that make up the ignition system inevitably become contaminated
- They are covered with a layer of dirt and dust, moisture and condensation of vapors, various fuels and lubricants
- Such dirt is a conductor for current, and significantly increases leakage, and this especially happens in humid weather and existing damage to the insulation
- The ingress of dirt and moisture into the insulation leads to further destruction and increase in microcracks.
Diagram, procedure for connecting high-voltage wires of VAZs.
First, let's decide which of the four cylinders is first?
The first cylinder in front-wheel drive VAZs is located closer to the timing belt. If you look at the engine from the front, the first cylinder is the leftmost). And then everything is simple - from left to right - 1, 2, 3, 4.
In rear-wheel drive VAZ Classic and Niva, the first cylinder is located closer to the front bumper of the car.
Checking high-voltage wires. To check the wires, you will need a multimeter tester. Check the resistance of the wires - it should be no more than 20 KOM (in practice, the longest wire of 1 cylinder has a resistance of up to 10 KOM). If the wire resistance is more than 20 Kom, it must be replaced.
Laying wires. Do not try to connect the wires in a bundle. Disassemble the wiring harnesses, release the wires from the plastic holders. Connect the high-voltage leads to the corresponding cylinder spark plugs. Lay the wires so that they do not rub against each other, engine parts, or hoses. Avoid sharp bends and tension on the wires. After connecting all the wires, secure them into the bundle with special comb holders included in the delivery kit.
The procedure for connecting I/O wires to a VAZ carburetor (2108, 2109, 21099)
The central wire from the distributor cover always goes to the ignition coil (bobbin).
The outlet of the distributor cover, which faces towards the front of the car, is connected to the first cylinder.
The outlet of the distributor cap, looking down, is connected to the third cylinder.
The outlet of the distributor cap, looking rearward, is connected to the fourth cylinder.
The outlet of the distributor cap, looking up, is connected to the second cylinder.
The procedure for connecting high-voltage wires to a VAZ Classic, Niva with a carburetor and distributor.
Central wire from the ignition coil (bobbin)
Injection VAZ produced before 2004 with an old-style ignition module (4-pin low-voltage connector)
Actually, on the module body it is already indicated which cylinder the pins correspond to - but we duplicated them in red in case the module gets completely dirty, and you might not be able to see it in the photo.
Injection VAZ produced after 2004 with a new ignition coil (3-pin low-voltage connector)
As with the old-style ignition modules, the new coils are also marked with pins corresponding to the cylinders. But the connection order is different from the order on the old-style ignition module. Be careful.
Location
On VAZ 2110 injection engines, high-voltage wires are attached at one end to the ignition coil, which is located on the front side of the cylinder block slightly to the right of the center, and the other end is connected to the spark plugs. On carburetor engines, the circuit is exactly the same, only instead of a coil, the wires go to the distributor, which is installed to the right of the cylinder head.
It should be noted that the number of wires in the injection version of the VAZ 2110 is less than in the carburetor version. The “tens” injection engine uses 4 high-voltage wires, and the carburetor engine uses 5.
Replacing high-voltage wires of the ignition system
High-voltage wires of the engine ignition system are special design elements that ensure the transmission of high-voltage pulses from the ignition coil to the engine cylinder spark plugs. If the high-voltage wires are in good condition, if other elements of the ignition system work smoothly, a spark appears in the cylinders in a timely manner, and the engine starts and runs stably in any weather. If even one of the high-voltage wires is damaged and needs to be replaced, starting the power unit becomes problematic, and during operation the engine will, at a minimum, stall and stall at the most inopportune moment.
Features of the design of high-voltage wires and their possible malfunctions
A standard high voltage wire consists of several elements. This is a conductor, a reliable layer of insulating coating, contacts and protective caps. In some cases, high voltage wires (armor wires, explosive wires, etc.) are equipped with resistors to suppress electromagnetic interference and other elements that make the design of the conductors more reliable and their operation more convenient. Depending on which particular element of the high-voltage wire has become unusable, the malfunctions of the transmission link of the ignition system also differ:
- if the insulating coating is destroyed, breakdown and leakage of currents occurs through the high-voltage wire, as a result, the voltage sufficient to form a spark and ignite the working mixture ceases to flow to the electrodes of the spark plugs;
- if a conductor becomes unusable, the resistance level of the conductor automatically increases (the consequences of this malfunction are almost the same as in the first case);
- If the contacts oxidize or break, then during engine operation short-term breaks in the electrical circuit occur, as a result of which the power unit begins to operate intermittently.
In all of the above cases, the high-voltage wires of the ignition system must be replaced, because it is impossible to repair them on your own or even by service specialists. This is simply not provided for by the design of high voltage wires.
What are the armored wires for the VAZ 2112 needed for and what functions do they perform?
Expert opinion: The main task of the high-voltage wires of the ignition system of gasoline engines is to transmit the ignition pulse from the coil (coils) or ignition distributor to the spark plugs of the internal combustion engine.
Along with this, the high-voltage wires on the VAZ 2112 car perform the following functions:
- ensuring high-quality isolation of high-voltage pulses;
- minimizing radio interference;
- protection against failure of ignition system elements.
If the electrical parameters of the high-voltage wire are violated, the car engine begins to “triple”, there is a large loss of car power, and the car’s starting system may fail. Such a malfunction must be corrected immediately, as it can lead to a complete failure of the ignition system, malfunction of the vehicle’s mechanical components due to uneven engine operation.
New armored wires for VAZ 2112
Sn00pi › Blog › How to check BB wires? Troubleshooting.
How to check high voltage ignition wires?
Automotive high-voltage (HV) wires play an important role for internal combustion engines, since they help transmit high current from the ignition coil to the spark plugs. The serviceability and efficiency of the wires determines the timeliness and intensity of ignition of the fuel-air mixture, and therefore the correct and uninterrupted operation of the engine. Despite their simplicity, wires have many different “sores” and can cause a lot of troubles to their owner, which in one way or another will affect his nerves and pocket.
Malfunctions of high-voltage wires (common problems):
As a rule, the malfunction boils down to the fact that current either does not flow to the spark plug at all, or it does, but in limited quantities. This can happen for the following reasons: — There has been a break in the current-carrying wire through which the pulse travels. — There is a current leak, that is, the insulation is damaged and the current flows to the side. — The resistance exceeds the permissible value. — Problems in contacts (with a spark plug or ignition coil).
In the event of a break in the current-carrying wire, the effect of an internal spark occurs, in other words, an electrical discharge is formed between the ends of the broken wire, which reduces the voltage and causes an electromagnetic parasitic pulse. This impulse, in turn, negatively affects the correct operation of many of the vehicle's sensors. One such damaged high-voltage wire can cause vibration and interruptions in engine operation. Due to a damaged high-voltage wire, ignition in the cylinder occurs late or every other time, as a result, the synchronous operation of the cylinders and the engine as a whole is disrupted.
How to check high-voltage wires? Effective ways:
First of all, it is necessary to check the explosive for the absence of visible damage (cracks, fractures, etc.). Make sure there is no breakdown, this can be determined even without instruments, just look under the hood in the dark; in the event of a breakdown while the engine is running, a spark will be visible on the explosive wire. You can check high-voltage wires using a wire. To do this, you need to take a piece of wire in the dark and strip it on both sides. Then one end must be shorted to ground (machine body), and the other end must be drawn along the entire length of the explosive wires, as well as joints, caps, etc. A spark will form at the breakdown sites.
This is interesting: What to do if your car is stolen?
You can also check the resistance of the high voltage wires, for this you will need a multimeter. — Turn on the ohmmeter mode. — Remove the wire from the spark plug of the first cylinder and the ignition coil. — Connect the multimeter electrodes to the ends of the wire and look at the readings.
In good wires, the resistance should vary from 3.5 to 10 kOhm, depending on the type of wires themselves. Information about resistance is most often indicated on the insulation of high-voltage wires. Check each wire, the spread between them should not exceed 2-4 kOhm. If there is a large variation, replace the wires. By the way, they are changed as a set, that is, all together.
To complete your reading of the resistance of the most popular high-voltage wires: Tesla - 6 kOhm Slon - from 4 kOhm to 7 kOhm (4 kOhm - 1st cylinder and up to 7 kOhm - on the last cylinder) ProSport - almost zero resistance Cargen - 0.9 kOhm
Note! The resistance of high-voltage wires varies depending on the length, thickness, and material from which the wires are made.
How to check the spark plug wires of a VAZ 2112 with a multimeter
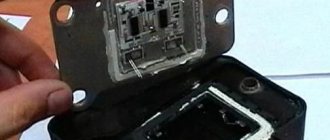
Before checking with a multimeter, it is worth conducting a visual inspection of the high-voltage line yourself for insulation damage, melting or chips.
Expert advice: Frequent causes of cable breakdowns are careless repairs or contact with hot motor parts. The cause may also be contact with active chemical elements on the insulation.
It is necessary to pay special attention to the contact part of high-voltage wires; they should not show signs of soot and oxidation. During inspection, you can also check for breaks in the high-voltage cable. To check, you need to start the engine and look at the high-voltage line. Sparks will jump at the rupture points.
Checking armored wires with a multimeter
The main problem with wiring is considered to be a problem with the spark plugs due to insufficient voltage. The cause of this malfunction may be:
- broken wires inside the insulation;
- voltage leakage due to poor insulation quality;
- cable resistance is higher than permissible;
- absence or poor contact between spark plugs and high-voltage lines.
In a ruptured high-voltage cable, an electrical discharge occurs, which causes voltage loss. As a result, it is no longer the rated voltage that is supplied to the spark plug, but an electromagnetic pulse.
Ignition: VAZ 2110 module, features and testing
So, the ignition of the VAZ 2110 for different engines (8 and 16 valve engines with working volumes of 1.5 liters and 1.6 liters) is set differently. At the same time, the operating principle, as well as the main components of the various ignition modules of the VAZ 2110, remain unchanged.
The most important thing in the ignition system is the creation of reliable and high-quality ignition of the fuel mixture at a time determined by the preliminary setting. Any deviations from the specified production parameters can lead to various breakdowns, including failure of the internal combustion engine.
If we consider the 2110 ignition coil and design features, it is important to know that VAZ 2110 cars at different times were equipped with different power plants with different ignition modules. For example, an 8-valve 1.5-liter engine has an ignition module with article number 2112-3705010, an 8-valve engine with a volume of 1.6 liters has a module with article number 2111-3705010, a 16-valve injector with a volume of 1.6 - module with article number 2112-3705010.. The modules are similar to each other in their main components and operating principle
The module for the VAZ 2110 consists of such basic elements as:
The modules are similar to each other in their main components and operating principle. The module for the VAZ 2110 consists of such basic elements as:
- two high-voltage switch switches in a common unit, through which current is transmitted to the spark plugs;
- two coils generating high-voltage pulses for pairs of spark plugs;
Moreover, the coil itself is actually a transformer with two windings (primary - about 500V and secondary - at least 20V), assembled into a single housing. The VAZ 2110 ignition module 8 valves and 16 works on the same principle (using the idle spark principle).
This means that the module, according to pulses transmitted from the ECU, distributes sparks in pairs to cylinders 1-4 and 2-3. The ECU sends low-voltage control signals to the module. The end of the signal corresponds to the beginning of the spark discharge. The duration of the discharge directly depends on the level of charge of the coil (the total value of the on-board voltage).
Purpose
Gasoline engines operate by burning fuel in the cylinders, ignition is carried out using a spark plug, which generates a spark. The supply and distribution of current is handled by the ignition system, in which high-voltage wires play a very important role. Through them, high-voltage voltage is transmitted directly to the spark plugs from the ignition module. Transporting voltages reaching 15,000 volts is quite a serious task, which the wires must cope with without difficulty.
Self-check of automotive high-voltage spark plug wires of the ignition system
It is necessary to begin diagnostics with an external inspection of high-voltage wires. During such an external examination, the presence of noticeable defects in the form of cracks, fractures, etc. is not allowed.
- The easiest way to check is to use a known good spare ignition wire. It is necessary to disconnect each armored wire one by one, replacing it with a spare one. Stabilization of engine operation after replacing one of the wires will indicate a faulty element.
- To identify a possible breakdown of the ignition armored wire, you must wait until it gets dark. When darkness falls, you will need to open the hood and start the engine. If there is a breakdown, then during engine operation an electric spark on the damaged high-voltage wire becomes clearly visible.
- Also, checking high-voltage automotive ignition wires can be done by using an additional insulated wire. To check, the ends of such a wire are stripped (exposed). Then one end is shorted to ground, and the other end should be passed along the highest voltage wire, connections, bends, caps, etc. If there is a breakdown in a certain place, then an electric spark will appear between the breakdown area and the end of the tester wire.
- Checking the resistance of high-voltage car wires is carried out using a multimeter. To check, the multimeter must be switched to operating mode as an ohmmeter. The next step is to remove the wire from the spark plug on the first cylinder, after which the specified wire is also disconnected from the ignition coil. Then the contacts of the multimeter are connected to the ends of the wire, after which the obtained data is evaluated.
In a similar way, you should check the remaining high-voltage ignition wires. It should be taken into account that the spread in readings between all wires should not be higher than 2 or maximum 4 kOhm. Exceeding this threshold will indicate the need to replace high-voltage automotive ignition wires.
It should be added that if a faulty wire is detected, replacing only one defective element is not recommended, since it is a temporary measure. It is optimal to replace high-voltage armored ignition wires in a car as a set. This approach allows for the most efficient operation of the ignition system and smooth engine operation in all modes. For the same reason, it is highly not recommended to repair high-voltage wires for further operation without replacement.
Do-it-yourself tuning and modernization of spark plugs to improve fuel efficiency and other characteristics of the internal combustion engine. How to modify the candles yourself.
Signs of faulty spark plugs. Assessing the condition of a spark plug during a visual inspection, methods for checking spark plugs. Plaque on the spark plug electrodes.
Examination
To begin with, you can simply inspect the wires for damage. If a visual inspection does not yield anything, you will have to arm yourself with a multimeter. To do this, you need to disconnect the wire, switch the device to ohmmeter mode and attach the probes to different ends of the wire. Resistance information will appear on the multimeter; the values should not exceed more than 20 kOhm, otherwise replacement is necessary. Thus, check all the wires.
If you don’t have a multimeter at hand, but you need to check the wires, then there is such a diagnostic method. You need a regular wire with ends exposed on both sides. So, short one side to ground (fix it to the car body), and drive the other side along the surface of the armored wire. If it starts to spark somewhere, the wire is faulty and needs to be replaced. This diagnostic can also be used to check the tips.
Checking high voltage wires
Checking wires with a multimeter
The first sign of a wire malfunction is the presence of an external spark on the explosive wires. It is easy to see in the dark by looking under the hood.
The next method is also best done in the dark: take a piece of wire and strip it on both sides. Next, we connect the wire with one end to ground (battery or car body), and with the other end we run it along the wires at the joints, caps, etc. if there is a leak, a spark will form.
To check the resistance of the wires, we need a multimeter in ohmmeter mode.
In order not to confuse the wires, it is more convenient to check them one by one, i.e. remove the wire from the 1st cylinder and remove the other end of this wire from the ignition module.
- Turn off the ignition.
- Remove one end of the wire from the cylinder.
- Remove the other end of the wire from the ignition module (as in the figure).
- We connect both ends to an ohmmeter and watch the readings.
- We carry out the same operation on all wires.
For serviceable wires, the resistance should vary from 3.5 to 10 kOhm, depending on the manufacturer (written on the wire insulation). And the permissible spread is 2-4 kOhm. If the spread is greater, then the wires need to be replaced (Replacing VAZ high-voltage wires).
Signs of faulty wires
There can be many different signs of faulty high-voltage wires, but there are several signs that, once detected, require the wires to be replaced.
Signs:
- The car jerks when you press the gas pedal. This is due to the fact that with a higher load the engine needs a large amount of fuel and its timely combustion, but since the wires are not able to give a spark at the right time, the car begins to twitch.
- When starting the car, one or more cylinders may not fire. This is due to the fact that when a spark is transmitted, it breaks through to the housing due to breakdown of the insulation.
To check the wires in more detail, you need to remove them from the car and carefully inspect them.
The wires should not contain:
- Gusts;
- Zadirov;
- Insulation breakdowns;
- Cracks in the plastic case;
Rupture of the protective cap of the GDP
If such problems are found on the wires of your car, then they need to be replaced.
Connecting armored pipelines VAZ 2110 injector 8 valves
Where did all this even start? Yes, because one day after work I started the car and realized that it was a complete mess. I opened the hood and looked. I think we need to check which cylinders are working. I take the wire of the first cylinder. And then the machine gave me a thousand pricks from the discharge that this wire emitted... Everything is clear, it breaks through. Having warmed up to 40 degrees, the tripping disappeared o_O. Ok, you can live. went home. I started thinking about what to do with the wires that I bought a year and a half ago. "Elephant". I looked at how much new ones cost - 900 or more, silicone wires. Hmm...a little expensive. I started digging into the drive. And then I remember that I saw an article about homemade explosive wires. 1 minute in Google and 15 articles on the drive are ready to read. Someone makes it from ZIL wires, there is a copper core - the resistance tends to 0. Someone makes a corrector vacuum from acoustic wires and silicone hoses. I settled on this decision. The article that I took as the BASIS! Special thanks for the advice Stuff0rd McSystem
What we need: - MGTF wire -0.35mm 2 meters (enough almost point-blank)
(I came across this brand of wire by accident in the comments) I read that the cross-section is not so important as the insulation of the wire, and that 0.2-0.5 cross-section is enough for the eyes. — Silicone vacuum corrector hoses 3 pcs
— Heat shrink 8mm (more than the diameter of the hoses) — 2 meters. - BB wires. - VDeshka - Someone’s mother... (Required!)
1. First, we take the old (or the only ones - like I did) wires and begin to disassemble them. I simply pulled the terminal on the spark plug side out of the insulator. It's hard but it works out. But the corner terminal must be carefully disassembled and the wire pushed towards the terminal so as not to damage it. Since I also pulled out the first one by force and almost broke it at the bend))
Products from Carden: main features
Products from this brand are used on cars of various brands: GAZ, ZAZ, VAZ and so on. The products are designed to operate at temperatures up to +180 degrees. The minimum indicator is minus forty degrees. The length of the wires may exceed the length of those products installed on the vehicle.
Carden high voltage wires
The characteristics of products from this company are high, since they contain two layers of silicone insulation. The company guarantees that the wires will withstand considerable voltage - up to 45,000 volts. Before installing new products, it is necessary to check the spread of their resistance. If it is too high, then you should think about replacing the old options.