Modern cars are rich in technical innovations that ensure stable operation of all systems. The VAZ 2114 crankshaft sensor plays an important role, and if trouble happens to it, you won’t be able to start the car.
Depending on how the crankshaft is positioned, the position of the piston system is calculated, and this affects the period of occurrence of a spark on the spark plugs and the supply of fuel to the combustion chamber of the cylinders. Errors in the operation of a miniature device can be critical.
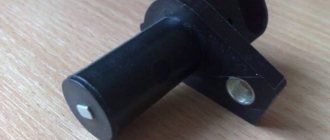
The device of the crankshaft sensor on the VAZ 2114
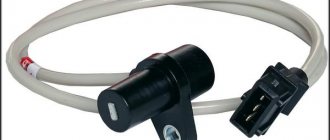
Externally, this small device is a plastic geometric figure, round on one side, rectangular on the other, and in the middle there is an ear with a hole for attaching to the body.
- This little thing in the car performs a rather important function - it reads the crankshaft rotation data and sends it to the “brains” of the car.
- The position of the crankshaft determines the location of the pistons. And based on this information, a periodicity of sparks occurs on the spark plugs, and the gas distribution mechanism, using an injector, supplies fuel to the combustion chamber of the cylinders.
Functionality check
Checking the crankshaft sensor is usually limited to visual inspection. Open the hood and pay attention to:
- Frame. The main sign that it is time to change the sensor is cracks.
- Increasing the opening on the bearing. As a rule, a score is formed that widens the gap.
- There are scratches on components.
- Condition of the crankshaft bearings. If they are melted, this indirectly indicates a breakdown of the DPVC.
- The gap between the crankshaft and the liner. Also point out any burrs that have formed.
- Condition of the key. As a rule, if the DPKV malfunctions, it is cut off.
How to check the crankshaft sensor of VAZ 2115 and 2114 more accurately? Multimeter required:
- Check the resistance first. Normally, it should be from 500 to 700 Ohms.
- Then you need to measure the voltage. Select the 200 mV position and connect the probes to the contact group. Then move the screwdriver near the sensor. The sensor will react to metal, and the voltage should appear on the display. If this is not the case, the sensor needs to be replaced.
What happens if the crankshaft sensor on a VAZ 2114 is faulty
If the crankshaft sensor malfunctions, not very pleasant things can happen to the car.
- It may start to twitch, trip, stall at idle.
- Also, if the sensor is faulty, the car may seem to be driving normally at first glance, but if you look at the fuel consumption, it will be much higher.
This happens because the electronics are unable to sense the ideal timing of spark and fuel. Therefore, whenever possible, it is better for motorists to carry a spare DPKV sensor with them. It is not expensive, 200-400 rubles, depending on the manufacturer.
AC voltage measurement
Checking the VAZ 2114 dpkv by measuring the variable component of the output signal is as follows. In order to measure the alternating component of voltage, it is necessary to ensure the appearance and absence of metal at its sensitive surface with a frequency of at least 200 Hz. To do this, you can use an auxiliary motor with a disk and a slot or protrusion, depending on the type of sensor. And power the sensor winding with a constant voltage of 1 or 2 V. Then switch the multimeter to the voltage measurement mode with a limit of up to 2 V of the alternating type. Next, you need to take a capacitor with a capacity of at least 1 μF and connect it to one of the terminals of the crankshaft position sensor, and the other end to one probe. Place the second probe on the second contact of the coil and turn on our resulting stand. Voltage should appear on the device readings when the disk rotates, this indicates that it is working properly. But, unfortunately, you will not see this voltage rating in the passport data. Because it depends on the selected capacitance, the more you increase it, the closer the readings will be to the supply voltage.
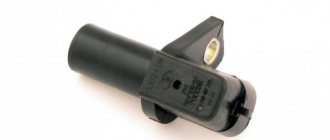
Types of crankshaft sensors
Inductive
inductive
Inductive (electromagnetic) inside have an iron rod wrapped with copper wire. This is the most common type of sensor. If a metal part (crankshaft pulley) appears near the rod, it reacts to its magnetic field, as a result of which its electromagnetic signal changes, which is fed to the electronic control unit. The concept of inductance itself is the extraction of energy from an electric current and storing it in another form.
The difference in signals before and after the passage of the crankshaft pulley is transmitted to the copper winding of the rod and an alternating current is generated on it. The winding itself is routed to a connector located on the DCPV housing. From the chip there are wires connecting the device to the control unit and the engine. The resulting alternating current is transmitted to the “brains” of the fourteenth, which determine the current position of the crankshaft. This type of sensor is considered more reliable and simpler than its counterpart.
Frequency
frequency
The design and operating principle of the frequency-type crankshaft sensor is more intricate. Such devices also have an electromagnetic rod, but they are equipped with a converter operating on the Hall principle, which generates a frequency pulse from the resulting alternating voltage.
Information is supplied to the ECU in the form of pulse signals, similar to an electromagnetic sensor. Among the disadvantages of this device are the excessive susceptibility of the device to electromagnetic interference occurring in the circuit, and the presence of an electronic circuit in it reduces its reliability.
The principle of operation of the sensors is the same, but their devices are slightly different. The first sensor has become more widespread due to its simpler design.
Dismantling and installation
So, you have determined that the DPKV has failed. Therefore, there is nothing left to do but replace it. To do this you will have to dismantle the old device.
- Turn off the ignition and open the hood. Securely secure it to avoid unpleasant blows to the back or head.
- Remove any dirt from around the sensor so that it can be removed and visually inspected.
- Disconnect the wiring block from the corresponding connector.
- Using a 10 mm wrench, you can easily remove the crankshaft sensor mount.
- Remove the damaged device.
- At the same time, be sure to check the generator drive timing pulley. It is not uncommon for damage to appear on it, due to which the device cannot operate correctly. These teeth cause error codes to appear on the on-board computer.
- If there are no defects and nothing prevents the installation of a new device, begin assembly.
- If necessary, clean the installation site of the DPKV.
- Place the new measuring device in the socket and tighten the mounting bolt. In this case, do not exceed a tightening torque of more than 12 N m.
- Be sure to use the adjusting washer, which is already supplied by responsible sensor manufacturers.
- Using a special feeler gauge, make sure that there is a gap of 1 millimeter between the pulley and the DPKV core.
- The gap error can be no more than 0.41 millimeters in the upward direction. Under no circumstances should the gap be less than the required 1 mm.
Maintain clearance
Price issue
As we have already noted, VAZ 2114 owners are not often faced with the need to change the DPKV. But always be prepared for such troubles.
You don’t have to spend a lot of money purchasing a new sensor. The price depends on the store and region where car parts are sold. On average, a recreation center costs about 200-400 rubles.
Crankshaft sensor malfunctions
- If the crankshaft sensor malfunctions, a check light on the vehicle’s instrument panel lights up.
- The car's traction may weaken significantly, the car may not start, the engine speed may fluctuate at idle (the speed can increase and decrease arbitrarily), and when driving, fuel consumption will increase.
- Sensor failure leads to disruption of the injectors responsible for fuel injection and disruption of the ignition system.
- Fuel injection does not coincide with the flashing of a spark on the spark plugs, which leads to unpredictable consequences.
- The car can even drive normally for some time with the check light on the instrument panel illuminated. But all this is temporary. As they say, “a good knock will come out.” However, of course, it is not necessary that with such symptoms it is the DKVP sensor that has broken down.
- Similar symptoms may occur if the oxygen sensor fails. If your car does not have an on-board computer, you can check the operation of the sensor by replacing it with a new one, or by going to a car service center.
Let's give an example. A friend's number fourteen started to malfunction and for a very long time he could not find the reason for this. I went to the service. They checked and found nothing, threw up their hands, and advised me to change the crankshaft sensor. Changed it. The car still stalls from time to time. I went to another service. They told me to change the oxygen sensor. Replaced that too. From the beginning everything was fine, and then everything returned to normal. The car started to shake again. Having achieved nothing in car services, he spoke about the problem at work. One colleague advised me to check the valves. I went, adjusted the valves and “a miracle happened.” One valve was indeed tightly pinched, and that was the cause of the malfunction. Therefore, before sinning on the sensor, carefully analyze the situation. In fact, the DKVP has a fairly long service life and does not fail very often.
Visual inspection of the sensor
However, if you still have suspicions that the crankshaft sensor may be the cause of the malfunction, then you need to remove it and inspect it.
- The first cause of malfunction may be cracks in the case, damage to the core, contacts.
- The sensor may also fail due to wear of the sensing element or a manufacturing defect. In this case, it is impossible to visually determine the functionality of the sensor. You'll have to go to a service center or buy a new one yourself and install it.
If the reason was not the DKVP, you can keep it in stock or return it to the store.
Method for checking the crankshaft sensor
You can check the functionality of the sensor yourself with a multimeter. It measures the resistance of the core winding. To do this, switch the device to the resistance measurement position. We set the switch to the 2 kOhm position. Then we press the clothespins of the contact group tightly to the sensor terminals. If the DVKP terminals are oxidized or dirty, they must be thoroughly cleaned with improvised means (sandpaper, needle file). This is also often the reason for sensor failure. The device should show from 500 to 800 Ohms. But you cannot be one hundred percent sure of its serviceability, since a removed sensor may give one reading, but during operation, when its temperature is increased, the readings may be completely different.
At this moment, a breakdown or short circuit may occur between the turns of the winding. This is where the whole difficulty lies, that is, in a non-working state everything is fine, but during operation the device produces an incorrect signal to the electronic control unit. If anyone still has it, you can look at the passport data of the crankshaft sensor. This piece of paper is usually placed in a box along with the device. The exact resistance and inductance must be specified here. You can also measure the inductance of the DCDC. To do this, place the device in the inductance measurement position. The working sensor readings should be about 400 mH.
The insulation condition of the sensor is also measured, but for this you will need another device called a megometer. Measurement in this case proceeds differently. We set the device to the 500 V mark. We connect one terminal of the device to the sensor body, and the other to its contact. In this case, the resistance should be about 20-25 MOhm. But this probably doesn’t make any sense. Therefore, decide for yourself what to do. Is it worth buying these devices for 500-800 rubles, or buying a sensor for 250 rubles. In principle, you can ask a neighbor or friend for the device. Everyone decides for themselves.
How to check DPKV
When it is suspected that the crankshaft position sensor is malfunctioning, it is necessary to dismantle the device and inspect it.
Causes and symptoms of sensor malfunction:
- the device body is cracked due to mechanical stress, the core or contacts are damaged;
- due to scuffing of the journal, the opening in the bearing has increased;
- the surface of the components is damaged, scratches or cracks appear;
- the sensitive element has failed over time;
- the crankshaft liners are melted;
- a manufacturing defect appeared;
- the gap between the crankshaft and the liner has increased;
- the working holes wear out or the key is cut off.
Checking the DPKV is performed with a multimeter. The device is capable of measuring the resistance of the core winding. This is done as follows:
- the multimeter switches to the required position, the switch is set to 2 kOhm;
- the contact group is located on the DPKV terminals;
- if the readings are from 500 to 800 Ohms, then the device is working properly;
- to obtain information about inductance, the multimeter is switched to the appropriate mode;
- If the sensor is in perfect order, then we remove the level of about 400 mH.
Often the terminals become dirty or oxidized. They are pre-cleaned with sandpaper. Multimeter readings do not give a 100% guarantee; a dismantled sensor may be faulty and give correct readings only in this form. While driving and the temperature rises, the readings may change. This happens if a short circuit occurs between the turns of the winding. We find the exact inductance and resistance indicators in the device data sheet.
The crankshaft sensor will also have to be replaced if the insulation is faulty. To check it, you will have to use a megohmmeter:
- the device is set to 500 V;
- one terminal is located on the contact, the second - on the body of the device being tested;
- The resistance of a working device fluctuates between 20–25 MOhm.
Replacing the position sensor can solve the problems that have arisen. These devices cannot be repaired, but quite often the cause of problems is contamination, which is not difficult to eliminate in a timely manner.
The car owner must ensure that the gap between the pulley and the device does not exceed one millimeter. A caliper is used for measurement.
Replacing the crankshaft sensor
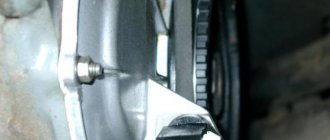
To replace the crankshaft sensor, you only need a ratchet wrench with a 10mm socket. You may also need an extension on the wrench, since removing the sensor is inconvenient. We open the hood and on the left side near the generator pulley we find the DKVP. It is screwed with an ordinary bolt to the oil pump cover. We disconnect the chip from the sensor and unscrew the bolt with a wrench.
We take it out of its seat. Installing a new device is carried out in the reverse order. You need to monitor the condition of the sensor. Periodically you need to clean it of dirt and ensure that the gap between the DCT and the pulley is according to the regulations. The gap between the generator pulley and the sensor core should be 0.61-1 mm. It can be measured with a caliper. The sensors are not repairable. Therefore, the faulty sensor can be safely thrown away.
Thus, the sensor is a fairly important element in the electrical part of the car. Its malfunction negatively affects the operation of all components and mechanisms, increasing their wear.
Using an Oscilloscope
Using an Oscilloscope
This method is the most reliable and with its help you can be 100% sure of the current state of the sensor. To do this, you need to turn on the oscilloscope to a limit of 10 ms and an amplitude of 1 V/div. And try to start the engine with the starter. In this case, on a well-charged battery, the engine should be accelerated by the starter to 800 rpm, this will correspond to a frequency of 200 Hz and a corresponding period of 5 ms/div. You should observe impulses, one period of which occupies two cells.