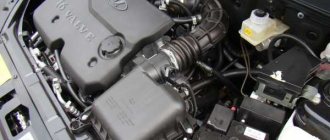
The body structure of the VAZ-2109 car is made in the form of a metal frame. The frame is welded from stamped parts by spot welding.
Therefore, you can change individual body elements without passing through other places. On a VAZ 2109, the radiator frame is replaced when cracks appear on it.
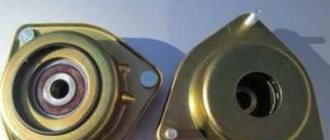
Since the engine mount is installed at the bottom of the frame, when it is loosened, the engine itself sags. Replacing the VAZ 2109 radiator frame can be done easily and on your own.
Sequencing
First, we’ll tell you how to replace this part yourself. You will need to prepare the car - sequentially disassemble it from the engine compartment so that you have access to the radiator. Dismantle it and the old part. Next you need to do:
- Sand the new part (it is covered with shipping primer) and re-paint it with automotive primer. Do this only in advance, since later it will be impossible to do this work from the engine compartment.
- Use a chisel and hammer to remove the old grate.
- Clean the welding points, putty and coat with primer. Take measurements and weld the new frame. Place the weld points where they were.
- Paint the outside of the structure. It is advisable to additionally cover it with anti-gravel.
- Reassemble the car in reverse order.
Replacing the TV is extremely important, as if it is weak, it may sag and break. The cost of this work at a service station is quite high, so car enthusiasts often try to make the replacement themselves.
Easter basket bunnies
December 13, 2022 admin
Easter basket with bunnies. Patchwork Sewing Postila
Basket of rabbits for Easter. Pattern BLOG HOUSEWIFE
DIY Easter basket with bunnies. Master class with step-by-step photos / Masterclasses Blogs
Easter with animals.
Easter Basket With Eggs And A Bunny On A Green Meadow With Flowers Stock Photo, Picture And Royalty Free Image.
Easter. Easter basket. Master Class. razpetelka.ru
Life is full of red and black crosses. — Easter basket with bunnies. Patchwork
Easter Rabbits with a basket of eggs - Photo, image, buy posters, order posters, paintings on canvas. — Russia — Posterok.com
We sew Easter baskets - sewing
Easter bunnies. Discussion on LiveInternet - Russian Online Diary Service
Basket HARE COUNTRY EASTER Orange Gifts
Easter. Easter basket. Master Class. razpetelka.ru
Baskets, boxes “Bunnies and Bunnies”. Discussion on LiveInternet - Russian Online Diary Service
Sunny bunnies Happy Easter
Stickers Easter basket 48292 production and printing to order in Minsk
Basket with bunnies / DIY / basket with flowers with your own hands / Pinme.ru / Pinme
Easter wallpaper. Discussion on LiveInternet - Russian Online Diary Service
Easter ideas and inspiration. Continuation.
rabbit basket with bow. square
Easter. Hares with a basket of eggs — Stock photo Natalia Preobrazhenskaya (natalinka) (#2023425) Stockfresh
Leave a comment
How to weld a TV on a VAZ 2109 video
The VAZ-2109 was produced quite a long time ago.
Over the years of service, its radiator grille was exposed to an aggressive environment in the form of salts and moisture. It is for this reason that more and more often motorists have to change it. Replacing a VAZ-2109 TV yourself can only be done if you have a welding machine. How to replace a VAZ-2109 TV with your own hands
Sequencing
- Sand the new part (it is covered with shipping primer) and re-paint it with automotive primer. Do this only in advance, since later it will be impossible to do this work from the engine compartment.
- Use a chisel and hammer to remove the old grate.
- Clean the welding points, putty and coat with primer. Take measurements and weld the new frame. Place the weld points where they were.
- Paint the outside of the structure. It is advisable to additionally cover it with anti-gravel.
- Reassemble the car in reverse order.
Replacing the TV is extremely important, as if it is weak, it may sag and break. The cost of this work at a service station is quite high, so car enthusiasts often try to make the replacement themselves.
How to amplify a new TV on a VAZ-2109
It is necessary to drill holes around the perimeter of the new TV to help secure the part more securely. Through them you can fasten the grille with self-tapping screws. Next, install the headlights, look at the gaps and weld the structure. Clean the weld spots.
Step-by-step replacement of the VAZ-2109 door lock cylinder
To strengthen the structure, weld a profile pipe at the bottom. Weld it to the walls, and then install the second part of the TV. The pipe profile should be square 50x50 millimeters.
Postcard template for February 23
December 13, 2022 admin
Postcard template for February 23 » Allday - all the best in the world of graphics and design!
DIY postcard stencils for February 23
Gallery.ru / February 23 – humorous postcard (PSD) – TEMPLATES FOR PHOTOSHOP – download (1) – solncewo
Congratulations » Department of Education of the Molchanovsky District Administration
Happy Defender of the Fatherland! — Union of Free Trade Unions
Background for postcards for February 23 (33 pictures)
Make a postcard for February 23rd. Postcard template included Tatyana Saxon's blog
Download postcard frame for February 23
Templates for presentation February 23 – Templates for presentations – File catalog – Everything for the Schoolchild
DIY postcard stencils for February 23
DIY postcard stencils for February 23
Postcard design for February 23
February 23 /templates/-article on the website “ADVERTISING SERVICES CENTER”
Postcard template for February 23 » ALLDAY - people's website about design
Lika Golden VK
February 23 frame
PSD source of the poster-card for February 23rd! » 3drus – 3D graphics, 2D graphics, web design, 3d Max, Maya, Blender, ZBrush, Adobe P
Holiday February 23rd Defenders of the Fatherland Day - For kindergarten teachers - Maam.ru
Leave a comment
Delivery by transport company
Delivery by one of the transport companies with a representative office in your city. Delivery time: 2-10 days depending on the distance of your locality from Togliatti. The most convenient and fastest way to deliver orders of different sizes. Delivery cost from 250 rub. depending on weight and delivery distance.
Orders are sent by transport companies based on 100% payment for the order. Dispatch by transport companies PEK, KIT, Baikal-Service is carried out on Wednesday, Thursday and Friday.
Big heart made of balloons for a wedding
December 13, 2022 admin
How to decorate an apartment or house for Valentine's Day? (13 photos)
heart-baloons-1-1 » Decoration and decoration of a wedding with balloons in Kyiv. Price
Heart of balls, Heart of
Heart made of balloons, buy heart-shaped balloons with helium Rainbow balloons
Hearts made of balloons for a wedding
Decoration with balloons for weddings, balloons for a wedding, wedding in Kazan Shar Sharych
Heart made of balloons. Air balloons. Balloons, helium balloons, balloons, helium, helium balloons. — buy in Krasnoyarsk
Launching a heart from round balls. in the city of Rostov-on-Don - Portal of profitable purchases BLIZKO.ru
Ivanovo flea market IvBB.RU * Bouquets of balloons, decoration with balloons
Personal website – Decoration of a wedding hall with BALLOONS
decoration of the hall for a wedding, balloons for a wedding, decoration of the presidium of the newlyweds.
Wedding decoration - Holiday44: Kostroma holiday catalog
Elena Polskaya VKontakte
Heart made of balloons for Valentine's Day
Hearts for wedding photo
Heart, double heart made of balloons Sunrise
Big hearts
Our names, animated pictures, photo printing, catalog
Decoration with balloons – Maritime Agency BaltFlot St. Petersburg
Who pays for the wedding? How to save money on a wedding
Leave a comment
How to amplify a new TV on a VAZ-2109
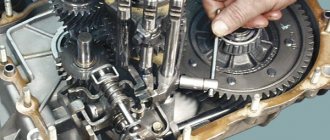
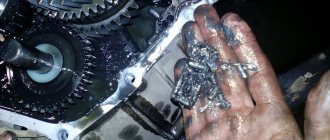
In the process of self-repair, you can strengthen the structure. To automate the process, the old TV is removed using a drill. Therefore, the upper and lower parts are often removed separately. During the process, monitor the condition of the bottom - the place where the part is attached to the body. You will need to join two sheets of metal. To do this, leave the width only 2 millimeters, many masters leave 5, which is wrong. Carefully, slowly, remove the metal to leave the desired sheet width.
It is necessary to drill holes around the perimeter of the new TV to help secure the part more securely. Through them you can fasten the grille with self-tapping screws. Next, install the headlights, look at the gaps and weld the structure. Clean the weld spots.
To strengthen the structure, weld a profile pipe at the bottom. Weld it to the walls, and then install the second part of the TV. The pipe profile should be square 50x50 millimeters. Thanks to this profile, the structural parts will not rotate. On 16-valve engines, it is imperative to use a pipe, since this power unit is heavier in weight. After you have made the first welding points and secured the part, remove the screws and weld the structure again.
Replacing a TV on a VAZ 2109 is not changing the wing; you have to work hard. In terms of time, this activity can take 5-6 hours. The reason for replacement is most often the age of the car and the constant exposure of the lower part of the radiator grille to an aggressive environment, which actually causes it to rust. In a weak spot, the TV may burst and lead to breakdown with serious consequences, since the motor may sag. You can replace the radiator grille yourself (if you have a welding machine), but it is better to take it to a service station.
VAZ 2109: replacing the radiator frame on your own
Radiator frame and its repair
The body structure of the VAZ-2109 car is made in the form of a metal frame. The frame is welded from stamped parts by spot welding. Therefore, you can change individual body elements without passing through other places. On a VAZ 2109, the radiator frame is replaced when cracks appear on it. Since the engine mount is installed at the bottom of the frame, when it is loosened, the engine itself sags. Replacing the VAZ 2109 radiator frame can be done easily and on your own.
Are you looking for VAZ body repair in Ulyanovsk (Simbirsk)?
Body repairs of VAZ vehicles of varying degrees of complexity from modern manufacturers are performed using modern equipment. All types of work are carried out in compliance with the recommendations determined by leading market companies. In the case when VAZ body repair requires restoration of the body geometry, the elimination of defects takes place on the basis of stocks. The use of slipways from leading companies allows us to perform body repairs of any makes and models of domestic and foreign cars, including VAZ. In cases where body parts are made of aluminum, argon welding is used during body repairs. In some cases, this technology allows you to save an expensive part from being replaced. In case of minor damage to the paintwork, VAZ body repair uses a special technology in which only the damaged area is repaired. In this case, VAZ body repair is effective for scratches, chips, and abrasions. Often such car body repairs are also accompanied by repairs and painting of bumpers and plastic parts.
Sequence of actions when replacing a TV on a VAZ 2109
1. All spare parts of the new radiator are covered with shipping primer, which will have to be torn off, re-primed with automotive primer and painted. This must be done before installation on the car, since after, from the engine compartment, there will be no such opportunity. 2. Dismantle the old radiator grille. Basically, it is always attached by welding, and no bolts are used, so we remove the spot weld using a chisel and hammer. 3. The next stage of replacing the VAZ 2109 TV will be the installation of a new radiator grille. It is necessary to make a control measurement and weld a new frame. A mandatory procedure is to clean the welding points with a grinder, followed by putty and primer of the entire surface. 4. The preparatory stage is completed, you can start painting the TV from the outside. The TV is not necessary, but it is also advisable to treat it with anti-gravel. 5. Install all car parts in reverse order. Replacing the TV on a VAZ 2109 is completed.
The VAZ-2109 is a car that is not distinguished by a strong body; iron quickly succumbs to corrosion, and almost all body parts rust. Replacing the front spar is required when its metal is rotten in different places; the part is also replaced if it is severely deformed after an impact (accident).
Front wing
On the “ten”, the front fender is dismantled for repair or replacement, as is the radiator frame. Here are the instructions to follow when making a replacement:
- The battery is de-energized by disconnecting the terminals;
- The fender liner is removed;
- The decorative element of the threshold is then dismantled;
- The wing is moved slightly to the side, the side repeater is removed from its place;
- The protective cover is removed, after which the socket with the lamp is disconnected;
- There is a bolt at the bottom that secures the buffer on the side; it needs to be loosened;
- Now you need to unscrew the 5 nuts securing the protective component of the crankcase;
- Another bolt securing the wing from below is unscrewed with a 10mm head;
- All that remains is to unscrew the rear and top bolts. It will be more convenient to do this through the wheel arch;
- The wing is removed;
- A new one is installed, and the seal and cuff must also be changed;
- After carefully adjusting the gaps, the bolts are finally tightened.
Article on the topic: How to hack a Samsung smart TV
Replacement
To carry out repair work, you need to prepare tools, materials, power tools:
- complete set of keys;
- locksmith - chisel, hammer;
- electric welding machine;
- electrodes dia. 2 mm;
- drill;
- drill dia. 5-6 mm;
- a grinder with a grinding wheel, have a metal disc in stock;
- primer;
- paint;
- solvent;
- aerosol can with anti-gravel composition in black Body 950;
- cotton gloves;
- canvas mittens;
- rags;
- fire extinguisher – you need to check the expiration date;
- plastic containers for 6-7 liters, they can be made from 10 liter canisters;
- safety glasses;
- tassels;
- moisture-resistant sandpaper.
Preparing the machine
Replacing the lower cross member of the VAZ 2109 radiator frame
Place the vehicle on a flat surface:
- Open the hood.
- Open the expansion tank cap.
- Place a container under the cooling radiator and open the drain plug.
- Drain the antifreeze.
- Place the second prepared container under the engine and drain the antifreeze from it.
- After this, install and tighten the plugs.
- Disconnect both terminals from the battery.
- Remove the battery.
- Place wheel chocks under the rear wheels.
Tip: before lifting the front end, it is advisable to remove the rims. Since when carrying out welding work, a spark may fall on rubber cylinders.
- Raise the front of the car with a jack.
- Install standard supports.
- Align the front part of the body level. You can apply a level.
- Remove the front decorative grille.
- Unscrew the headlight mounts from the engine compartment and disconnect the terminals.
- Take them out and put them on a rack in the garage.
- Unscrew the upper radiator mounting. First remove the electrical wiring terminals from the fan and remove the wires as far as possible from the intended work area. If possible, wrap the wires with tarpaulin.
- Tilt the radiator towards the engine and unscrew the clamps securing the pipes.
- Remove the pipes. Move them away from the front end.
- Remove the radiator and fan assembly.
- Remove the radiator inserts from the lower channel.
Preparing the frame
VAZ 2109 radiator frame panel
When carrying out work by one car enthusiast, it is necessary to prepare the purchased parts:
- Clean the frame parts from transport primer. Pay special attention to welding points and bends.
- Use welding to weld the joints.
- Clean with a grinder. If necessary, straighten.
- Apply a solvent with a brush to degrease the metal.
- It is necessary to prime the internal parts first, since after they are installed from the engine they become inaccessible.
- After checking these parts on site, mark them.
- Connect them together with clamps.
- Carry out welding work to connect them. Start welding parts from the top and gradually move to the bottom.
- Clean welded joints.
- Strip the front of the frame down to metal.
- Cover with primer, then paint with one coat of paint.
- The sealant is applied.
While the parts are drying, you need to cut off the old frame.
Removing the old frame
Note: before cutting, you need to select a flat piece of wood and cut it to fit the space from left to right. Make marks on the block for the frame, at the installation sites and in the middle of the frame. To prevent welding sparks from hitting important parts, place a sheet of metal in front of the engine and cover the engine itself with a tarpaulin. After this, start cutting.
So:
- Using an electric drill, drill out the spot welds at the fastening points. The outer part of the frame is welded to the side members (see Replacing the front side member on a VAZ on your own).
- Now use a chisel to cut off the remaining weld seams.
Note. If it doesn’t lend itself well, put a cutting disc on the grinder. Carefully, taking great care when cutting, trim the welding areas.
- Remove old frame.
After cutting the frame, inspect the internal surfaces of the engine compartment. If necessary, correct any detected defects. Apply primer and sealant.
Preparatory activities
To repair the bottom with your own hands, you first need to prepare in a certain way. You will need a set of tools, premises, a lot of time, experience and desire to do such things.
Of the tools, it is especially important to prepare the following components:
- Welding machine. In the case of repairing the underbody of a car, it is better to use a semi-automatic machine with wire and carbon dioxide. It is better, more efficient and more reliable than gas and electrodes;
- Angle grinder. It will be useful, if necessary, to remove rust from the floor, to adjust elements and patches, to clean seams and surfaces;
- Car stands. Here you can use various items. So look for what you have;
- The rest of the kit is standard and includes such components as anti-corrosion solution, mastic for seams, welding wire, sandpaper, primer, soundproofing sheets, paint, etc.
Now you need to drive the car into the garage or other equipment room and put it on stands.
The machine should be positioned in such a way that it is comfortable and safe to work under it.
Disconnect the battery, then remove the doors. In this case, experts advise providing spacers for doorways in order to maintain body rigidity and the necessary geometry.
Dismantling the interior
Since you need to repair the underbody not only under the car, but also from the inside, you will have to completely disassemble the interior. This is a difficult task that will take a lot of time. Be psychologically prepared for this. You will have to dismantle:
- Armchairs;
- Floor tunnel lining;
- Carpeting;
- Air ducts;
- Soundproofing layer.
Carefully collect all the wiring, combine it into bundles if they are not collected, so that later there will be no problems with assembly. Collect all fasteners, distribute them into boxes or bags, and label them. This is extremely important because you may face serious problems later.
Article on the topic: How to check capacitors on a TV
If you plan to completely replace the bottom or weld a panel to the floor, then the dashboard and beard will have to be removed to create open access to the engine shield.
Lifting a car
Welding
So, you have disassembled your VAZ 2110, so now you can really assess the condition of the bottom, as well as analyze the required amount of work. The most optimal situation is one that does not require replacement of elements. The rust spots are cleaned until high-quality metal is obtained, after which they are strengthened by patches. But not everyone manages to face such a situation.
If the holes in the bottom turn out to be through, this will lead to a loss of body rigidity, therefore it is strongly recommended to replace the element completely. In the case of the VAZ 2110, the following body elements are distinguished:
- Floor panels;
- Support platforms;
- Threshold extensions;
- Spar extensions;
- Crossbar;
- Connectors.
Now let's discuss a few basic nuances of welding.
- To replace a part that has “slipped” due to corrosion, it must be drilled out at the welded points or simply cut off using a grinder.
- Do not forget that the brake and fuel system pipelines pass under the bottom. It is extremely difficult to dismantle them, so the easiest way is to cut them off and install new pipeline elements during reassembly.
- If the floor panels are in critical condition, the entire bottom assembly should be replaced. But in this case, be sure to dismantle the exhaust system.
- If it is necessary to change the thresholds, they are dismantled and new ones are installed one by one. It is important to control the geometry.
- If the floor and thresholds are being replaced at the same time, the thresholds are replaced first, and only then the floor panels.
- Carefully mark the elements for welding. The old components must strictly correspond to the new ones being cut out.
- You cannot do without an assistant, so agree in advance with someone who can help you.
- Always start the bottom from the bottom, then grab it.
- Do not make the main weld using a continuous weld. Maintain a step of approximately 4-5 centimeters.
Related article: How to reset network settings on a Samsung TV
When welding work is completed, be sure to carry out anti-corrosion treatment.
Finishing
Now the condition of the new, or rather updated, body should be brought to perfection, providing the necessary high level of protection against corrosion, destructive rust, gravel and other troubles. To do this, perform several sequential operations:
- Clean the metal, removing scale and achieving shine;
- Lubricate the surfaces with joint compound;
- Treat metal elements with primer;
- Apply a coat of paint to match the body color;
- Treat the outside of the bottom with mastic and anti-gravel compound;
- Measure carefully and then cut out the sheet sound insulation with scissors. It is heated with an industrial hair dryer and placed on the bottom. This is if we are talking about bitumen noise.
Updated body
Now the work on repairing the underbody of your car is approaching its logical conclusion. However, a difficult, important stage of reassembly awaits you ahead. Therefore, we strongly do not recommend relaxing.
If you correctly disassemble the interior and dismantle the underbody elements, there should be no problems with their assembly. We advise you to write down each stage, record it on video, and sign each bag with fasteners.
As you can see, it is quite possible to repair the bottom yourself. Just do not work at random, without prior preparation and appropriate tools. This is a good way to save money, but if you lack experience and skills, it is better to contact specialized service stations with such problems.
Purpose of the spar
The spar is a load-bearing body element, which is a beam, serves as the basis for fastening the components and components of the car, and also plays the role of a shock absorber, softening the impact, absorbing deformation. The “nine” is equipped with paired front and rear spars; these body elements experience significant load.
If a car can move without problems with a dented fender and a rusty door, then the car should not be driven with a deformed front spar (PL). If this part is damaged, quite serious problems may arise:
- tires will quickly begin to be eaten away;
- the car is poorly controlled;
- the body loses strength and collapses.
If the condition of the spar is not the most critical, it can be welded, the geometry can be corrected on a special stand (slipway); in case of severe deformation or if there are cracks, the body element should be replaced. But it should immediately be noted that it is very difficult to do such work with your own hands - here it is important to accurately install the part, you must use welding. If the body element is installed incorrectly, the geometry of the body will be disrupted and the work will have to be redone.
The cost of the front side members of the VAZ-2109
The right front spar is very similar in design to the left one, but the parts are not interchangeable, they seem to be a mirror image of each other. Body parts for the “nine” are sold in almost every specialized auto store; you can buy a front spar for an average price of 1,800 to 2,200 rubles.
You can also purchase a PL repair insert; it can be useful if the entire body part does not change and needs to be repaired. The average cost of an insert on the right or left side is 800-1000 rubles, like the spars themselves, the repair inserts from the “nine” are identical and fit on models 2108, 21099, 2113-14-15. There are no side member reinforcements as such for the front part of the body on the VAZ-2108-09-099; rigidity is added to it by the lower radiator frame (“TV”), which is a connector and is welded in front between the left and right load-bearing parts of the body, and the front wing mudguards.
Tuning the high panel of the VAZ 21099
December 13, 2022 admin
Tuning VAZ 21099 photo with your own hands
Panel vaz 21099
Connection diagram for tachometer VAZ 2109 high panel
VAZ 2109 interior tuning video, owner reviews, photos - Tuning VAZ 2109 (Tuning nines)
Instrument panel tuning. Installing VDO in a high panel
Illumination of the instrument panel VAZ-21099 (high panel). Reglage de la vie
Wiring diagram VAZ 21099 carburetor high panel
VAZ 21099 high panel photo
Disassembling a torpedo VAZ 21099 video - panels on VAZ 2108, 2109, 21099
VAZ 21093 instrument panel tuning – VAZ Garage
Search by tag #nines on the website Wigeo.RU
I WILL BUY A BEARD FOR A HIGH TORPEDO VAZ 21099 - Yarportal, Yaroslavl forum
VAZ 21099 tuning salon photo
Tuning the dashboard (Hand made manual)
Removing and replacing a high panel on a VAZ 2108, 2109, 21099 - do-it-yourself car repair, video and repair and maintenance manual
Dashboard VAZ 2109 tuning
Tuning the dashboard of a VAZ video, owner reviews, photos - VAZ 2106 tuning the instrument panel, watch video
21099 tuning photos
Tuning VAZ 21099 :: You are your car
Europanel VAZ 11113 diagram
Leave a comment
Removing rotten parts
We begin repairs by removing rotten, rusty and deformed parts. I will describe the process using the example of a car, a VAZ 2109, which I was tasked with repairing. First, I’ll give you my problem areas in the car. The front floor of the car is completely rotten with all the jacks and reinforcements. And the jack could only be used with a sub-engine beam. The rear floor was also rotted. Corrosion also affected the car doors. In general, the bottom was almost absent. The wings were not in the best condition.
The front hood was noticeably rusty, all the floor connectors and the floor of the gas tank and spare tire were missing. The same fate befell the reflectors of almost all headlights. The front spar burst in the gearbox area. And above the muffler, in the floor of the trunk, there was a huge hole. The corners of the door were “eaten” by corrosion.
I describe in detail the condition of my car so that car enthusiasts can identify similar faults in theirs and draw the right conclusions. Once the necessary tools for car body repair are at hand, we begin installation.
Monolithic ceiling of the second floor video
December 13, 2022 admin
Leningrad region. Priozerskoe highway, village Yukki
Insulation of attic floors. How to insulate a wooden attic with your own hands: video
Profiled sheet for floors Overlap using a corrugated sheet watch video
Video: covering the first floor with beams, a house made of sibit, Video diary covering the first floor video online - Wellness
Pouring a monolithic floor: stages
Polystroy - Monolithic ceiling
VIDEOS — Search results for 'overlap' — video.bibib.kz
Beginning of construction, covering the first floor, day 4 – AgaClip – Make Your Video Clips
How to make an overlap between floors: three main options
Thickness of a monolithic floor slab - Reinforced concrete structures and more
Do-it-yourself country house, pouring monolithic floors
Construction
How to build a combined house with your own hands correctly
Insulation of interfloor ceilings Do-it-yourself apartment renovation
Monolithic construction in Smolensk / Buy, find out the price on the Classifieds24 website
Do-it-yourself monolithic ceiling photo
CHELYABINSK: Prefabricated monolithic floors - price 0.00 rubles, Building materials of the Chelyabinsk region, 74-chelyabinsk.ru
Leave a comment
The main reasons for the destruction of the front spar
As noted above, the submarine bends from impact and rusts over time. The following also have a destructive effect on this body element:
- constant engine vibrations, especially if the engine or gearbox mounts are loose;
- driving a car on bad roads;
- extreme driving.
Since the side members are practically the skeleton of the body, a large load falls on them. All vibrations and shocks are transmitted to these elements; as a result, the body parts cannot withstand, become deformed, and cracks appear on them.
Strengthening and modernization
Strengthening or tuning the body of a VAZ 2109 according to the instructions should be carried out only if the owner is well versed in the design features of the car, has an appropriate understanding of the device, and knows the technical data on weight and other parameters. Otherwise, it is better to entrust the modernization work to professionals at the service station. True, the price of their services in these matters is too high, but you will be satisfied with the result.
So, tuning a VAZ 2109 car is, first of all, upgrading its body. The process always begins with this, and only after that the power unit and other components of the machine are brought to the desired state.
The need for reinforcement at “nine” and the quality of life indicator
It’s interesting that many owners of the “Nine” install modern amplification components more for the sake of beauty. This cannot in any way be a plus for reinforcement, since for the most part such elements can only provide decorative benefits.
On the contrary, if the goal of tuning is primarily to strengthen the body, TK*, spacers, rods and gussets can be selected accordingly. They will significantly strengthen the frame and increase its ability to withstand external influences.
TK* - tubular roll cage
Strengthening, as mentioned at the beginning of the article, is a mandatory procedure. By installing longitudinal and transverse reinforcing elements into the body structure, you can achieve a significant increase in the rigidity of the body frame, and this is already very good. The integrity of the original design obtained at the factory will be maintained and at the same time the corresponding torsional rigidity parameters will increase. At the same time, the weight of the car will practically not increase.
No matter how rigid the body is, it will have weak, vulnerable areas. Even if, under the influence of external forces, these places receive only microscopic damage, over time this will inevitably develop into a big problem.
You can verify the weakness of the “nine” body using a simple example:
- Raise the car on a jack (you can do it on one or both sides at once);
- In 80-90% of cases, car doors jam in the openings, which indicates deformation of the body.
Body stretching by heating
One of the most effective methods for straightening minor damage is to pull back the metal with heating. It is carried out on its own using a welding inverter. Stretching of the metal is carried out after heating the damaged area - this way the material becomes more pliable, it will be easier to avoid the formation of cracks and other defects. Before starting work, a video with an example of such an operation will help you understand the essence of the process. After warming up, a completely standard tool is used for leveling - rubber and metal hammers of different weights. The damaged area is gradually tapped with them to its normal shape.
It should be borne in mind that stretching must be completed in a timely manner, that is, the metal must cool down by the end of the work, otherwise it may deform and again spoil the surface geometry.
How to replace an oil pump
Before you begin removing the oil pump and replacing it, it is necessary to carry out preparatory work. First, make sure you have easy access to the following tools:
- set of wrenches;
- socket heads;
- universal joints;
- extension.
We remove the old pump:
- If you own a fuel-injected car, you must first remove the crankshaft position sensor from the engine. You won't have to do this with a carburetor engine.
- After this, you should completely drain the engine oil that is in the engine.
- When you have drained all the oil, you need to remove the crankshaft timing pulley.
- Now remove the oil pan, unscrew the bolts that secure the oil pan, and remove it.
- Remove the oil pump bolts using an extension.
- Move the pump using a screwdriver - to do this, insert it between the bearing and the pump.
- After all this, carefully remove the pump from the crankshaft.
Once you have removed the old oil pump, you can begin installing the new one. This must be done in the correct sequence:
- Before installing the new pump, rotate the drive gear so that it is completely aligned with the flats on the crankshaft.
- Now you need to thoroughly lubricate the working edge of the crankshaft front oil seal; use engine oil for this.
- When you have completed all the previous operations, you can install the oil pump on the crankshaft. Carefully tuck the lip of the oil seal in, and then tighten the bolts that secure the oil pump.
After this, you need to carry out the final stage of installation - collect all the parts that you removed before (including covers and gaskets) and install them in the correct order.
If disassembly is needed
Let us immediately note that if you have to replace the lining with a new one (the one you choose), then a complete disassembly may not be necessary for this.
Article on the topic: How to dry meat in the refrigerator
But if noise insulation is planned due to the fact that the dashboard rattles when driving, then this cannot be avoided.
Disassembly work requires a lot of time and special scrupulousness. After all, if some fastening is spoiled or broken, then the new or tuned torpedo will not work as it should, it will creak and rattle unhappily while driving, spoiling the mood of the careless disassembler.
How to replace the front spar on a Nine
Replacing the front side members 2108-09 must be done on a slipway; in a regular car service without special equipment, it is very difficult to perform such work, and in some cases it is simply impossible. Before starting body repairs, it is necessary to partially disassemble the car, remove from the car:
- front optics and bumper;
- hood;
- radiator grille;
- expansion tank;
- radiator;
- front wing (on the side where the submarine changes);
If the car's hardware is sufficiently rusty that you have to additionally change (repair) other body elements, you may have to remove the gearbox and engine. The body repair itself is performed in the following order:
- the old spar is cut off (usually using a grinder or a gas cutter) so that the new part “falls” into place better, a beveled cut is made;
- the new submarine is cleaned of transportation soil;
- At the seat, rust, dust and dirt are removed from the metal; a grinder is used for this. A good result can be achieved by using a sandblasting machine; to remove traces of corrosion, a rust converter is needed;
- The new spar is butt welded, first tackling it in several places. Before final welding, the geometry of the body is checked; if the work is not done on a stand, the correct installation of the part is verified using control points:
- after welding work, the metal surface is cleaned again, degreased, the weld seam is treated with mastic, and primer is applied;
- After the primer has completely dried, the replaced body part is painted in the color of the body, and the car is assembled.
Report: TV repair (front panel).
TV - the front bar under the hood on which the radiator, headlights, etc. are mounted.
After a frontal impact, it very often becomes unusable, deforming and taking on part of the load from the impact. During repairs, they usually don’t repair it, but simply bend it “in place”; naturally, it doesn’t hold anything after that. They do this because in the Capella (as in most cars) the TV is welded. But for example, in Mark-2 it is bolted.
Repair as such consists of: – removing the TV from the car – straightening and repairing – installation on the car
Corrections and repairs are done only by the most stubborn, normal people buy used ones for disassembly (along with pieces of side members). They wanted to give it to me for 3000 rubles, yeah right! After the repair, I climbed onto the existential, there is a horizontal bar for 3000 rubles, and vertical ones for 600 rubles, moreover, they are new in the ground, blah!
Equipment and materials. To remove the TV: – Drill + drill bit for drilling out welding points
To repair it: – Straightening hammers – Something to repair it on (anvil)
To put back: – Resistance welding machine – Kriptsangs
I’m not even talking about the fact that you need a set of screwdrivers, keys, pliers, you have to work with gloves, etc. Straight arms are also desirable. I won’t talk about how to sculpt and clean the putty, apply primer and paint; look for rules for using sandpaper and blocks in any textbook for bodybuilders. It would be a good idea to inspect the condition of the bolts and nuts, as well as run the threads in all threaded holes (I broke 3 bolts).
This is what the car looked like before the repair:
Get hit in the face:
This is what happens to the TV:
A couple more angles:
Like everyone else, at first I decided to quickly straighten it with wooden blocks - yeah, I ran away. It didn't look even at all (I thought I took a picture of it).
It seemed to be outwardly even, but in fact the lock was 2 cm deeper than the hood, and the hood naturally did not close.
The procedure is as follows. We disassemble the face: remove the bumper, headlights, bumper buffers (if the car is hit in the face, it’s a piece of cake to remove). We unscrew the front pieces of hardware on which the headlights and air conditioning tank are attached. In the photo it is still hanging, unscrew it. We also unscrew and remove the air conditioner pipes going to the radiator (I couldn’t remove the TV without removing them, except by sawing it into 3 parts). We also remove the wiring. In short, we make it so that only a piece of iron remains from the TV.
Remove the wings if desired. The desire must be very strong, because... To remove them you need to unhook the fender liner, and to do this you need to remove the wheel, you need to jack it, etc. Therefore, you can unscrew only 4 bolts and place a wooden block. Here you can see:
The cost of replacing the front side member of a VAZ-2108-09 in a car service center
Since replacing a submarine is not an easy job even for an average car service center, not all craftsmen undertake it, especially since not everyone is eager to begin restoring the body of a used Nine. Mostly, small auto repair shops carry out minor and medium body repairs, while large auto repair centers do not want to deal with domestic cars at all. Prices for body work from auto repair companies and private owners are most often approximate; often the final cost of the repairman is announced closer to the end of the repair. The fact is that “pitfalls” may unexpectedly appear, and as a result of their identification, the work is delayed and becomes more complex.
Some car service centers indicate two values in the price list at once - the upper and lower limits; in large cities or the capital, they charge from 3,500 to 9,000 rubles for replacing the front side member; usually, work from private repairmen in garages costs less. Often, along with the submarine, it is necessary to change the wing splash guard, sills, and repair the bottom; some auto repair shops note in their prices that the cost of repairs in the price list is indicated without painting.
Features of the VAZ 2109 body
ATTENTION! A completely simple way to reduce fuel consumption has been found! Don't believe me? An auto mechanic with 15 years of experience also didn’t believe it until he tried it. And now he saves 35,000 rubles a year on gasoline! Read more"
“Nine” is a front-wheel drive passenger car with a hatchback body. The car is equipped with 5 doors. It has several modifications, released at different times and for different purposes - 21091, 21093, 21099.
The body of the “nine” is made in a load-bearing structure and is 1-volume. 5 people can easily fit inside the car, although the hatchback does not have the comfort of a sedan. It was with the aim of increasing the convenience and spaciousness of the interior that one of the modifications of the “nine” was invented - the VAZ 21099.
The body of the “nine” is distinguished by a wedge-shaped shape, which is already a plus. The fact is that this form can significantly improve the AED* characteristics and reduce the resistance of oncoming air flows when the vehicle is moving.
Significant benefits in reducing the impact of air flow come from the smoothed outer surfaces of the hood, the greater slope of the windshield and rear window, as well as the unusually smooth connection of the front bumper to the body frame.
This body layout, coupled with a more economical power unit and new tire shapes, made it possible to significantly reduce fuel consumption.
In addition, this indicator is closely related to the reduction in body weight, which was achieved through the introduction of lightweight plastics and new composite materials. The plastic parts of the body and interior of the Nine, and there are a lot of them in the car, weigh about 80 kg.
Note. The reduction in weight of the VAZ 2109 is also due to the use of lightweight aluminum materials.
To carry out tuning on the “nine”, it will be useful to know how much the body of the VAZ 2109 weighs. This will make it possible to strengthen the frame by adding as much extra weight as needed. According to the table below, we see that the weight of the VAZ 2109 body in its bare state is 450 kg. Designers call this mass useful.
Despite the light weight, the car owner is given the opportunity to easily transport from 50 to 275 kg of various cargo in the trunk, depending on the number of passengers inside the cabin.
Thanks to front-wheel drive and a special body structure, the “nine” is distinguished by enviable stability against lateral skidding. Good handling is ensured, again, due to the front drive wheels and the coincidence of the direction of the traction force with the direction of movement of the wheels.
The handling of the “nine” is especially good in comparison with other domestic cars, on icy roads, slippery roads, and so on.
In addition, the front-wheel drive design of the car allows for better use of the length of the body compared to rear-wheel drive models. This also makes it possible to reduce the weight of the car, make the interior and driving position more comfortable.
Due to the absence of intermediate transmission links in the “nine”, it is possible to increase the useful volume of the vehicle without increasing the dimensions of the body. In the “nine” the floor tunnel is short; only parts of the brake and exhaust system are located here.
The rear of the Nine is also very compact. The 20-litre fuel tank is located under the rear seat, and the spare tire is located in a niche in the floor of the luggage compartment. This helped increase the free space in the trunk.
Replacing VAZ 2109 thresholds with your own hands - how to handle them, repairs, etc.
The VAZ 2109 is a relatively old car, and today most of these cars require attention to both components and assemblies, as well as to the body.
Most often, thresholds are subject to corrosion; without anti-corrosion protection, they quickly become unusable and lose their load-bearing capacity.
As a result, they have to be replaced with new elements, resorting to welding.
Why do thresholds wear out?
Thresholds are load-bearing elements that provide the body with additional rigidity. Due to the fact that these parts are located in the lower part of the body, they are constantly exposed to negative factors:
All this significantly reduces the service life of the thresholds. In addition, the mediocre quality of painting and anti-corrosion treatment of body elements from the factory leads to the fact that almost every owner of a “Nine” is faced with the need to replace the thresholds on their car.
Upholstery
Refinement and tuning of the VAZ-2109 is also very important. Sometimes old upholstery cracks and it just looks terrible. Therefore, many people decide to have their seats upholstered. For this you can use any material with a dense texture. They should also reupholster the ceiling and hatch so as not to disturb the style of the car.
Thus, you can perform car tuning yourself. To do this, it is recommended to purchase a special kit consisting of all the necessary parts.
vote
Article rating